1991 MITSUBISHI 3000GT lock
[x] Cancel search: lockPage 1015 of 1146
SUPPLEMENTAL RESTRAINT SYSTEM (SRS) - General lnform=*ion52B-5
r1.c
L
E.
,
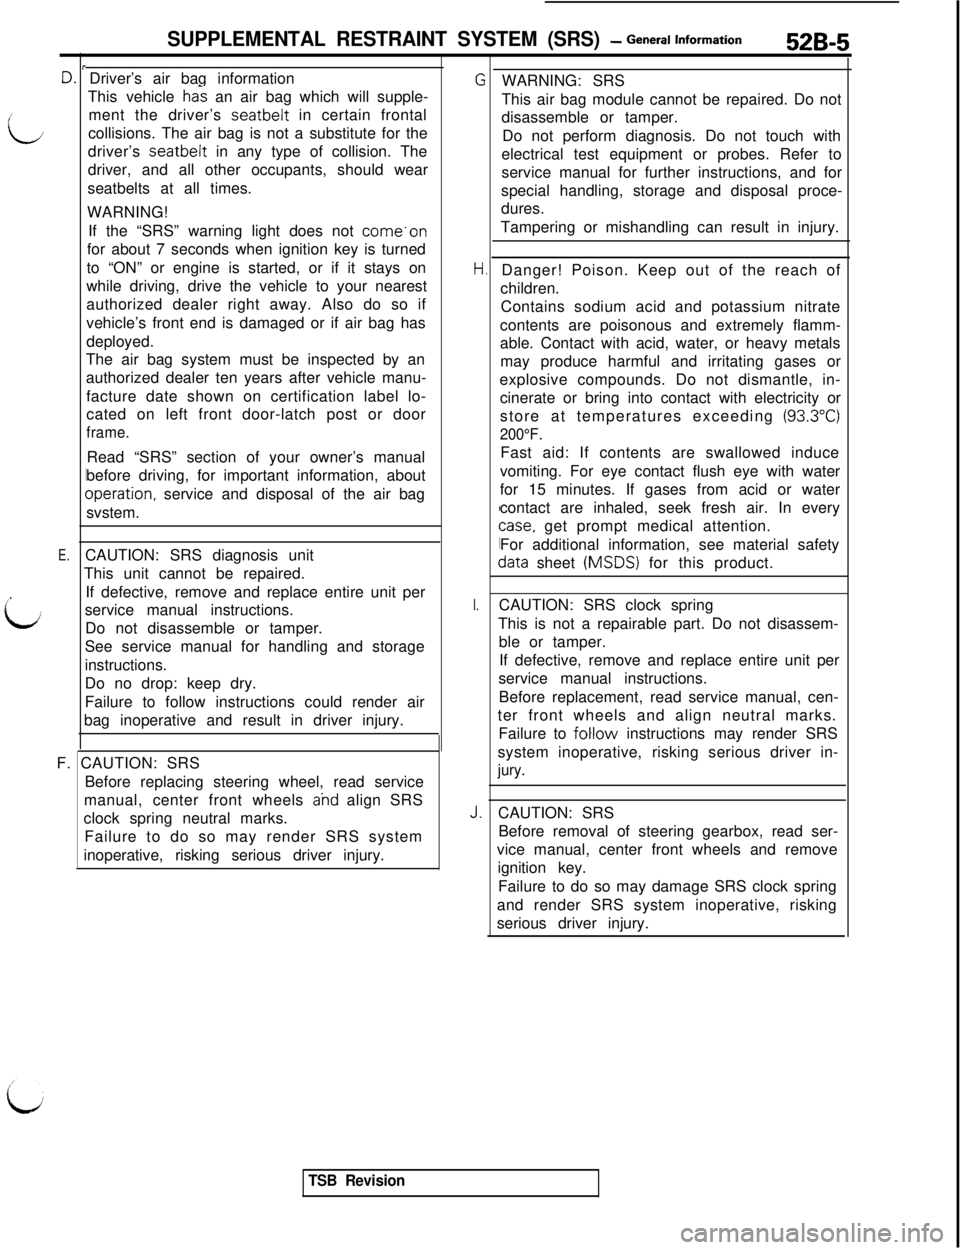
iiCAUTION: SRS diagnosis unit
This unit cannot be repaired.
If defective, remove and replace entire unit per
service manual instructions.
Do not disassemble or tamper.
See service manual for handling and storage
instructions.Driver’s air bag information
This vehicle
ha% an air bag which will supple-
ment the driver’s seatbelt in certain frontal
collisions. The air bag is not a substitute for the
driver’s seatbelt in any type of collision. The
driver, and all other occupants, should wear
seatbelts at all times.
WARNING!
If the “SRS” warning light does not come.on
for about 7 seconds when ignition key is turned
to “ON” or engine is started, or if it stays on
while driving, drive the vehicle to your nearest
authorized dealer right away. Also do so if
vehicle’s front end is damaged or if air bag has
deployed.
The air bag system must be inspected by an
authorized dealer ten years after vehicle manu-
facture date shown on certification label lo-
cated on left front door-latch post or door
frame.Read “SRS” section of your owner’s manual
before driving, for important information, about
Dperation, service and disposal of the air bag
svstem.
Do no drop: keep dry.
Failure to follow instructions could render air
bag inoperative and result in driver injury.
F. CAUTION: SRS
Before replacing steering wheel, read service
manual, center front wheels
ahd align SRS
clock spring neutral marks.
Failure to do so may render SRS system
inoperative, risking serious driver injury.
I.
J.WARNING: SRS
This air bag module cannot be repaired. Do not
disassemble or tamper.
Do not perform diagnosis. Do not touch with
electrical test equipment or probes. Refer to
service manual for further instructions, and for
special handling, storage and disposal proce-
dures.
Tampering or mishandling can result in injury.
Danger! Poison. Keep out of the reach of
children.
Contains sodium acid and potassium nitrate
contents are poisonous and extremely flamm-
able. Contact with acid, water, or heavy metals
may produce harmful and irritating gases or
explosive compounds. Do not dismantle, in-
cinerate or bring into contact with electricity or
store at temperatures exceeding
(93.3”C)
200°F.Fast aid: If contents are swallowed induce
vomiting. For eye contact flush eye with water
for 15 minutes. If gases from acid or water
contact are inhaled, seek fresh air. In every
case, get prompt medical attention.
For additional information, see material safety
data sheet (MSDS) for this product.
CAUTION: SRS clock spring
This is not a repairable part. Do not disassem-
ble or tamper.
If defective, remove and replace entire unit per
service manual instructions.
Before replacement, read service manual, cen-
ter front wheels and align neutral marks.
Failure to
foHow instructions may render SRS
system inoperative, risking serious driver in-
jury.CAUTION: SRS
Before removal of steering gearbox, read ser-
vice manual, center front wheels and remove
ignition key.
Failure to do so may damage SRS clock spring
and render SRS system inoperative, risking
serious driver injury.
TSB Revision
Page 1016 of 1146
52B-6SUPPLEMENTAL RESTRAINT SYSTEM (SRS) - General Information
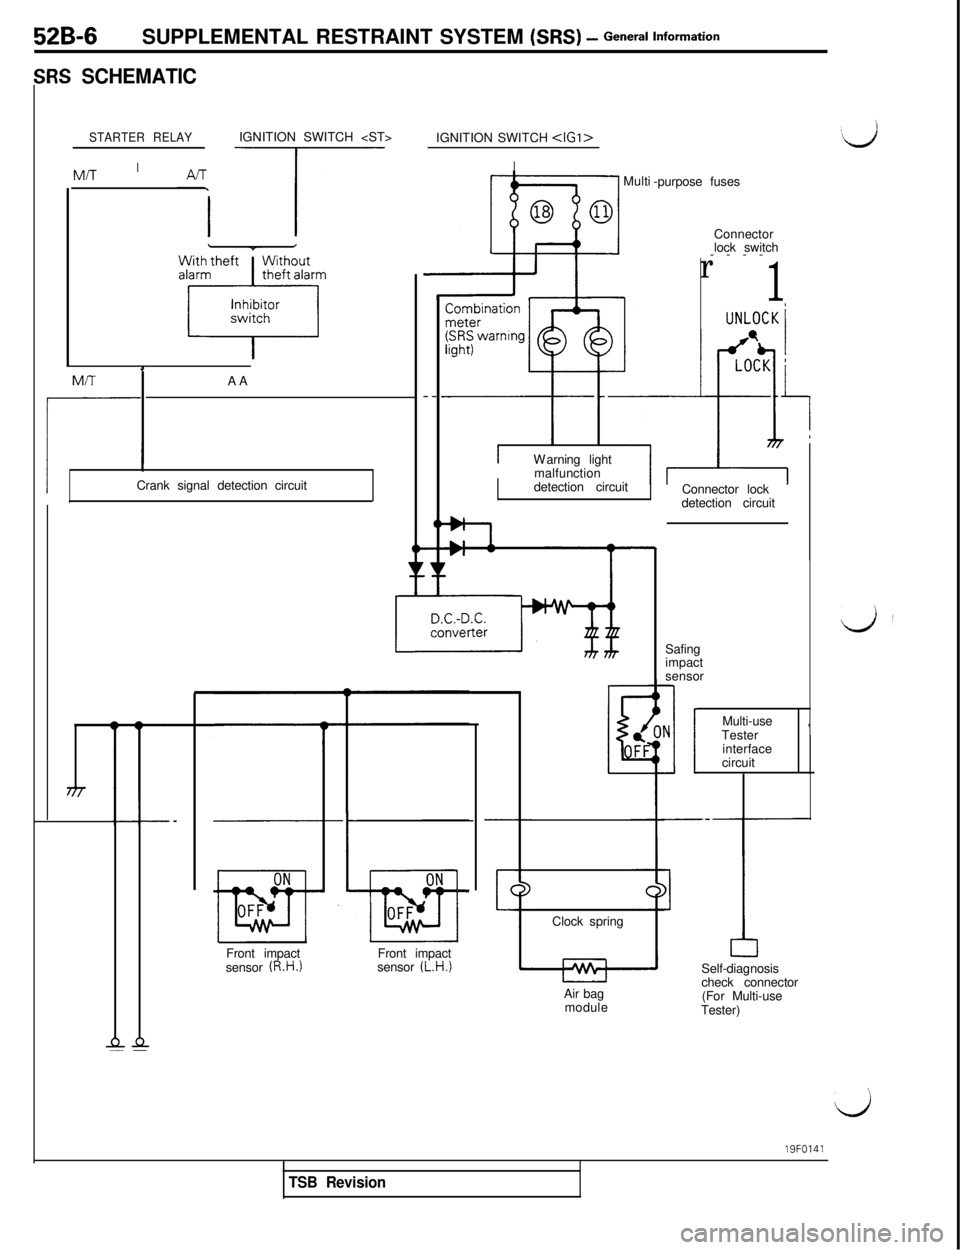
;RS SCHEMATIC
STARTER RELAYIGNITION SWITCH
I
‘dIGNITION SWITCH
IMulti
-purpose fuses
Connector
lock switch
----
r
1
UNLOCKiM/T -AA
IWarning light
malfunction
detection circuitICrank signal detection circuit
Connector lock
detection circuit
Safing
impact
sensor
1
N
i-Multi-use ,
Tester
interface
circuit
Self-diagnosis
check connector
(For Multi-use
Tester)
19FO141Front impact
sensor
(L.H.)Clock spring
Front impact
sensor (R.H.)IP-l-Air bag
module
TSB Revision
Page 1018 of 1146
52B-8SUPPLEMENTAL RESTRAINT SYSTEM (SRS) - General Information
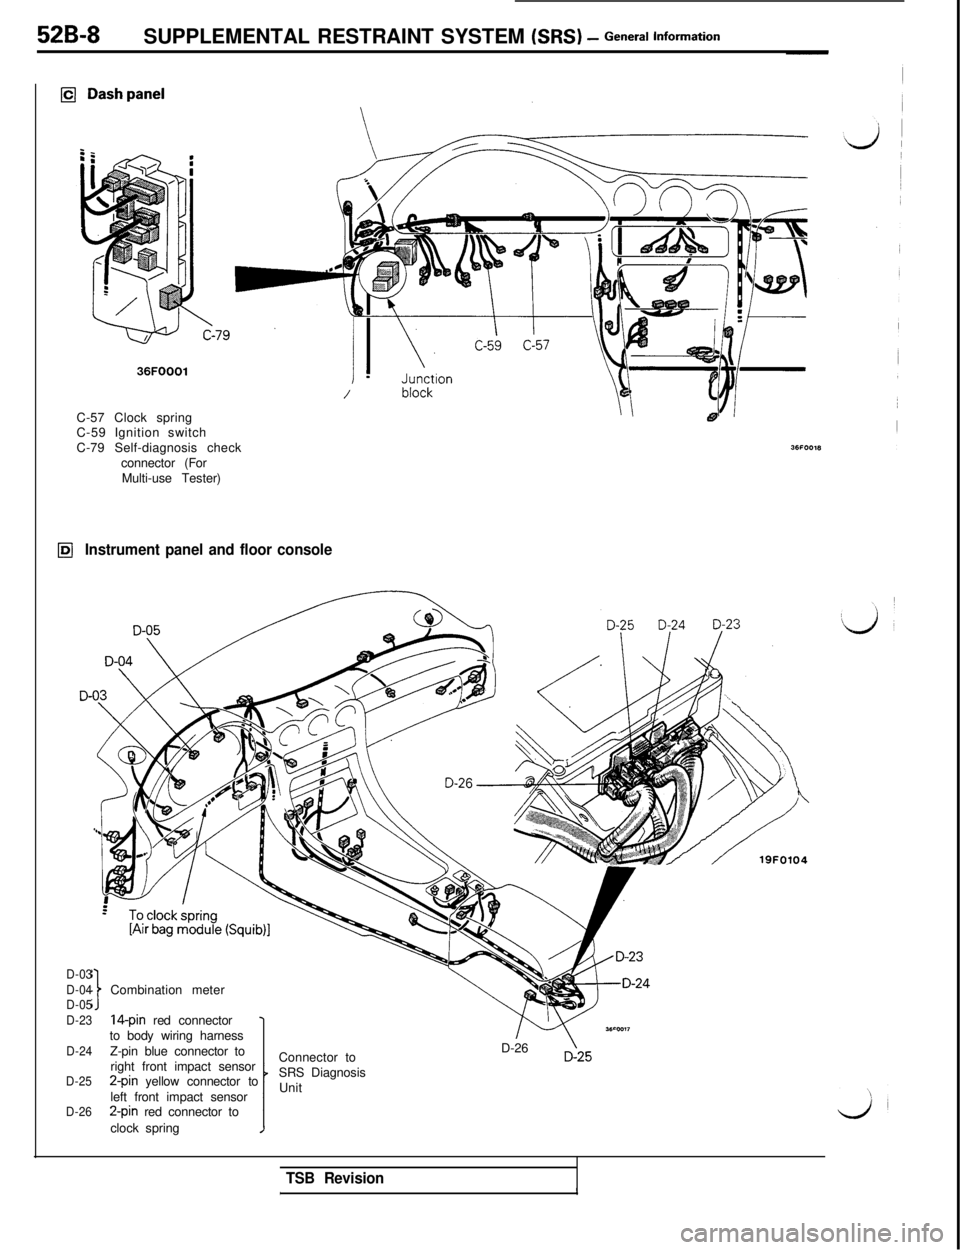
36FOOOlJ/C-57 Clock spring
C-59 Ignition switch
C-79 Self-diagnosis check
connector (For
Multi-use Tester)
IbJInstrument panel and floor console
D-
D-03
D-04Combination meter
D-05
D-2314-pin red connector
to body wiring harness
D-24Z-pin blue connector to
right front impact sensor
D-252-pin yellow connector to
left front impact sensor
D-262-pin red connector to
clock springConnector to
SRS Diagnosis
UnitD-26225
TSB Revision,1
Page 1019 of 1146
SUPPLEMENTAL RESTRAINT SYSTEM (SRS) - General Information52B-9.ock sprinq
\ Secondary lock lever
13R0721Harness side
connectorPrimary lock
/(Improperly fitted state)SRS diagnosis
unit side connector
Forced down13RO664Secondarv
lock lever’
projection
(Properly fitted state)
Secondary
lock spring
u13RO685
Prll
13R068t
ITSB I
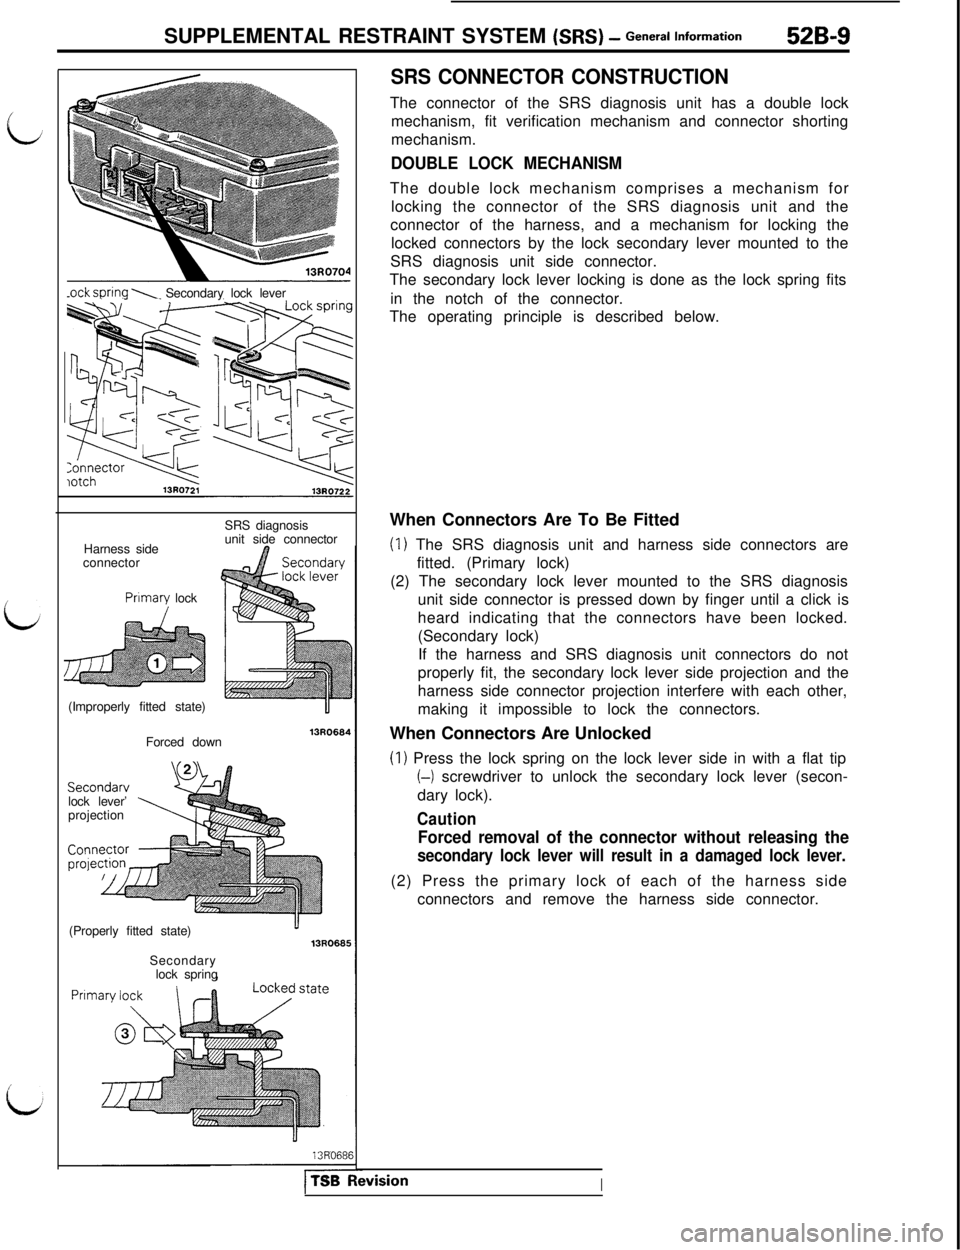
SRS CONNECTOR CONSTRUCTIONThe connector of the SRS diagnosis unit has a double lock
mechanism, fit verification mechanism and connector shorting
mechanism.
DOUBLE LOCK MECHANISMThe double lock mechanism comprises a mechanism for
locking the connector of the SRS diagnosis unit and the
connector of the harness, and a mechanism for locking the
locked connectors by the lock secondary lever mounted to the
SRS diagnosis unit side connector.
The secondary lock lever locking is done as the lock spring fits
in the notch of the connector.
The operating principle is described below.
When Connectors Are To Be Fitted
(I) The SRS diagnosis unit and harness side connectors are
fitted. (Primary lock)
(2) The secondary lock lever mounted to the SRS diagnosis
unit side connector is pressed down by finger until a click is
heard indicating that the connectors have been locked.
(Secondary lock)
If the harness and SRS diagnosis unit connectors do not
properly fit, the secondary lock lever side projection and the
harness side connector projection interfere with each other,
making it impossible to lock the connectors.
When Connectors Are Unlocked
(1) Press the lock spring on the lock lever side in with a flat tip
(--) screwdriver to unlock the secondary lock lever (secon-
dary lock).
Caution
Forced removal of the connector without releasing the
secondary lock lever will result in a damaged lock lever.(2) Press the primary lock of each of the harness side
connectors and remove the harness side connector.
FvisionI
Page 1020 of 1146
52B-10SUPPLEMENTAL RESTRAINT SYSTEM (SRS) - General InformationI
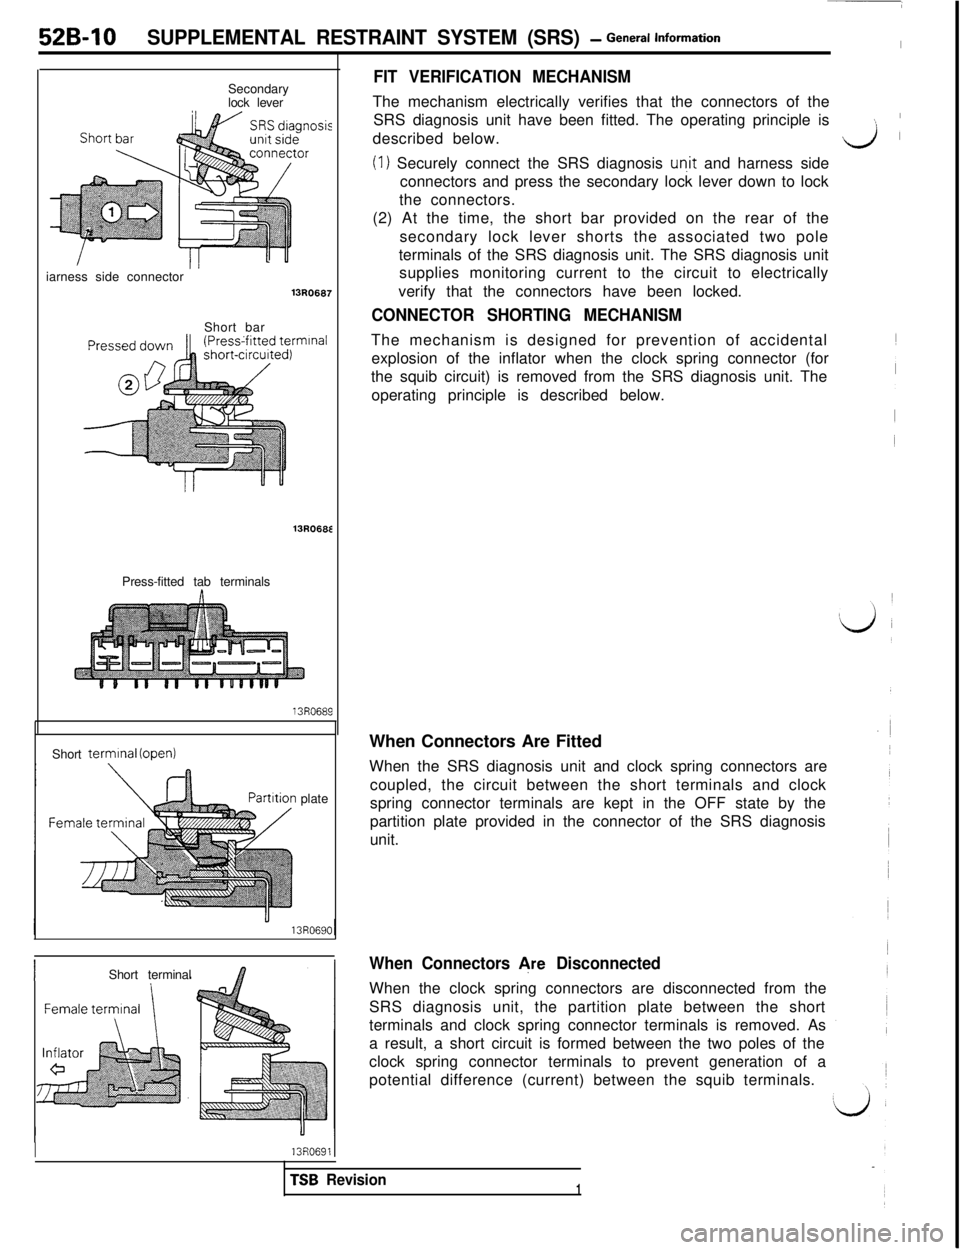
FIT VERIFICATION MECHANISMSecondary
lock leverThe mechanism electrically verifies that the connectors of the
SRS diagnosis unit have been fitted. The operating principle is
:described below.
d
(
(1) Securely connect the SRS diagnosis un.it and harness side
connectors and press the secondary lock lever down to lock
the connectors.
sisiarness side connector
13R0687Short bar
nlnal13R068E
Press-fitted tab terminals
13R0689Short
terminal (open)
plate
IShort terminal
I13R06911(2) At the time, the short bar provided on the rear of the
secondary lock lever shorts the associated two pole
terminals of the SRS diagnosis unit. The SRS diagnosis unit
supplies monitoring current to the circuit to electrically
verify that the connectors have been locked.
CONNECTOR SHORTING MECHANISMThe mechanism is designed for prevention of accidental
explosion of the inflator when the clock spring connector (for
the squib circuit) is removed from the SRS diagnosis unit. The
operating principle is described below.
When Connectors Are Fitted
When the SRS diagnosis unit and clock spring connectors are
coupled, the circuit between the short terminals and clock
spring connector terminals are kept in the OFF state by the
partition plate provided in the connector of the SRS diagnosis
unit.
When Connectors &e DisconnectedWhen the clock spring connectors are disconnected from the
SRS diagnosis unit, the partition plate between the short
terminals and clock spring connector terminals is removed. As
a result, a short circuit is formed between the two poles of the
clock spring connector terminals to prevent generation of a
potential difference (current) between the squib terminals.
TSB Revision1
Page 1022 of 1146
52B-12SUPPLEMENTAL RESTRAINT SYSTEM (SRS) -General Information
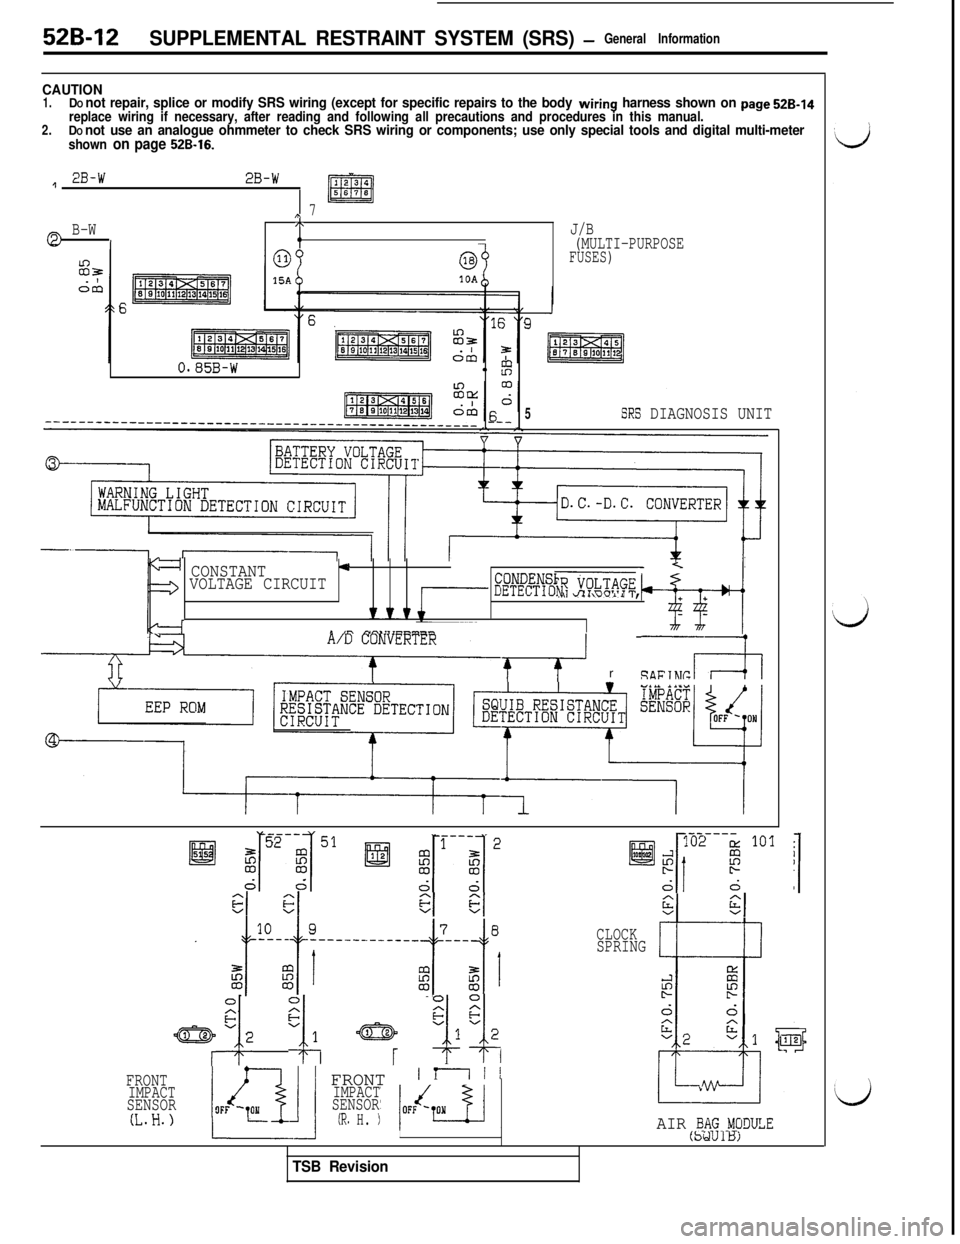
CAUTION1.DO not repair, splice or modify SRS wiring (except for specific repairs to the body wiring harness shown on page QB-14
2.replace wiring if necessary, after reading and following all precautions and procedures in this manual.DO not use an analogue ohmmeter to check SRS wiring or components; use only special tools and digital multi-metershown on page 52B-16.
12B-W2B-W
,, 7
B-WI\.J/B0(MULTI-PURPOSEFUSES)
10A
0.85B-WI' 2
---_-__--_----_--------~---~~~--~~--~~-~-~----~---- --_5SRS DIAGNOSIS UNIT
= CONSTANT4I- -xI
> VOLTAGE CIRCUITCONDENSIDETECTIL,. vAI\vvII ,
vvvn ,n N~,11rrnm,vn
Ttttlr .,,,,,,a
l@i fTii51 l@!l %piJ’
/
-i----
EBI
102!x 101
‘o’ @ii?r
i 1I
z
dd
3) clEl $1BVIi2VI
Qy y2 qli y jl y2/
FRONTIMPACTFRONT ' - ' '
SENSOR
I!?--
IMPACT
SENSOR
(L.H.)OFF -If-(R. H. )II
CLOCKSPRING
(5QUIBjAIR QA$e_MODULE
TSB Revision
Page 1024 of 1146
.52B-14 SUPPLEMENTAL RESTRAINT SYSTEM (SRS) - SRS Service Precautions
SRS SERVICE PRECAUTIONSMBZPBAA
1.In order to avoid injury to yourself or others from3.accidental deployment of the air bag during SRSNever Attempt to Repair the Following Com-servicing, read and carefully follow all the
pre-
ponents:dcautions and procedures described in this
manu-l Front Impact Sensors
al.l SRS Diagnosis Unit (SDU)
2.Do not use any electrical test equipment on orl Clock Spring
near SRS components, except those specifiedl Air Bag Module
on
P.52B-16.If any of those components are diagnosed as
Never use an analogue ohmmeter.faulty, they should only be replaced, in accord-
ance with the INDIVIDUAL COMPONENT SER-
VICE procedures in this manual, starting at page
[52B-561.
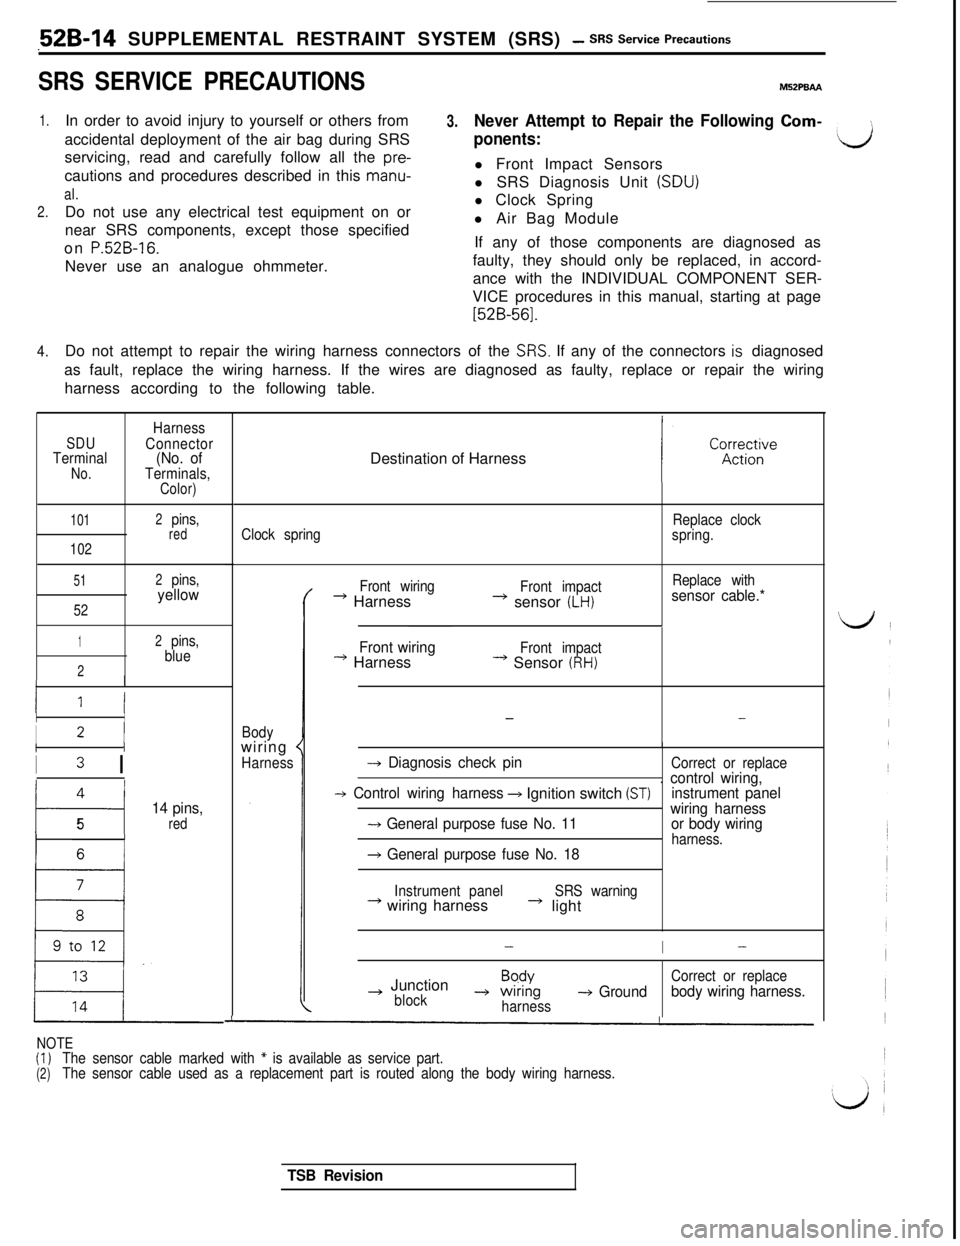
4.Do not attempt to repair the wiring harness connectors of the
SRS. If any of the connectors is diagnosed
as fault, replace the wiring harness. If the wires are diagnosed as faulty, replace or repair the wiring
harness according to the following table.
SDUTerminalNo.
Harness
Connector
(No. ofTerminals,Color)
101
102
2pins,red
51
52
2pins,yellow
12pins,
blue
2
II
II
I2 IIi
I3 I
4
t---i
14 pins,
5red
16 t
LDestination of Harness
Clock springReplace clock
spring.
Bodywiring
*
HarnessFront wiring
* HarnessFront impact+ sensor (LH)
Replace withsensor cable.*
Front wiring
--) HarnessFront impact* Sensor (RH)
--
-+ Diagnosis check pinCorrect or replace
-+ Control wiring harness+ Ignition switch (ST). control wiring,
instrument panel
-+ General purpose fuse No. 11wiring harness
or body wiringharness.+ General purpose fuse No. 18
Instrument panel+ wiring harnessSRS warning* light
-I-
~ JunctionBpdYCorrect or replace
block-+ wrnng-+ Groundharnessbody wiring harness.
NOTE(I)
(2)The sensor cable marked with * is available as service part.
The sensor cable used as a replacement part is routed along the body wiring harness.
TSB Revision
Page 1025 of 1146
SRS ServicePrecautions /SUPPLEMENTAL RESTRAINT SYSTEM (SRS) - Spectiications52B-15View A
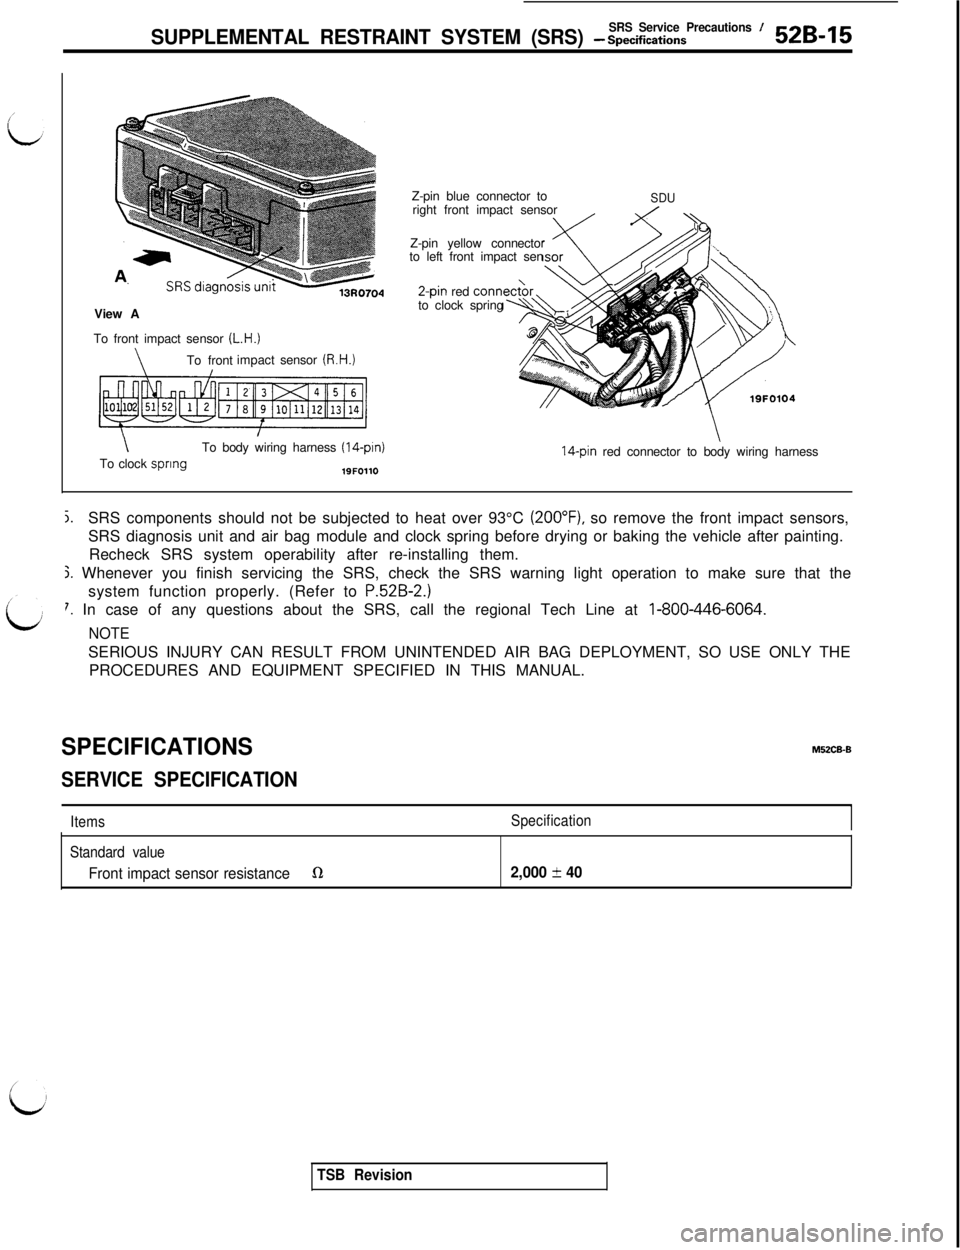
To front impact sensor
(L.H.)
\To frontimpactsensor (R.H.)
\To body wiring harness (14-pin)To clock spring19FOllOZ-pin blue connector to
right front impact sensor
Z-pin yellow connector
to left front impact sen2-pin red corm
to clock spring
SDU
14-pin red connector to body wiring harness
j.SRS components should not be subjected to heat over 93°C (2OO”F), so remove the front impact sensors,
SRS diagnosis unit and air bag module and clock spring before drying or baking the vehicle after painting.
Recheck SRS system operability after re-installing them.
j. Whenever you finish servicing the SRS, check the SRS warning light operation to make sure that the
system function properly. (Refer to
P.52B-2.)
7. In case of any questions about the SRS, call the regional Tech Line at I-800-446-6064.
NOTESERIOUS INJURY CAN RESULT FROM UNINTENDED AIR BAG DEPLOYMENT, SO USE ONLY THE
PROCEDURES AND EQUIPMENT SPECIFIED IN THIS MANUAL.
SPECIFICATIONSMUCB-B
SERVICE SPECIFICATION
ItemsSpecification
Standard value
Front impact sensor resistanceQ2,000 f 40
TSB Revision