Page 1027 of 1146
SUPPLEMENTAL RESfRAlNT SYSTEM (SRS) - Troub!eshooting 52B-17TROUBLESHOOTING
M52ECAA
idSRS DIAGNOSTIC PROCEDURES
- INITIAL STEPS’FOLLOW THESE STEPS WHEN BEGINNING ANY SRS SERVICE:
/II/ ,- -u’ 16FO304
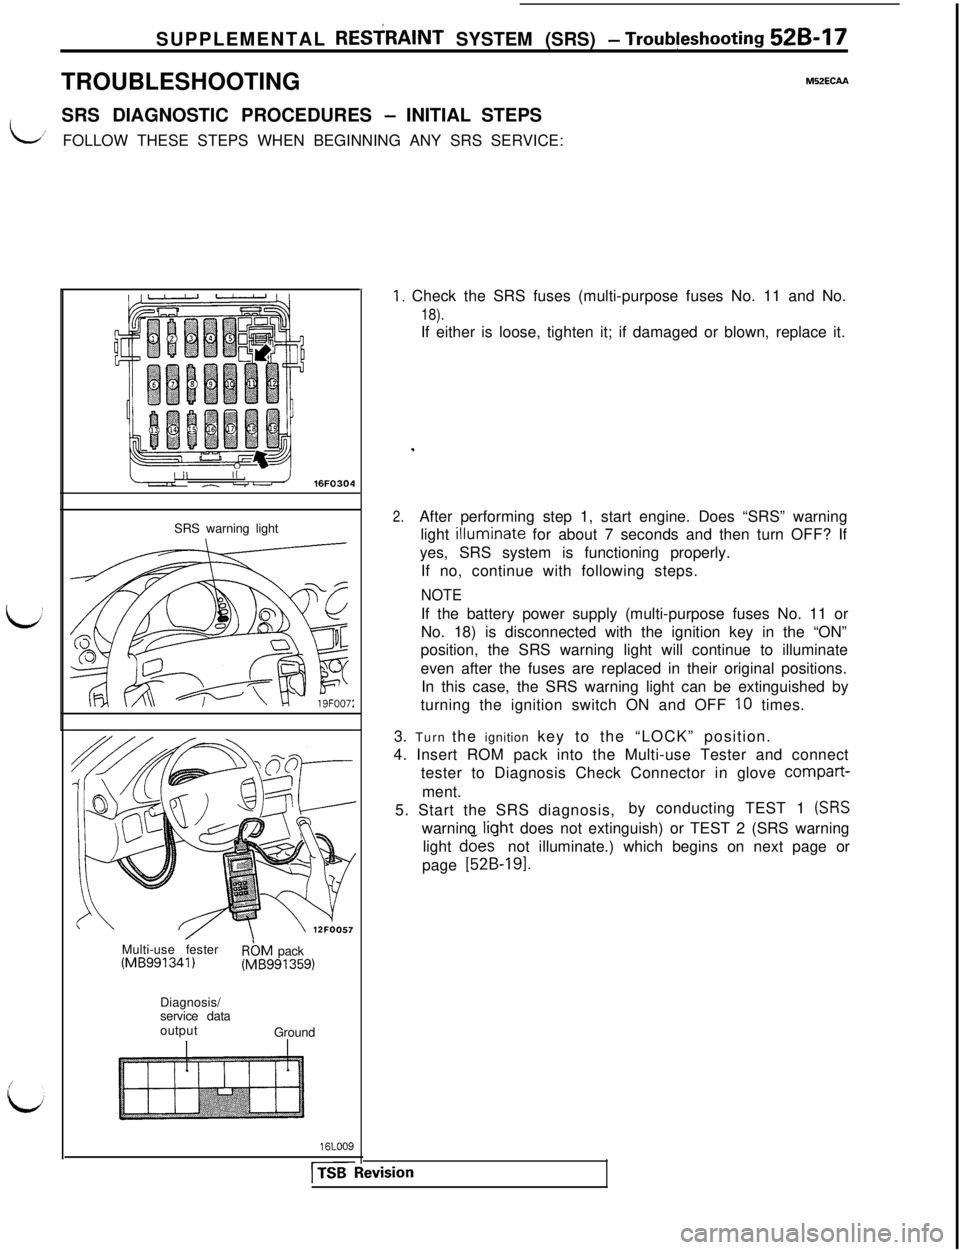
SRS warning light
Multi-use fester
(MB991341)RbM pack(MB991359)
Diagnosis/
service data
output
Ground
16LOO9
[TSB
1. Check the SRS fuses (multi-purpose fuses No. 11 and No.
18).If either is loose, tighten it; if damaged or blown, replace it.
.
2.After performing step 1, start engine. Does “SRS” warning
light
illumi.nate for about 7 seconds and then turn OFF? If
yes, SRS system is functioning properly.
If no, continue with following steps.
NOTEIf the battery power supply (multi-purpose fuses No. 11 or
No. 18) is disconnected with the ignition key in the “ON”
position, the SRS warning light will continue to illuminate
even after the fuses are replaced in their original positions.
In this case, the SRS warning light can be extinguished by
turning the ignition switch ON and OFF
10 times.
3. Turn the ignition key to the “LOCK” position.
4. Insert ROM pack into the Multi-use Tester and connect
tester to Diagnosis Check Connector in glove compart-
ment.
5. Start the SRS diagnosis,by conducting TEST 1
(SRSwarninq liqht does not extinguish) or TEST 2 (SRS warning
light does- not illuminate.) which begins on next page or
page
[52B-191.
ivision
Page 1030 of 1146
![MITSUBISHI 3000GT 1991 Service Manual 52B-20 SUPPLEMENTAL RESTRAINT SYSTEM (SRS) - Troubleshooting
SELF-DIAGNOSIS QUICK REFERENCE CHART
Fault
No.
-
11
32
Diagnosis code name
[Failure mode]
(NORMAL)
G-SENS. TRBL
1[Short circuit]
G-SENS. T MITSUBISHI 3000GT 1991 Service Manual 52B-20 SUPPLEMENTAL RESTRAINT SYSTEM (SRS) - Troubleshooting
SELF-DIAGNOSIS QUICK REFERENCE CHART
Fault
No.
-
11
32
Diagnosis code name
[Failure mode]
(NORMAL)
G-SENS. TRBL
1[Short circuit]
G-SENS. T](/manual-img/19/57085/w960_57085-1029.png)
52B-20 SUPPLEMENTAL RESTRAINT SYSTEM (SRS) - Troubleshooting
SELF-DIAGNOSIS QUICK REFERENCE CHART
Fault
No.
-
11
32
Diagnosis code name
[Failure mode]
(NORMAL)
G-SENS. TRBL
1[Short circuit]
G-SENS. TRBL 2[One open-circuit]
G-SENS. TRBL 3[Two open-circuit]
SQUIB TRBL 1[Short circuit]
SQUIB TRBL 2
[Open-circuit]
CONDENS. VO. HI
CONDENS. VO. LO
CRANKING TRBL
CONN. UNLOCKED
Explanation
Normal. The SRS is in goodorder.
The circuits for the front impact sensor are shortedto each other.
Right or left impact sensor cirucit is open or the
wire from the sensor to the SDU is open-circuit.
Right and left impact sensor circuits are open or thewires from the sensors to the SDU areopen-circuit.
The circuits for the air bag module (squib) are
shorted to each other or the circuit isgrounded.
The air bag module Isquib) circuit is open or the wire
from the air bag to the SDU (clock spring) is open-circuit.
The capacitor (integrated in the
SDU) terminal voltage
is higher than the specified value for 5 seconds.
The capacitor (integrated in the
SDU) terminal voltage
is lower than the specified value for 5 seconds.
The circuit for the cranking signal is shorted to
some power supply circuits.
It takes at least 45 seconds that the SDU detects
this fault.
The lock switch (short bar) of the SDU double lockconnector isopen.Service
Perform TEST 5
Perform TEST 6(I) Turn the ignition key
to the “LOCK” posi-
tion, disconnect the
negative battery
cable and tape the
terminal.
(2) After waiting atleast 30 seconds,
replace the SDU.
(Refer to P.52B-59.)
Perform TEST 7
Perform TEST 8NOTE
- IMPORTANT
(1) After repairing the SRS, reconnect the battery cable, erase the diagnosis code memory from theMulti-use Tester and check the SRS warning light operation to verify the system functions
properly. (Refer to TEST 1.)
(2) SDU
= SRS Diagnosis Unit
1 TSB Revision
Page 1031 of 1146
![MITSUBISHI 3000GT 1991 Service Manual SUPPLEMENTAL RESTRAINT SYSTEM (SRS) - Troubleshooting 52B-21
/
id
FaultDiagnosis code nameNo.[Failure mode]Explanation
Service
41
IG VOLT LOW 1The multi-purpose fuse (No. 18) is blown or the wirefrom MITSUBISHI 3000GT 1991 Service Manual SUPPLEMENTAL RESTRAINT SYSTEM (SRS) - Troubleshooting 52B-21
/
id
FaultDiagnosis code nameNo.[Failure mode]Explanation
Service
41
IG VOLT LOW 1The multi-purpose fuse (No. 18) is blown or the wirefrom](/manual-img/19/57085/w960_57085-1030.png)
SUPPLEMENTAL RESTRAINT SYSTEM (SRS) - Troubleshooting 52B-21
/
id
FaultDiagnosis code nameNo.[Failure mode]Explanation
Service
41
IG VOLT LOW 1The multi-purpose fuse (No. 18) is blown or the wirefrom the fuse to the SDU is open-circuit or itsresistance value is increased.
It takes at least 5 seconds that the SDU detects
this fault.
Perform TEST 9
42
IG VOLT LOW 2The multi-purpose fuse (No. 11) is blown or the wirefrom the fuse to the SDU is open-circuit or itsresistance value is increased.
It takes at least 5 seconds that the SDU detects
this fault.
Perform TEST 10
SRS LMP TRBL 1
i
The SRS warning light circuits are open or the wireWhen SRS warning lightOpen circuit orfrom the light to the SDU is grounded.does not extinguish:43ground shortIIt takes at least 5 seconds with the light OFF thatPerform TEST 11the SDU detects this fault.When SRS warning light
does not illuminate:
Perform TEST 12
SRS LMP TRBL 2The SRS warning light drive transistor (integrated
(1) Turn the ignition key
44SRS warning light
[I
in the SDU) is open-circuit.to the “LOCK” posi-
drive transistortion, disconnet the
is open-circuitnegative battery
cable and tape the
SRS DIAG. UNITThe EEP ROM or A/D converter (integrated in the SDU)terminal.is defective.(2) After waiting at
45least 30 seconds,
replace the SDU.
(Refer to P.52B-59.)
/NOTE -IMPORTANT
b(1) After repairing the SRS, reconnect the battery cable, erase the diagnosis code memory from theMulti-use Tester and check the SRS warning light operation to verify the system functions
properly. (Refer to TEST 1.)
(2) SDU
= SRS Diagnosis Unit
1 TSB Revision
Page 1032 of 1146
52B-22 SUPPLEMENTAL RESTRAINT SYSTEM (SRS) - Troubleshooting
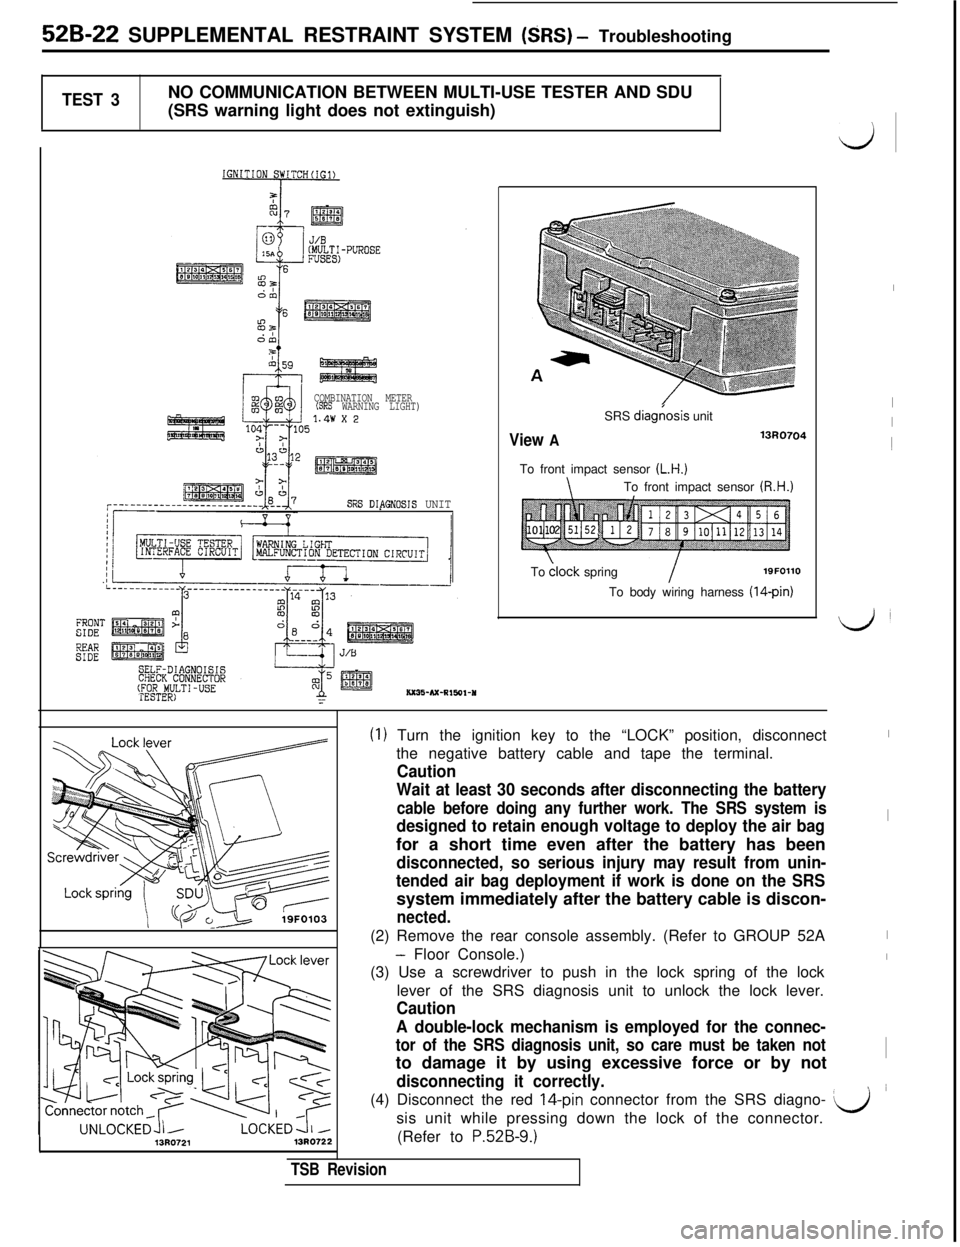
TEST 3NO COMMUNICATION BETWEEN MULTI-USE TESTER AND SDU
(SRS warning light does not extinguish)
COMBINATION METER(SRS WARNING LIGHT)
SRS DIPGNOSIS UNITSRS
diag(osis unit
View A13R0704To front impact sensor
(L.H.)
\To front impact sensor (R.H.)To
clock springI19FOllO
To body wiring harness (14-pin)
13R072113RO72:L
A double-lock mechanism is employed for the connec-
tor of the SRS diagnosis unit, so care must be taken notto damage it by using excessive force or by not
. .disconnecting it correctly.(4) Disconnect the red
IQpin connector from the SRS diagno- Q’sis unit while pressing down the lock of the connector.
(Refer to
P.52B-9.)
TSB Revision
(1) Turn the ignition key to the “LOCK” position, disconnect
the negative battery cable and tape the terminal.
Caution
Wait at least 30 seconds after disconnecting the battery
cable before doing any further work. The SRS system is
designed to retain enough voltage to deploy the air bagfor a short time even after the battery has been
disconnected, so serious injury may result from unin-
tended air bag deployment if work is done on the SRSsystem immediately after the battery cable is discon-
nected.(2) Remove the rear console assembly. (Refer to GROUP 52A
- Floor Console.)
(3) Use a screwdriver to push in the lock spring of the lock
lever of the SRS diagnosis unit to unlock the lock lever.
Caution
d
I
I
I1
LJ
I
I
I
I
I
Page 1033 of 1146
r
/
lliSUPPLEMENTAL RESTRAINT SYSTEM (SRS)
- Troubleshootina 52B-23
L
MB991349SRS Check Harness
View ASRS Check Harness connector @
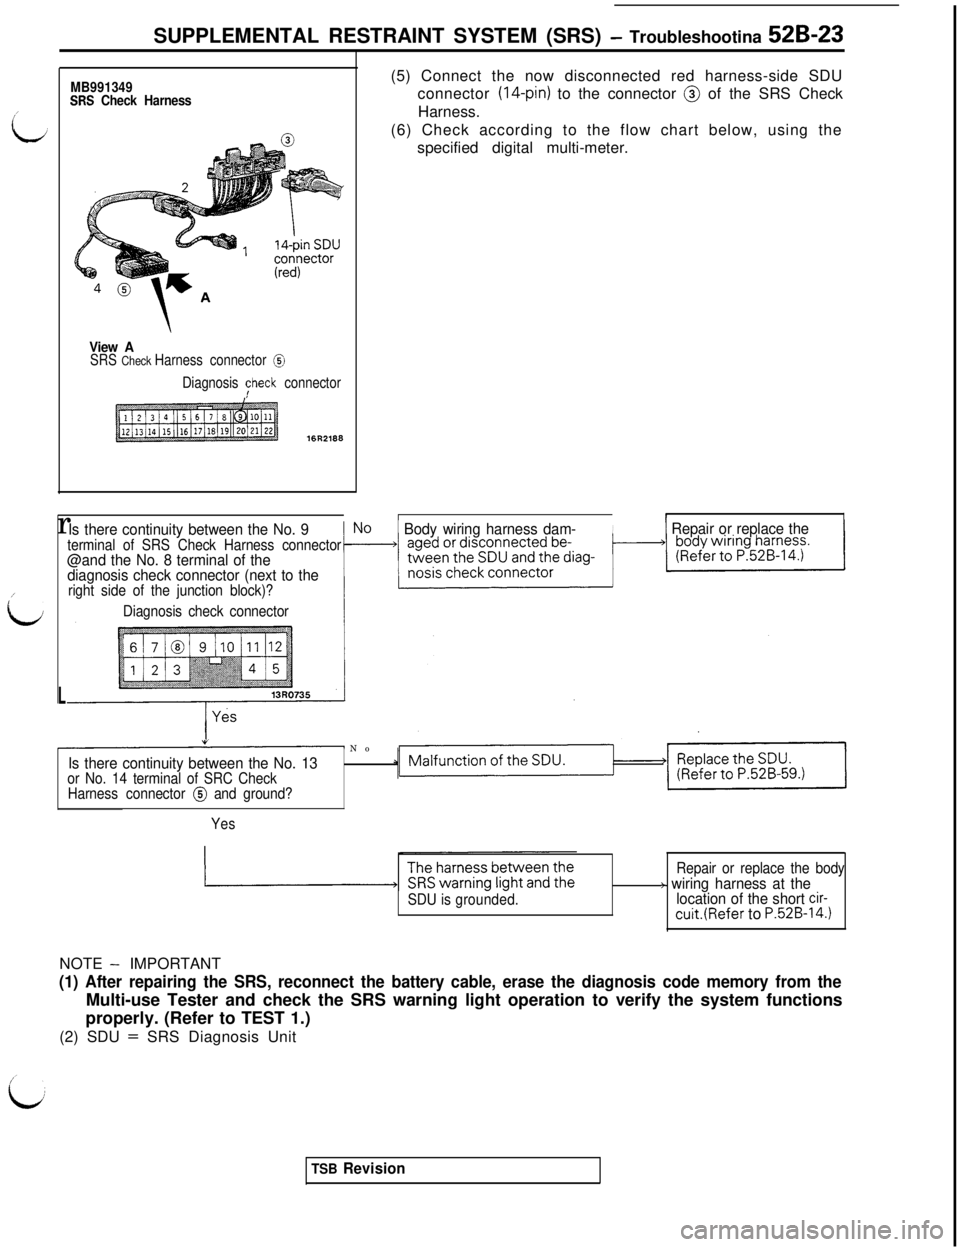
Diagnosis Fheck connector16R2166(5) Connect the now disconnected red harness-side SDU
connector
(l&pin) to the connector @ of the SRS Check
Harness.
(6) Check according to the flow chart below, using the
specified digital multi-meter.
III1 Body wiring harness dam-/1 Repair or replace the1Is there continuity between the No. 9terminal of SRS Check Harness connector@and the No. 8 terminal of the
diagnosis check connector (next to the
right side of the junction block)?
Diagnosis check connectorv
~ No
Is there continuity between the No. 13or No. 14 terminal of SRC Check
Harness connector @ and ground?
Yes
SDU is grounded.Repair or replace the body
+ wiring harness at the
location of the short cir-cuit.(Refer to P.52B-14.)NOTE
- IMPORTANT
(1) After repairing the SRS, reconnect the battery cable, erase the diagnosis code memory from theMulti-use Tester and check the SRS warning light operation to verify the system functions
properly. (Refer to TEST 1.)
(2) SDU
= SRS Diagnosis Unit
TSB Revision
Page 1034 of 1146
52B-24 SUPPLEMENTAL RESTRAINT SYSTEM (SRS) - Troubleshooting
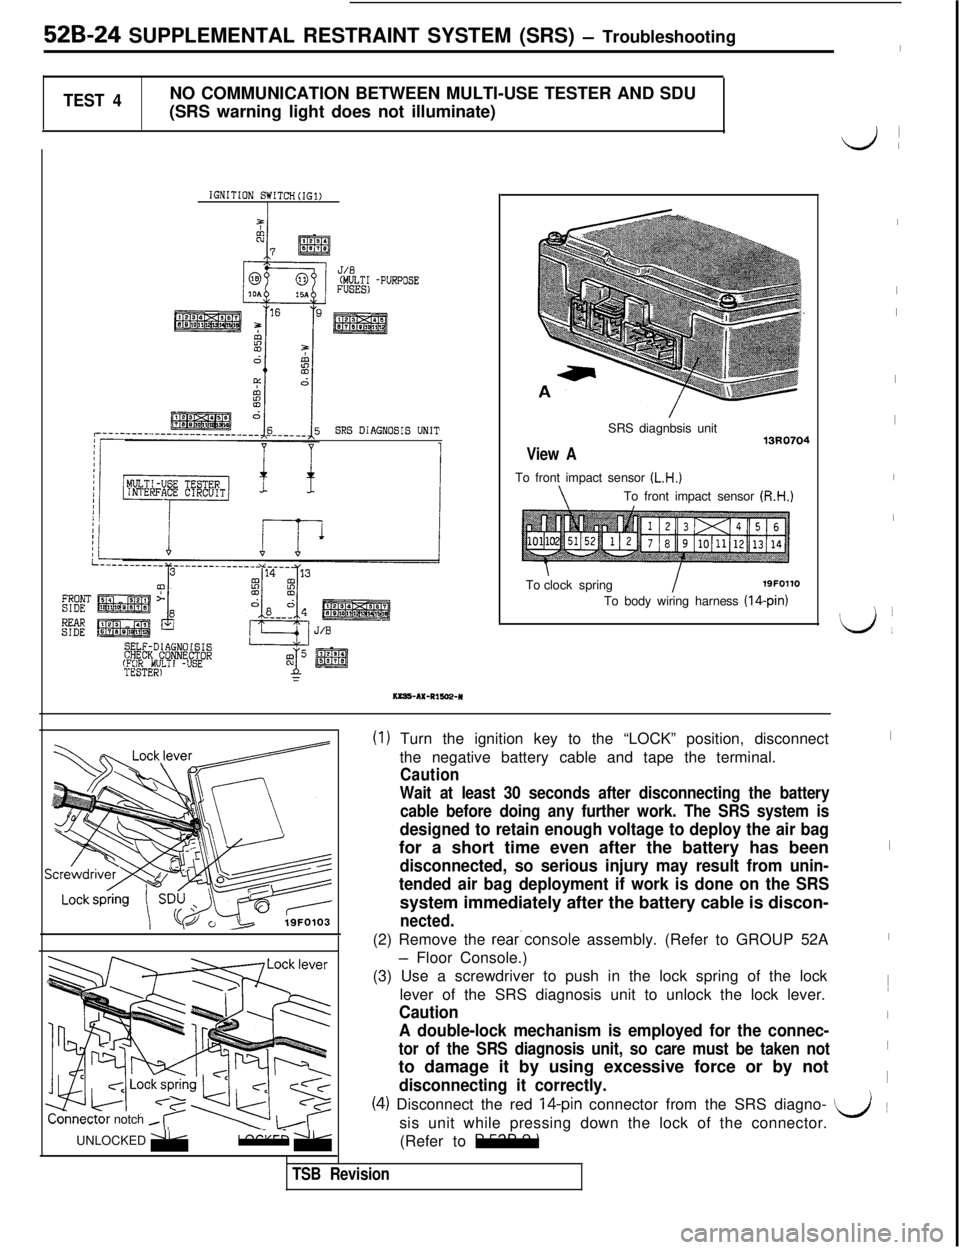
TEST 4NO COMMUNICATION BETWEEN MULTI-USE TESTER AND SDU
(SRS warning light does not illuminate)
IGNITION SWITCH(IG1)
J/.8(MULTI -PURPOSEFUSES)
SRS DIAGNOSIS UNIT
MULTI -3SETESTER1
KKRS-AX-RISE+R
View ASRS diagnbsis unit
To front impact sensor
(L.H.)
\To front impact sensor (R.H.)Toclock spring
I19FOllO
To body wiring harness (14-pin)
onnectornotch -UNLOCKED
;;bb;;,LOCKED zRok
(1) Turn the ignition key to the “LOCK” position, disconnect
the negative battery cable and tape the terminal.
Caution
Wait at least 30 seconds after disconnecting the battery
cable before doing any further work. The SRS system is
designed to retain enough voltage to deploy the air bagfor a short time even after the battery has been
disconnected, so serious injury may result from unin-
tended air bag deployment if work is done on the SRSsystem immediately after the battery cable is discon-
nected.(2) Remove the rear.console assembly. (Refer to GROUP 52A
- Floor Console.)
(3) Use a screwdriver to push in the lock spring of the lock
lever of the SRS diagnosis unit to unlock the lock lever.
Caution
A double-lock mechanism is employed for the connec-
tor of the SRS diagnosis unit, so care must be taken notto damage it by using excessive force or by not
disconnecting it correctly.
idi
I
I
I
I
I
I
I
L)I
I
I
I1
I
I~
i(4) Disconnect the red l4-pin connector from the SRS diagno- L/~
sis unit while pressing down the lock of the connector.
(Refer to
P.52B-9.)
\
TSB Revision
Page 1035 of 1146
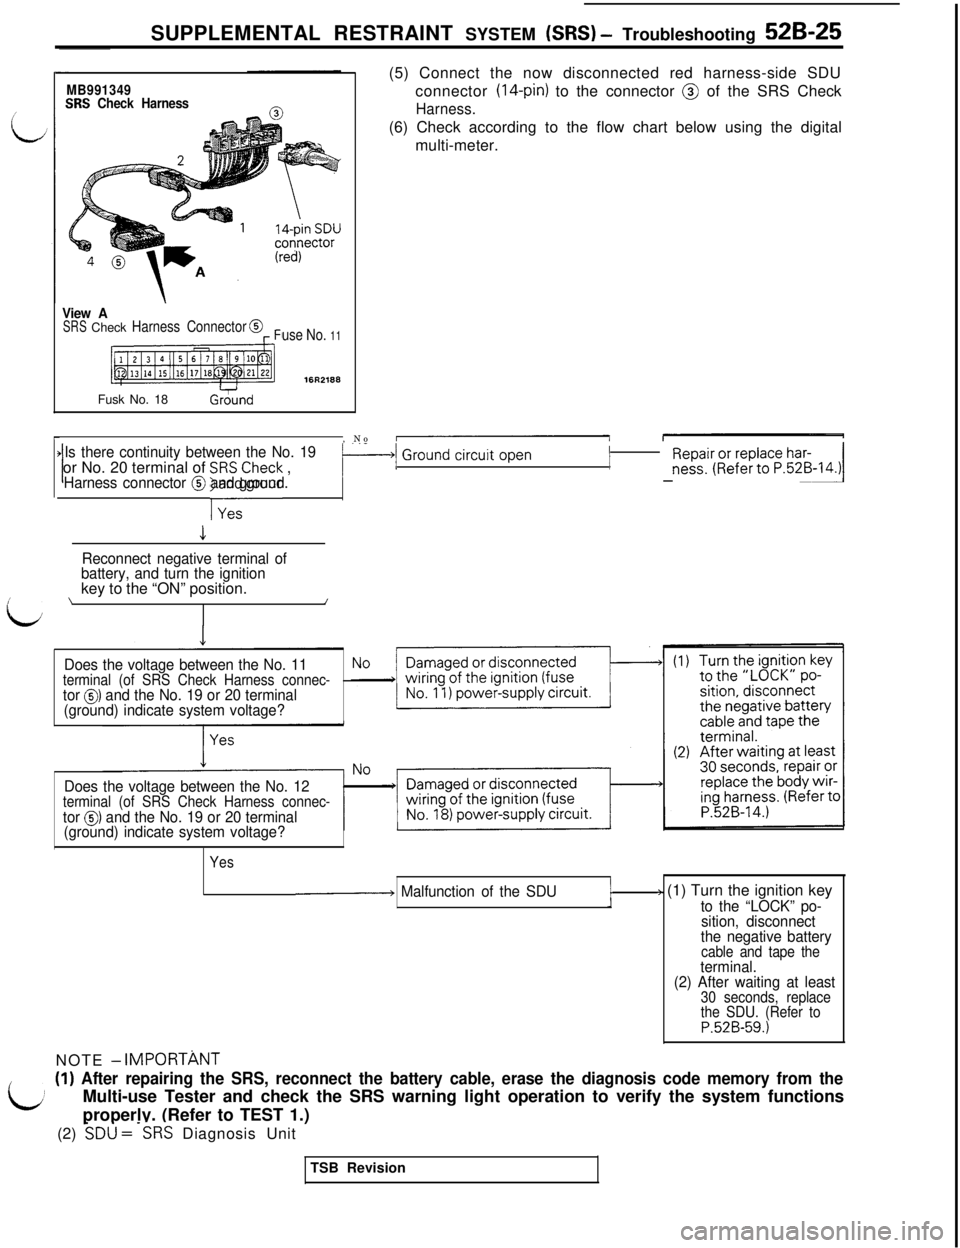
SUPPLEMENTAL RESTRAINT SYSTEM (SRS) - Troubleshooting 52B-25
r, NoIs there continuity between the No. 19‘1 ~~~~~i~k;~~~~.~~~-~4.~or No. 20 terminal of y:IsCheck ,-1 Ground circuit OpenIHarness connector @ and ground.
i
MB991349SW Check Harness
View ASRSCheckHarness Connector
use No. 1116R2186
Fusk No. 18
Gxnd(5) Connect the now disconnected red harness-side SDU
connector
(14-pin) to the connector @ of the SRS Check
Harness.(6) Check according to the flow chart below using the digital
multi-meter.
Reconnect negative terminal of
battery, and turn the ignitionkey to the “ON” position.
\I
I
Does the voltage between the No. 11terminal (of SRS Check Harness connec-tor 0) and the No. 19 or 20 terminal
(ground) indicate system voltage?
Does the voltage between the No. 12
terminal (of SRS Check Harness connec-tor 0) and the No. 19 or 20 terminal
(ground) indicate system voltage?
Yes
p Malfunction of the SDU+ (1) Turn the ignition key
to the “LOCK” po-
sition, disconnect
the negative battery
cable and tape theterminal.
(2) After waiting at least
30 seconds, replace
the SDU. (Refer to
P.52B-59.)NOTE
- IMPORTkNT
cd
(1) After repairing the SRS, reconnect the battery cable, erase the diagnosis code memory from theMulti-use Tester and check the SRS warning light operation to verify the system functions
properly. (Refer to TEST 1.)
(2)
?Du =-SRS Diagnosis Unit
TSB Revision
Page 1036 of 1146
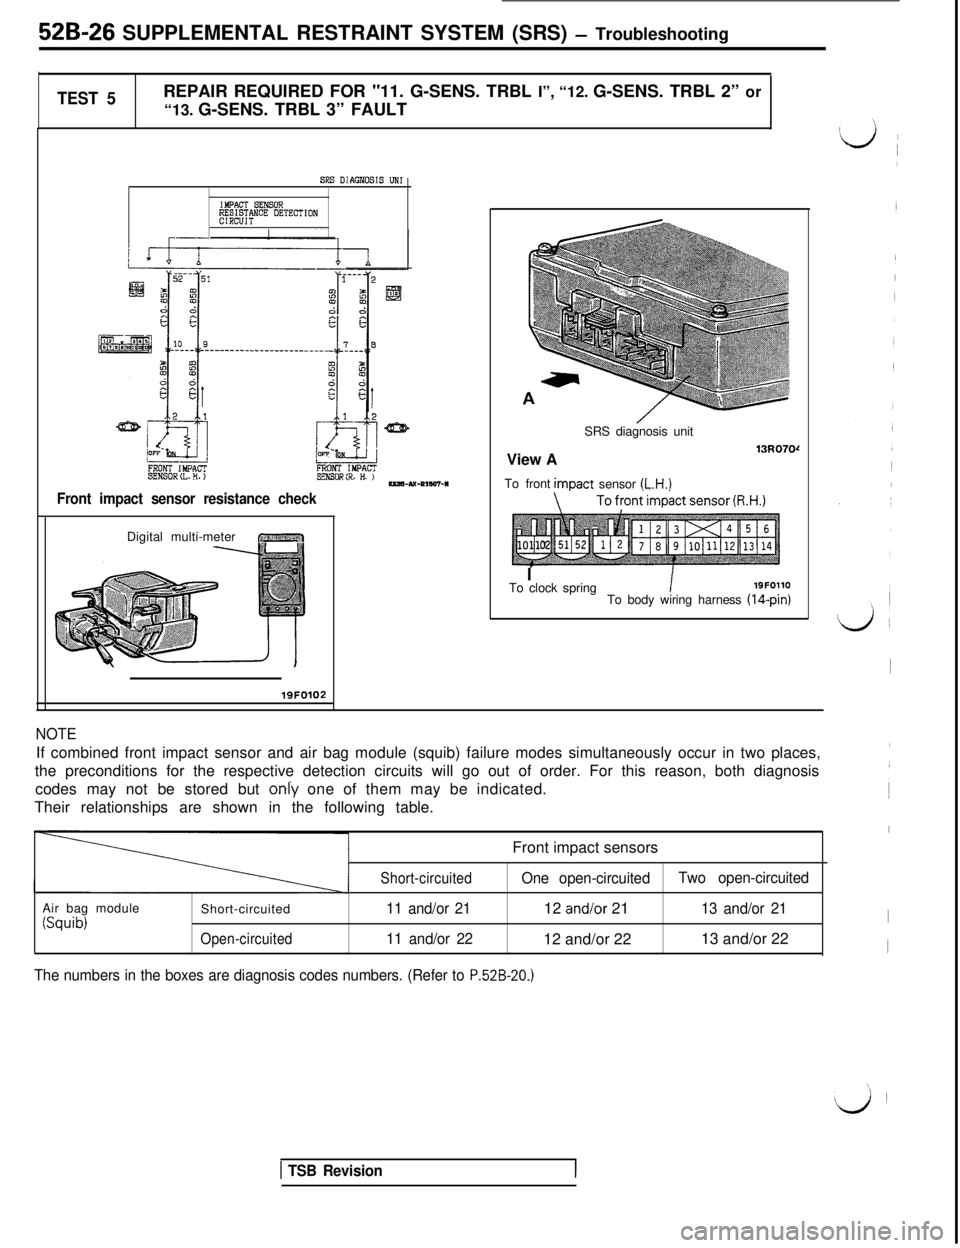
52B-26 SUPPLEMENTAL RESTRAINT SYSTEM (SRS) - Troubleshooting
TEST 5REPAIR REQUIRED FOR "11. G-SENS. TRBL I”, “12. G-SENS. TRBL 2” or
“13. G-SENS. TRBL 3” FAULT
SRS DIAGNOSIS UN1
IMPACT S!NSOR~M&N"E DETECTION
FRONT IMPACTSENS0RtL.H.)FRONT IMPACTsEN80R(R. H. )--u-~,w-*
Front impact sensor resistance checkDigital multi-meter
r ~1iii”~“‘.,,,,/ ?\I. I,// q
NOTEIf combined front impact sensor and air bag module (squib) failure modes simultaneously occur in two places,
the preconditions for the respective detection circuits will go out of order. For this reason, both diagnosis
codes may not be stored but only one of them may be indicated.
Their relationships are shown in the following table.
Front impact sensors
Air bag module
(Squib)Short-circuitedOpen-circuitedShort-circuited
11 and/or 21
11 and/or 22One open-circuitedTwo open-circuited12 and/or 2113 and/or 21I12 and/or 2213 and/or 22
I
The numbers in the boxes are diagnosis codes numbers. (Refer to P.52B-20.)
/SRS diagnosis unit
View A
13u070rTo frontimDact sensor
(L.H.)
ITo clock springI19FOllO
To body wiring harness (14-pin)
lQFO102
1 TSB Revision