Page 1037 of 1146
SUPPLEMENTAL RESTRAINT SYSTEM (SRS) - Troubleshooting 529-27
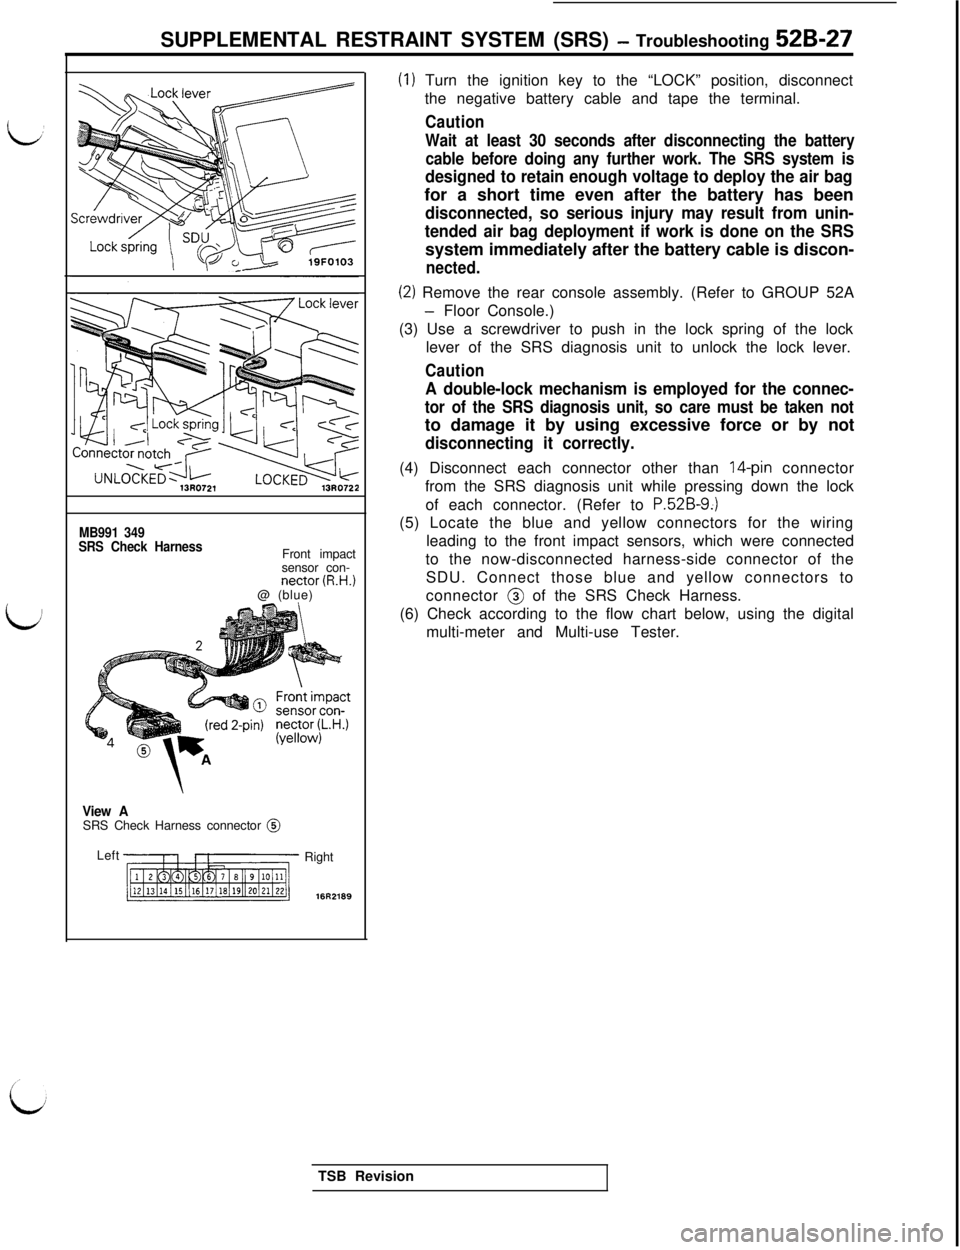
MB991 349
SRS Check HarnessFront impact
sensor con-
nectar (R.H.)@ (blue)
View ASRS Check Harness connector @
Left
Right
16R2189
(I) Turn the ignition key to the “LOCK” position, disconnect
the negative battery cable and tape the terminal.
Caution
Wait at least 30 seconds after disconnecting the battery
cable before doing any further work. The SRS system is
designed to retain enough voltage to deploy the air bagfor a short time even after the battery has been
disconnected, so serious injury may result from unin-
tended air bag deployment if work is done on the SRSsystem immediately after the battery cable is discon-
nected.
(2) Remove the rear console assembly. (Refer to GROUP 52A-Floor Console.)
(3) Use a screwdriver to push in the lock spring of the lock
lever of the SRS diagnosis unit to unlock the lock lever.
Caution
A double-lock mechanism is employed for the connec-
tor of the SRS diagnosis unit, so care must be taken notto damage it by using excessive force or by not
disconnecting it correctly.(4) Disconnect each connector other than
14-pin connector
from the SRS diagnosis unit while pressing down the lock
of each connector. (Refer to
P.52B-9.)(5) Locate the blue and yellow connectors for the wiring
leading to the front impact sensors, which were connected
to the now-disconnected harness-side connector of the
SDU. Connect those blue and yellow connectors to
connector @ of the SRS Check Harness.
(6) Check according to the flow chart below, using the digital
multi-meter and Multi-use Tester.
TSB Revision
Page 1039 of 1146
LSUPPLEMENTAL RESTRAINT SYSTEM (SRS)
- Troub!eshooting 529-29
/ CONTINUED FROM PREVIOUS PAGE/*
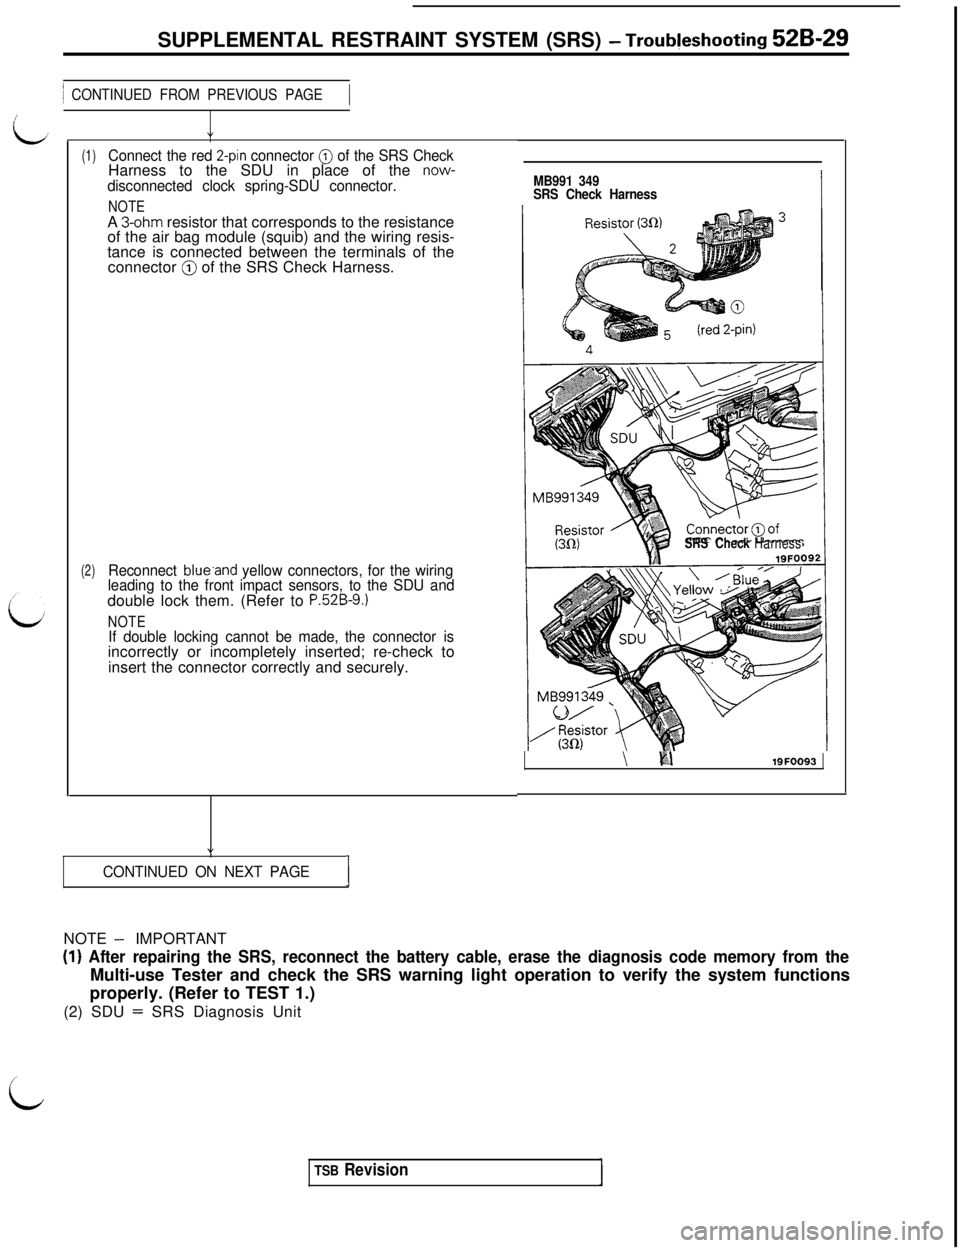
(1)Connect the red 2-pin connector @ of the SRS CheckHarness to the SDU in place of the now-disconnected clock spring-SDU connector.
NOTEA 3-ohm resistor that corresponds to the resistance
of the air bag module (squib) and the wiring resis-
tance is connected between the terminals of the
connector
@ of the SRS Check Harness.
(2)Reconnect blue.and yellow connectors, for the wiring
leading to the front impact sensors, to the SDU anddouble lock them. (Refer to
P.52B-9.)
NOTEIf double locking cannot be made, the connector isincorrectly or incompletely inserted; re-check to
insert the connector correctly and securely.
”
CONTINUED ON NEXT PAGEIMB991 349
SRS Check Harness
SRS CheckHarness
\ ii%\19FOO93NOTE
- IMPORTANT
(I) After repairing the SRS, reconnect the battery cable, erase the diagnosis code memory from theMulti-use Tester and check the SRS warning light operation to verify the system functions
properly. (Refer to TEST 1.)
(2) SDU
= SRS Diagnosis Unit
i
TSB Revision
Page 1040 of 1146
52B-30 SUPPLEMENTAL RESTRAINT SYSTEM (SRS) - Troubleshooting
1 CONTINUED FROM PREVIOUS PAGE-1
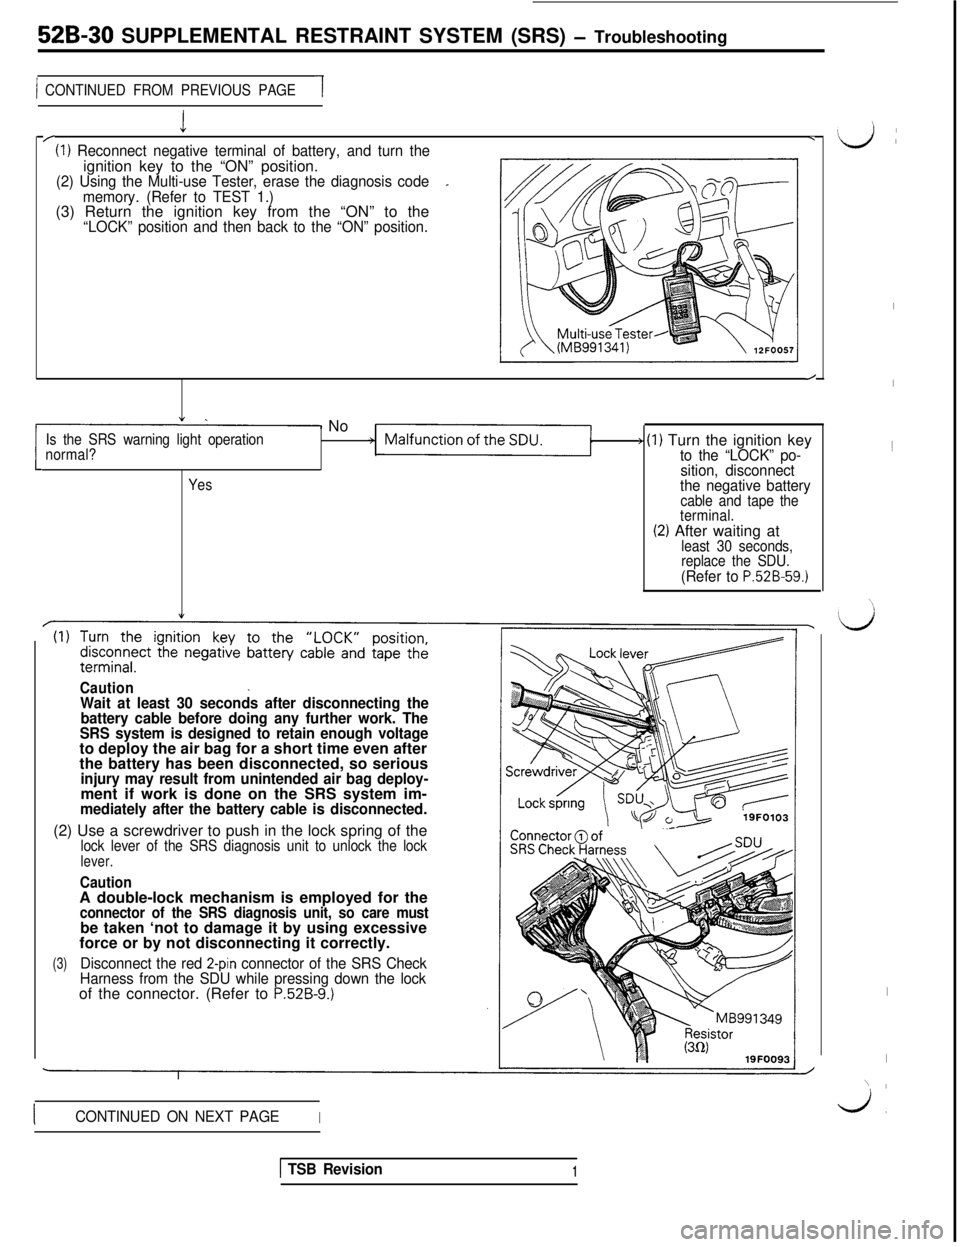
I/(I) Reconnect negative terminal of battery, and turn the.ignition key to the “ON” position.
(2) Using the Multi-use Tester, erase the diagnosis code_
memory. (Refer to TEST 1.)(3) Return the ignition key from the “ON” to the
“LOCK” position and then back to the “ON” position.
/
1 NoIs the SRS warning light operation
normal?) (1) Turn the ignition keyto the “LOCK” po-
Yessition, disconnect
the negative battery
cable and tape the
terminal.
(2) After waiting atleast 30 seconds,
replace the SDU.
(Refer to P.528-59.)
CautionWait at least 30 seconds after disconnecting the
battery cable before doing any further work. The
SRS system is designed to retain enough voltageto deploy the air bag for a short time even after
the battery has been disconnected, so serious
injury may result from unintended air bag deploy-ment if work is done on the SRS system im-
mediately after the battery cable is disconnected.(2) Use a screwdriver to push in the lock spring of the
lock lever of the SRS diagnosis unit to unlock the locklever.
CautionA double-lock mechanism is employed for the
connector of the SRS diagnosis unit, so care mustbe taken ‘not to damage it by using excessive
force or by not disconnecting it correctly.
(3)Disconnect the red 2-pin connector of the SRS Check
Harness from the SDU while pressing down the lockof the connector. (Refer to
P.52B-9.)
ICONTINUED ON NEXT PAGEI
I
I1
\\
;Ls
I
I
’ I\cj,
1 TSB Revision1
Page 1041 of 1146
:
id
cSUPPLEMENTAL RESTRAINT SYSTEM (SRS)
- Troubleshooting 52B-31
1 CONTINUED FROM PREVIOUS PAGE(
(1) Remove the air bag module. (Refer to P.52B-62.)(2) Join the No. 2 and No. 7 connectors of the clock
spring to SRS Check Harness connector @ and SRSCheck Harness connector 0, respectively.
NOTEWhen joining SRS Check Harness connector 0, alignits white paint with the hollow portion of the No. 2
connector of the clock spring.
19FO109
MB991349
SRS Check Harness
No. 2 connector
of the clock spring
16R2190
I
ICONTINUED ON NEXT PAGEI
i
1 TSB Revision
Page 1042 of 1146
52B-32 SUPPLEMENTAL RESTRAINT SYSTEM (SRS) - Troubleshooting
CONTINUED FROM PREVIOUS PAGE
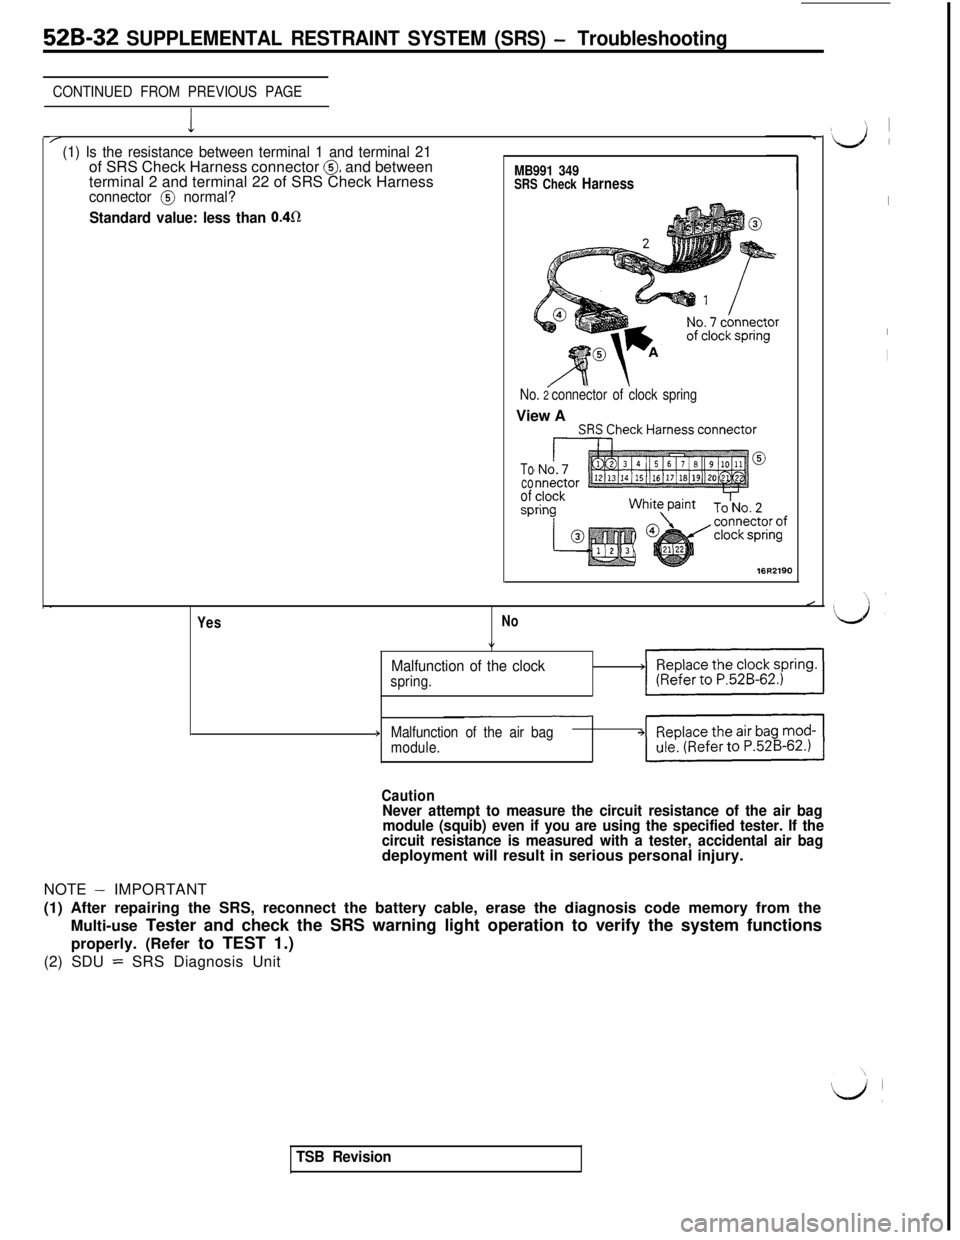
I/(1) Is the resistance between terminal 1 and terminal 21of SRS Check Harness connector @ and between
terminal 2 and terminal 22 of SRS Check HarnessMB991 349SRS Check Harnessconnector @ normal?
Standard value: less than 0.4R
No. 2 connector of clock springView A
To
co
of
SP
16R2190.
Yes
/
No
*
Malfunction of the clockspring.>V/
>Malfunction of the air bag
module.
CautionNever attempt to measure the circuit resistance of the air bag
module (squib) even if you are using the specified tester. If the
circuit resistance is measured with a tester, accidental air bagdeployment will result in serious personal injury.
NOTE
- IMPORTANT
(1) After repairing the SRS, reconnect the battery cable, erase the diagnosis code memory from the
Multi-use Tester and check the SRS warning light operation to verify the system functions
properly. (Refer to TEST 1.)
(2) SDU
= SRS Diagnosis Unit
TSB Revision
’ I
‘d ’
I
I
I
Page 1044 of 1146
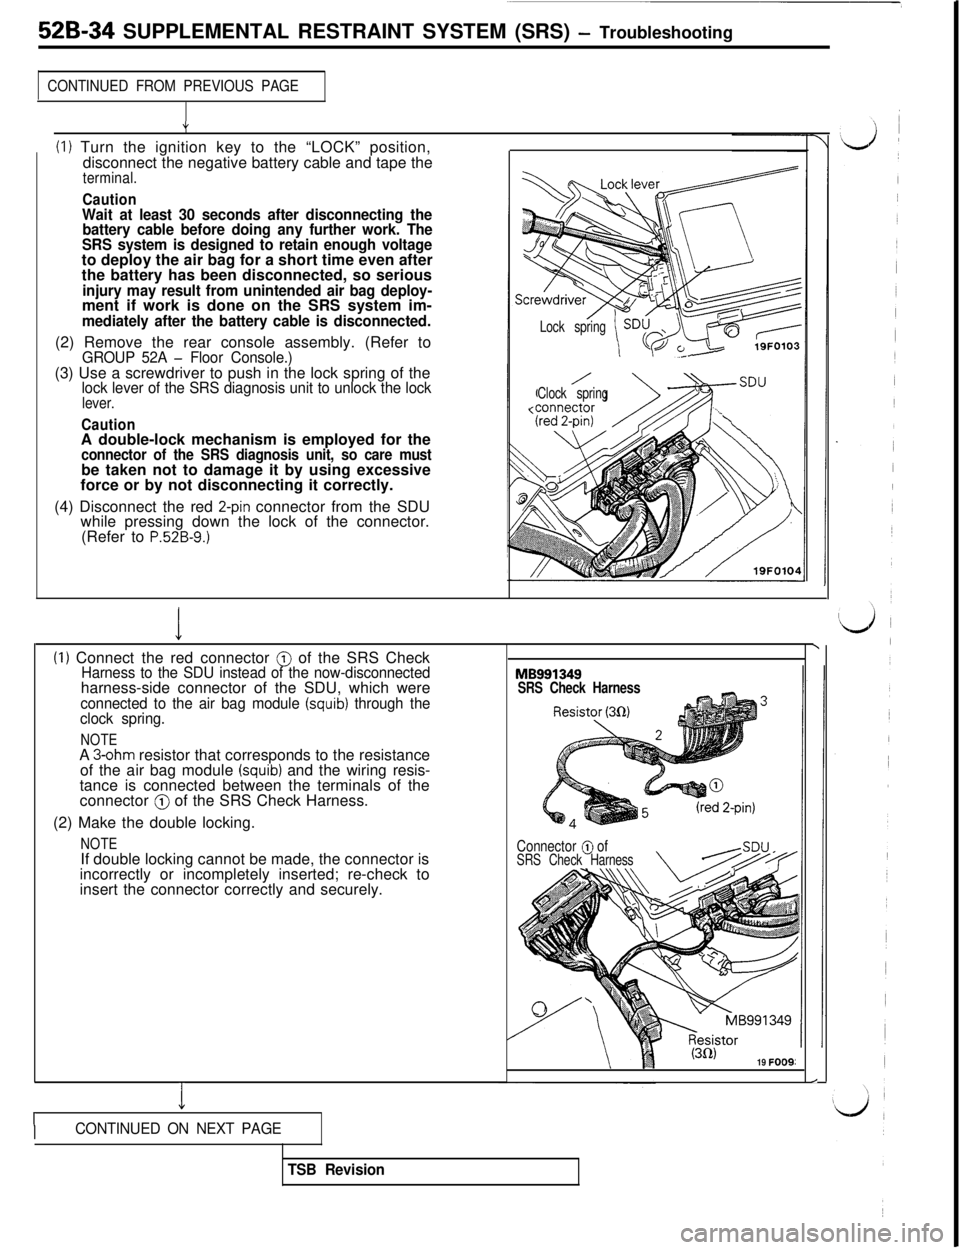
526-34 SUPPLEMENTAL RESTRAINT SYSTEM (SRS) - Troubleshooting
CONTINUED FROM PREVIOUS PAGE
c
(1) Turn the ignition key to the “LOCK” position,
disconnect the negative battery cable and tape the
terminal.
CautionWait at least 30 seconds after disconnecting the
battery cable before doing any further work. The
SRS system is designed to retain enough voltageto deploy the air bag for a short time even after
the battery has been disconnected, so serious
injury may result from unintended air bag deploy-ment if work is done on the SRS system im-
mediately after the battery cable is disconnected.(2) Remove the rear console assembly. (Refer to
GROUP 52A - Floor Console.)(3) Use a screwdriver to push in the lock spring of the
lock lever of the SRS diagnosis unit to unlock the locklever.
CautionA double-lock mechanism is employed for the
connector of the SRS diagnosis unit, so care mustbe taken not to damage it by using excessive
force or by not disconnecting it correctly.
(4) Disconnect the red
2-pin connector from the SDU
while pressing down the lock of the connector.
(Refer to
P.52B-9.)
/Lock spring
/Clock spring
I\(I) Connect the red connector @ of the SRS CheckHarness to the SDU instead of the now-disconnectedharness-side connector of the SDU, which were
connected to the air bag module (squib) through the
clock spring.
NOTE
SRS Check HarnessA
3-ohm resistor that corresponds to the resistance
of the air bag module (squib) and the wiring resis-
tance is connected between the terminals of the
connector
@ of the SRS Check Harness.
(2) Make the double locking.
NOTEIf double locking cannot be made, the connector is
incorrectly or incompletely inserted; re-check to
insert the connector correctly and securely.Connector @ ofSRS Check Harness
(3R)19 FOO9:
1
/
ICONTINUED ON NEXT PAGE
TSB Revision
Page 1045 of 1146
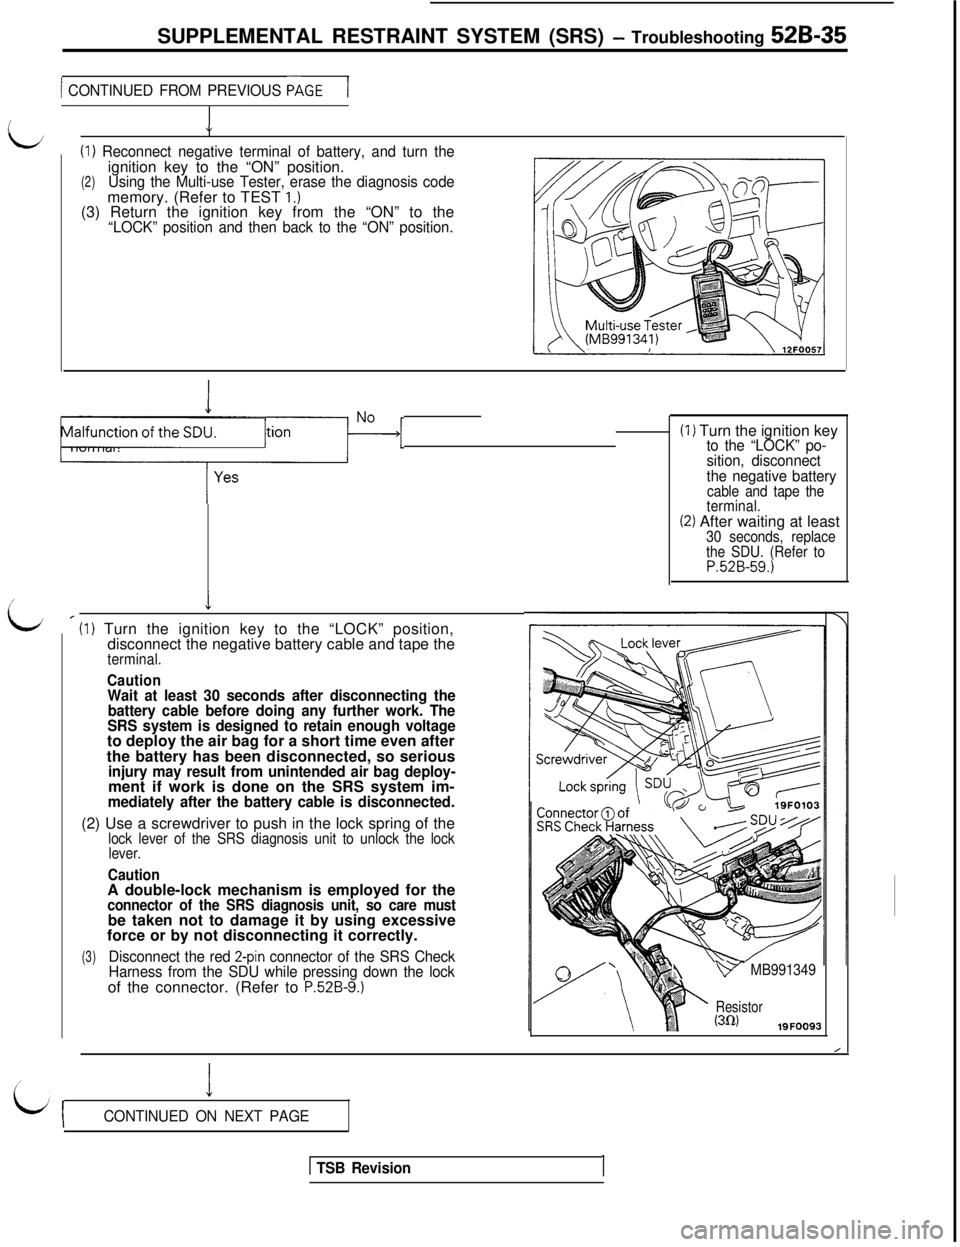
I
L
:
L;
1’SUPPLEMENTAL RESTRAINT SYSTEM (SRS)
- Troubleshooting 526-35
1 CONTINUED FROM PREVIOUS PAr/
J(I)
Reconnect negative terminal of battery, and turn the
(2)ignition key to the “ON” position.Using the Multi-use Tester, erase the diagnosis codememory. (Refer to TEST 1.)(3) Return the ignition key from the “ON” to the
“LOCK” position and then back to the “ON” position.
Is the SRS warning light operation)?IMalfunction-[
_Iv
’ (I) Turn the ignition key to the “LOCK” position,
disconnect the negative battery cable and tape the
terminal.
CautionWait at least 30 seconds after disconnecting the
battery cable before doing any further work. The
SRS system is designed to retain enough voltageto deploy the air bag for a short time even after
the battery has been disconnected, so serious
injury may result from unintended air bag deploy-ment if work is done on the SRS system im-
mediately after the battery cable is disconnected.(2) Use a screwdriver to push in the lock spring of the
lock lever of the SRS diagnosis unit to unlock the lock
lever.
CautionA double-lock mechanism is employed for the
connector of the SRS diagnosis unit, so care mustbe taken not to damage it by using excessive
force or by not disconnecting it correctly.
(3)Disconnect the red 2-pin connector of the SRS Check
Harness from the SDU while pressing down the lockof the connector. (Refer to
P.52B-9.)(I) Turn the ignition key
to the “LOCK” po-
sition, disconnect
the negative battery
cable and tape the
terminal.
(2) After waiting at least30 seconds, replace
the SDU. (Refer to
P.52B-59.)4
v MB991349
Resistor(302)19FOO93
I
LijCONTINUED ON NEXT PAGE
1 TSB RevisionI
Page 1046 of 1146
52B-36 SUPPLEMENTAL RESTRAINT SYSTEM (SRS) - Troubleshooting
1 CONTINUED FROM PREVIOUS PAGE1(I) Remove the air bag module. (Refer to
P.52B-62.)(2) Join the No. 2 and No. 7 connectors of the clockspring to SRS Check Harness connector @ and SRSCheck Harness connector 0, respectively.
NOTEWhen joining SRS Check Harness connector 0, alignits white paint with the hollow portion of the No. 2
connector of the clock spring.
19FO109
MB991349
SRS Check Harness
No.2 connector
of the clock spring
I
ICONTINUED ON NEXT PAGEI
\
/
TSB Revision