Page 588 of 1640

Installation
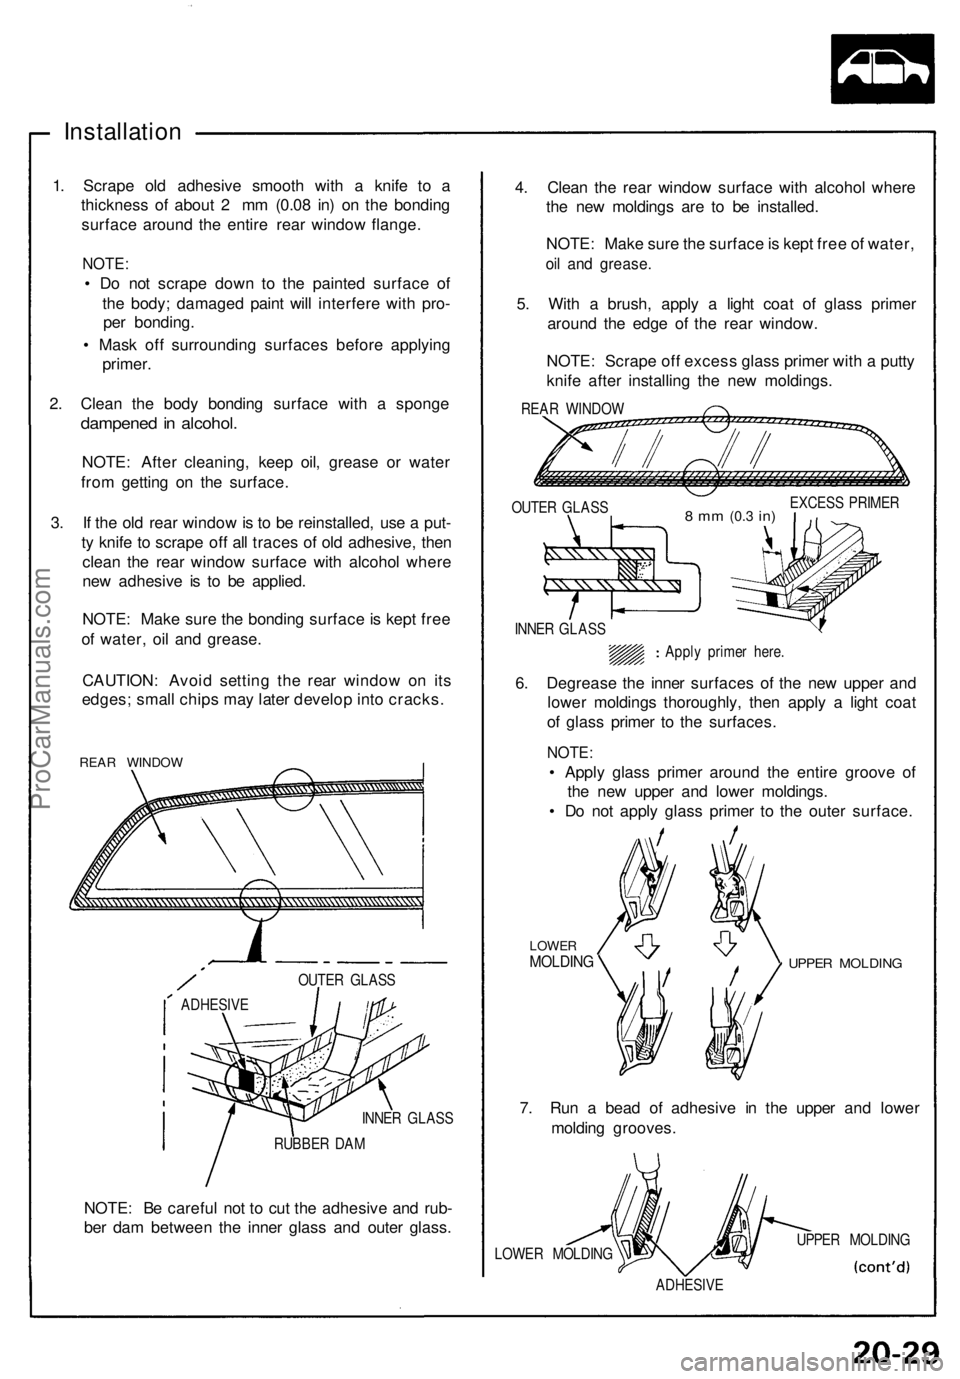
1. Scrap e ol d adhesiv e smoot h wit h a knif e t o a
thicknes s o f abou t 2 m m (0.0 8 in ) o n th e bondin g
surfac e aroun d th e entir e rea r windo w flange .
NOTE:
• D o no t scrap e dow n t o th e painte d surfac e o f
th e body ; damage d pain t wil l interfer e wit h pro -
pe r bonding .
• Mas k of f surroundin g surface s befor e applyin g
primer .
2 . Clea n th e bod y bondin g surfac e wit h a spong e
dampene d in alcohol .
NOTE: Afte r cleaning , kee p oil , greas e o r wate r
fro m gettin g o n th e surface .
3 . I f th e ol d rea r windo w is t o b e reinstalled , us e a put -
t y knif e t o scrap e of f al l trace s of old adhesive , the n
clea n th e rea r windo w surfac e wit h alcoho l wher e
ne w adhesiv e i s t o b e applied .
NOTE : Mak e sur e th e bondin g surfac e is kep t fre e
of water , oi l an d grease .
CAUTION : Avoi d settin g th e rea r windo w o n it s
edges ; smal l chip s ma y late r develo p int o cracks .
REAR WINDO W
OUTER GLAS S
ADHESIV E
INNER GLAS S
RUBBE R DA M
NOTE : B e carefu l no t t o cu t th e adhesiv e an d rub -
be r da m betwee n th e inne r glas s an d oute r glass . 4
. Clea n th e rea r windo w surfac e wit h alcoho l wher e
th e ne w molding s ar e t o b e installed .
NOTE : Mak e sur e th e surfac e is kep t fre e of water ,
oil an d grease .
5. Wit h a brush , appl y a ligh t coa t of glas s prime r
aroun d th e edg e o f th e rea r window .
NOTE : Scrap e of f exces s glas s prime r wit h a putt y
knif e afte r installin g th e ne w moldings .
REAR WINDO W
OUTE R GLAS S
8 m m (0. 3 in)EXCES S PRIME R
INNE R GLAS S
Apply prime r here .
6. Degreas e th e inne r surface s of the ne w uppe r an d
lowe r molding s thoroughly , the n appl y a ligh t coa t
o f glas s prime r t o th e surfaces .
NOTE:
• Appl y glas s prime r aroun d th e entir e groov e of
th e ne w uppe r an d lowe r moldings .
• D o no t appl y glas s prime r t o th e oute r surface .
LOWERMOLDIN GUPPER MOLDIN G
7. Ru n a bea d o f adhesiv e i n th e uppe r an d lowe r
moldin g grooves .
LOWER MOLDIN G UPPE
R MOLDIN G
ADHESIV E
ProCarManuals.com
Page 589 of 1640

Rear Windo w
Installatio n
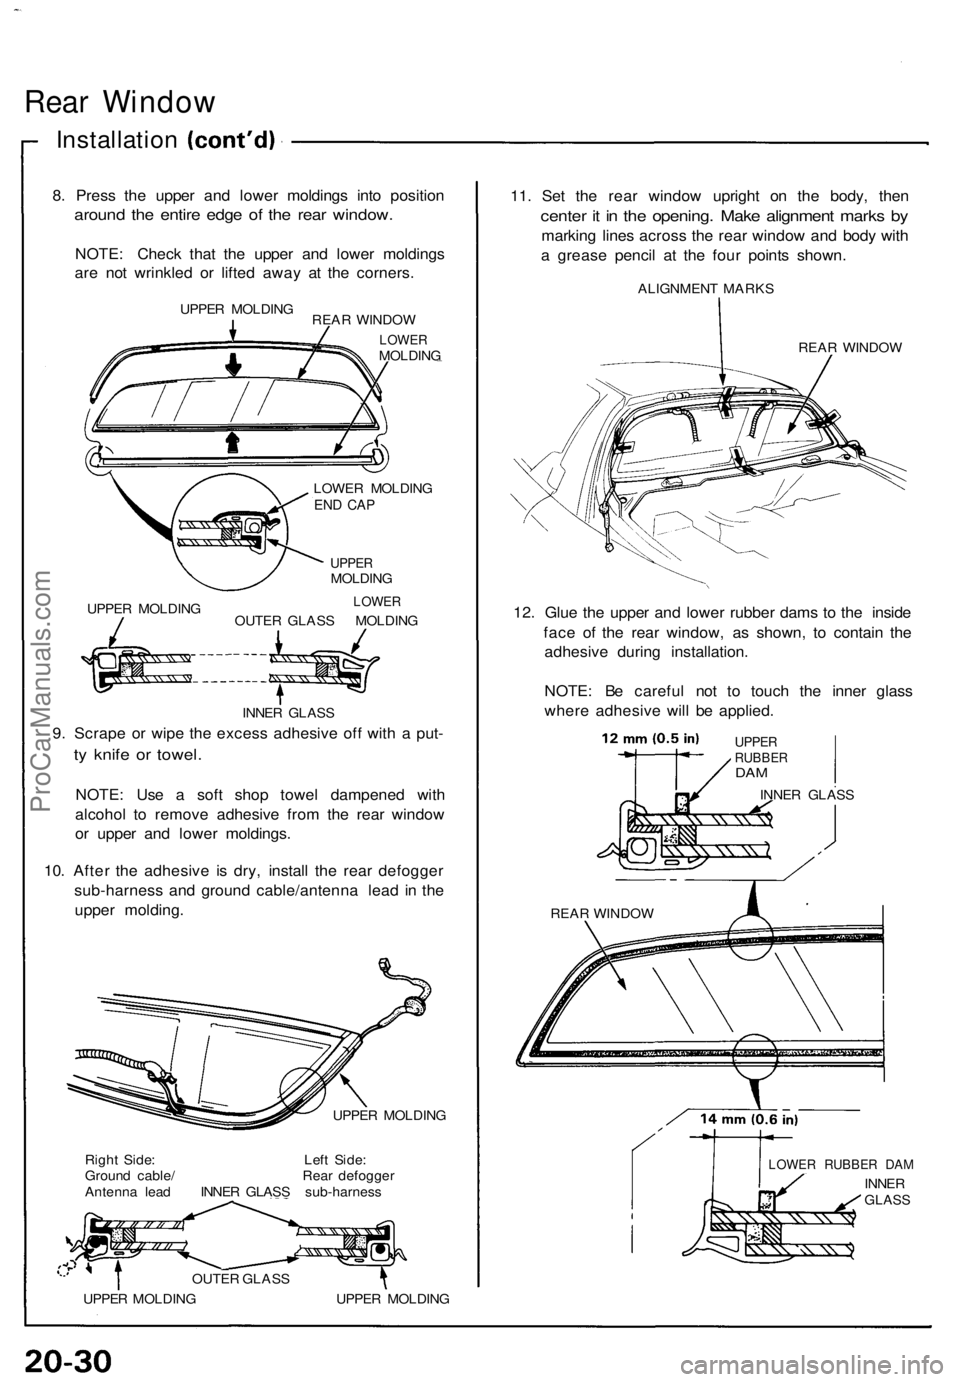
8. Pres s th e uppe r an d lowe r molding s int o positio n
around th e entir e edg e o f th e rea r window .
NOTE: Chec k tha t th e uppe r an d lowe r molding s
ar e no t wrinkle d o r lifte d awa y a t th e corners .
UPPER MOLDIN G
REAR WINDO W
LOWERMOLDIN G
LOWE R MOLDIN G
END CA P
UPPE RMOLDIN G
UPPE R MOLDIN G
LOWER
OUTER GLAS S MOLDIN G
INNE R GLAS S
9. Scrap e o r wip e th e exces s adhesiv e of f wit h a put -
ty knif e o r towel .
NOTE : Us e a sof t sho p towe l dampene d wit h
alcoho l t o remov e adhesiv e fro m th e rea r windo w
o r uppe r an d lowe r moldings .
10 . Afte r th e adhesiv e i s dry , instal l th e rea r defogge r
sub-harnes s an d ground cable/antenn a lea d i n th e
uppe r molding .
UPPER MOLDIN G
Righ t Side : Lef t Side :
Groun d cable / Rea r defogge r
Antenn a lea d INNE R GLAS S sub-harnes s
OUTE R GLAS S
UPPE R MOLDIN G UPPE R MOLDIN G
11. Se t th e rea r windo w uprigh t o n th e body , the n
cente r i t i n th e opening . Mak e alignmen t mark s b y
markin g line s acros s th e rea r windo w an d bod y wit h
a greas e penci l a t th e fou r point s shown .
ALIGNMEN T MARK S
REAR WINDO W
12. Glu e th e uppe r an d lowe r rubbe r dam s t o th e insid e
fac e o f th e rea r window , a s shown , t o contai n th e
adhesiv e durin g installation .
NOTE : B e carefu l no t t o touc h th e inne r glas s
wher e adhesiv e wil l b e applied .
LOWER RUBBE R DA M
INNE RGLAS S
UPPERRUBBE RDAM
INNE R GLAS S
REA R WINDO W
ProCarManuals.com
Page 590 of 1640

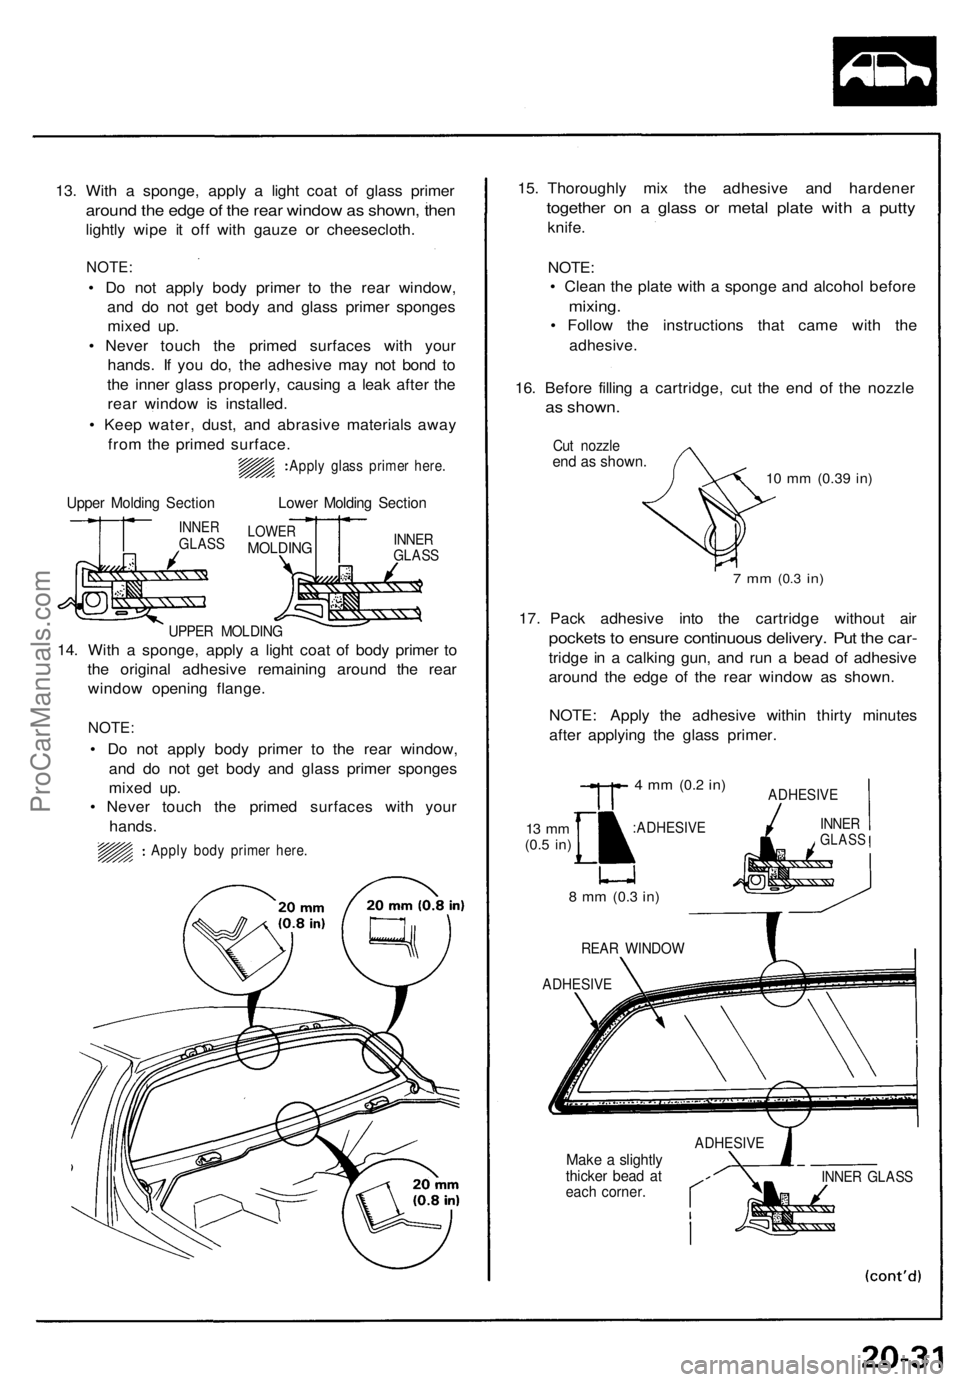
13. With a sponge, apply a light coat of glass primer
around the edge of the rear window as shown, then
lightly wipe it off with gauze or cheesecloth.
NOTE:
• Do not apply body primer to the rear window,
and do not get body and glass primer sponges
mixed up.
• Never touch the primed surfaces with your
hands. If you do, the adhesive may not bond to
the inner glass properly, causing a leak after the
rear window is installed.
• Keep water, dust, and abrasive materials away
from the primed surface.
Apply glass primer here.
Upper Molding Section
INNER
GLASS
Lower Molding Section
LOWER
MOLDING
INNER
GLASS
UPPER MOLDING
14. With a sponge, apply a light coat of body primer to
the original adhesive remaining around the rear
window opening flange.
NOTE:
• Do not apply body primer to the rear window,
and do not get body and glass primer sponges
mixed up.
• Never touch the primed surfaces with your
hands.
Apply body primer here.
15. Thoroughly mix the adhesive and hardener
together on a glass or metal plate with a putty
knife.
NOTE:
• Clean the plate with a sponge and alcohol before
mixing.
• Follow the instructions that came with the
adhesive.
16. Before filling a cartridge, cut the end of the nozzle
as shown.
Cut nozzle
end as shown.
10 mm
(0.39
in)
7 mm
(0.3
in)
17. Pack adhesive into the cartridge without air
pockets to ensure continuous delivery. Put the car-
tridge in a calking gun, and run a bead of adhesive
around the edge of the rear window as shown.
NOTE: Apply the adhesive within thirty minutes
after applying the glass primer.
13 mm
(0.5
in)
4 mm
(0.2
in)
:ADHESIVE
ADHESIVE
8 mm
(0.3
in)
REAR WINDOW
ADHESIVE
ADHESIVE
Make a slightly
thicker bead at
each corner.
INNER GLASS
INNER
GLASSProCarManuals.com
Page 732 of 1640
Relay and Control Unit Locations
Front Compartment
HORN RELAY
A/C COMPRESSOR CLUTCH
RELAY
RADIATOR FAN
LOW RELAY
RADIATOR FAN
HIGH RELAY
CONDENSER FAN RELAY
UNDER-HOOD RELAY BOX A
LEFT HEADLIGHT RETRACTOR
CUT RELAY
WINDSHIELD WIPER
LOW RELAY
WINDSHIELD WIPER
INTERMITTENT RELAY
POWER AMPLIFIER
RELAY
ABS
REAR FAIL-SAFE RELAY
ABS FRONT
FAIL-SAFE RELAY
HEADLIGHT RELAY
RIGHT HEADLIGHT RETRACTOR RELAY
Wire colors: BLU/GRN,
BRN/WHT, BLU/RED,
GRN/YEL, and BLK
LEFT HEADLIGHT RETRACTOR RELAY
Wire colors: BLU/BLK,
WHT/BLK, GRN/RED,
BLU,
and BLK
RIGHT HEADLIGHT RETRACTOR
CUT RELAY
BLOWER RELAY
BLOWER HIGH RELAY
WINDSHIELD WIPER
HIGH RELAY
WINDSHIELD
WASHER RELAY
UNDER-HOOD
RELAY BOX B
DIMMER RELAY
POWER WINDOW
RELAY
TAILLIGHT RELAY
ABS MOTOR RELAY
UNDER-HOOD FUSE/RELAY BOXProCarManuals.com
Page 734 of 1640
Dashboard, Door and Floor
DRIVER'S DOOR PANEL
ABS CONTROL UNIT
DAYTIME RUNNING
LIGHTS CONTROL
UNIT (Canada)
POWER WINDOW
CONTROL UNIT
STARTER CUT RELAY
Wire colors: BLK/WHT,
BLK/WHT, BLK/GRN,
and BLK/BLU
SECURITY CONTROL UNIT
CIGARETTE LIGHTER
RELAY
Wire colors: YEL/RED,
BLU/GRN, BRN/YEL, and BLK
FOOT WELL BASS SPEAKER
EPS CONTROL UNIT
(Behind foot well
bass speaker)
RIGHT FRONT FLOOR
PANEL
SRS UNIT
POWER DOOR LOCK
CONTROL UNITProCarManuals.com
Page 737 of 1640
Relay and Control Unit Locations
Engine Compartment
REAR WINDOW DEFOGGER
RELAY
ENGINE COMPARTMENT
FAN RELAY (A/T)
Wire colors: YEL/BLK,
BLU/RED, WHT/GRN,
and WHT/BLU
SPARK PLUG VOLTAGE
DETECTION MODULE
ENGINE COMPARTMENT
FUSE/RELAY BOX
IGNITION CONTROL
MODULE (ICM)ProCarManuals.com
Page 820 of 1640
Rear Window Defogger Timer System:
No. Terminal Test condition
Test: Desired result
Possible cause if result is not obtained
Oil Pressure Indicator System:
No. Terminal Test condition
Test: Desired result
Possible cause if result is not obtainedProCarManuals.com
Page 821 of 1640
Integrated Control Unit
Input Test
Side Marker Light Flasher System:
No. Terminal
Test condition
Test: Desired result
View from wire side
Possible cause if result is not obtained
Power Window Key-off Timer System:
No. Terminal
Test condition
Test: Desired result
Possible cause if result is not obtainedProCarManuals.com