Page 1495 of 2103
SHAFT Propeller
M a t i n g m a r k s
joint boot
Center propeller
shaft Lbbro’ joint
assembly
REMOVAL SERVICE
PROPELLER SHAFT ASSEMBLY REMOVAL
(1) Make on the flange
and ‘flange yoke and remove the
shaft.
. .
C a u t i o n ’
the propeller shaft in a straight and level
manner so as to ensure that the boot is not
through pinching. ,
NOTE
Damage to the boot can be and the Work will
be easier, if a piece of cloth or material is inserted
in the boot.
(2) Use special tool a to let objects
SPACER REMOVAL
The number of spacers depends on models. Check the num-
ber of spacers used and write it down for reference during
reassembly.
Oil seal lipINSTALLATION SERVICE POINT
PROPELLER SHAFT ASSEMBLY INSTALLATION
Caution
Do not damage the transfer case oil seal
TSB Revision. .
Page 1499 of 2103
PROPELLER SHAFT Propeller, Shaft
J o u r n a l
I
Mating
Cen t er
\I
DISASSEMBLY SERVICE POINTS
R I N G S R E M O V A L
(1) Make mating marks on the yoke and universal joi nt that
is to be disassembled.
(2) Remove the snap rings from the yoke with snap ring
pliers.
JOURNAL BEARINGS REMOVAL
Use the special tool to force out the journal beari ngs from
the yoke and propeller shaft.
Caution
Do not tap the journal bearings, or the propeller s haft
won’t function well.
CENTER YOKE REMOVAL
(1)Place mating marks on the center yoke and center pr opel-
ler shaft assembly.
(2) Remove the center yoke from center shaft.
C EN T E R B E A R I N G A S S E MB LY
BOLTS REMOVAL
Put mating marks on the center propeller shaft, the Lobro
joint and the companion flange before removing
the bolts.
Page 1501 of 2103
S H A F T
Plastic
F L A N G E R E M O V A L
Put mating marks on the companion ‘flange and rear,
propeller shaft before removing the companion
SERVICE”
CENTER BEARING
FLANGE/SELF-LOCKING
(1) Apply multipurpose grease shown in the ‘figure.
(2) Install the center bearing assembly to the rear
shaft as shown in the illustration.
(3) Align the mating marks on the companion flange
rear propeller shaft.
(4) Press-fit the center bearing assembly with the companion
flange while tightening the self-locking nut.
JOINT INSTALLATION
(1) installing the boot, insert the boot band.
Wrap the splined of propeller shaft tape
install the Lobro joint ,
JOINT ASSEMBLY INSTALLATION
Install fhe Lobro joint assembly as follows:
Apply a thin coat of the specified grease to the ba ll grooves
of the inner and outer races.
Specified greasd: Repair kit
.
. - -
T S B
Page 1505 of 2103
FRONT AXLE
CONTENTS
DRIVE SHAFT 10ON-VEHICLE SERVICE. . . . . . . . . . . . . . . . . . . . .5. . . . . . . . . . . . . . . . . . . .Hub
Replacement. . . . . . . . . . . . . . . . . . . . . . .5
DRIVE SHAFT . . . . . . . . . . . . . . . . . . . .19Wheel Bearing End Play Check . . . . . . . . . . . . . . .5
FRONT HUB ASSEMBLY. . . . . . . . . . . . . . . . . . .6SERVICE SPECIFICATIONS. . . . . . . . . . . . . . . . .2
GENERAL INFORMATION. . . . . . . . . . . . . . . . . .2SPECIAL TOOLS. . . . . . . . . . . . . . . . . . . . . . . . . . .3
KNUCKLE. . . . . . . . . . . . . . . . . . . . . . . . . . . . . . . . .8TROUBLESHOOTING. . . . . . . . . . . . . . . . . . . . . . .4
LUBRICANTS. . . . . . . . . . . . . . . . . . . . . . . . . . . . . .2
Page 1506 of 2103

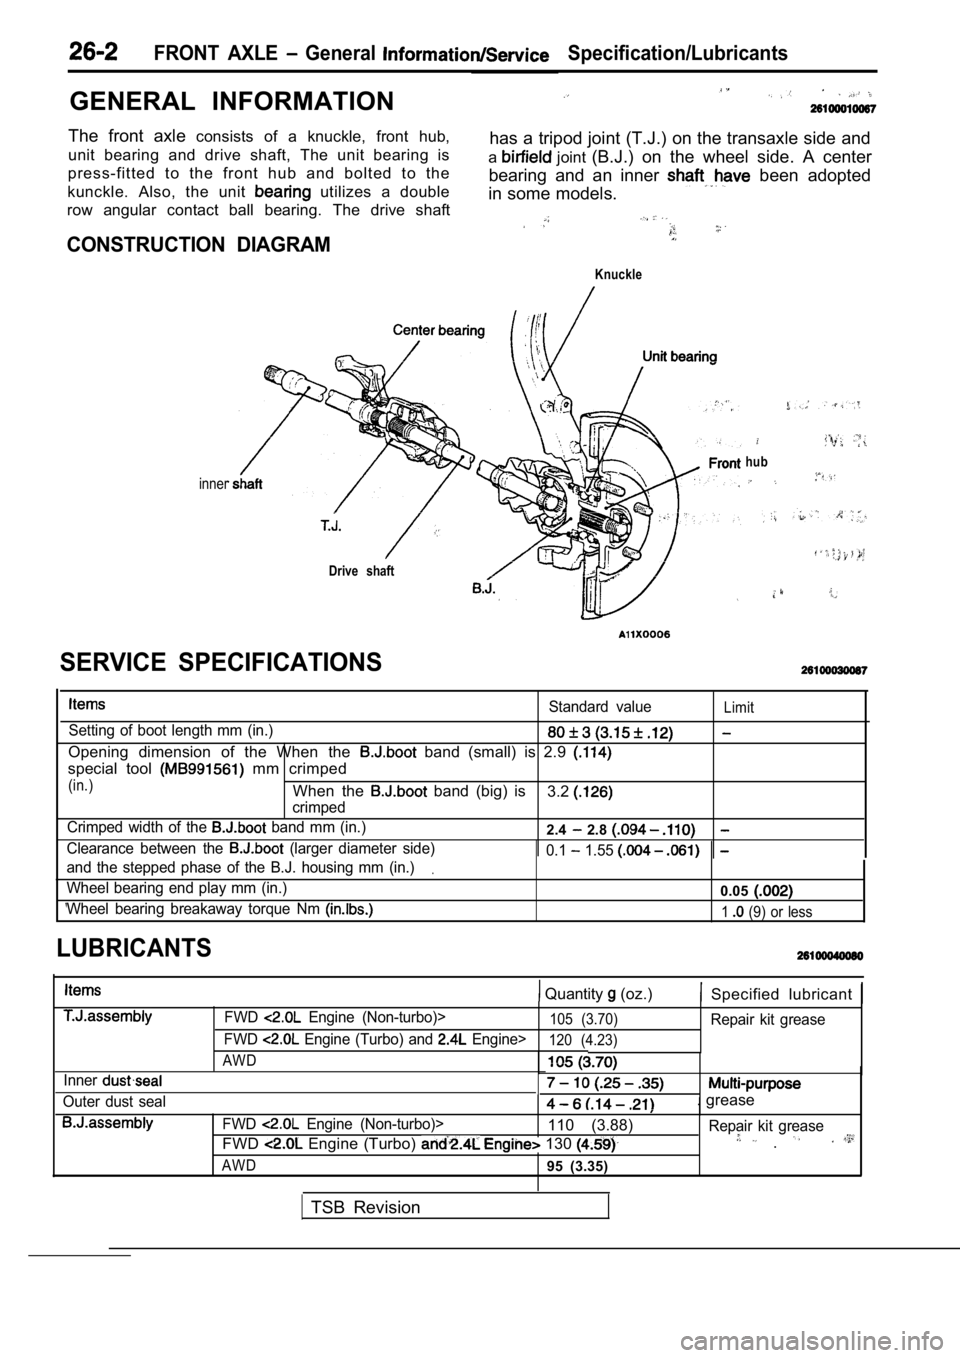
GENERAL INFORMATION
FRONT AXLE General Specification/Lubricants
The front axle consists of a knuckle, front hub,
unit bearing and drive shaft, The unit bearing is has a tripod joint (T.J.) on the transaxle side and
press-fitted to the front hub and bolted to the a
joint
(B.J.) on the wheel side. A center
kunckle. Also, the unit
utilizes a double bearing and an inner been adopted
in some models.
row angular contact ball bearing. The drive shaft
CONSTRUCTION DIAGRAM
Knuckle
inner
Drive shaft
hub
Standard valueLimit
Setting of boot length mm (in.)
Opening dimension of the When the band (small) is 2.9
special tool mm crimped
(in.)When the band (big) is
crimped3.2
Crimped width of the band mm (in.)2.4 2.8
Clearance between the (larger diameter side) 0.1 1.55
and the stepped phase of the B.J. housing mm (in.).
Wheel bearing end play mm (in.)0.05
Wheel bearing breakaway torque Nm 1 (9) or less
SERVICE SPECIFICATIONS
LUBRICANTS
Quantity (oz.) Specified lubricant
Inner
Outer dust sealFWD
Engine (Non-turbo)>105 (3.70)Repair kit grease
FWD
Engine (Turbo) and Engine>120 (4.23)
AWD
. grease
FWD Engine (Non-turbo)>110 (3.88) Repair kit grease
FWD Engine (Turbo) 130 .
AWD95 (3.35)
TSB Revision
Page 1509 of 2103
I
8990767
ON-VEHICLE SERVICE
WHEEL BEARING END PLAY CHECK
1. Remove the disc brake caliper and suspend it with a
wire.
2. Remove the brake disc from the front hub.
3.Attach a dial gauge as shown in the illustration, and then
measure the end play while moving the hub in the ax ial
direction.
Limit: 0.05 mm in.)
4.If end play exceeds the replace the front hub assem-
bly.
HUB BOLT REPLACEMENT
1. Remove the caliper assembly and secure it with w ire
so that it does not fall.
2. Remove the brake disc.
3. Use the special tools to remove the hub bolts.
Caution
Be sure to tie the cord special tool to a nearby
part.
4.Use the wheel nuts to securely install the new hub bolts,
while being careful of the serrations of the hub bo lts and
hub;
TSB Revision
Page 1510 of 2103
26-6FRONT AXLE Front
FRONT HUB ASSEMBLY
REMOVAL AND INSTALLATION
88 Nm65
8885
Removal steps
1. Cotter pin 2. Drive shaft nut
3. Front wheel speed sensor
with 4. Caliper assembly
5. Brake disc
A l
Nut
Nm
145-188
5
Caution
6. Upper
7. Front hub.
The front hub assembly not be disassembled..
REMOVAL SERVICE POINTS
DRIVE SHAFT R E M O V A L .
CALIPER ASSEMBLY REMOVAL
Secure the removed caliper so that it
does not fall., ,
ARM BALL JOINT AND KNUCKLE
DISCONNECTION
Caution
1.Using the tool, loosen the tie rod end mounting
nut. Only loosen the nut; do not remove it from the
joint.
2.Support the tool with a cord, etc. to prevent
it from coming off.
TSB Revision
Page 1511 of 2103

FRONT AXLE Front Hub Assembly
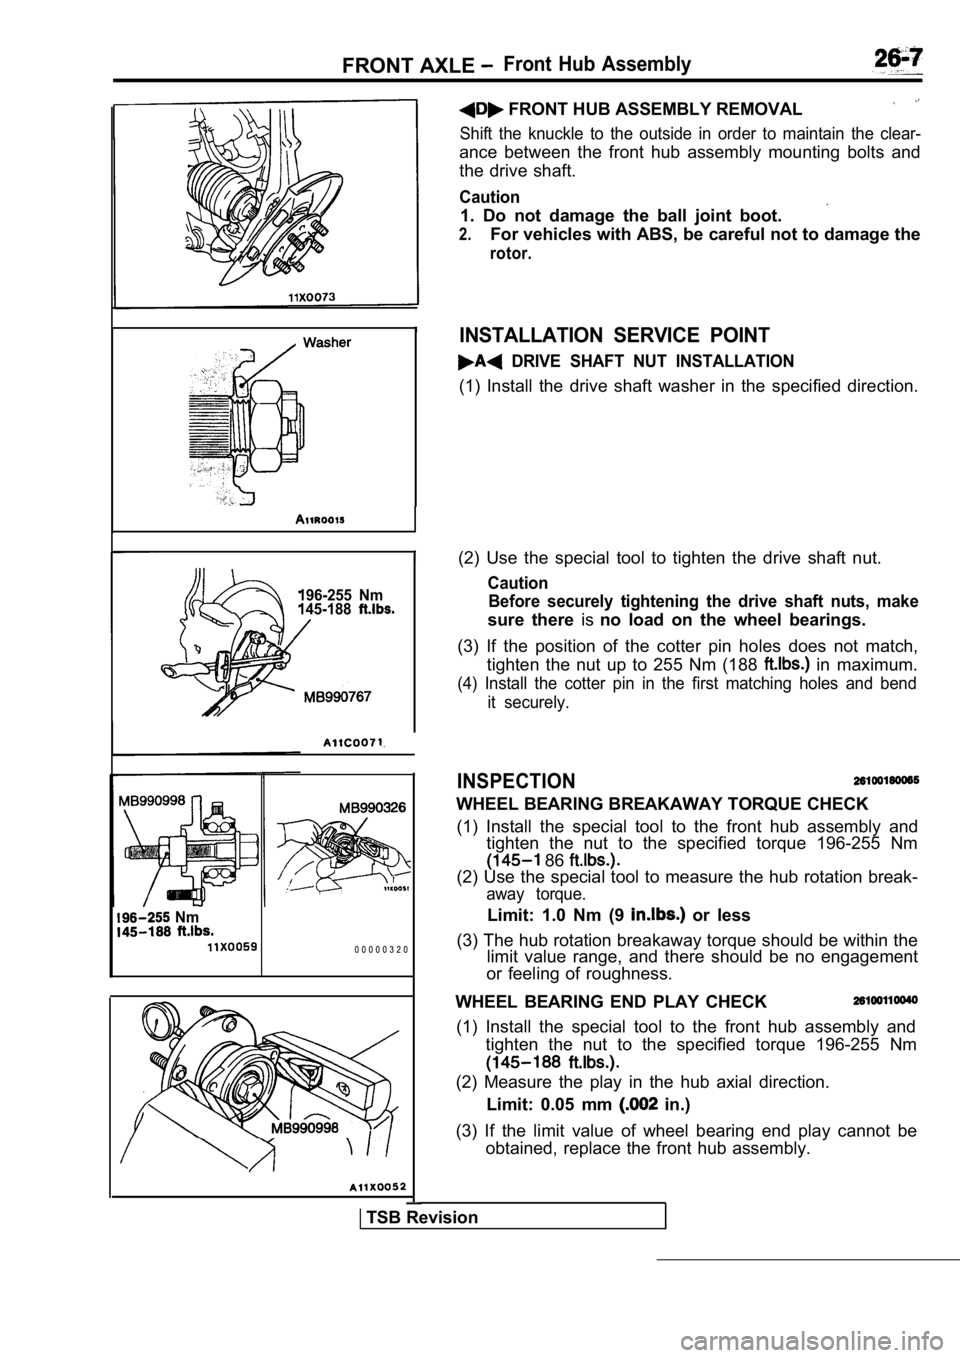
196-255 Nm
145-188
I(2) Use the special tool to tighten the drive shaft nut.
Caution
Before securely tightening the drive shaft nuts, ma ke
sure there isno load on the wheel bearings.
(3) If the position of the cotter pin holes does no t match,
tighten the nut up to 255 Nm (188
in maximum.
(4) Install the cotter pin in the first matching ho les and bend
it securely.
INSPECTION
WHEEL BEARING BREAKAWAY TORQUE CHECK
(1) Install the special tool to the front hub assem bly and
tighten the nut to the specified torque 196-255 Nm
86
(2) Use the special tool to measure the hub rotatio n break-
away torque.
Limit: 1.0 Nm (9 or less
(3) The hub rotation breakaway torque should be wit hin the
limit value range, and there should be no engagemen t
or feeling of roughness. Nm
0 0 0 0 0 3 2 0
FRONT HUB ASSEMBLY REMOVAL
Shift the knuckle to the outside in order to mainta in the clear-
ance between the front hub assembly mounting bolts and
the drive shaft.
Caution
1. Do not damage the ball joint boot.
2.For vehicles with ABS, be careful not to damage the
rotor.
INSTALLATION SERVICE POINT
DRIVE SHAFT NUT INSTALLATION
(1) Install the drive shaft washer in the specified direction.
WHEEL BEARING END PLAY CHECK
(1) Install the special tool to the front hub assem bly and
tighten the nut to the specified torque 196-255 Nm
(2) Measure the play in the hub axial direction.
Limit: 0.05 mm
in.)
(3) If the limit value of wheel bearing end play ca nnot be
obtained, replace the front hub assembly.
TSB Revision