1989 MITSUBISHI GALANT clutch
[x] Cancel search: clutchPage 728 of 1273
23-22 AUTOMATIC
TRANSAXLE
- Troubleshooting
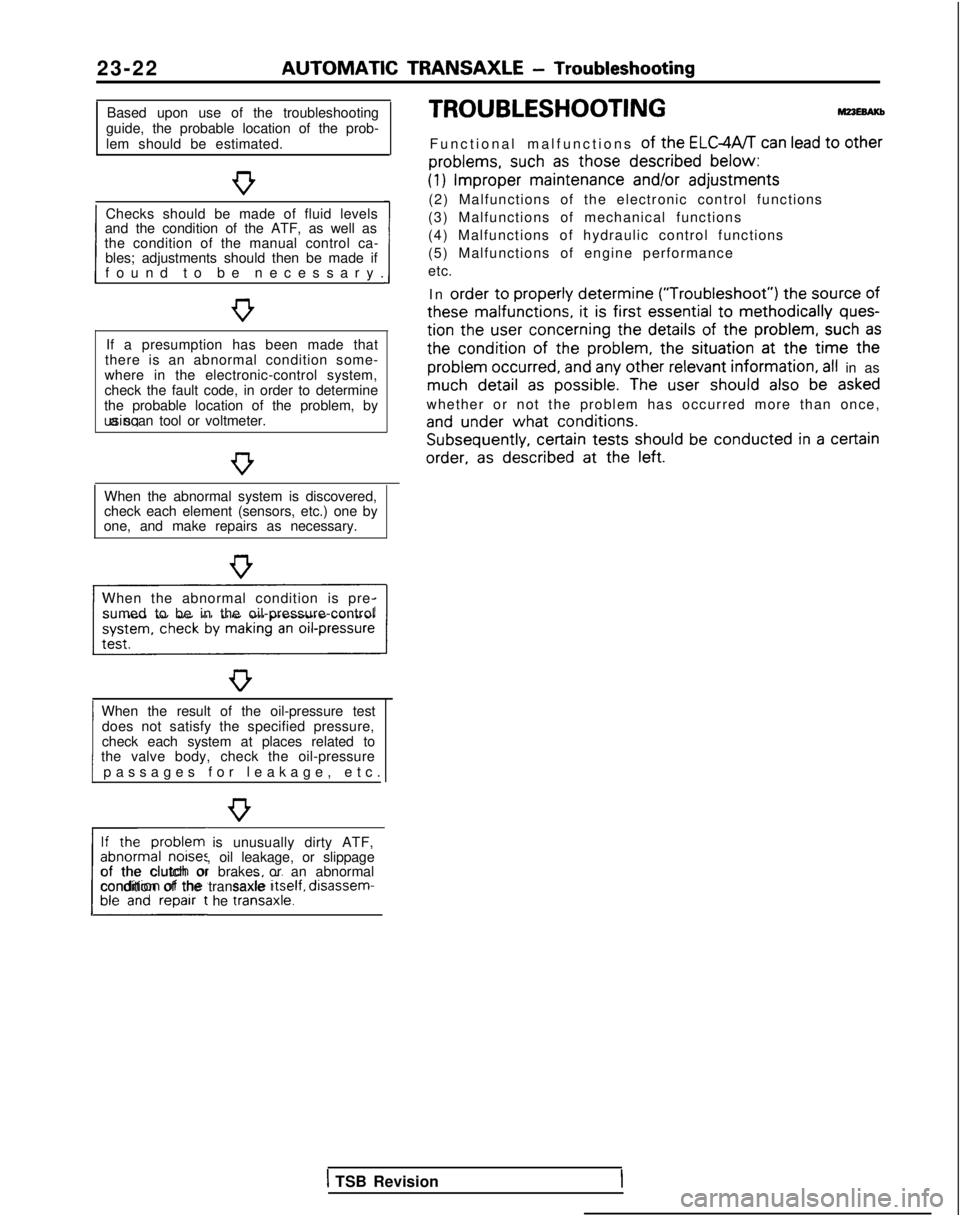
Based upon use of the troubleshooting
guide, the probable location of the prob-
lem should be estimated.
Checks should be made of fluid levels
and the condition of the ATF, as well as
1 found to be necessary
.
the condition of the manual control ca-
bles; adjustments should then be made if
If a presumption has been made that
there is an abnormal condition some-
where in the electronic-control system,
check the fault code, in order to determine
the probable location of the problem, by using a scan tool or voltmeter.
When the abnormal system is discovered,
check each element (sensors, etc.) one by
one, and make repairs as necessary.
When the abnormal condition is pre- sumed to be in the oil-pressure-control
When the result of the oil-pressure test does not satisfy the specified pressure,
1 passages for leakage, etc
.
check each system at places related to
the valve body, check the oil-pressure
If the problem is unusually dirty ATF,
abnormal noises, oil leakage, or slippage
L##t he traniaxle.1
of the clutch or brakes or an abnormal
condition of the transaxle Itself,
disassem-
TROUBLESHOOTING
Functional malfunctions of the ELGWT can lead to other
problems,
such
as those described
below:
(1) Improper
maintenance
and/or
adjustments
(2) Malfunctions of the electronic control functions
(3) Malfunctions of mechanical functions
(4) Malfunctions of hydraulic control functions
(5) Malfunctions of engine performance
etc.
In order
to properly
determine (“Troubleshoot”)
the
source
of
these
malfunctions,
it is first essential
to methodically ques-
tion
the
user
concerning
the details
of the problem,
such as
the
condition of
the
problem,
the
situation at
the
time the
problem
occurred,
and any other relevant
information, all in as much detail
as possible.
The user
should
also be asked
whether or not the problem has occurred more than once,
and under
what conditions. Subsequently,
certain
tests should
be conducted in a certain
order,
as described
at
the
left.
1 TSB Revision
Page 730 of 1273
23-24AUTOMATIC TRANSAXLE - Troubleshooting
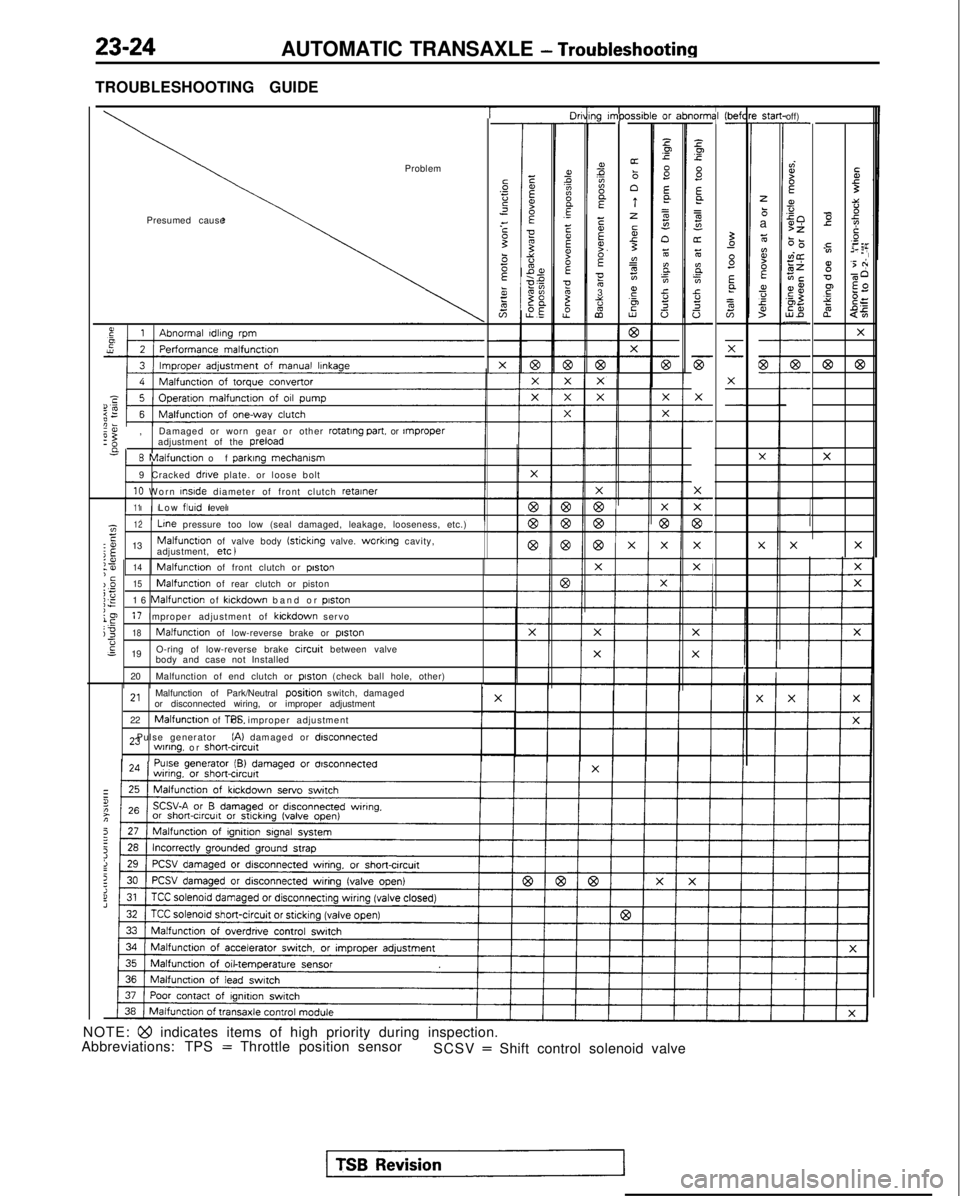
TROUBLESHOOTING GUIDE
T-----lO"ni31-
z.Ip.c
8Ea
=
s"oz6
E.
;In.ci!
a
-
F
X
-
-
X
77
c-
X
F-
i-
1g I”,PC-
ms?A
E
EEF.E053%
2
xsib-or z-
Pp
s E
a=g
n6
BE0.cY.20 (befl
-St.3-
zbaz
ti?BEa,fs
off)-
dI?f
s50>z6-0vi@zEiECE$,aZ5%-
-
7-
-
Ibr
I
Problem
Presumed causeTi3::-0 e
2Ts
y.=:,02 EF
g'5 +
v-60
F $2
s?
$=
2
$5
X
@63
X
X
I’
-
57-
-X-
-
G-- X
-
-X
X
e:,
Damaged or worn gear or other rotating part.
or rnproperadjustment of the preload
n
8 Malfunction of
parklng
mechamsm
9 Cracked drive plate. or loose bolt
10 Worn InsIde
diameter of front clutch retainer
11Low flutd
level
X
-
1z12 Line
pressure too low (seal damaged, leakage, looseness, etc.)E:o 13Malfunctton of valve body (sticking valve. worktng cavity,
j$adjustment, etc )XX
I
:?I14‘cMalfunction of front clutch or poston
)_O15Malfunction of rear clutch or pistoni;;E16 Malfunction of klckdown band or piston
le17 Improper adjustment of kickdown servoj318Malfunction of low-reverse brake or piston-6s 19 O-ring of low-reverse brake circuit between valve
body and case not Installed
20 Malfunction of end clutch or
piston (check ball hole, other)
2,Malfunction of Park/Neutral positjon switch, damaged
or disconnected wiring, or improper adjustment
22
Malfunction of TPS. or improper adjustment
23 Pulse generator
(A) damaged or disconnectedwlnng. or short&cut^
NOTE: Qo indicates items of high priority during inspection.
Abbreviations: TPS = Throttle position sensor SCSV = Shift control solenoid valve
Page 731 of 1273
AUTOMATIC TRANSAXLE
- Troubleshooting23-25
r star
P =
<
zzGsEa
c”65
srBZzi;4
1
1
Y-
a
s
s-
7
ii-
s-
3-1
z-
3
1_:5s
5
f-
d
1i
‘I3
E*aOm5s;K
;$2zIrg:,8
EP2.2
$2-
If
E:
p2zz0om,c .Gis:75’‘5$5oz28-
-
-
7-
_/-
4
X
?I-
92L”$ElE0
-
zmz
“$
P::g=f,i?Ppzz?$5.- -CE$2
gsi
-
= 0
0752=o-+u$Z
52
gEEO-
- nsaxl’
-
;
4
i?
3
b
$
:
b
?
mk?
::
w
nalfu-
f3::2?gmyQr0.3-J$GbG
LF!‘,
SO” c-
f35eL?g_mc?PV,L 0
.FnEC+8r35-
x-
,hlft-r-
if5 -0
::2Bg
z
5
Pz=$5
3
4
- ck la
- fte
T
z2
B5t8s,-55
P$%88,3d-
x
-i1
Is,
c
5
‘0mc
gi?
DEEf
ge‘2
c”d
p$
“=‘
EiumTNm,ci )th(
l-
jhO#
X-
-
-
-
XX
X-X-
-
-
g,-
X
-.
I
-
5cIpcg;UCa, 22,$ ‘cG$68-
gz
?&SiEss
555m$g
IcE-
?5g
26a2
_’s
8fsz
gD$;i058-cw3
5zYE8g$nso’51b’F m
asz fis-$2x-uo
E(1
9
-z
N
E2
2m-
z-
r 0
35fc2 .ss:!0=3;Pg-
xx--x-X-X-
-
-
-
-
x-
-
-
-
-
-
-
-
6F-
X
X
xX-
-
-
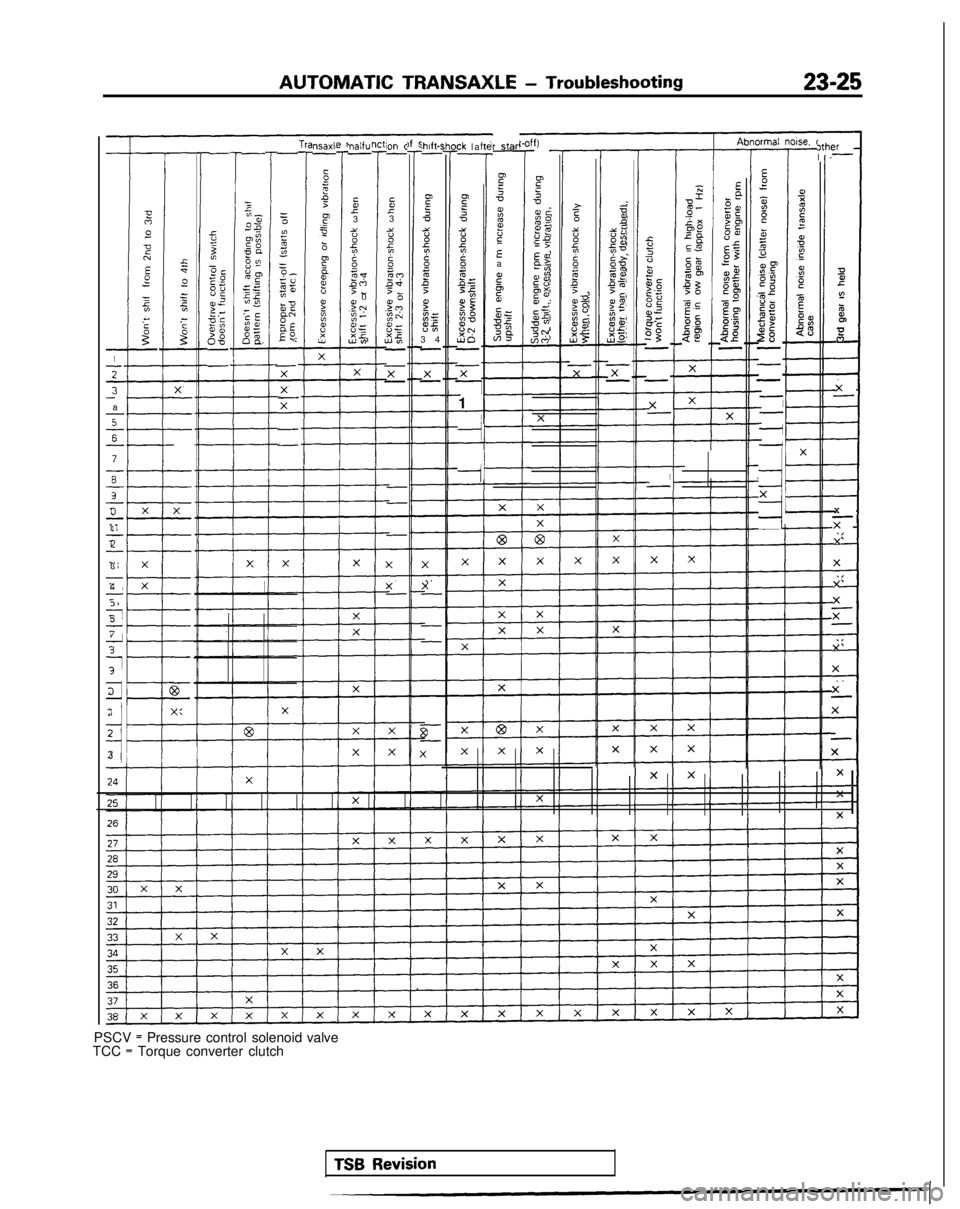
PSCV = Pressure control solenoid
TCC = Torque converter clutch
I-
X
TX
X
X
X
x- X
X
X-
X
-
X
valve
TSB Revision
Page 732 of 1273
23-26AUTOMATIC TRANSAXLE - Troubleshooting
HOT
TFA0715
AW
D
TFA0700
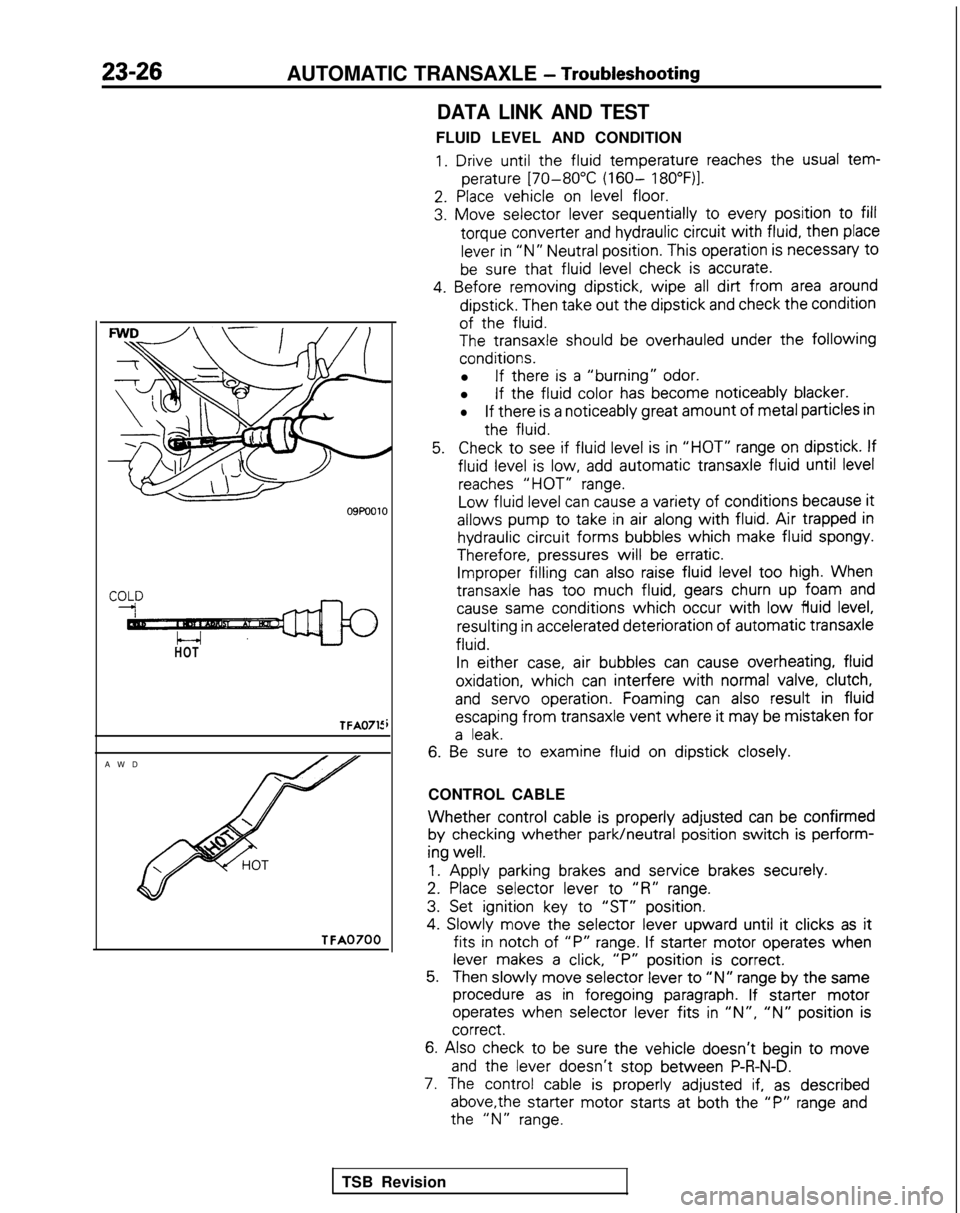
DATA LINK AND TEST
FLUID LEVEL AND CONDITION
1. Drive until the
fluid
temperature
reaches the
usual tem-
perature
[70-80°C (160- 18O”F)l.
2. Place
vehicle
on level floor.
3. Move
selector
lever sequentially
to
every
position
to fill
torque
converter
and hydraulic circuit
with fluid,
then
place
lever in “N” Neutral position.
This operation is necessary
t0
be sure that fluid
level check is accurate.
4. Before
removing
dipstick,
wipe all dirt from area around
dipstick.
Then take out
the
dipstick
and check the
condition
of the
fluid.
The
transaxle
should be overhauled under the following
conditions.
l If there
is a “burning” odor.
l If the
fluid
color
has become
noticeably
blacker.
lIf there
is a noticeably
great
amount
of metal particles in
the
fluid.
5.Check to
see if fluid
level is in “HOT” range on dipstick.
If
fluid
level is low, add automatic
transaxle
fluid
until level
reaches “HOT” range.
Low
fluid
level can cause a variety of
conditions
because it
allows
pump
to
take
in air along with fluid. Air trapped in
hydraulic circuit
forms
bubbles
which
make fluid
spongy.
Therefore,
pressures
will be erratic. Improper filling
can also raise fluid level too
high. When
transaxle
has too
much fluid,
gears churn up foam and
cause same
conditions
which occur with low fluid
level, resulting
in accelerated deterioration
of
automatic
transaxle
fluid.
In
either
case, air bubbles
can cause overheating,
fluid
oxidation,
which can interfere
with normal valve, clutch,
and
servo
operation.
Foaming can also result
in fluid
escaping
from
transaxle
vent where it
may be mistaken
for
a leak.
6. Be
sure to
examine
fluid
on dipstick
closely.
CONTROL CABLE
Whether control
cable is properly
adjusted
can be confirmed
by
checking
whether park/neutral
position
switch is perform-
ing
well.
1.
Apply
parking brakes and service
brakes securely.
2. Place
selector
lever
to
“R” range.
3. Set ignition
key to
“ST” position.
4.
Slowly
move
the
selector
lever
upward
until it
clicks as it
fits in
notch of “P” range. If starter
motor
operates
when
lever makes a click, “P”
position
is correct.
5.Then slowly
move
selector
lever to “N” range by
the
same
procedure as in foregoing
paragraph. If starter
motor
operates
when selector
lever
fits in ‘IN”, “N” position
is correct.
6.
Also check to be sure the
vehicle
doesn’t
begin to move
and
the
lever
doesn’t
stop
between
P-R-N-D.
7. The control
cable is properly
adjusted if, as described
above,the
starter
motor
starts
at both the
“P” range and the
“N” range.
TSB Revision
Page 735 of 1273
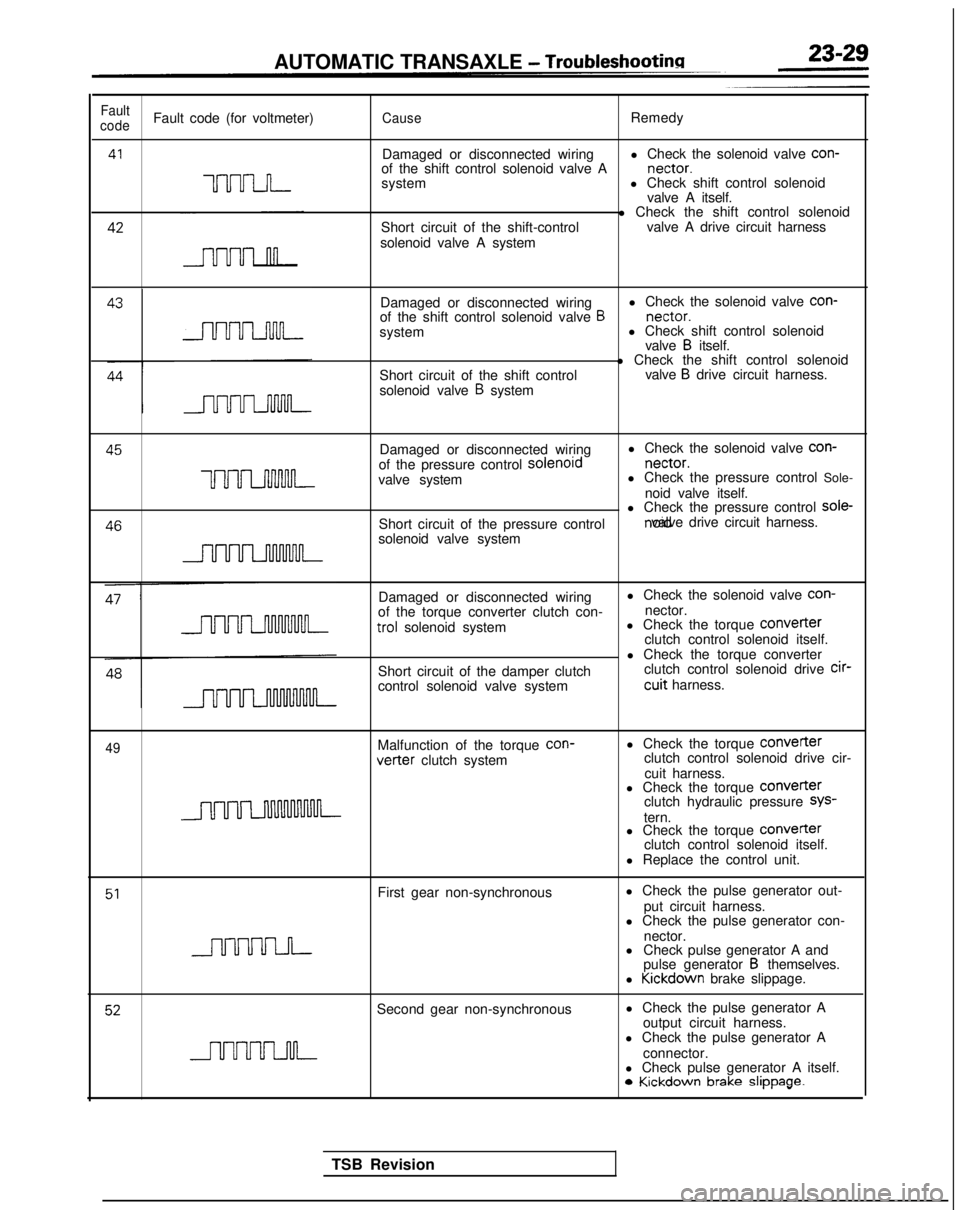
AUTOMATIC TRANSAXLE - Troubleshootina
Fault
codeFault code (for voltmeter)CauseRemedy
41
UUU-LJ-I-
Damaged or disconnected wiring l Check the solenoid valve con-
of the shift control solenoid valve A nectar.
system l Check shift control solenoid
valve A itself. 42
Short circuit of the shift-control
solenoid valve A system l Check the shift control solenoid
valve A drive circuit harness
Damaged or disconnected wiring l Check the solenoid valve con-
of the shift control solenoid valve
B nectar.
system l Check shift control solenoid
valve
B itself.
Short circuit of the shift control
solenoid valve
B system l Check the shift control solenoid
valve
B drive circuit harness. 45
Damaged or disconnected wiringl Check the solenoid valve con-
of the pressure control solenord nectar.
uuuLnnnM-valve system
l Check the pressure control Sole-
noid valve itself. 46
l Check the pressure control sole-
Short circuit of the pressure control noid valve drive circuit harness.
solenoid valve system
Damaged or disconnected wiring
of the torque converter clutch con- trol
solenoid system
Short circuit of the damper clutch
control solenoid valve system l Check the solenoid valve con-
nector.
l Check the torque COnVeIter
clutch control solenoid itself.
l Check the torque converter clutch control solenoid drive cir-
cuit harness.
49Malfunction of the torque
con-vetter clutch system
l Check the torque
Converterclutch control solenoid drive cir-
cuit harness.
l Check the torque
COnVeITerclutch hydraulic pressure SYS-
tern.
l Check the torque COnVerter
clutch control solenoid itself.
l Replace the control unit.
51First gear non-synchronous l Check the pulse generator out-
put circuit harness.
l Check the pulse generator con-
nector.
l Check pulse generator A and
pulse generator
B themselves.
l Kickdown
brake slippage.
52Second gear non-synchronous l Check the pulse generator A
output circuit harness.
l Check the pulse generator A
connector.
l Check pulse generator A itself. 0
Kickdown brake slippage.
TSB Revision
Page 736 of 1273
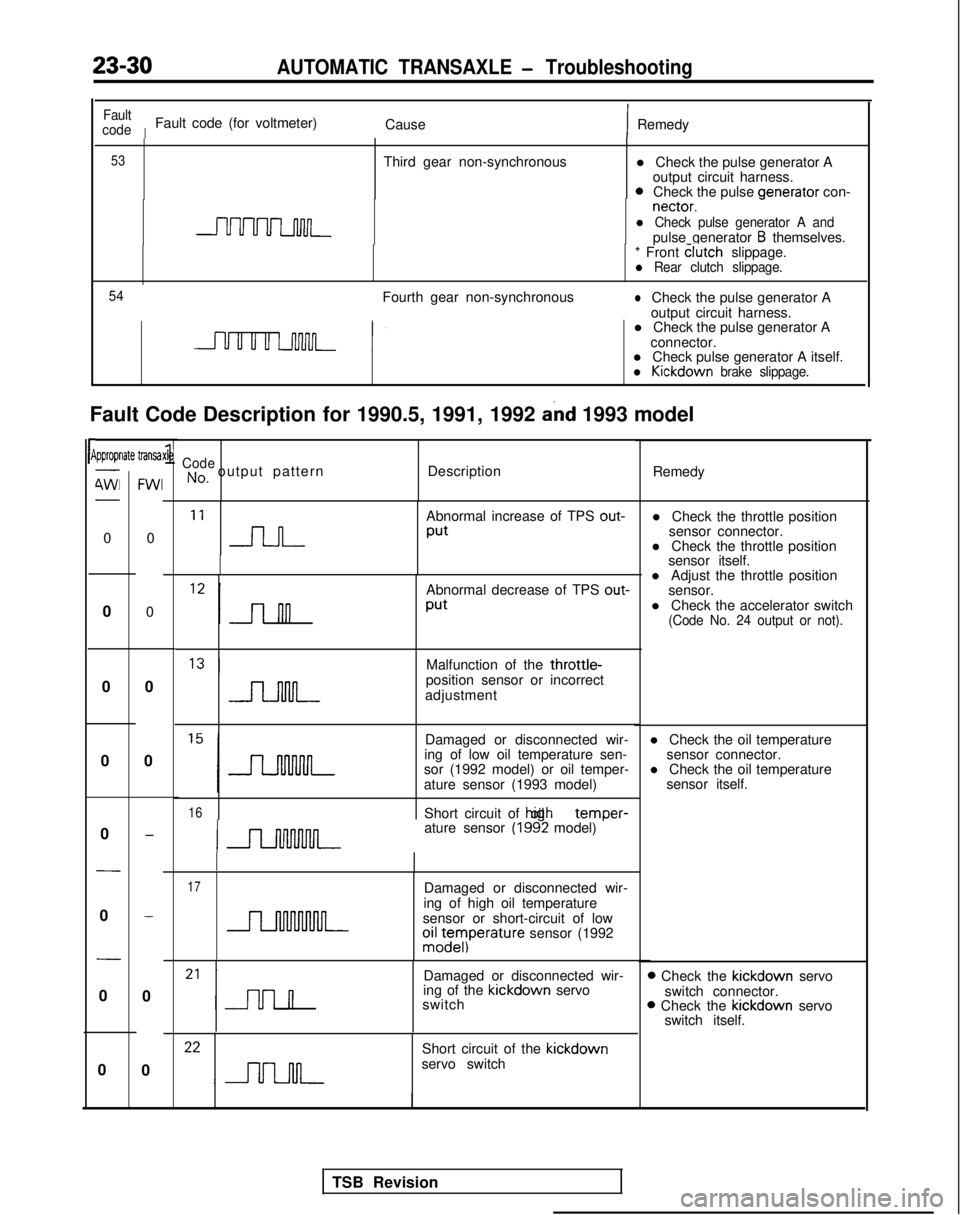
23-30AUTOMATIC TRANSAXLE - Troubleshooting
l Check the pulse generator Aoutput circuit harness.
0Check the pulse venerator
con- nectar.
-l Check pulse generator A andpulse generator B themselves.
Fault Code Description for 1990.5, 1991, 1992
and 1993 model
rP
Fault
code
IFault code (for voltmeter) CauseIRemedy
53Third gear non-synchronous
* Front clutch
slippage.
l Rear clutch slippage.
54
Fourth gear non-synchronouslCheck the pulse generator A
output circuit harness.
l Check the pulse generator A
connector.
l Check pulse generator A itself.
l Kickdown brake slippage.
ipproprlate transa-
4Wl-
0
0
0
0
0
-
0
-
0
0
FWI
0
0
0
0
-
-
0
0
xle1CodeNo, output pattern Description
Remedy
‘I n
Abnormal increase of TPS out-
Put
Abnormal decrease of TPS out-
Put
l Adjust the throttle position
sensor.
l Check the accelerator switch
(Code No. 24 output or not).
Malfunction of the throttle-position sensor or incorrect
adjustment
Damaged or disconnected wir-
ing of low oil temperature sen- l Check the oil temperature
sensor connector.
sor (1992 model) or oil temper- l Check the oil temperature
ature sensor (1993 model) sensor itself.
16Short circuit of hiah oil temDer-
ature sensor (1992 model) ’
17Damaged or disconnected wir-
ing of high oil temperature
sensor or short-circuit of low
oiz;eyIperature sensor (1992
Damaged or disconnected wir-
ing of the kickdown
servo
switch
Short circuit of the kickdown
servo switch l Check the throttle position
sensor connector.
l Check the throttle position sensor itself.
D Check the kickdown
servo
switch connector.
B Check the kickdown
servo
switch itself.
TSB Revision
Page 737 of 1273
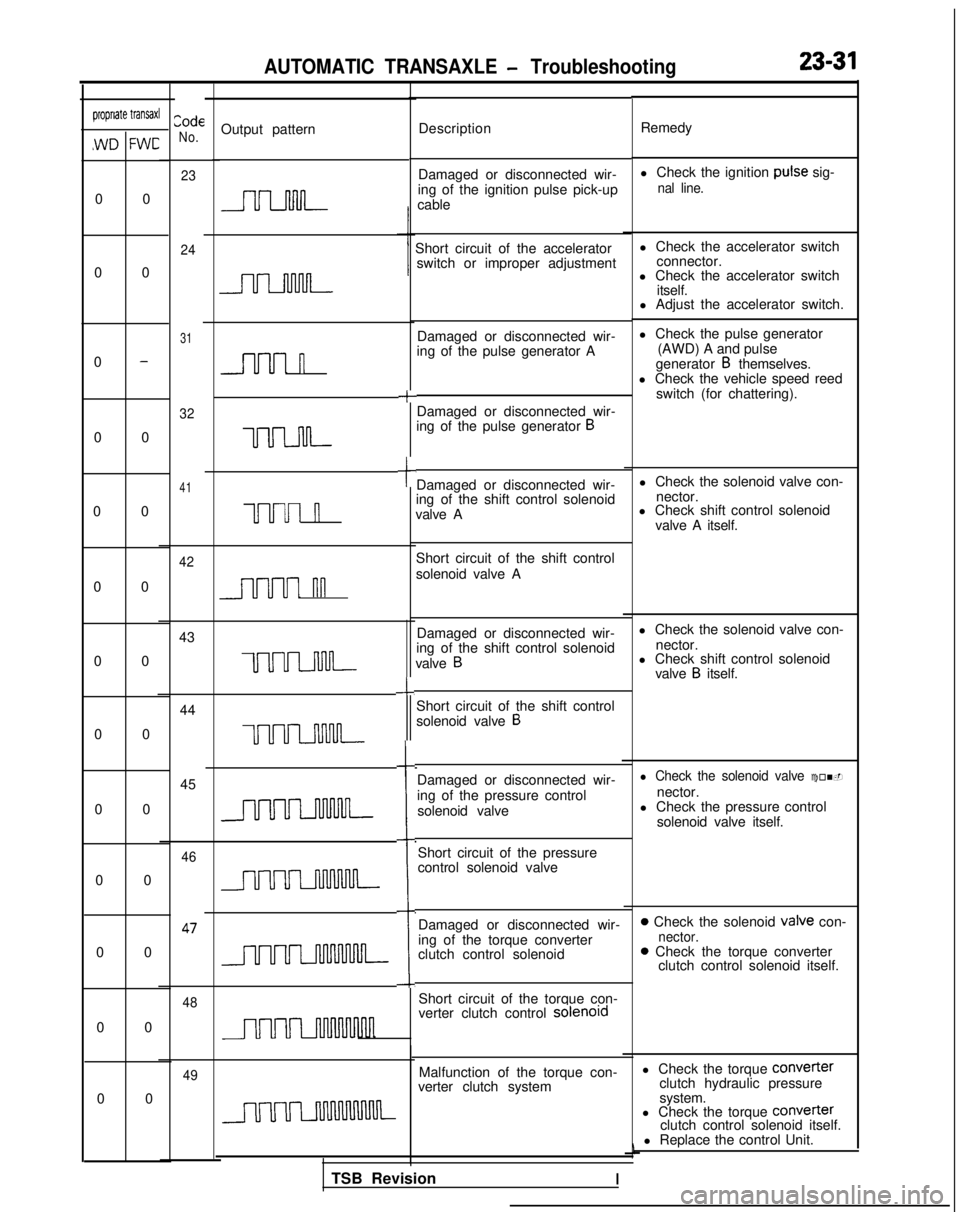
AUTOMATIC TRANSAXLE - Troubleshooting23-31
CodeNo.propriate transaxl
,WD FWC
Output pattern Description Remedy
Damaged or disconnected wir-
ing of the ignition pulse pick-up
cable l Check the ignition
puke sig-
nal line.
Short circuit of the accelerator
l Check the accelerator switch
switch or improper adjustment connector.
l Check the accelerator switch
itself.
l Adjust the accelerator switch.
Damaged or disconnected wir-
ing of the pulse generator A
+
l Check the pulse generator
(AWD) A and pulse
generator
B themselves.
l Check the vehicle speed reed
switch (for chattering).
Damaged or disconnected wir-
ing of the pulse generator
B
tDamaged or disconnected wir-
ing of the shift control solenoid
valve A l Check the solenoid valve con-
nector.
l Check shift control solenoid
valve A itself.
Short circuit of the shift control
solenoid valve A
Damaged or disconnected wir-
ing of the shift control solenoid
valve
B
l Check the solenoid valve con- nector.
-L
l Check shift control solenoidvalve B itself.
Short circuit of the shift control
solenoid valve
B
i
Damaged or disconnected wir-
ing of the pressure control solenoid valvel Check the solenoid valve con-
nector.
l Check the pressure control
solenoid valve itself.
Short circuit of the pressure
control solenoid valve
Damaged or disconnected wir-
ing of the torque converter
clutch control solenoid
0 Check the solenoid valve con-nector.0 Check the torque converter clutch control solenoid itself.
Short circuit of the torque con-
verter clutch control solenord
Malfunction of the torque con-
verter clutch system l Check the torque COnVefter
clutch hydraulic pressure
system.
0 0
0 0
0
-
0 0
0 0
0 00 00 0
0 0 0 0
0 0
0 00 0
23
24
31
32
41
n
uuuul
UUUI n
42
nn
43
uum
44 45
uum
46 47
48
TSB RevisionI
l Check the torque
Converter
clutch control solenoid itself.
l Replace the control Unit.
49
Page 738 of 1273
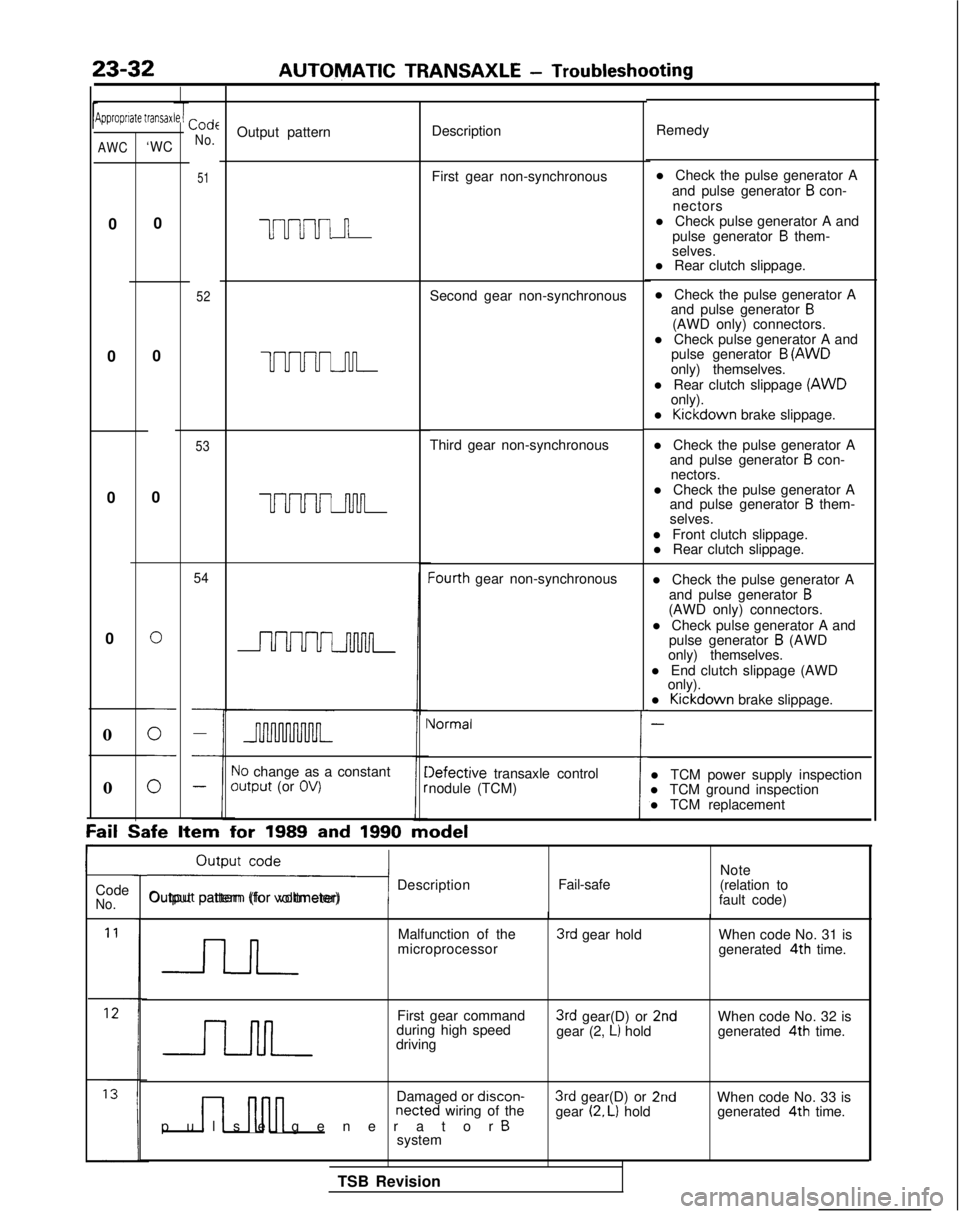
23-32AUTOMATIC TRANSAXLE
- Troubleshooting
Jipproprrate transaxCode
No.Output pattern Description
Remedy
51First gear non-synchronous
uuuul n
52Second gear non-synchronous l Check the pulse generator A
and pulse generator
B con-
nectors
l Check pulse generator A and pulse generator
B them-
selves.
l Rear clutch slippage.
l Check the pulse generator A and pulse generator
B(AWD only) connectors.
l Check pulse generator A and pulse generator
B (AWD
only) themselves.
l Rear clutch slippage (AWD
only).
l Kickdown
brake slippage.
l Check the pulse generator A and pulse generator
B con-
nectors.
l Check the pulse generator A and pulse generator
B them-
selves.
l Front clutch slippage. l Rear clutch slippage.
l Check the pulse generator A and pulse generator
B(AWD only) connectors.
l Check pulse generator A and pulse generator
B (AWD
only) themselves.
l End clutch slippage (AWD only).
l Kickdown
brake slippage.
-
l TCM power supply inspection
l TCM ground inspection
l TCM replacement
AWC‘WC
0
0 0
0
0
UUUUJ-u-l-
53Third gear non-synchronous
0
0
UUUUuwL
54Iourth gear non-synchronous
0
i
Vormal
10 change as a constantoutput (or OV)Iefective transaxle control
nodule (TCM)
0
Fail Safe
Item for
1989 and 1990 model
ri Description
Output pattern (for voltmeter) Fail-safeNote
(relation to
fault code)
Code
No.
Malfunction of the
microprocessor3rd gear hold When code No. 31 is
generated 4th
time.
First gear command
during high speed
driving
3rd gear(D) or 2ndgear (2, L) hold When code No. 32 is
generated 4th
time.
n nnn
Damaged or discon-netted wiring of the
pulse generator Bsystem
3rd gear(D) or 2ndgear (2. L) hold When code No. 33 is
generated 4th
time.
TSB Revision