1989 FORD FIESTA adding oil
[x] Cancel search: adding oilPage 11 of 296

filter; if the additional working clearance is
required, remove also the auxiliary drivebelt
cover.
7Being careful not to touch the hot exhaust
components, place the drain pan under the
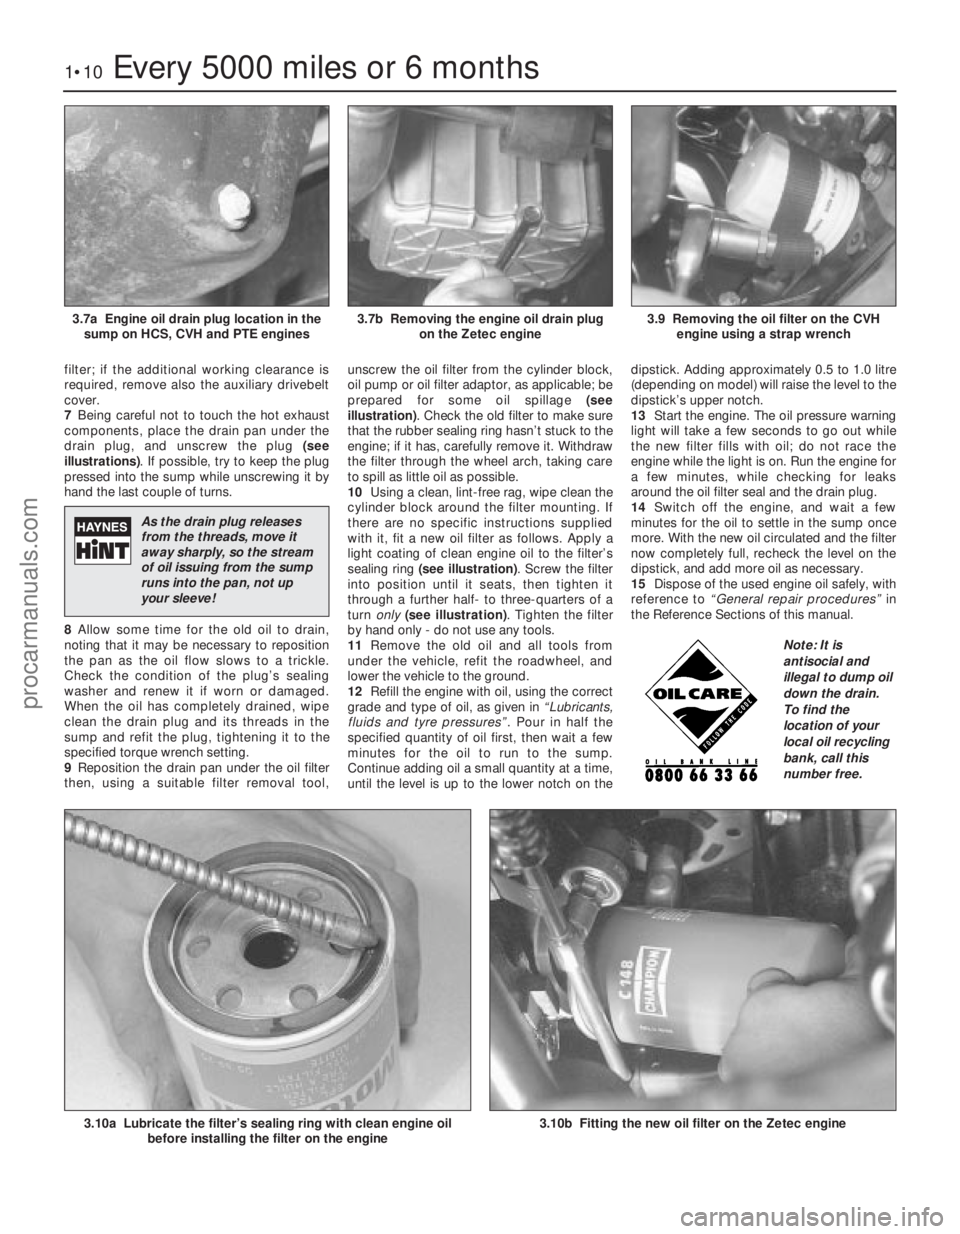
drain plug, and unscrew the plug (see
illustrations) . If possible, try to keep the plug
pressed into the sump while unscrewing it by
hand the last couple of turns.
8 Allow some time for the old oil to drain,
noting that it may be necessary to reposition
the pan as the oil flow slows to a trickle.
Check the condition of the plug’s sealing
washer and renew it if worn or damaged.
When the oil has completely drained, wipe
clean the drain plug and its threads in the
sump and refit the plug, tightening it to the
specified torque wrench setting.
9 Reposition the drain pan under the oil filter
then, using a suitable filter removal tool, unscrew the oil filter from the cylinder block,
oil pump or oil filter adaptor, as applicable; be
prepared for some oil spillage
(see
illustration) . Check the old filter to make sure
that the rubber sealing ring hasn’t stuck to the
engine; if it has, carefully remove it. Withdraw
the filter through the wheel arch, taking care
to spill as little oil as possible.
10 Using a clean, lint-free rag, wipe clean the
cylinder block around the filter mounting. If
there are no specific instructions supplied
with it, fit a new oil filter as follows. Apply a
light coating of clean engine oil to the filter’s
sealing ring (see illustration) . Screw the filter
into position until it seats, then tighten it
through a further half- to three-quarters of a
turn only (see illustration) . Tighten the filter
by hand only - do not use any tools.
11 Remove the old oil and all tools from
under the vehicle, refit the roadwheel, and
lower the vehicle to the ground.
12 Refill the engine with oil, using the correct
grade and type of oil, as given in “Lubricants,
fluids and tyre pressures” . Pour in half the
specified quantity of oil first, then wait a few
minutes for the oil to run to the sump.
Continue adding oil a small quantity at a time,
until the level is up to the lower notch on the dipstick. Adding approximately 0.5 to 1.0 litre
(depending on model) will raise the level to the
dipstick’s upper notch.
13
Start the engine. The oil pressure warning
light will take a few seconds to go out while
the new filter fills with oil; do not race the
engine while the light is on. Run the engine for
a few minutes, while checking for leaks
around the oil filter seal and the drain plug.
14 Switch off the engine, and wait a few
minutes for the oil to settle in the sump once
more. With the new oil circulated and the filter
now completely full, recheck the level on the
dipstick, and add more oil as necessary.
15 Dispose of the used engine oil safely, with
reference to “General repair procedures” in
the Reference Sections of this manual.
1•10Every 5000 miles or 6 months
3.10b Fitting the new oil filter on the Zetec engine 3.10a Lubricate the filter’s sealing ring with clean engine oil before installing the filter on the engine
3.9 Removing the oil filter on the CVHengine using a strap wrench3.7b Removing the engine oil drain plug on the Zetec engine3.7a Engine oil drain plug location in thesump on HCS, CVH and PTE engines
1595Ford Fiesta Remake
Note: It is
antisocial and
illegal to dump oil
down the drain.
To find the
location of your
local oil recycling
bank, call this
number free.
As the drain plug releases
from the threads, move it
away sharply, so the stream
of oil issuing from the sump
runs into the pan, not up
your sleeve!
procarmanuals.com
http://vnx.su
Page 98 of 296

Before adding antifreeze, check all hoses
and hose connections, because antifreeze
tends to leak through very small openings.
Engines don’t normally consume coolant, so if
the level falls regularly, find the cause and
correct it. The exact mixture of antifreeze-to-water
which you should use depends on the relative
weather conditions. The mixture should
contain at least 40% antifreeze, but not more
than 70%. Consult the mixture ratio chart on
the antifreeze container before adding
coolant. Hydrometers are available at most
automotive accessory shops to test the
coolant. Use only good-quality ethylene-
glycol-based antifreeze which meets the
vehicle manufacturer’s specifications.
3 Cooling system hoses -
disconnection and renewal
1
Note: Refer to the warnings given in Section 1
of this Chapter before starting work.
1 If the checks described in Chapter 1 reveal
a faulty hose, it must be renewed as follows.
2 First drain the cooling system (see Chap-
ter 1); if the antifreeze is not due for renewal,
the drained coolant may be re-used, if it is
collected in a clean container.
3 To disconnect any hose, use a pair of pliers
to release the spring clamps (or a screwdriver
to slacken screw-type clamps), then move
them along the hose clear of the union.
Carefully work the hose off its stubs. The
hoses can be removed with relative ease
when new - on an older car, they may have
stuck.
4 If a hose proves stubborn, try to release it
by rotating it on its unions before attempting
to work it off. Gently prise the end of the hose
with a blunt instrument (such as a flat-bladed
screwdriver), but do not apply too much force,
and take care not to damage the pipe stubs or
hoses. Note in particular that the radiator hose
unions are fragile; do not use excessive force
when attempting to remove the hoses.
5 When refitting a hose, first slide the clamps
onto the hose, then work the hose onto its
unions. 6
Work each hose end fully onto its union,
then check that the hose is settled correctly
and is properly routed. Slide each clip along
the hose until it is behind the union flared end,
before tightening it securely.
7 Refill the system with coolant (see Chap-
ter 1).
8 Check carefully for leaks as soon as
possible after disturbing any part of the
cooling system.
4 Thermostat -
removal, testing and refitting
1
Note: Refer to the warnings given in Section 1
of this Chapter before starting work.
Removal
1 Disconnect the battery negative (earth) lead
(refer to Chapter 5A, Section 1).
2 Drain the cooling system (see Chapter 1).
3 Refer to the relevant Part of Chapter 4 and
remove the air cleaner or air inlet hoses,
according to engine type as necessary, to
gain access to the thermostat housing.
HCS, CVH and PTE engines
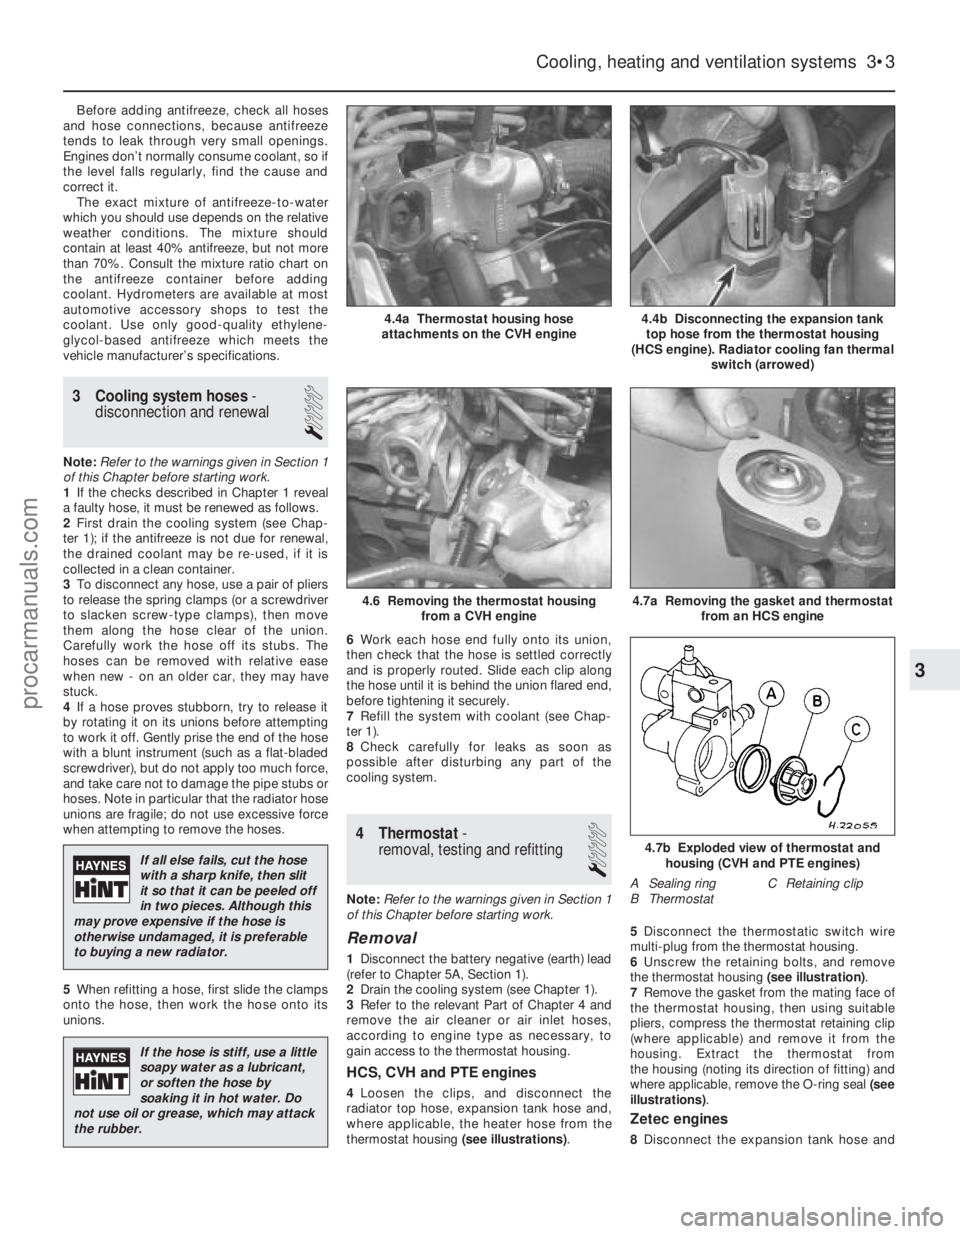
4 Loosen the clips, and disconnect the
radiator top hose, expansion tank hose and,
where applicable, the heater hose from the
thermostat housing (see illustrations).5
Disconnect the thermostatic switch wire
multi-plug from the thermostat housing.
6 Unscrew the retaining bolts, and remove
the thermostat housing (see illustration).
7 Remove the gasket from the mating face of
the thermostat housing, then using suitable
pliers, compress the thermostat retaining clip
(where applicable) and remove it from the
housing. Extract the thermostat from
the housing (noting its direction of fitting) and
where applicable, remove the O-ring seal (see
illustrations) .
Zetec engines
8Disconnect the expansion tank hose and
Cooling, heating and ventilation systems 3•3
4.4b Disconnecting the expansion tank
top hose from the thermostat housing
(HCS engine). Radiator cooling fan thermal switch (arrowed)4.4a Thermostat housing hose
attachments on the CVH engine
4.7b Exploded view of thermostat and housing (CVH and PTE engines)
A Sealing ring C Retaining clip
B Thermostat
4.7a Removing the gasket and thermostat from an HCS engine4.6 Removing the thermostat housingfrom a CVH engine
3
1595Ford Fiesta Remake
If all else fails, cut the hose
with a sharp knife, then slit
it so that it can be peeled off
in two pieces. Although this
may prove expensive if the hose is
otherwise undamaged, it is preferable
to buying a new radiator.
If the hose is stiff, use a little
soapy water as a lubricant,
or soften the hose by
soaking it in hot water. Do
not use oil or grease, which may attack
the rubber.
procarmanuals.com
http://vnx.su