1988 PONTIAC FIERO fuel pump
[x] Cancel search: fuel pumpPage 663 of 1825

6E3-A-"I 2.8L (VlN S) DRIVEABILITY AND EMlSSlONS
TO OIL PRESS. SW.
&FUEL PUMP RELAY
FUSE
81 HOLDER BATTERY 12 V .. m.. . n.
. . . . . . . . FUSIBLE LINK
439 PNWBLK
419 BRNNVHT
SERIAL
DATA
451
WHTJBLK
450 BLKNVHT
ALDL CONNECTOR
NO "SERVICE ENGlNE SOON" "LIGHT
2.8b (VIM 5) 'T" "SERIES (PORT)
Circuit Description:
There should always be a steady "Service Engine Soon" light when the ignition is "ON" and engine stopped.
Battery is supplied directly to the light bulb. The electronic control module
(ECNI) will control the light and
turn it "ON" by providing a ground path through CKT 419 to the ECM.
Test Description: Numbers below refer to circled
numbers on the diagnostic chart.
1. If the fuse in holder is blown refer to facing page of
Code
54 for complete circuit.
2. Using a test light connected to 12 volts probe each
of the system ground circuits to be sure a good
ground is present. See ECM terminal end view in
front of this section for
ECM pin locations of
ground circuits.
Diagnostic Aids:
Engine runs OK, check:
@ Faulty light bulb.
@ CKT 419 open.
@ Gage fuse blown.
This will result in no oil or
generator lights, seat belt reminder, etc. Engine
cranks but will not run.
@ Continuous battery - fuse or fusible link open.
@ ECM ignition fuse open.
@ Battery CKT 340 to ECM open.
@ Ignition CKT 439 to ECM open.
e Poor connection to ECM.
Solenoids and relays are turned "ON"
and "OFF"
by the ECM, using internal electronic switches called
"drivers". Each driver is part of a group of four called
"Quad-Drivers". Failure of one driver can damage
any other driver in the set. Solenoid and relay coil
resistance must measure more than 20 ohms. Less
resistance will cause early failure of the ECM
"driver".
Before replacing ECM, be sure to check the coil
resistance of all solenoids and relays controlled by the
ECM. See ECM wiring diagram for the
solenoid(s)
and relay(s) and the coil terminal identification.
Page 665 of 1825
6E3-A-92 2.8b (VIN SI DRIVEABILITY AND EMISSIONS
TO OIL PRESS. SW.
&FUEL PUMP RELAY
FUSE
& HOLDER BATTERY 12
V
.. am.. . FUSIBLE LINK 15 WAY
439
PNWBLK
- 419 BUNNVHT
SERIAL DATA
451
WHTIBLK
450 BLWHT
ALDL CONNECTOR
CHART A-2
NO ALDL OR WONT FLASH CODE 12
""SERVICE ENGlNE SOON" MGHT ""8N13SPEADY
2.8L (VIN S) ""FYSERlES (PORT)
Circuit Description:
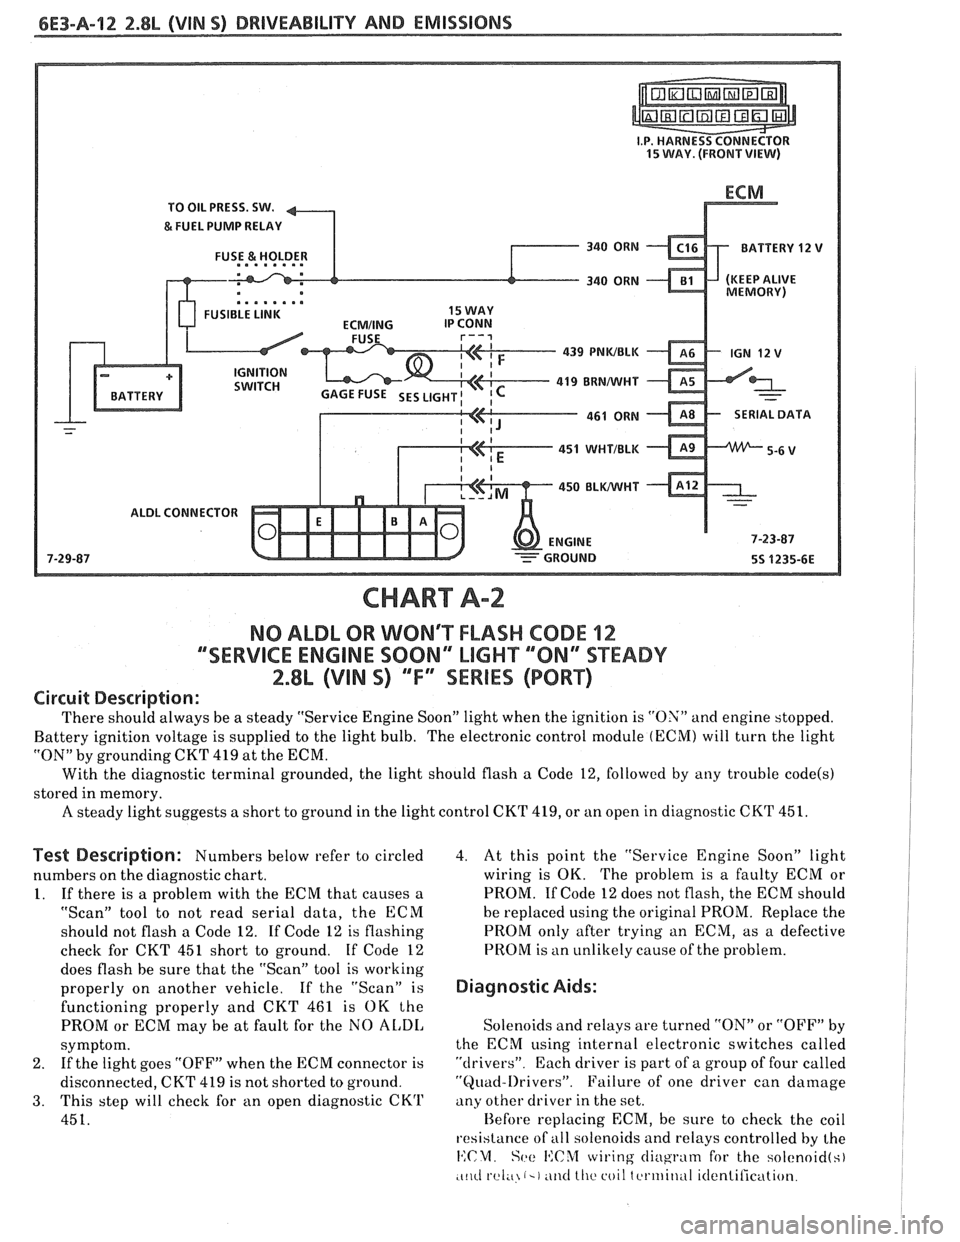
There should always be a steady "Service Engine Soon" light when the ignition is "ON" and engine stopped.
Battery ignition voltage is supplied to the light bulb. The electronic control module
(ECM) will turn the light
"ON" by grounding CKT
419 at the ECM.
With the diagnostic terminal grounded, the light should flash
a Code 12, followed by any trouble code(s)
stored in memory.
A steady light suggests a short to ground in the light control CKT 419, or an open in diagnostic CKT 451.
Test Description: Numbers below refer to circled
numbers on the diagnostic chart.
1. If there is a problem with the ECM that causes a
"Scan" tool to not read serial data, the ECM
should not flash a Code 12. If Code 12 is flashing
check for CKT
451 short to ground. If Code 12
does flash be sure that the "Scan" tool is working
properly on another vehicle. If the "Scan" is
functioning properly and CKT 461 is OK the
PROM or ECM may be at fault for the NO
AL,DI,
symptom.
2. If
the light goes "OFF" when the ECM connector is
disconnected, CKT 419 is not shorted to ground.
3. This step will check for an open diagnostic CKrl'
451.
4. At this point the "Service Engine Soon" light
wiring is OK. The problem is a faulty ECM or
PROM. If Code 12 does not flash, the ECM should
he replaced using the original PROM. Replace the
PROM only after trying an ECM, as a defective
PROM is an unlikely cause of the problem.
Diagnostic Aids:
Solenoids and relays are turned "ON" or "OFF" by
the ECM using internal electronic switches called
"drivers". Each driver is part of a group of four called
"Quad-l)rivers". Failure of one driver can damage
any other driver in the set.
Hefore replacing ECM, be sure to check the coil
resistance of
all solenoids and relays controlled by the
14:CM. Set: I':C%f wiring cliugrntn for the solcnoid(s)
.c~~cl rel;~ (-1 ~ititl lllc coil tcrtriitlul itlentilication.
Page 671 of 1825
6E3-A-I8 2.8b (VIN 5) DRIVEABILITY AND EMISSIONS
PUMP INLET FILTER
IN-TANK PUMP
FUEL
PRESSURE CONNECTOR
CHART A-7
(Page 4 of 2)
FUEL SYSTEM DsAGNOSBS
2.8L (VIN S) ""FYSERBES (PORT)
Circuit Description:
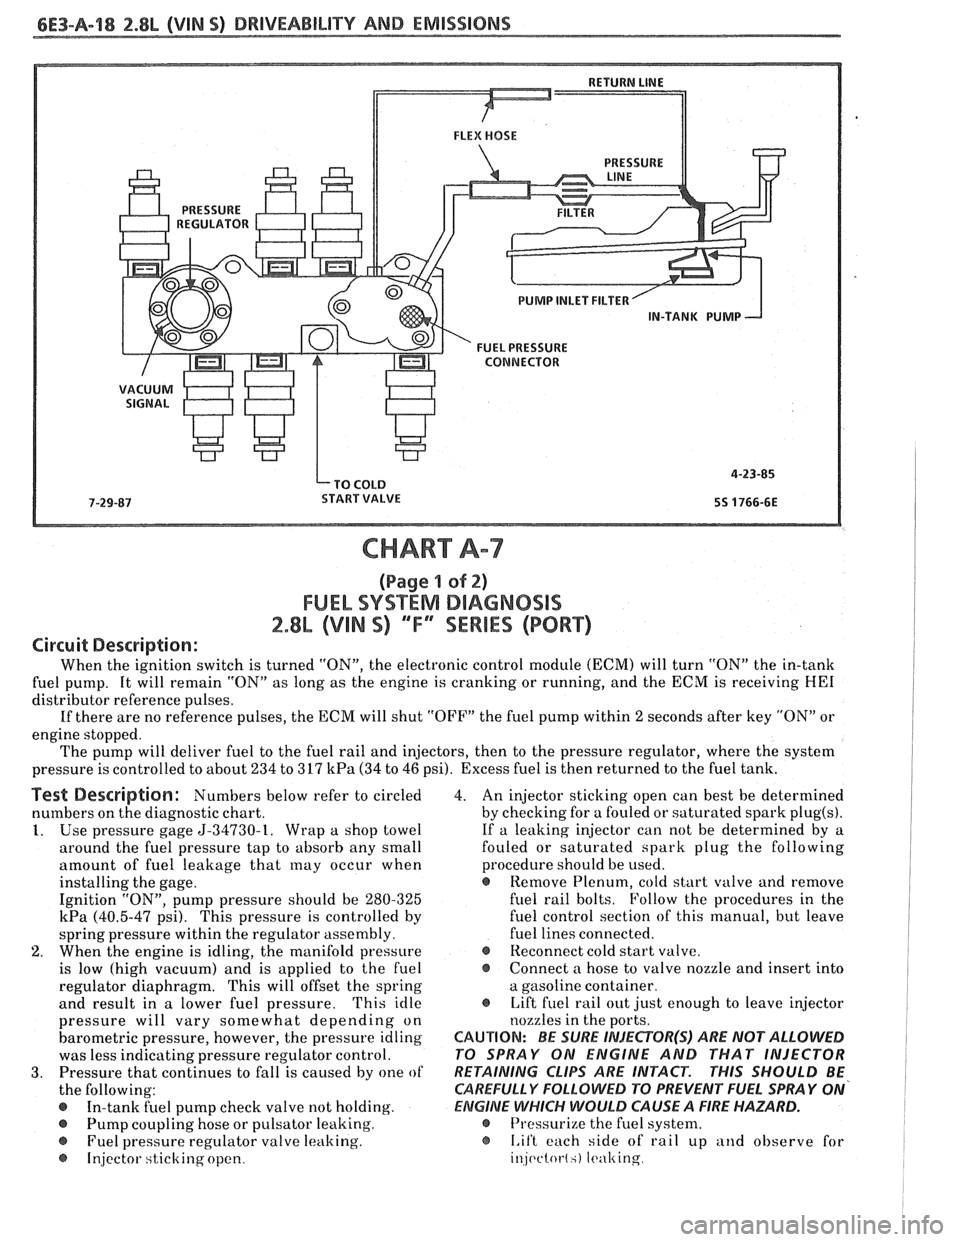
When the ignition switch is turned "ON", the electronic control module (ECM) will turn "ON" the in-tank
fuel pump. It will remain "ON" as long as the engine is cranking or running, and the ECM is receiving
HE1
distributor reference pulses.
If there are no reference pulses, the ECM will shut "OFF" the fuel pump within
2 seconds after key "ON" or
engine stopped.
The pump will deliver fuel to the fuel rail and injectors, then to the pressure regulator, where the system
pressure is controlled to about 234 to 317
kPa (34 to 46 psi). Excess fuel is then returned to the fuel tank.
Test Description: Numbers below refer to circled
numbers on the diagnostic chart.
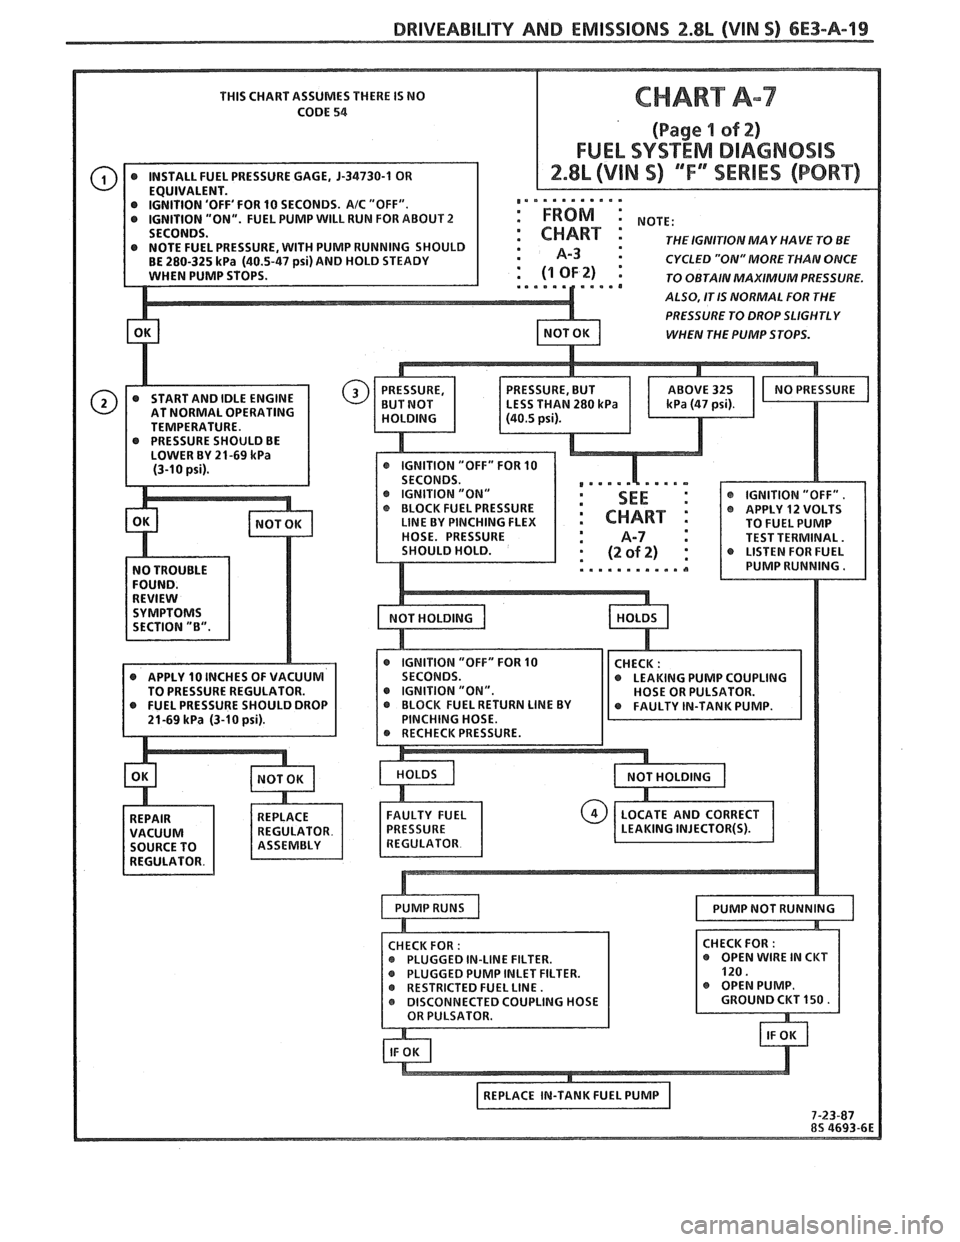
1. Use pressure gage 5-34730-1. Wrap a shop towel
around the fuel pressure tap to absorb any small
amount of fuel leakage that
may occur when
installing the gage.
Ignition "ON", pump pressure should be 280-325
kPa (40.5-47 psi). This pressure is controlled by
spring pressure within the regulator assembly.
2. When the engine is idling, the manifold pressure
is low (high vacuum) and is applied to the fuel
regulator diaphragm. This will offset the spring
and result in a lower fuel pressure.
'This idle
pressure will vary somewhat depending on
barometric pressure, however, the pressure idling
was less indicating pressure regulator control.
3. Pressure that continues to fall is caused by one of
the following:
In-tank fuel pump check valve not holding.
@ Pump coupling hose or pulsator leaking.
Fuel pressure regulator valve leaking.
@ Injector sticking open. 4.
An injector sticking open can best be determined
by checking for a fouled or saturated spark
plug(s).
If a leaking injector can not be determined by a
fouled or saturated spark plug the following
procedure should be used.
e Remove Plenum, cold start valve and remove
fuel rail bolts. Follow the procedures in the
fuel control section of this manual, but leave
fuel lines connected.
@ Reconnect cold start valve.
@ Connect a hose to valve nozzle and insert into
a gasoline container.
@ Lift fuel rail out just enough to leave injector
nozzles in the ports.
CAUTION: BE SURE INJEePOR(S) ARE NOT ALLOWED
PO SPRAY ON ENGINE AND THAT INJECTOR
RETAINING
CLIPS ARE INTACT. PHIS SHOULD BE
CAREFULLY
FOLLOWD PO PREVENT FUEL SPRAY ON'
ElZIGlNE WHICH WOULD CAUSE A FIRE HAZARD.
@ Pressurize the fuel system.
@ I.if't each side of rail up and observe for
injc~ctot-l.) It.ulting
Page 672 of 1825
DRIVEABILITY AND EMISSIONS 2.8L (VIN S) 6E3-A-19
THIS CHART ASSUMES THERE IS NO
CODE
54
'OFF' FOR 10 SECONDS. AIC "OFF". ,,. . . . . . . . .'.
"ON". FUEL PUMP WILL RUN FOR ABOUT 2 : FROM :
THE IGNITIONMAY HAVE TO BE : A-3 : CYCLED "ON" MORE THAN ONCE
TO OBTAIN MAXIMUM PRESSURE.
ALSO, IT IS NORMAL FOR THE
PRESSURE TO DROP SLIGHTLY
WHEN THE PUMP STOPS.
AT NORMAL OPERATING
TEMPERATURE.
IGNITION "ON"
@ IGNITION "OFF".
BLOCK FUEL PRESSURE @ APPLY 12 VOLTS LINE BY PINCHING FLEX
TO FUEL PUMP
HOSE. PRESSURE TEST TERMINAL.
@ IGNITION "OFF" FOR 10 @ APPLY 10 INCHES OF VACUUM
LEAKING PUMP COUPLING
TO PRESSURE REGULATOR. @ IGNITION "ON".
INLET FILTER.
Page 673 of 1825
6E3-A-28 2.8b (VIN 9) DRIVEABILITY AND EMISSIONS
PUMP INLET FILTER
IN-TANK PUMP
FUEL PRESSURE CONNECTOR
CHART A-7
(Page 2 sf 2)
FUEL SYSTEM DIAGNOSIS
2.8L (VIN S) ""FYSEWlES (PORT)
Pest Description: Numbers below refer to circled
numbers on the diagnostic chart.
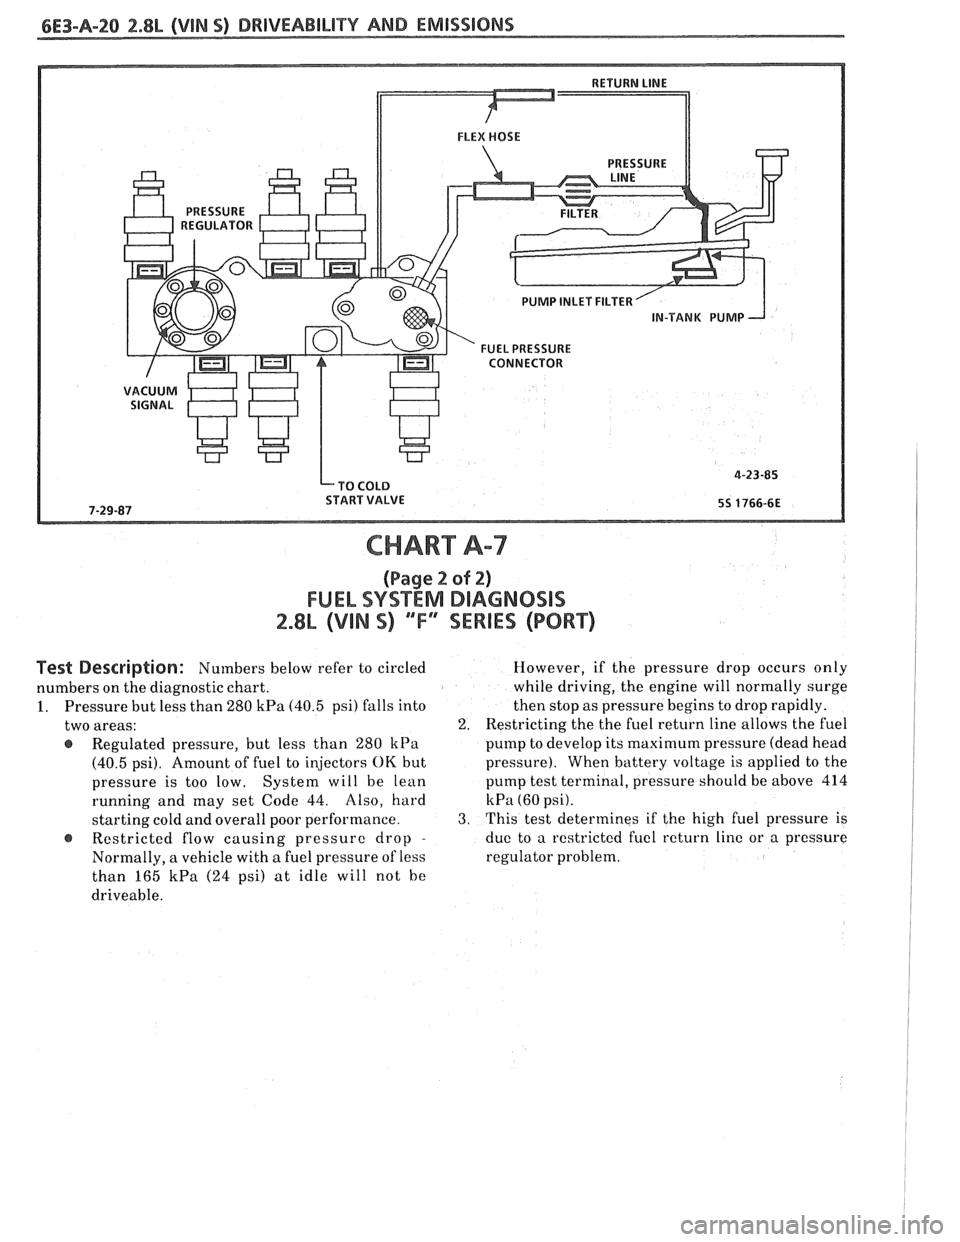
1. Pressure but less than 280
kPa (40.5 psi) falls into
two areas:
@ Regulated pressure, but less than 280 kPa
(40.5 psi). Amount of fuel to injectors OK but
pressure is too low. System will be lean
running and may set Code 44. Also, hard
starting cold and overall poor performance.
Restricted flow causing pressure drop
-
Normally, a vehicle with a fuel pressure of less
than 165
kPa (24 psi) at idle will not he
driveable. However,
if the pressure drop occurs only
while driving, the engine will normally surge
then stop as pressure begins to drop rapidly.
2. Restricting the the fuel return line allows the fuel
pump to develop its
maximum pressure (dead head
pressure). When battery voltage
is applied to the
pump test terminal, pressure should be above 414
kPa (60 psi).
3. This test determines if the high fuel pressure is
due to a restricted fuel return line or a pressure
regulator problem.
Page 703 of 1825
6E3-A-50 2.8L (VIN S) DRIVEABILITY AND EMISSIONS
OXYGEN (02) SENSOR
-
CODE 44
OXYGEN SENSOR CIRCUIT
(LEAN EXHAUST INDICATED)
2.8L (VIN S) "F" "SERIES (PORT)
Circuit Description:
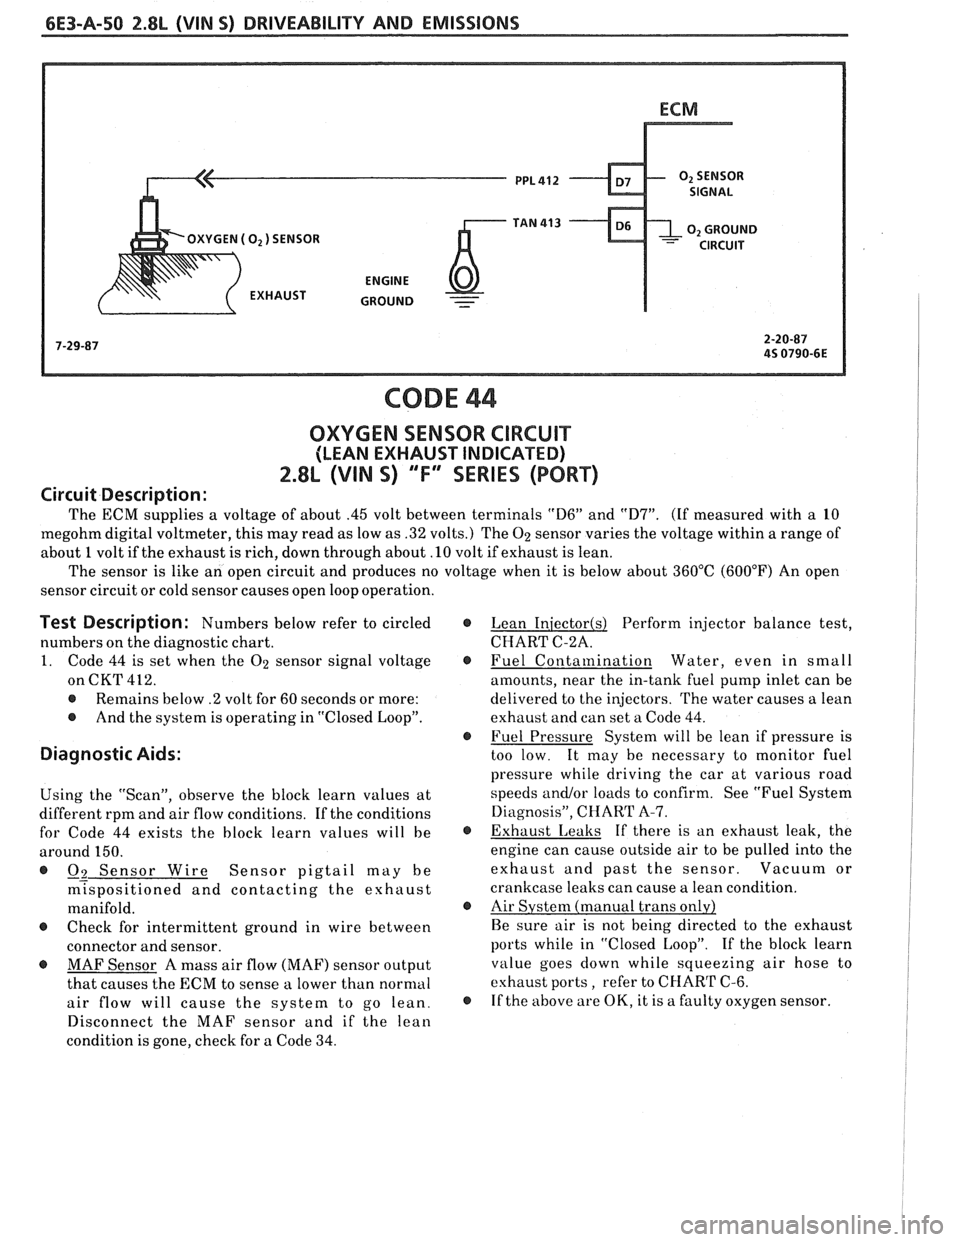
The ECM supplies a voltage of about .45 volt between terminals "D6" and "D7". (If measured with a 10
megohm digital voltmeter, this may read as low as .32 volts.) The
O2 sensor varies the voltage within a range of
about
1 volt if the exhaust is rich, down through about .10 volt if exhaust is lean.
The sensor is like an open circuit and produces no voltage when it is below about 360°C (600°F) An open
sensor circuit or cold sensor causes open loop operation.
Test Description: Numbers below refer to circled
numbers on the diagnostic chart.
1. Code 44 is set when the O2 sensor signal voltage
on CKT 412.
@ Remains below .2 volt for 60 seconds or more:
@ And the system is operating in "Closed Loop".
Diagnostic Aids:
Using the "Scan", observe the block learn values at
different rpm and air flow conditions. If the conditions
for Code 44 exists the block learn values will be
around 150.
@ -- 09 Sensor Wire Sensor pigtail may be
m~spositioned and contacting the exhaust
manifold.
@ Check for intermittent ground in wire between
connector and sensor.
@ MAF Sensor A mass air flow (MAF) sensor output
that causes the ECM to sense a lower than normal
air flow will cause the system to go lean.
Disconnect the MAF sensor and if the lean
condition is gone, check for a Code 34.
@ Lean Iniector(s) Perform injector balance test,
CHART C-2A.
@ Fuel Contamination Water, even in small
amounts, near the in-tank fuel pump inlet can be
delivered to the injectors. The water causes a lean
exhaust and can set a Code 44.
@ Fuel Pressure System will be lean if pressure is
too low. It may be necessary to monitor fuel
pressure while driving the car at various road
speeds
andlor loads to confirm. See "Fuel System
Diagnosis", CHART A-7.
@ Exhaust Leaks If there is an exhaust leak, the
engine can cause outside air to be pulled into the
exhaust and past the sensor. Vacuum or
crankcase leaks can cause a lean condition.
@ Air Systenl (manual trans only)
Be sure air is not being directed to the exhaust
ports while in "Closed Loop". If the block learn
value goes down while squeezing air hose to
exhaust ports, refer to CHART C-6.
@ If the above are OK, it is a faulty oxygen sensor.
Page 707 of 1825
BATTERY + PUMP SWI
439 PNWBLK
CODE 54
FUEL PUMP CIRCUIT
(LOW VOLTAGE)
2.8L (VIM S) ""FYSERIES (PORT)
Circuit Description:
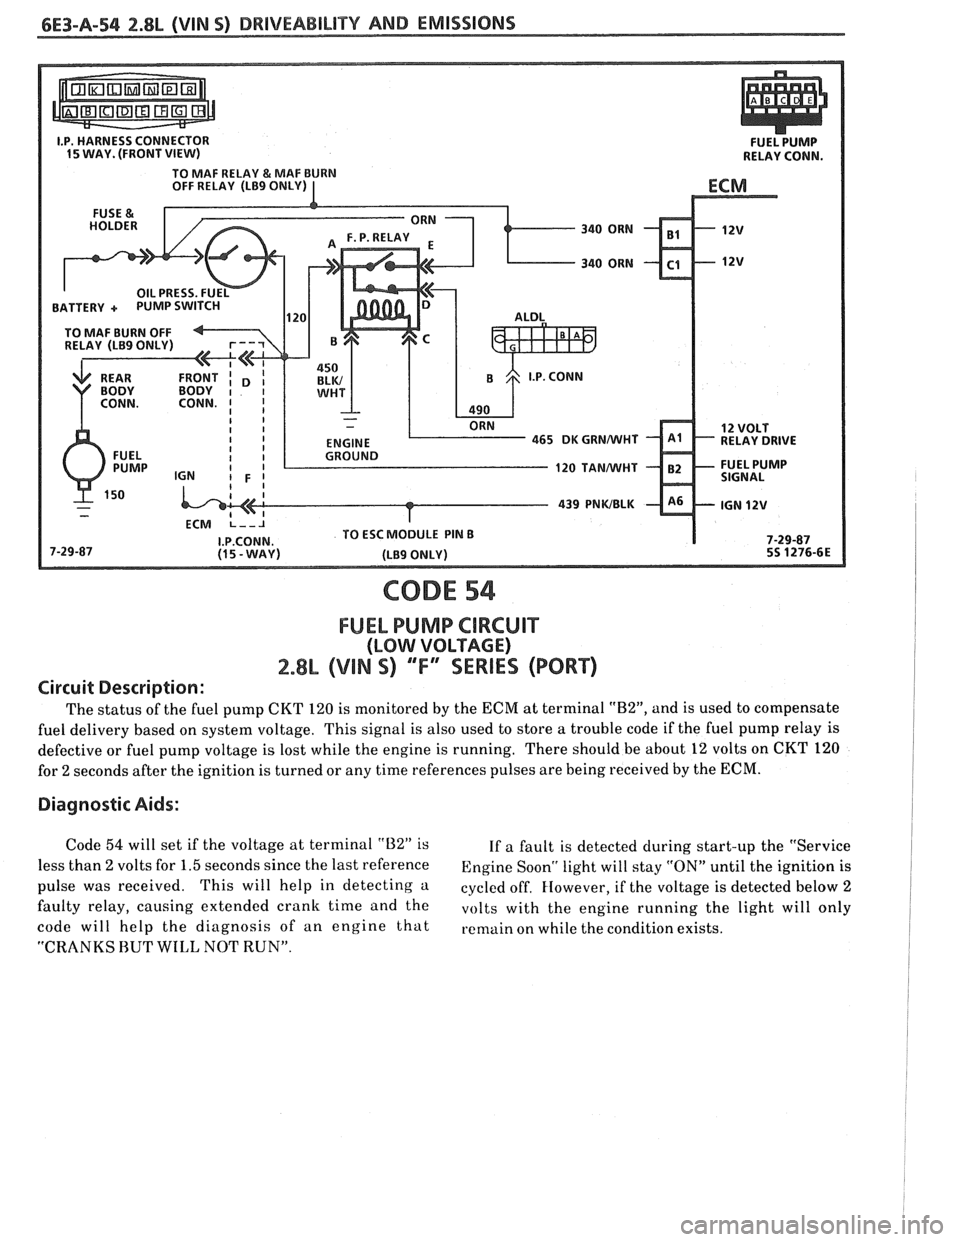
The status of the fuel pump CKT 120 is monitored by the ECM at terminal "B2", and is used to compensate
fuel delivery based on system voltage. This signal is also used to store a trouble code if the fuel pump relay is
defective or fuel pump voltage is lost while the engine is running. There should be about
12 volts on CKT 120
for
2 seconds after the ignition is turned or any time references pulses are being received by the ECM.
Diagnostic Aids:
Code 54 will set if the voltage at terminal "U2" is
If a fault is detected during start-up the "Service
less than
2 volts for 1.5 seconds since the last reference Engine Soonw light will stay "ON" until the ignition is
pulse was received. This will help in detecting a cycled off. However, if the voltage is detected below 2
faulty relay, causing extended cranlc time and the volts with the engine running the light will only
code will help the diagnosis of an engine that remain on while the condition exists.
"CRANKS HUT WILL NOT RUN".
Page 712 of 1825
DRIVEABILITY AND EMISSIONS 2.8L (VIN S) 6E3-B-3
e A faulty in-tank fuel pump check valve will @ If engine starts but then immediately stalls,
allow the fuel in the lines to drain back to the open
distributor by-pass line. If engine then
tank after the engine is stopped. To check for starts
and runs OK, replace pickup coil.
this condition:
@ If engine starts and stalls, disconnect MAF
Perform Fuel System Diagnosis, CHART A-7. sensor. If engine then runs and sensor
@ Remove spark plugs. Check for wet plugs, connections are OK, replace the sensor.
cracks, wear, improper gap, burned
f lectrodes,
or heavy deposits. Repair or replace as
necessary.
HESITATION, SAG, STUMBLE
Definition: Momentary lack of response as the accelerator is pushed down. Can
occur at all car speeds.
Usually most severe when first trying to make the car move, as
from a stop sign. May cause the engine to stall if severe enough.
Perform careful visual check as described at
start of Section
"B".
a CHECK:
- Fuel pressure. See CHART A-7. Also check for
water contaminated fuel.
- Air leaks at air duct between MAF sensor and
throttle body.
- Spark plugs for being fouled or faulty wiring.
- PROM (2.8L) or MEM-CAL (5.OL & 5.7L)
number. Also check service bulletins for latest
MEM-CAL or PROM.
- TPS for binding or sticking. Voltage should
increase at a steady rate as throttle is moved
toward WOT.
- Ignition timing. See Emission Control
Information label.
- Generator output voltage. Repair if less than 9
or more than 16 volts.
- HE1 ground, CKT 453.
- Canister purge system for proper operation.
See CHART C-3.
- EGR - See CHART C-7.
@ Perform injector balance test CHART C-2A.
SURGES AND/OR CHUGGLE
Definition: Engine power variation under steady
throttle or cruise. Feels like the car speeds up and
slows down with no change in the accelerator pedal.
Be sure driver understands transmission
converter clutch and
A/C compressor operation
in Owner's Manual.
e Perform careful visual inspection as described
at start of Section
"B".
CHECK:
- TCC and 4th gear switch operation - See
CHART C-8A.
- Loose or leaking air duct between MAF sensor
and throttle body.
- Generator output voltage. Repair if less than 9
or more than 16 volts.
- EGR - There should be no EGR at idle. See
CHART C-7. Also check for plugged EGR
solenoid filter.
- Vacuum lines for kinks or leaks.
- Ignition timing. See Emission Control
Information label.
- In-line fuel filter. Replace ifdirty or plugged.
- Fuel pressure while condition exists. See
CHART A-7.
@ Inspect oxygen sensor for silicone contamination
from fuel, or use of improper RTV sealant. The
sensor may have a white, powdery coating and
result in a high but false signal voltage (rich
exhaust indication). The ECM will then reduce
the amount of fuel delivered to the engine,
causing a severe driveability problem.
@ Remove spark plugs. Check for cracks, wear,
improper gap, burned electrodes, or heavy
deposits. Also check condition of distributor cap,
rotor, and spark plug wires.
@ To help determine if the condition is caused by a
rich or lean system, the car should be driven at
the speed of the complaint. Monitoring block
learn at the complaint speed will help identify the
cause of the problem. If the system is runnig lean
(block learn greater than
138), refer to
"Diagnostic Aids" on
facing page of Code 44. If
the system is running rich (block learn less than
118), refer to "Diagnostic Aids" on facing page of
Code 45.