1988 PONTIAC FIERO wiring diagram
[x] Cancel search: wiring diagramPage 959 of 1825
INDEX
SECTION PAGE
Cooling Fan Control
................. General Description C12-1
........................ Diagnosis C12-2
........................... Cuts Out B-5
................... Cylinder Select Error A-48
.................... Deceleration Mode C2-3
......................... Detonation B-4
..................... Dieseling. Run On B-6
............. Distributor Reference Signal C1-4
...................... ECM Terminals A-7
.................. ECM Wiring Diagram A3-A6
EGR Control Valve
................. General Description C7-1
................. Valve Identification C7-2
................... Diagnosis. Service C7-2
A-40
.................. EGR Control Solenoid C7-3
......................... EGR Check C7-4
Electronic Control Module
................. General Description C1-1
......................... Diagnosis C1-4
............................ Service C1-5
..................... Function Check C1-7
Electronic Spark Control (ESC) System
................. General Description C5-1
................... Diagnosis. Service C5-4
Electronic Spark Timing EST
............. A-50
A-52
Engine Cranks But Won't Run
............ A-14
........................ Engine Knock C5-4
.......................... ESC Module C5-2
.......................... ESC Sensor C5-1
.................... ESC System Check C5-4
................... ESTllgnition System C4-1
Evaporative Emission Control System
................. General Description C3-1
.......................... Diagnosis C3-2
Exhaust Emissions Excessive (Odors)
....... B-7
Exhaust Gas Recirculation (EGR) System
.... C7-1
Exhaust System Check Restricted
......... B-8
Fuel Control System
................. General Description C2- 1
......................... Diagnosis C2-5
..................... Fuel Cutoff Mode C2-3
SECTION PAGE
Fuel Injectors ........................
Fuel Pressure Connection Assy ............
Fuel Pressure Relief Procedure ...........
Fuel Pump Electrical Circuit .............
Fuel Pump Relay ......................
Fuel Rail
General Description
.................
........................... Service
Fuel System Diagnosis
..................
Fuel System Pressure Test ...............
Fuel Tank Pressure Control Valve .........
.......................... Hard Start B-2
.......... HE1 High Energy Ignition System C4-1
.......................... Hesitation
B-3
............ Idle Air Control System Check C2-20
.................. Idle Air
Control Valve C2-4
......................... Diagnosis C2-5
.................... Ignition System EST C4-1
........ Ignition System Check Integral Coil C4-4
........................ Incorrect Idle B-6
.................. Information Sensors C1.2. 9
.................. Injector
Balance Test C2-18
........................ lntermittents B-2
........................ Knock Sensor C1-3
........................ Lack Of Power B-4
......... Light. Manual Transmission Shift C8-6
.............. Light. Service Engine Soon A-10
MAF Sensor
.................. General Description C1-2
.......................... Diagnosis C1-5
A.42.44. 46
............................ Service C1-8
... Manual Transmission Electrical Diagnosis C8-10
MAT Sensor
.................. General Description C1-2
......................... Diagnosis C1-5
A.34. 38
Page 960 of 1825
INDEX
SECTION
PAGE
MEM -Cal
General Description ................. C1-I
Diagnosis ......................... C1-4
A-60
Service
........................... C1-6
Functional Check
................... C1-7
Minimum
Idle Speed Adjustment ......... C2-12
Misses ............................. 8-5
Negative Backpressure Valve ............ C7-2
No ALDL Data
....................... A- 12
No "Service Engine Soon" Light
.......... A-10
.................... Oil Pressure Switch C2-16
Oxygen Sensor
General Description
.................. C1-3
......................... Diagnosis C1-5
A.24.54. 56
........................... Service C1-8
Park Neutral Switch
General Description
................. C1-3
Diagnosis
.......................... C1-10
C1-5
Service
........................... C1-9
Poor Fuel Economy
.................... B.6.
C5-4
Poor Performance
.................... C5-4
Positive Crankcase Ventilation (PCV)
General Description. Diagnosis
......... C13-1
Service
............................ C13-2
Pressure Regulator
.................... C2-4
........................ Quad Drivers C 1-4
..................... Reference Signal C1-5
.......................... Rough Idle B-6
RunMode .......................... C2-2
RunOn ............................. B-6
SECTION PAGE
................... Sensor Information C1-2-9
"Service Engine Soon" Light On Steady .... A- 12
................... Setting Timing ... . C4-2
.......................... Shift Light C8-6
Sluggish
............................ B-4
......................... Spark Knock B-4
........................ Speed Sensor C8-2
.................. Speedo Buffer Sensor C8-4
Spongy
............................. B-4
............................ Stalling B-6
........................ Starting Mode C2-2
........................... Stumble B-3
Surges
............................. B-3
.................. System Over Voltage A-60
Throttle Body Unit
................. General Description C2-3
........................... Service C2-11
Throttle Position Sensor
................. General Description C1-3
......................... Diagnosis C1-5
A-30
....................... Adjustments C2-12
........................... Service C1-8
Transmission Converter Clutch TCC System
.................. General Description C8-1
......................... Diagnosis C8.2. 4
U
........................ Unstable Idle B-6
V
...................... Vapor Canister C3-1
Vehicle Speed Sensor
.................. General Description C1-3
.......................... Diagnosis C1-5
A-36
Vehicle Anti-Theft System (VATS)
................. General Description A-58
......................... Diagnosis A-59
W
...................... Wiring Diagrams A-3
................... Won't Flash Code 12 A-
12
Sag
.................+............. B-3
......................... "Scan" Data A-8
Page 964 of 1825
DRIVEABILITY AND EMISSIONS - FUEL INJECTION 6E-3
VEHICLE EMISSION CONTROL INFORMATION
MBEL
The Vehicle Emission Control Information label
(Figure
1) contains important emission specifications
and setting procedures. In the upper left corner is
exhaust emission information which identifies the
year, the manufacturing division of the engine, the
displacement in liters of the engine, the class of
vehicle and type of fuel metering. Also there is an
illustrated emission component and vacuum hose
schematic. A similar label is located in the engine
compartment of every General Motors Corporation
vehicle. If the label has been removed, it can be
ordered from the parts division.
(WDDGM)
INTRODUCTION
Electronic Engine Control
Each engine has an electronic engine control
module
(ECM) to control the fuel system. The ECM
varies the
airlfuel ratio by controlling the fuel flow
through the
injectorb).
In addition, the ECM controls the ignition timing
as well as the fuel pump and other systems.
It is important to review the component sections
and wiring diagrams in Section
"6E2" and "6E3" for a
specific engine, to determine what is controlled by the
ECM and what systems are
non-ECM controlled.
What This Section Contains
Each General Motors engine has system controls
to reduce exhaust emissions while maintaining good
driveability and fuel economy. This section explains:
@ Wow to use the Driveability and Emission
Sections
"6E2" for TBI, and "6E3" for Port
Fuel engines.
A brief description of systems used to control
fuel and emissions.
@ Abbreviations that are used in "Driveability
and Emissions".
@ Wiring harness service information for
harnesses used with the ECM.
@ Special tools used to diagnosis and repair a
system. Before
checking the system, observe the following:
Blocking Drive Wheels
The vehicle drive wheels always should be
blocked, and parking brake firmly set, while checking
the system.
Cold Oxygen Sensor
On some engines, the oxygen sensor will cool off
after only a short period of operation at idle. This will
put the system into "Open Loop". To restore "Closed
Loop" operation, run the engine at part throttle and
accelerate from idle to part throttle a few times until
the system goes "Closed Loop".
VlSUAUPHYSlCAL UNDERHOOD
INSPE6"rON
This can often lead to fixing a problem without further
steps. Inspect all vacuum hoses for correct routing,
pinches, cuts, or disconnects. Be sure to inspect hoses
that are difficult to see beneath the air cleaner,
compressor, generator, etc. Inspect all the wires in the
engine compartment for correct and good connections,
burned or chafed spots, pinched wires, or contact with
sharp edges or hot exhaust manifolds. This
visual/physical inspection is very important. It must ,
be done carefully and thoroughly.
BASIC KNOWLEDGE REQUIRED
Before using this section of the service manual,
there are some areas that you should be familiar with.
Without this basic knowledge, you will have trouble
using the diagnostic procedures contained in this
section.
Basic Electric Circuits
You should understand the basic theory of
electricity, and know the meaning of voltage, amps,
ALL NEW GENERAL MOTORS VEHICLES ARE CERTIFIED BY THE UNITED STATES
ENVIRONMENTAL PROTECTION
AGENCY AS CONFORMING TO THE REQUIREMENTS OF THE
REGULATIONS
FOR THE CONTROL OF AIR POLLUTION FROM NEW MOTOR VEHICLES. THlS
CERTIFICATION IS CONTINGENT OM CERTAIN ADJUSTMENTS BEING SET TO FACTORY
STANDARDS. IN MOST CASES, THESE ADJUSTMENT
POINTS EITHER HAVE BEEN
PERMANENTLY SEALED
AND/OR MADE INACCESSIBLE TO PREVENT INDISCRIMINATE OR
ROUTINE ADJUSTMENT IN THE FIELD. FOR
THlS REASON, "TI- FACTORY PROCEDURE FOR
TEMPORARILY REMOVING PLUGS, CAPS, ETC., FOR PURPOSES OF SERVICING THE PRODUCT,
MUST BE STRICTLY FOLLOWED AND, WHEREVER PRACTICABLE, RETURNED
TO WE
ORIGINAL INTENWF THE DESIGN.
Page 965 of 1825
6E-4 DRIVEABILITY AND EMISSIONS - FUEL INJECnON
and ohms. You should understand what happens in a
circuit with an open or a shorted wire. You should be
able to read and understand a wiring diagram. A
short to ground
is referred to as a ground to
distinguish it from a short between wires.
Use of Circuit Testing Tools
You should know how to use a test light, how to
connect and use
a tachometer, and how to use jumper
wires to by-pass components to test circuits. Care
should be taken to not deform the terminal when
testing.
Use of Digital Volt-Ohm Meter (DVM)
You should be familiar with the digital volt-ohm
Meter, particularly essential tool J-29125-A,
J34029A
or equivalent. You should be able to measure voltage,
resistance, and current, and know how to use the
meter correctly.
The digital volt-ohm meter is covered in the
"Special
ToolsJ'portion of this section.
DIAGNOSTIC INFORMATION
The electronic control module (ECM) is equipped
with a self-diagnosis system which detects system
failure and aids the technician by identifying the
circuit at fault via a trouble code. Below is
information about the way the ECM displays a
problem and how this corresponds to a trouble code in
the ECM. The ECM can also indicate an "Open Loop"
or "Closed Loop" mode.
"'Service Engine Soonw Light
This light is on the instrument panel, and has two
functions:
@ It is used to tell the driver that a problem has
occurred, and that the vehicle should be taken for
service as soon as reasonably possible.
@ It is used by the technician to read out "Trouble
CodesJ' to help diagnose system problems.
As a bulb and system check, the light will come
"ON" with the key "ON" and the engine not running.
When the engine is started, the light will turn "OFF".
If the light remains "ONJ', the self-diagnostic system
has detected a problem. If the problem goes away, the
light will go out in most cases after 10 seconds, but a
Trouble Code will remain stored in the ECM.
Intermittent "Service Engine Soon" Light
The diagnostic charts in Section "A" are set up to
check whether or not a stored trouble code is
"intermittent" or "hard". An
"intermittent" code is one which does not
always reset when the code setting parameters are
met, or is not present while you are working on the
vehicle. This is often caused by
a loose connection.
The facing page will contain diagnostic aids to help in
detecting
intermittents.
A "hard" code is one which is present when you
are working on the vehicle and the condition still
exists while working on the vehicle. The chart with
the stored trouble code number will lead you to the
cause of the problem.
Trouble Codes
The engine control module (ECM) is really a
computer. It uses sensors to look at many engine
operating conditions. It has
a memory and it knows
what certain sensor readings should be under certain
conditions. These conditions are described on the
facing page of each Trouble Code chart. If a sensor
reading is not what the ECM thinks it should be, the
ECM will turn "ON" the "Service Engine Soon" light
on the instrument panel, and will store a Trouble Code
in the memory. The Trouble Code tells which circuit
the trouble is in. A circuit consists of a sensor (such as
coolant temperature), the wiring and connectors to it,
and the ECM.
i
To get a Trouble Code out of the ECM, we use the
assembly line diagnostic link (ALDL) connector.
!
ALDL Connector I
I
The assembly line diagnostic link (ALDL) is a
diagnostic connector located in the passenger
compartment (Figure 2). It has terminals which are
used in the assembly plant to check that the engine is
operating properly before it leaves the plant.
Terminal "B" is the Diagnostic terminal, and it can be
connected to terminal
"A", or ground, to enter the
Diagnostic mode, or the Field Service Mode.
The ALDL connector is also used by "ScanJ' tools to
read information from the ECM via the Serial Data
Line. Serial Data information
is used extensively
throughout the manual.
Diagnostic Mode
1
If the Diagnostic terminal is grounded with the
ignition "ON" and the engine stopped, the system will
enter the Diagnostic Mode. In this mode the ECM
will:
1. Display a Code 12 by flashing the "Service Engine
Soon" light (indicating the system is operating). A
Code 12 consists of one flash, followed by a short
pause, then two flashes in quick succession. This
code will be flashed three times. If no other codes
Page 1036 of 1825
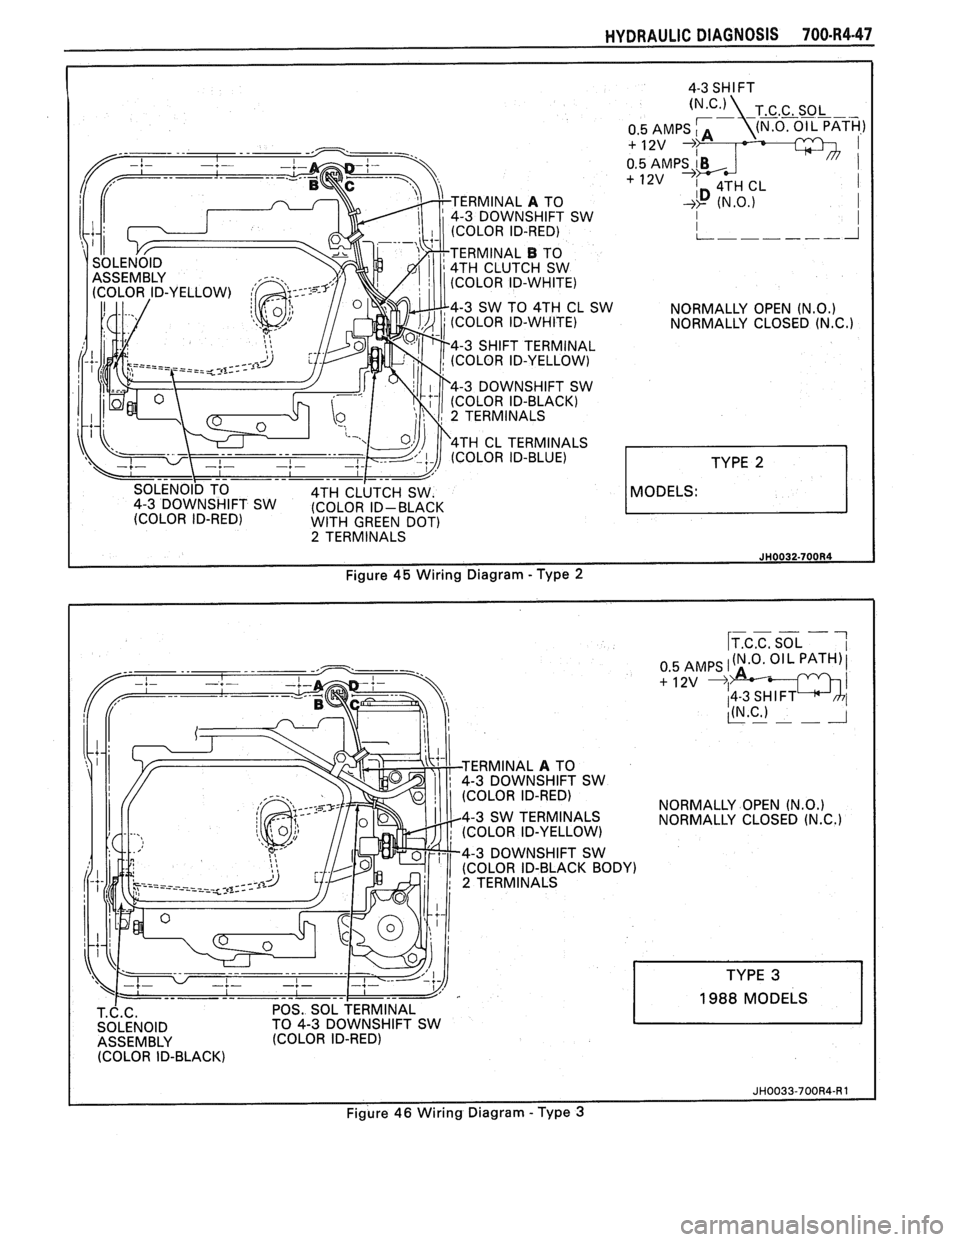
MODELS:
HYDRAULIC DIAGNOSIS 70O-R4-47
ERMINAL A TO
4-3 DOWNSHIFT SW
(COLOR ID-RED)
TERMINAL
B TO
4TH CLUTCH SW
(COLOR ID-WHITE)
4-3 SW TO 4TH CL SW
NORMALLY OPEN
(N.0.) (COLOR ID-WHITE) NORMALLY CLOSED (N.C.1
4-3 SHIFT TERMINAL
(COLOR ID-YELLOW)
4-3 DOWNSHIFT SW
(COLOR ID-BLACK)
2 TERMINALS
4TH CL TERMINALS
(COLOR ID-BLUE)
WITH GREEN DOT) 2 TERMINALS
3 DOWNSHIFT SW
NORMALLY OPEN
(N.0.) NORMALLY CLOSED (N.C.)
4-3 DOWNSHIFT SW
POS. SOL TERMINAL
TO 4-3 DOWNSHIFT SW
(COLOR ID-RED)
1988 MODELS
Figure
46 Wiring Diagram -Type 3
Page 1037 of 1825
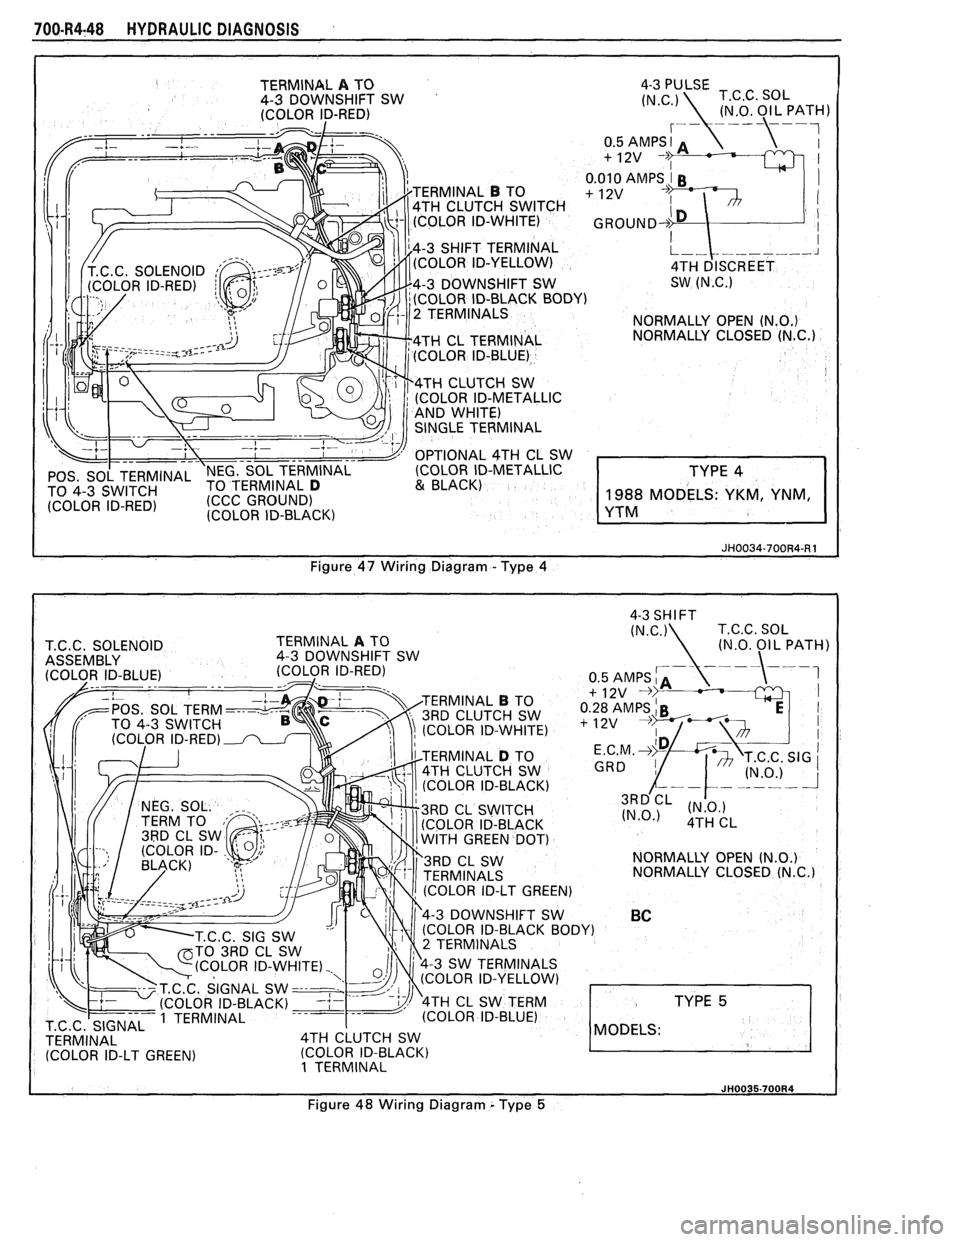
700.R4-48 HYDRAULIC DIAGNOSIS
I JH0034-700R4-R1 Figure 47 Wiring Diagram - Type 4
4-3 SHIFT I
I JH0035.700R4 J Figure 48 Wiring Diagram - Type 5
Page 1038 of 1825
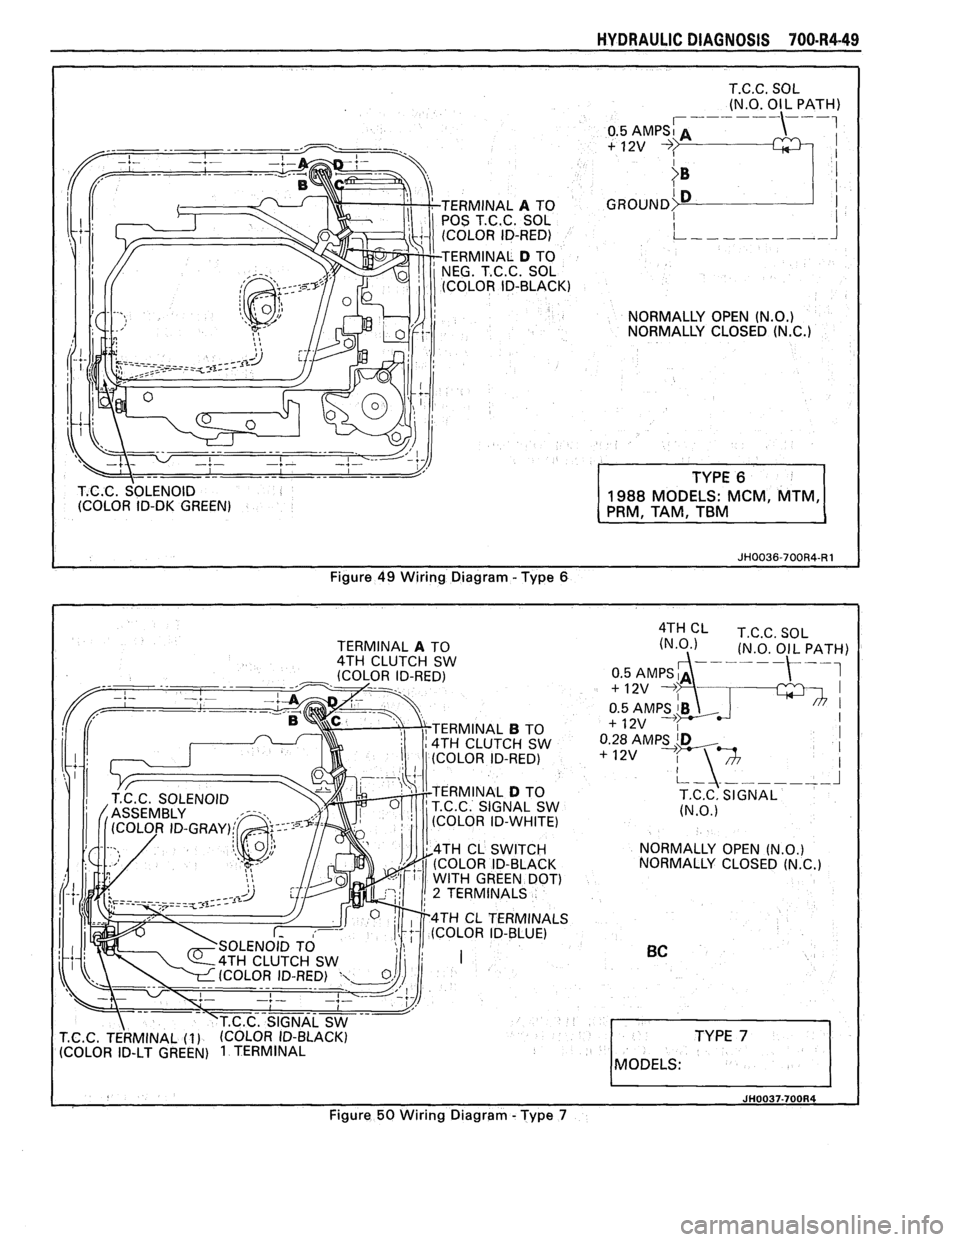
HYDRAULIC DIAGNOSIS 700.R4-49
T.C.C. SOL
(N.O. OIL
PATH) , --- --- ---,
T.C.C. SOLENOID
(COLOR ID-DK GREEN) 1988 MODELS: MCM, MTM,
PRM, TAM, TBM
Figure 49 Wiring Diagram -Type 8
I JH0037-700R4 I
Figure 50 Wiring Diagram - Type 7
Page 1039 of 1825
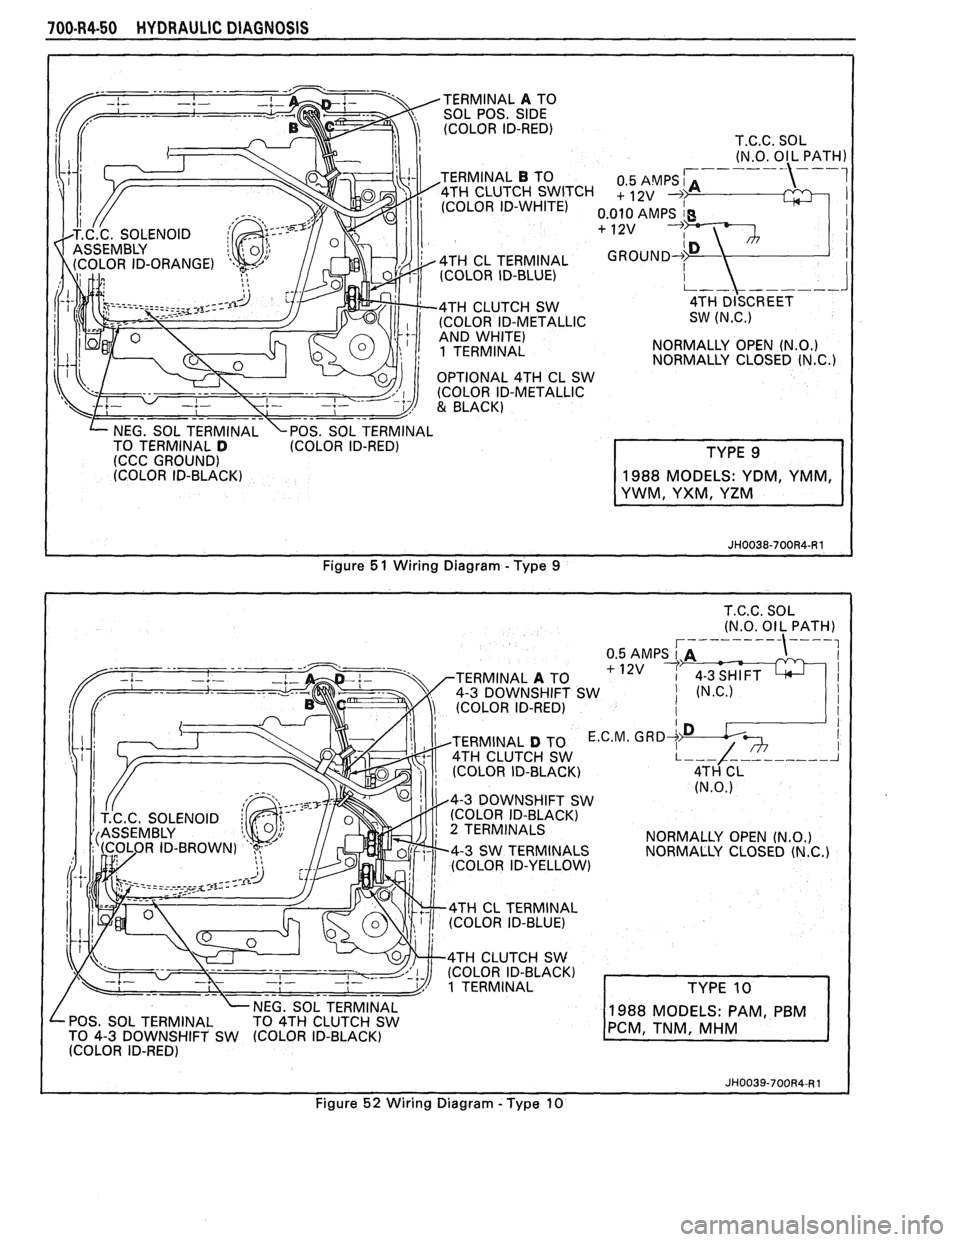
700-R4-50 HYDRAULIC DIAGNOSIS
TERMINAL A TO
SOL POS. SIDE (COLOR ID-RED)
T.C.C. SOL
(N.O. Ol L PATH)
TERMINAL
B TO
1 TERMINAL NORMALLY
OPEN (N.O.) NORMALLY CLOSED (N.C.)
NEG. SOL TERMINAL \POS. SOL TERMINAL
TO TERMINAL D (COLOR ID-RED)
(CCC GROUND)
(COLOR ID-BLACK)
Figure
5 1 Wiring Diagram - Type 9
TERMINAL A TO
4-3 DOWNSHIFT SW
(COLOR ID-RED)
TERMINAL
D TO E.C.M. 4TH CLUTCH SW
(COLOR ID-BLACK)
4-3 DOWNSHIFT SW
(COLOR ID-BLACK)
2 TERMINALS
NORMALLY OPEN (N.O.) 4-3 SW TERMINALS
NORMALLY CLOSED (N.C.) (COLOR ID-YELLOW)
4TH CL TERMINAL
(COLOR ID-BLUE)
4TH CLUTCH SW
(COLOR ID-BLACK)
1 TERMINAL
POS. SOL TERMINAL
TO 4-3 DOWNSHIFT SW
988 MODELS: PAM P
I (COLOR ID-RED)
I
Figure 52 Wiring Diagram - Type 10