1988 PONTIAC FIERO remote control
[x] Cancel search: remote controlPage 1501 of 1825
INTERIOR LIGHTS DIMMING
(Continued from previous page)
WITHOUT DIGITAL CLUSTER
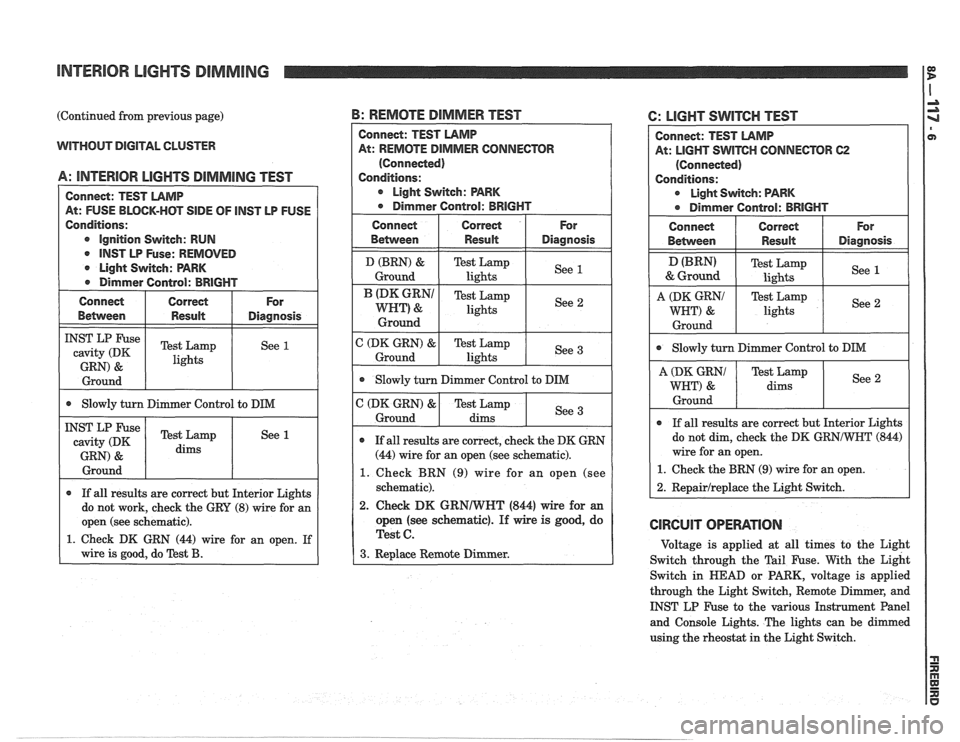
A: llUTERlOR LIGHTS DlMMlNG TEST
Connect: TEST LAMP
At: FUSE BLOCK-HOT
SIDE OF lNST LP FUSE
Conditions:
e ignition Switch: RUN
lNST LP Fuse: REMOVED
Light Switch: PARK
Dimmer Control: BRIGHT
Connect Correct
For
Between Result Diagnosis
INST LP Fuse Test Lamp cavity (DK See 1
GRN) & lights
Ground
I I @ Slowly turn Dimmer Control to DIM I
INST LP Fuse Test Lamp
cavity (DK See 1
1 GRN) & 1 dims 1 1
I Ground I I 1
If all results are correct but Interior Lights
do not work, check the GRY
(8) wire for an
I open (see schematic). I
1. Check DK GRN (44) wire for an open. If
I wire is good. do %st B.
B: REMOTE DIMMER TEST
At: REMOTE DIMMER CONNECTOR
1. Check BRN (9) wire for an open (see
2. Check DK GRNIWNT (844) wire for an
open (see schematic). If wire is good, do
C: LIGHT SWITCH TEST
Connect: TEST LAMP
At: LIGHT
SWITCH CONNECTOR 62
(Connected)
Conditions:
r Light Switch: PARK
a Dimmer Control: BRIGHT
Connect Correct For
Betvveen Result Diagnosis
(BRN) Test
Lamp
, &Ground lights See 1
1
A I I Test Lamp
lights I See 2 /
I Ground I I I
I Slowly turn Dimmer Contml to DIM I
dims
Ground
If all results are correct but Interior Lights
do not dim, check the DK
GRNIWNT (844)
wire for an open.
1. Check the BRN (9) wire for an open.
2. Repairlreplace the Light Switch.
CIRCUIT OPERATION
Voltage is applied at all times to the Light
Switch through the Tail Fuse. With the Light
Switch in
HEAD or PARK, voltage is applied
through the Light Switch, Remote Dimmer, and
INST LP Fuse to the various Instrument Panel
and Console Lights. The lights can be dimmed
using the rheostat in the Light Switch.
Page 1547 of 1825
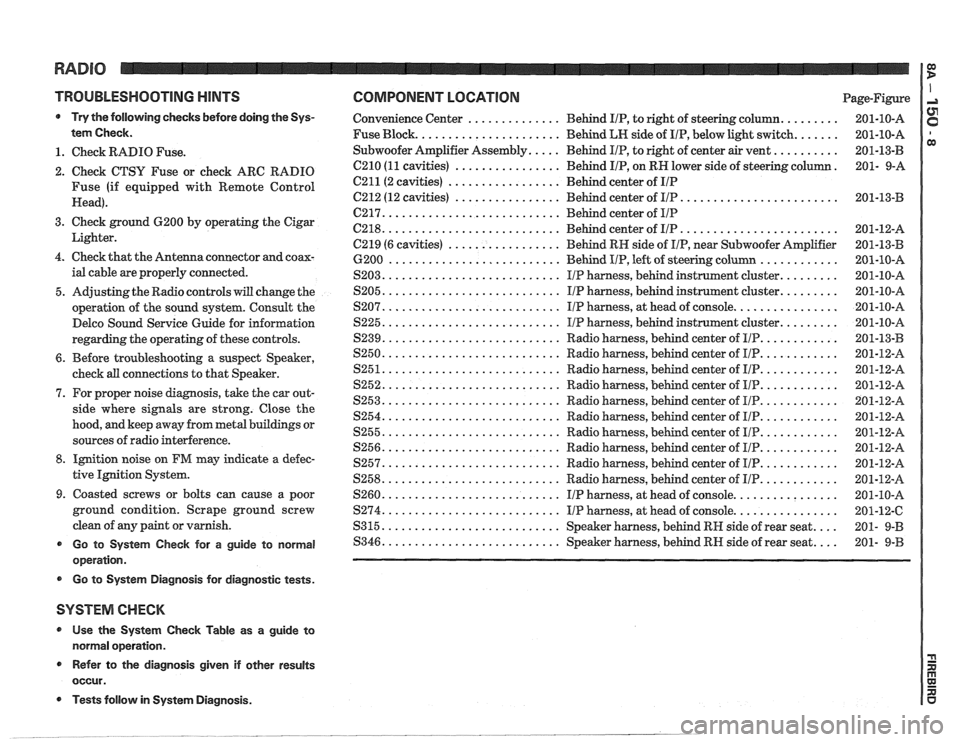
TROUBLESHOOTING HINTS
Try the following checks before doing the Sys-
tem Check
.
1 . Check RADIO Fuse .
2 . Check CTSU Fuse or check ARC RADIO
Fuse (if equipped with Remote Control
Head)
.
3 . Check ground 6200 by operating the Cigar
Lighter
.
4 . Check that the Antenna connector and coax-
ial cable are properly connected
.
5 . Adjusting the Radio controls will change the
operation of the sound system
. Consult the
Delco Sound Service Guide for information
regarding the operating of these controls
.
6 . Before troubleshooting a suspect Speaker,
cheek
all connections to that Speaker .
7 . For proper noise diagnosis. take the car out-
side where
signals are strong . Close the
hood. and keep away from metal buildings or
sources of radio interference
.
8 . Ignition noise on FM may indicate a defec-
tive Ignition System
.
9 . Coasted screws or bolts can cause a poor
ground condition
. Scrape ground screw
clean of any paint or varnish
.
Go to System Check for a guide to normal
operation
.
r Go to System Diagnosis for diagnostic tests .
SYSTEM CHECK
* Use the System Check Table as a guide to
normal operation
.
Refer to the diagnosis given if other results
occur
.
COMPONENT LOCATION Page-Figure
......... .............. Convenience Center Behind IIP. to right of steering column 201-10-A
....... Fuse Block ...................... Behind LH side of IIP. below light switch 201-10-A
.......... Subwoofer Amplifier Assembly ..... Behind IIP. to right of center air vent
201-13-B
. C210 (11 cavities) ................ Behind IIP. on RH lower side of steering column 201- 9-A
C211(2 cavities) ................. Behind center of IIP
........................ C212 (12 cavities) ................ Behind center of IIP 201-13-B
C217 ........................... Behind center of IIP
........................ C218 ........................... Behind center of IIP 201-12-A
C219 (6 cavities)
................. Behind RH side of IIP. near Subwoofer Amplifier 201-13-B
............ 6200 .......................... Behind IIP. left of steering column 201-10-A
......... $203 ........................... IIP harness. behind instrument cluster 201-10-A
......... $205 ........................... IIP harness. behind instrument cluster 201-10-A
................ $207 ........................... I/P harness. at head of console 201-10-A
......... S225 ........................... IIP harness. behind instrument cluster 201-10-A
............ $239 ........................... Radio harness. behind center of IIP 201-13-B
............ S250 ........................... Radio harness. behind center of I/P 201-12-A
............ $251 ........................... Radio harness. behind center of IIP 201-12-A
............ S252 ........................... Radio harness. behind center of IIP 201-12-A
............ S253 ........................... Radio harness. behind center of l[/P 201-12-8
............ $254 ........................... Radio harness. behind center of IIP 201-12-A
............ S255 ........................... Radio harness. behind center of I/P 201-12-A
............ ,9256 ........................... Radio harness. behind center of IIP 201-12-A
............ S257 ........................... Radio harness. behind center of IIP 201-12-A
............ S258 ........................... Radio harness. behind center of IIP 201-12-A
$260 ........................... IIP harness. at head of console ................ 201-10-A
................ S274 ........................... IIP harness. at head of console 201-12-C
$315 ........................... Speaker harness. behind RH side of rear seat .... 201- 9-B
.... $346 ........................... Speaker harness. behind RH side of rear seat 201- 9-B
Tests follow in System Diagnosis .
Page 1548 of 1825
RADIO
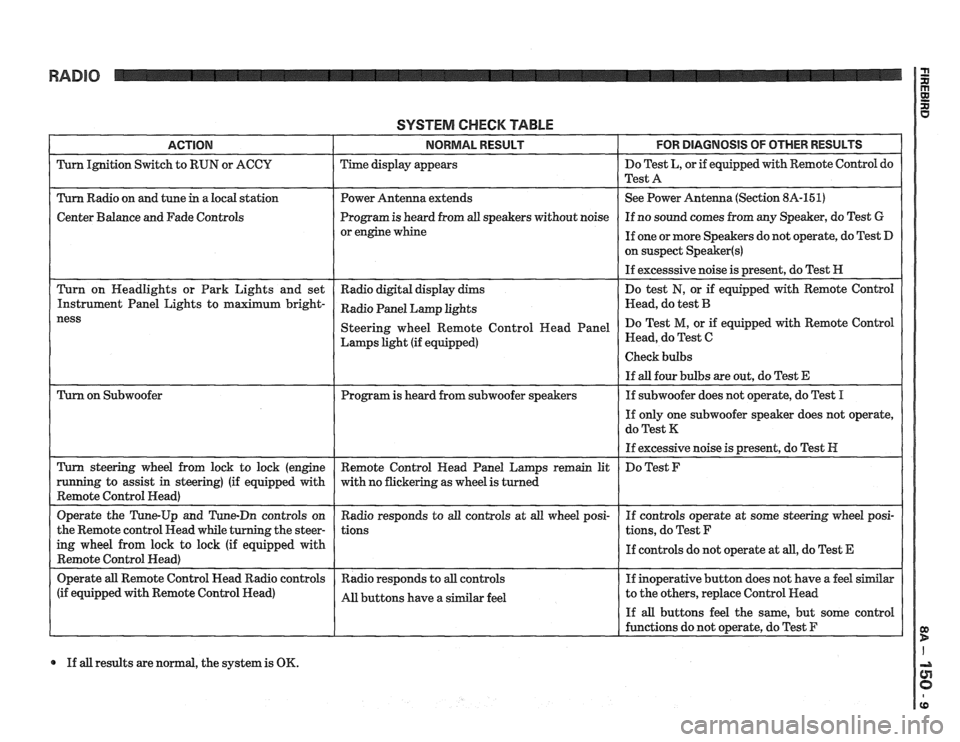
SYSTEM CHECK TABLE
ACTION NORMAL RESULT FOR DlAGNOSlS OF OTHER RESULTS
Turn Ignition Switch to RUN or ACCU Time display appears Do
Test L, or if equipped with Remote Control do
Test A
Turn Radio on and tune
in a local station Power Antenna extends See
Power Antenna (Section 8A-151)
Center Balance and Fade Controls Program
is heard from all speakers without noise If
no sound comes from any Speaker, do Test G
or engine whine
If one or more Speakers do not operate, do Test D
on suspect
Speaker(s)
If excesssive noise is present, do Test H
Turn on Headlights or Park Lights and set
Radio digital display dims Do
test
N, or if equipped with Remote Control
Instrument Panel Lights to maximum
bright- Radio Panel Lamp khts Head, do test B
Lamps light (if equipped) Head,
do Test C
If all results are normal, the system is OK.
Page 1549 of 1825
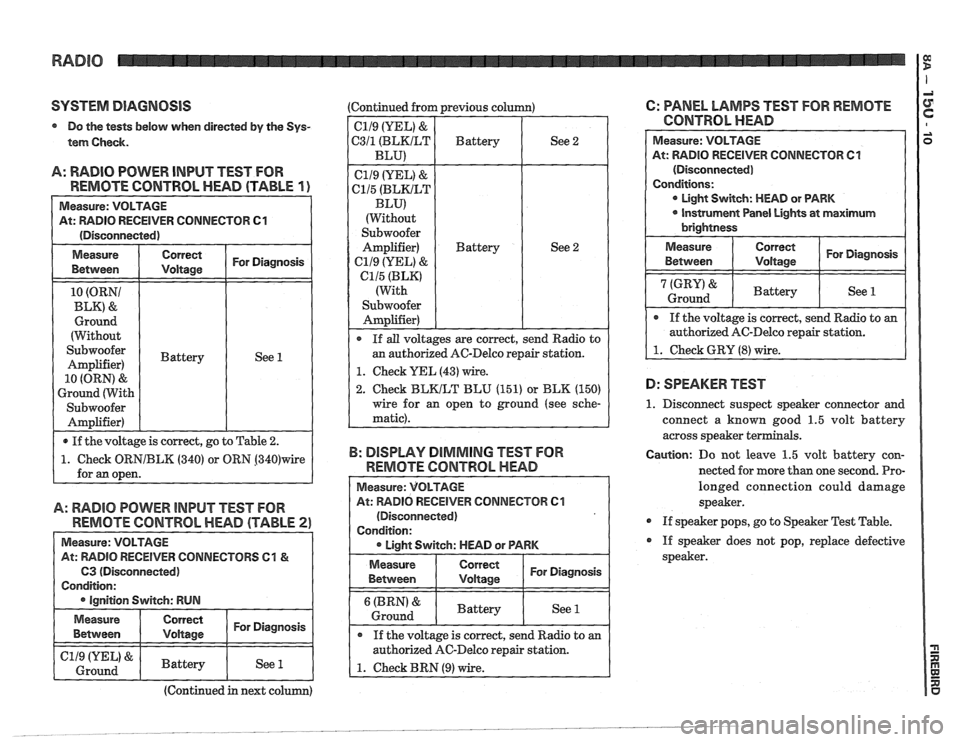
SYSTEM DIAGNOSIS
Do the tests below when directed by the Sys-
tem Check.
A: RADIO POWER INPUT TEST FOR
REMOTE CONTROL HEAD (TABLE
1 )
Measure: VOLTAGE
At: RADIO RECEIVER CONNECTOR
C1
(Disconnected)
Measure
Between
1 ~~~~~~ I For Diagnosis I
10 (ORNI
BLK) &
Ground
(Without
Subwoofer Battery I See 1 Amplifier)
Ground (With
Subwoofer Amplifier)
If the voltage is correct, go to Table
2.
1. Check ORNIBLK (340) or ORN 1340)wire
for an open.
A: RADlO POWER INPUT TEST FOR
REMOTE CONTROL HEAD (TABLE
2)
At: RADlO RECEIVER CONNECTORS 61 i%
C3 (Disconnected)
(Continued in next column) Continued from previous
column)
C119 (YEL) &
C311 (BLKILT Battery See 2
BLU)
ell9 (YEL) &
Cl/5 (BLKILT
BLU)
(Without
Subwoofer Amplifier) Battery See
2
el19 (YEL) &
C115 (BLK)
(With
Subwoofer Amplifier)
If all voltages are correct, send Radio to
an authorized
AC-Delco repair station.
1. Check YEL (43) wire.
2. Check BLKILT BLU (151) or BLK (150)
wire for
an open to ground (see sche-
matic).
B: DISPLAY DIMMING TEST FOR
REMOTE CONTROL HEAD
At: RADIO RECElVER CONNECTOR C1
(Disconnected)
C: PANEL LAMPS TEST FOR REMOTE
CONTROL HEAD
(Disconnected)
D: SPEAKER TEST
1. Disconnect suspect speaker connector and
connect
a known good 1.5 volt battery
across speaker t
Caution: Do not leave 1.5 volt battery con-
nected for more than one second. Pro-
longed connection could damage
speaker.
If speaker pops, go to Speaker Test Table.
If speaker does not pop, replace defective
speaker.
Page 1550 of 1825
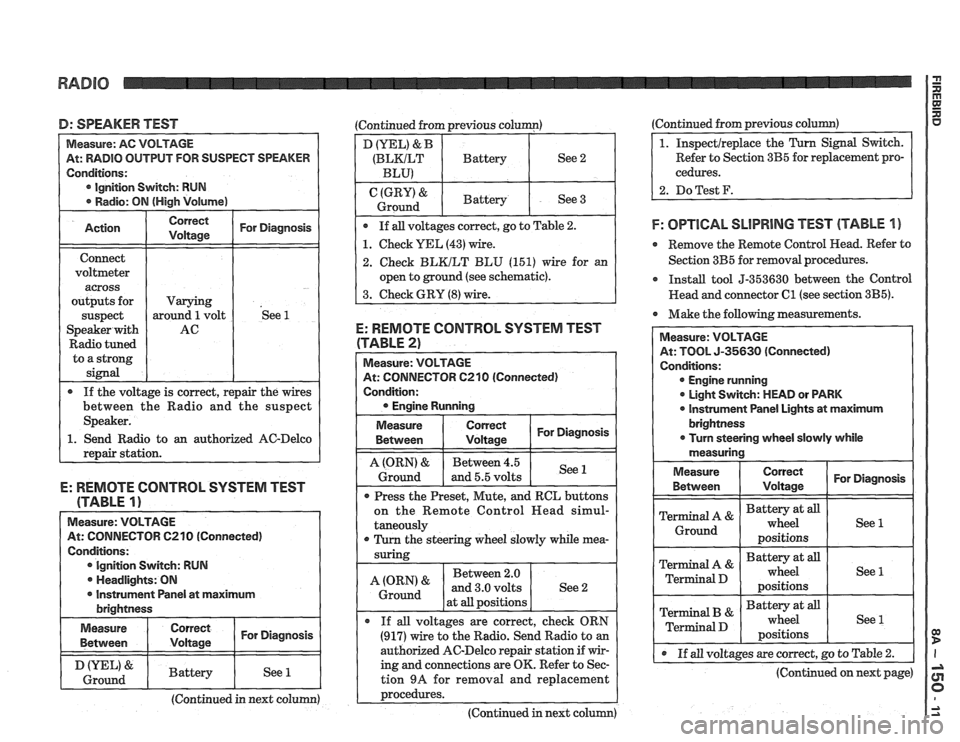
D: SPEAKER TEST (Continued from previous column)
At: RADIO OUTPUT FOR SUSPECT SPEAKER
Ignition Switch: RUN
o an authorized AC-Delco
E: REMOTE CONTROL SYSTEM TEST
(TABLE
1)
Measure: VOLTAGE
At: CONNECTOR C210 (Connected)
Conditions: Ignition Switch: RUN
. Headlights: ON
I r Instrument Panel at maximum I brightness
I Measure I I For Diagnosis ( Between
I & I Battery I See 1 1 Ground I I I I
(Continued in next column)
D (YEL) & B
(BLKILT Battery See 2
BLU)
(GRY) & Battery
Ground See 3
If all voltages correct, go to Table
2.
1. Check YEL (43) wire.
2. Check BLKILT BLU (151) wire for an
open to ground (see schematic).
3. Check GRY
(8) wire.
E: REMOTE CONTROL SYSTEM TEST
(TABLE 2)
At: CONNECTOR 6210 (Connected)
Condition:
Measure
Between
I tz I For Diagnosis
1 I - I
A (ORN) & Between 4.5
Ground and 5.5 volts See 1
Press
the Preset, Mute, and RCL buttons
on the Remote Control
Head simul-
taneously
r Turn the steering wheel slowly while mea-
Between 2.0
at
all positions
If
all voltages are correct, check ORN
(917) wire to the Radio. Send Radio to an
authorized AC-Delco repair station if wir-
ing and connections are OK. Refer to Sec-
tion
9A for removal and replacement
~rocedures. ---- - -
(Continued in next column) (Continued from
previous
column)
Refer to Section 3B5 for replacement pro-
cedures.
2. DoTest F.
F: OPTlCAL SLlPRlNG TEST (TABLE 1 )
e Remove the Remote Control Head. Refer to
Section 3B5 for removal procedures.
r Install tool 5-353630 between the Control
Head and connector
C1 (see section 3B5).
Make the following measurements.
At: TOOL 5-35630 (Connected)
Engine running
0 Light Switch: MEAD or PARK
0 lnstrument Panel Lights at maximum
@ If all voltages are correct, go to Table 2.
(Continued on next page)
Page 1551 of 1825
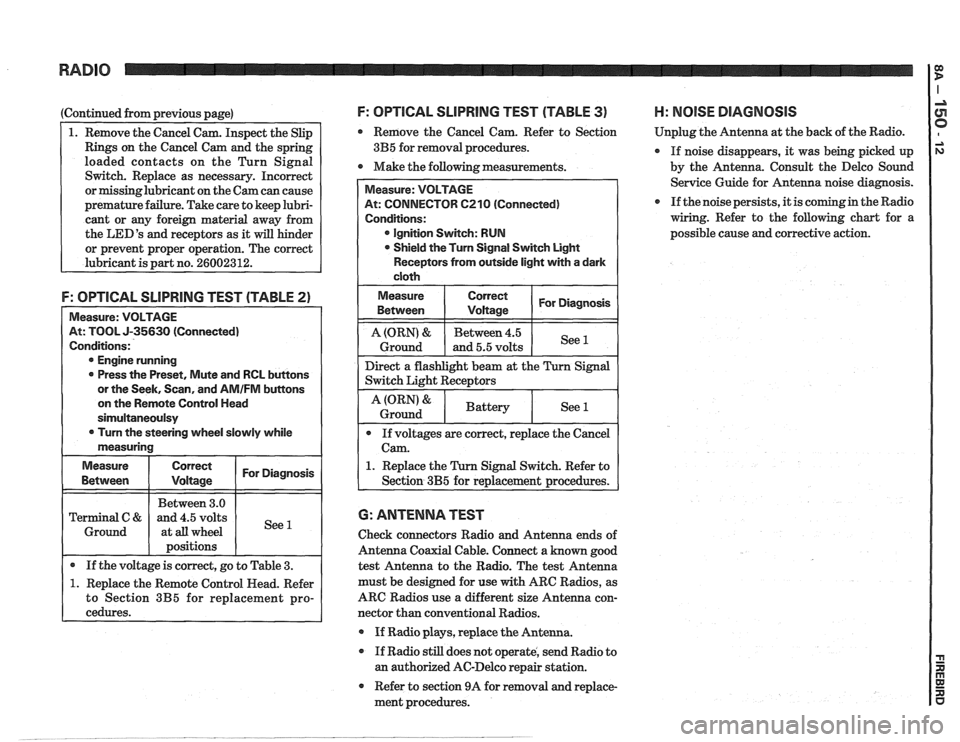
RADIO
(Continued from previous page)
1. Remove the Cancel Cam. Inspect the Slip
Rings on the Cancel Cam and the spring
loaded contacts on the Turn Signal
Switch. Replace as necessary. Incorrect
or missinglubricant on the Cam can cause
premature failure. Take care to keep lubri-
cant or any foreign material away from
the
LED'S and receptors as it will hinder
or prevent proper operation. The correct
lubricant is part no.
26002312.
F: OPTICAL SLlPRlNG TEST (TABLE 2)
Measure: VOLTAGE
At: TOOL J-35630 (Connected)
Conditions:
@ Engine running
0 Press the Preset, Mute and RCL buttons
or the Seek, Scan, and
AMIFM buttons
on the Remote Control Head
sirnultaneoulsy
0 Turn the steering wheel slowly while
measuring
Measure
Correct I For Diagnosis I
I I Between 3.0 1 I Terminal C & and 4.5 volts
1 Ground 1 at all wheel
I 1 positions I I
I . If the voltage is correct, go to Table 3. (
1. Replace the Remote Control Head. Refer
to Section
3B5 for replacement pro-
cedures.
F: OPTICAL SLlPRllUG TEST (TABLE 3) H: NOlSE DIAGNOSIS
Remove the Cancel Cam. Refer to Section Unplug
the Antenna at the back of the Radio.
3B5 for removal procedures.
If noise disappears, it was being picked up
0 Make the following measurements.
by the Antenna. Consult the Delco Sound
Service Guide for Antenna noise diagnosis.
If the noise persists, it is coming in the Radio
wiring. Refer to the following chart for a
possible cause and corrective action.
At: CONNECTOR 6210 (Connected)
@ Ignition Switch: RUN
Shield the Turn Signal Switch Light
Receptors from outside light with a dark
1. Replace the Turn Signal Switch. Refer to
6: ANTENNA TEST
Check connectors Radio and Antenna ends of
Antenna Coaxial Cable. Connect a known good
test Antenna to the Radio. The test Antenna
must be designed for use
with ARC Radios, as
ARC Radios use a different size Antenna con-
nector than conventional Radios.
@ If Radio plays, replace the Antenna.
If Radio still does not operate, send Radio to
an authorized AC-Delco repair station.
Refer to section 9A for removal and replace-
ment procedures.
Page 1556 of 1825
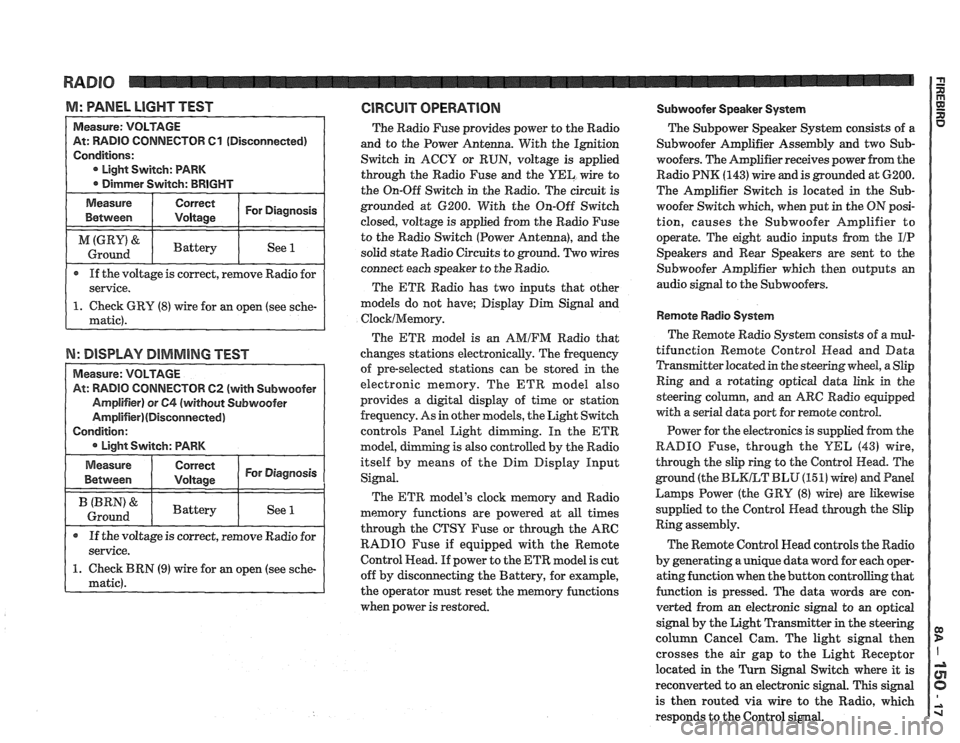
M: WNEL LIGHT TEST GlRGUlT OPERATION Subwoofer Speaker System
TOR 61 (Disconnected)
If the voltage is correct, remove Radio for
N: DISPLAY DIMMING TEST
TOW 62 (with Subwoofer
The Radio Fuse provides power to the Radio
and to the Power Antenna. With the Ignition
Switch in ACCY or RUN, voltage is applied
through the Radio Fuse and the
UEL wire to
the On-Off Switch in the Radio. The circuit is
grounded at 6200. With the On-Off Switch
closed, voltage is applied from the Radio Fuse
to the Radio Switch (Power Antenna), and the
solid state Radio Circuits to ground. Two wires
connect each speaker to the Radio.
The ETR Radio has two inputs that other
models do not have; Display Dim Signal and
ClocklMemory.
The ETR model is an AMIFM Radio that
changes stations electronically. The frequency
of pre-selected stations can be stored
in the
electronic memory. The ETR model also
provides a digital display of time or station
frequency. As in other models, the Light Switch
controls Panel Light dimming. In the
ETR
model, g is also controlled by the Radio
itself by means of the Dim Display Input
Signal.
The ETR model's clock memory and Radio
memory functions are powered at all times
through the CTSY Fuse or through the ARC
RADIO Fuse if equipped with the Remote
Control Head. If power to the ETR model is cut
off by disconnecting the Battery, for example,
the operator must reset the memory functions
when power is restored. The
Subpower Speaker
System consists of a
Subwoofer Amplifier Assembly and two Sub-
woofers. The Amplifier receives power from the
Radio PNK
(143) wire and is grounded at 6200.
The Amplifier Switch is located in the
Sub-
woofer Switch which, when put in the ON posi-
tion, causes the Subwoofer Amplifier to
operate. The eight audio inputs from the
I/P
Speakers and Rear Speakers are sent to the
Subwoofer Amplifier which then outputs an
audio signal to the Subwoofers.
Remote Radio System
The Remote Radio System consists of a mul-
tifunction Remote Control
Head and Data
Transmitter located in the steering wheel, a Slip
Ring and a rotating optical data link in the
steering
colurnn, and an ARC Radio equipped
with a serial data port for remote control.
Power for the electronics is supplied from the
RADIO Fuse, through the
YEL (43) wire,
through the slip ring to the Control Head. The
ground (the
BLKLT BLU (15 1) wire) and Pand
Larnps Power (the GRY (8) wire) are Likewise
supplied to the Control Head through the Slip
Ring assembly.
The Remote Control Head controls the Radio
by generating a unique data word for each oper-
ating function when the button controlling that
function is pressed. The data words are con-
verted from an electronic signal to an optical
signal by the Light Transmitter in the steering
column Cancel Cam. The light signal then
crosses the air gap to the Light Receptor
located in the
Turn Signal Switch where it is
reconverted to
an electronic signal. This signal
is then routed via wire to the Radio, which
responds to the Control signal.
Page 1628 of 1825
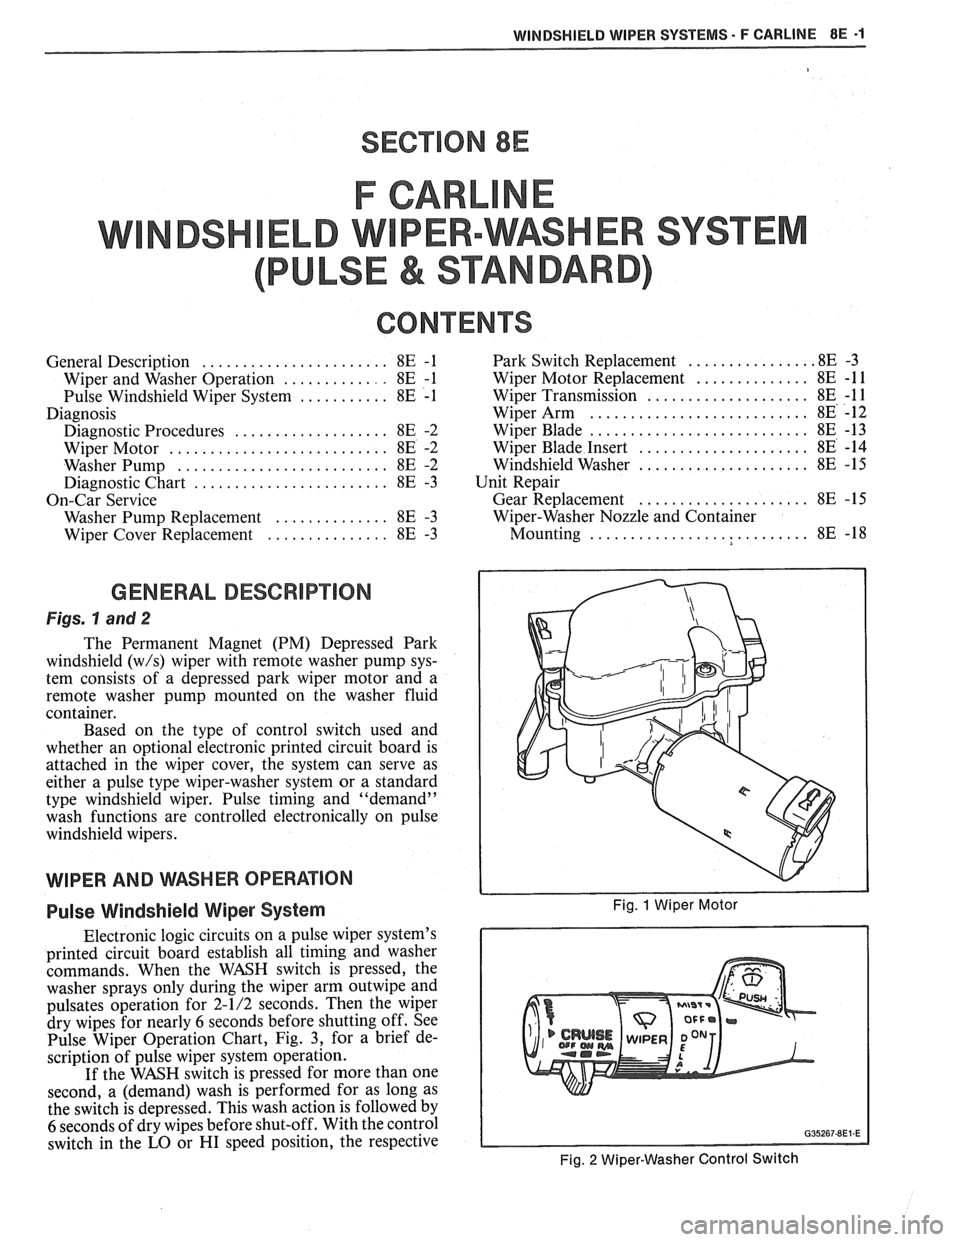
WINDSI4IELD WIPER SYSTEMS - F CARLINE 8E -1
SECTION 8E
F CARL
ELD W PER-WASHER SYSTEM
PULSE & STANDARD
CONTENTS
General Description ....................... 8E -1 Park Switch Replacement ............... .8E -3
Wiper and Washer Operation
............ 8E -1
Wiper Motor Replacement .............. 8E -1 1
Pulse Windshield Wiper System
........... 8E -1
Wiper Transmission .................... 8E -1 1
Diagnosis Wiper Arm
........................... 8E -12
Diagnostic Procedures
................... 8E -2 Wiper Blade ........................... 8E -13
Wiper Motor
........................... 8E -2 Wiper Blade Insert ..................... 8E -14
Washer Pump
.......................... 8E -2 Windshield Washer ..................... 8E -15
........................ Diagnostic Chart 8E -3 Unit Repair
On-Car Service Gear Replacement
..................... 8E - 15
Washer Pump Replacement .............. 8E -3 Wiper-Washer Nozzle and Container
Wiper Cover Replacement
............... 8E -3 Mounting ........................... 8E -1 8
GENERAL DESCRIPTION
Figs. hand 2
The Permanent Magnet (PM) Depressed Park
windshield
(w/s) wiper with remote washer pump sys-
tem consists of a depressed park wiper motor and a
remote washer pump mounted on the washer fluid
container.
Based on the type of control switch used and
whether an optional electronic printed circuit board is
attached in the wiper cover, the system can serve as
either a pulse type wiper-washer system or a standard
type windshield wiper. Pulse timing and "demand"
wash functions are controlled electronically on pulse
windshield wipers.
WIPER AND WSHER OPERAflON
Pulse Windshield Wiper System Fig. 1 Wiper Motor
Electronic logic circuits on a pulse wiper system's
printed circuit board establish all timing and washer
commands. When the WASH switch is pressed, the
washer sprays only during the wiper arm
outwipe and
pulsates operation for 2-1/2 seconds. Then the wiper
dry wipes for nearly
6 seconds before shutting off. See
Pulse Wiper Operation Chart, Fig.
3, for a brief de-
scription of pulse wiper system operation.
If the WASH switch is pressed for more than one
second, a (demand) wash is performed for as long as
the switch is depressed. This wash action is followed by
6 seconds of dry wipes before shut-off. With the control
switch in the
LO or HI speed position, the respective
Fig. 2 Wiper-Washer Control Switch