1988 PONTIAC FIERO sensor
[x] Cancel search: sensorPage 653 of 1825
6E3-8 2.8L (VIM $1, 5.OL (VIN F) & 5.7L(VlN 8) BRlVEABILlTY AND EMISSIOMS
ALL NEW GENERAL MOTORS VEHICLES ARE CERTIFIED BY THE UNITED STAEES
ENVIRONMENTAL PROTECTION AGENCY AS CONFOWMlNG TO "THE REQUIREMENTS QF THE
REGULATIONS FOR THE CONTROL OF AIR POLLUTION FROM NEW MOTOR VEHICLES. THIS
CERTlFlCATlON IS CONTINGENT ON CERTAIN ADJUSTMENTS BEING SET TO FACTORY
STANDARDS. IN MOST CASES, THESE ADJUSTMENT POINTS EITHER HAVE BEEN
PERMANENTLY SEALED ANDIOR MADE
INACCESSlBLE TO PREVENT INDISCRIMINATE OR
ROUTINE ADJUSTM&M"FIN THE FIELD. FOR THIS REASON, THE FACTORY PROCEDURE FOR
TEMPORARILY REMOVING PLUGS, CAPS, ETC., FOR PURPOSES OF SERVICING THE PRODUCT,
MUST
BE STRICTLY FOLLOWED AND, WHEREVER PRACTICABLE, RETURNED TO THE
ORIGINAL INTENT QF THE DESIGN.
INTRODUCTION
GENERAL BESCRIPT18N DIAGNOSIS PROCEDURE
This section applies to engines which have a fuel
injector in the intake manifold near the intake valve
for each cylinder. It is commonly referred to as "Port
Fuel Injection".
These engines have controls to reduce exhaust
emissions, while maintaining good driveability and
fuel economy.
An engine control module
(ECM) is the heart of
this control system and has sensors used to provide
information about engine operation and the various
systems it controls. Details of basic operation,
diagnosis, functional checks, and on-vehicle service
are covered in Section "C", "Component Systems".
The ECM has the ability to do some diagnosis of
itself, and of other parts of the system. When it finds a
problem, it lights a "Service Engine Soon" light on the
instrument panel and
a trouble code will be stored in
the ECM memory. This does not mean that the engine
should be stopped right away, but that the cause of the
light coming
"ON" should be checked as soon as
reasonably possible. The
following
sections(s) are written for specific
engine applications and are clearly indentified. Be
sure to use only the section which applies to the
engine family being diagnosed.
Before using this section of the manual, you
should be familiar with the information and the
proper diagnosing procedures as described in Section
"GE". If the proper diagnosis procedures are not
followed, as described in Section
"6EM, it may result in
unnecessary replacement of good parts.
Trouble tree charts incorporate diagnosis
procedures using an ALDL "SCAN" tool where
possible.
The "SCANJ' tool has the ability to save time
in diagnosis and prevent the replacement of good
parts. The
key to using the "SCAN" tool
successfully for diagnosis lies in the technician's
ability to understand the system he is
trving to
diagnose. as well as an understanding of the
"SCAN" tool's limitations. See Section "6E" for
more information.
Page 654 of 1825
DRIVEABILITY AND EMISSIONS f.8b (VIN S) 6E3-A-1
Cold Oxygen Sensor
The "Diagnostic Circuit Check" verifies the On some engines.
the oxygen sensor will cool off
system is functioning correctly . some special after only a short period of operation at idle . This will
considerations to keep in mind while making the put the system into "Open Loop" . To restore "Closed
"Diagnostic Circuit Check" are: Loop"
operation. run the engine
at part throttle
several minutes and accelerate from idle to part
Blocking Drive Wheels throttle a few times .
The vehicle drive wheels should always be blocked Basic Procedure
while checking the system . If you have not reviewed the basic information on
how to
use the diagnostic procedures. go to the
introduction of this section
.
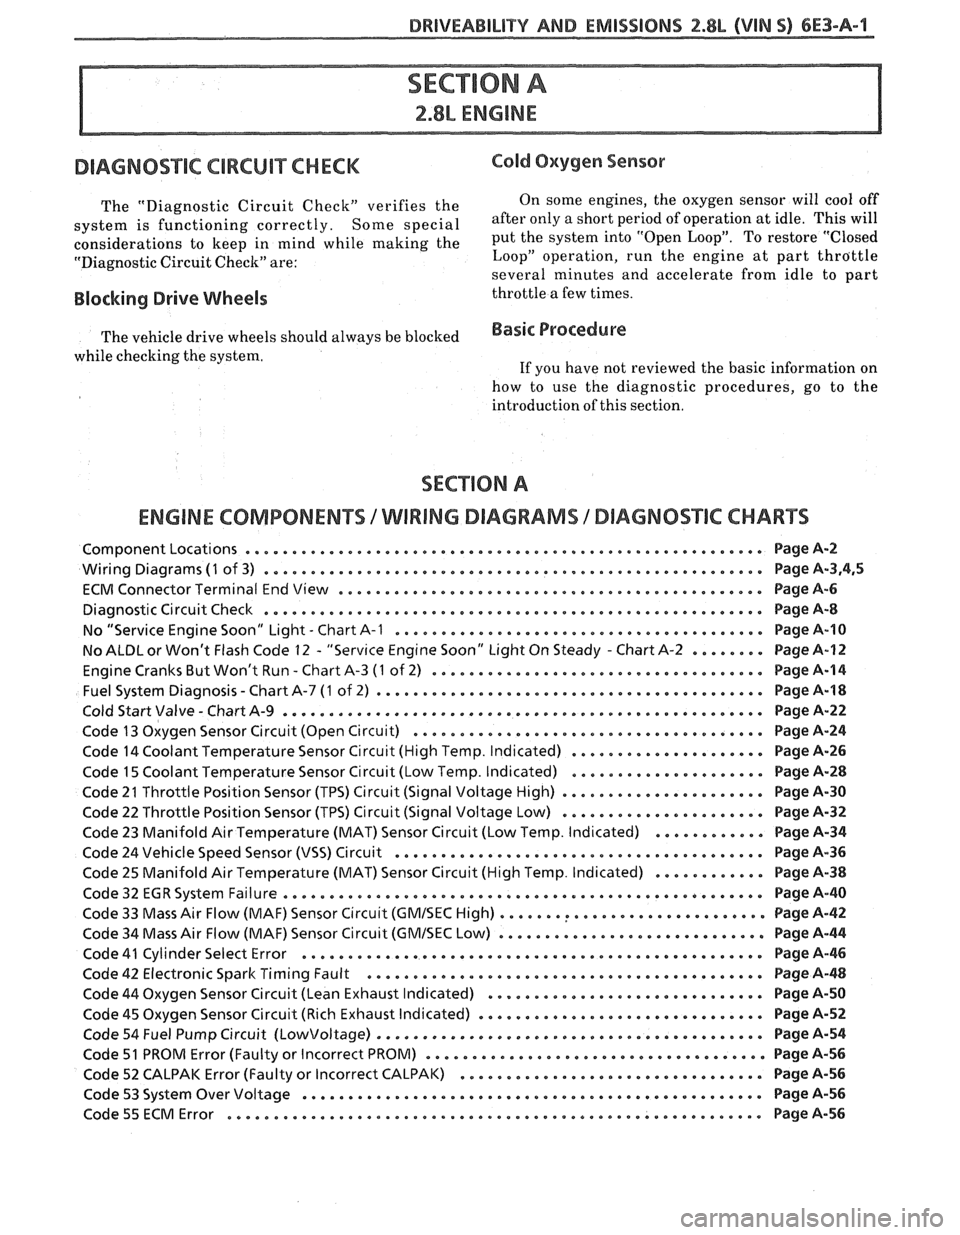
ENGINE COMPONENTS /WIRING DIAGRAMS / DIAGNOSTIC CHARTS
ComponentLocations ........................................................ PageA-2
Wiring Diagrams (1 of 3) ...................................................... Page A.3.4. 5
ECM Connector Terminal End View
.............................................. Page A-6
Diagnostic Circuit Check
...................................................... Page A-8
No "Service Engine Soon" bight
. Chart A-1 ........................................ Page A-10
No
ALBL or Won't Flash Code 12 . "Serv~ce Engine Soon" Light On Steady . Chart A-2 ........ Page A-12
. Engine Cranks But Won't Run Chart A-3 (1 of 2) .................................... Page 8-14
. Fuel System Diagnosis Chart A-7 (1 of
2) .......................................... Page A-18
Cold Start Valve
. Chart A-9 .................................................... Page A-22
Code 13 Oxygen Sensor Circuit (Open Circuit)
...................................... Page A-24
Code 14 Coolant Temperature Sensor Circuit (High Temp
. Indicated) ..................... Page A-26
Code 15 Coolant Temperature Sensor Circuit (Low Temp
. Indicated) ..................... Page A-28
Code 21 Throttle Position Sensor (TPS) Circuit (Signal Voltage High)
...................... Page A-30
Code 22 Throttle Position Sensor (TPS) Circuit (Signal Voltage Low)
...................... Page A-32
Code 23 Manifold Air Temperature (MAT) Sensor Circuit (Low Temp
. Indicated) ............ Page A-34
Code 24 Vehicle Speed Sensor (VSS) Circuit
........................................ Page A-36
Code
25 Manifold Air Temperature (MAT) Sensor Circuit (High Temp . Indicated) ............ Page A-38
Code 32
EGR System Failure .................................................... Page A-40
Code 33 Mass Air Flow (MAF) Sensor Circuit
(GMISEC High) ............................. Page A-42
Code 34 Mass Air Flow (MAF) Sensor Circuit
(GMISEC bow) ............................. Page 8-44
Code
41 Cylinder Select Error .................................................. Page A-46
Code 42 Electronic Spark Timing Fault
................... .... .................... Page 8-48
Code 44 Oxygen Sensor Circuit (Lean Exhaust Indicated)
.............................. Page A-50
Code
45 Oxygen Sensor Circuit (Rich Exhaust Indicated) ............................... Page A-52
Code 54 Fuel Pump Circuit
(Lowvoltage) .......................................... Page A-54
Code
51 PROM Error (Faulty or Incorrect PROM) ..................................... Page A-56
Code 52 CALPAK Error (Faulty or Incorrect CALPAK)
................................. Page 44-56
Code 53 System Over Voltage .................................................. Page A-56
Code55ECMError ............................O.~o.~.~e.~e~e.~e....... .. PageA-56
Page 655 of 1825
6E3-A-2 2.88, (VIM S) DRIVEABILITY AND EMISSIONS
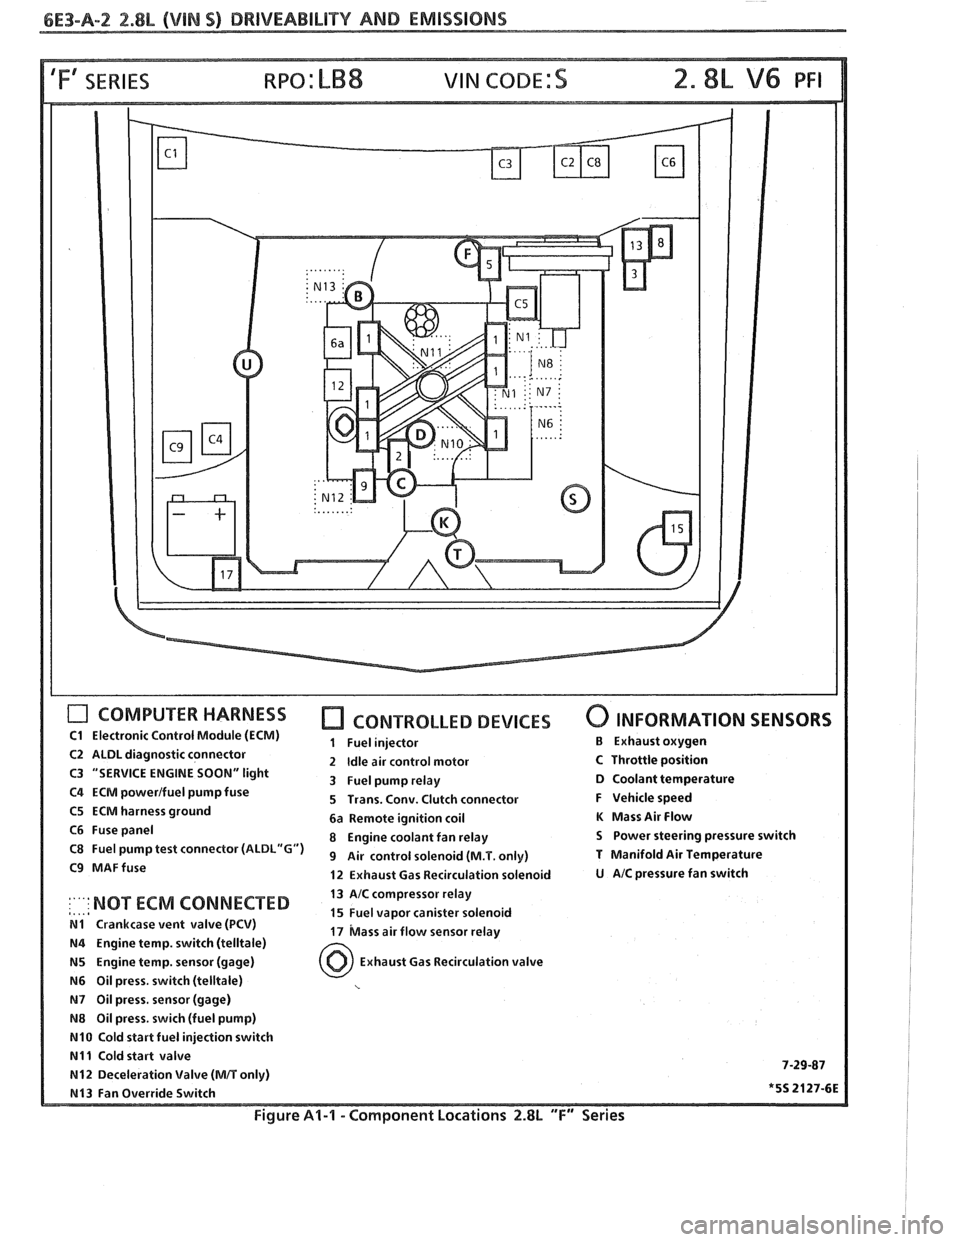
'Fa SERIES
COMPUTER HARNESS
C1 Electronic Control Module (ECM)
C2 ALDL diagnostic connector
C3 "SERVICE ENGINE
SOON" light
C4 ECM powerlfuel pump fuse
C5 ECM harness ground
C6 Fuse panel
C8 Fuel pump test connector
(ALDL"G")
C9 MAFfuse
CONTROLLED DEVICES
1 Fuel injector
2
Idle air control motor
3 Fuel pump relay
5 Trans. Conv. Clutch connector
6a Remote ignition coil
8 Engine coolant fan relay
9 Air control solenoid (M.T. only)
12 Exhaust Gas Recirculation solenoid
0 INFORMATION SENSORS
B Exhaust oxygen
C Throttle position D Coolant temperature
F Vehicle speed
K Mass Air Flow
S Power steering pressure switch
T Manifold Air Temperature
U AIC pressure fan switch
13 AIC compressor relay
,..,a :'"' NOT ECM 'ONNECTED 15 Fuel vapor canister solenoid N1 Crankcase vent valve (PCV) 17 bass air flow sensor relay N4 Engine temp. switch (telltale)
N5 Engine temp. sensor (gage) Exhaust Gas Recirculation valve
N6 Oil press. switch (telltale)
N7 Oil press, sensor (gage)
N8 Oil press. swich (fuel pump)
N10 Cold start fuel injection switch
N11 Cold start valve 7-29-87 N12 Deceleration Valve (MIT only)
N13 Fan Override Switch *5S 2127-6E
Figure Al-l - Component Locations 2.8L "F" Series
Page 656 of 1825
BRlVEABlLlTY AND EMISSIONS 2.8L (VIN 5) 6E3-A-3
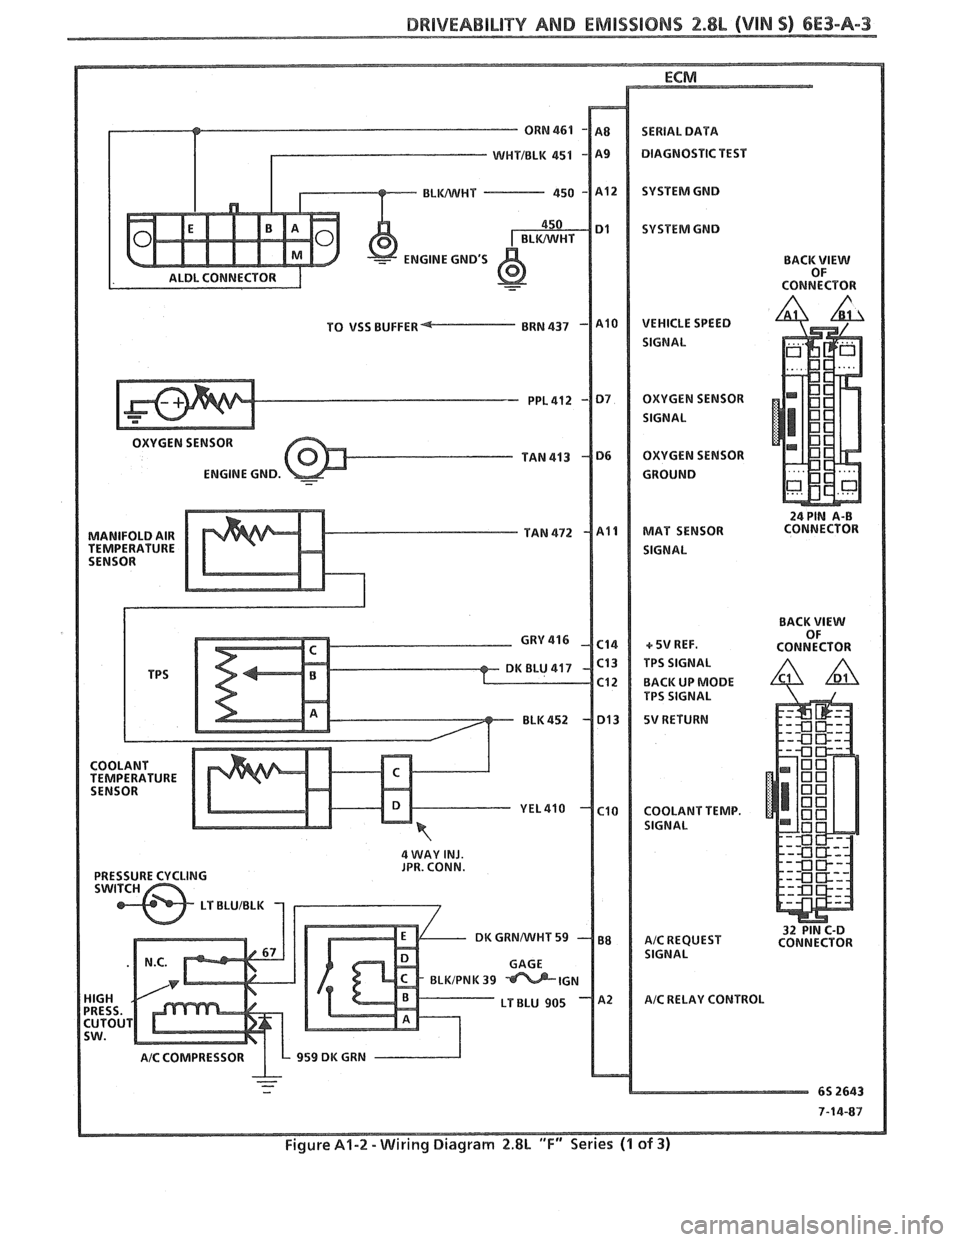
ENGINE GND'S BACK VIEW
OF
CONNECT OR
TO VSS BUFFER
OXYGEN SENSOR
ENGINE GND.
MANIFOLD AIR
TEMPERATURE
4 WAY INJ.
JPR. CONN.
7-14-87
Figure A1-2 -Wiring Diagram 2.8L "F" Series (1 of 3)
Page 667 of 1825
6E3-A-14 2.8L (VIN S) DRIVEABILITY AND EMISSIONS
PICK-UP COIL
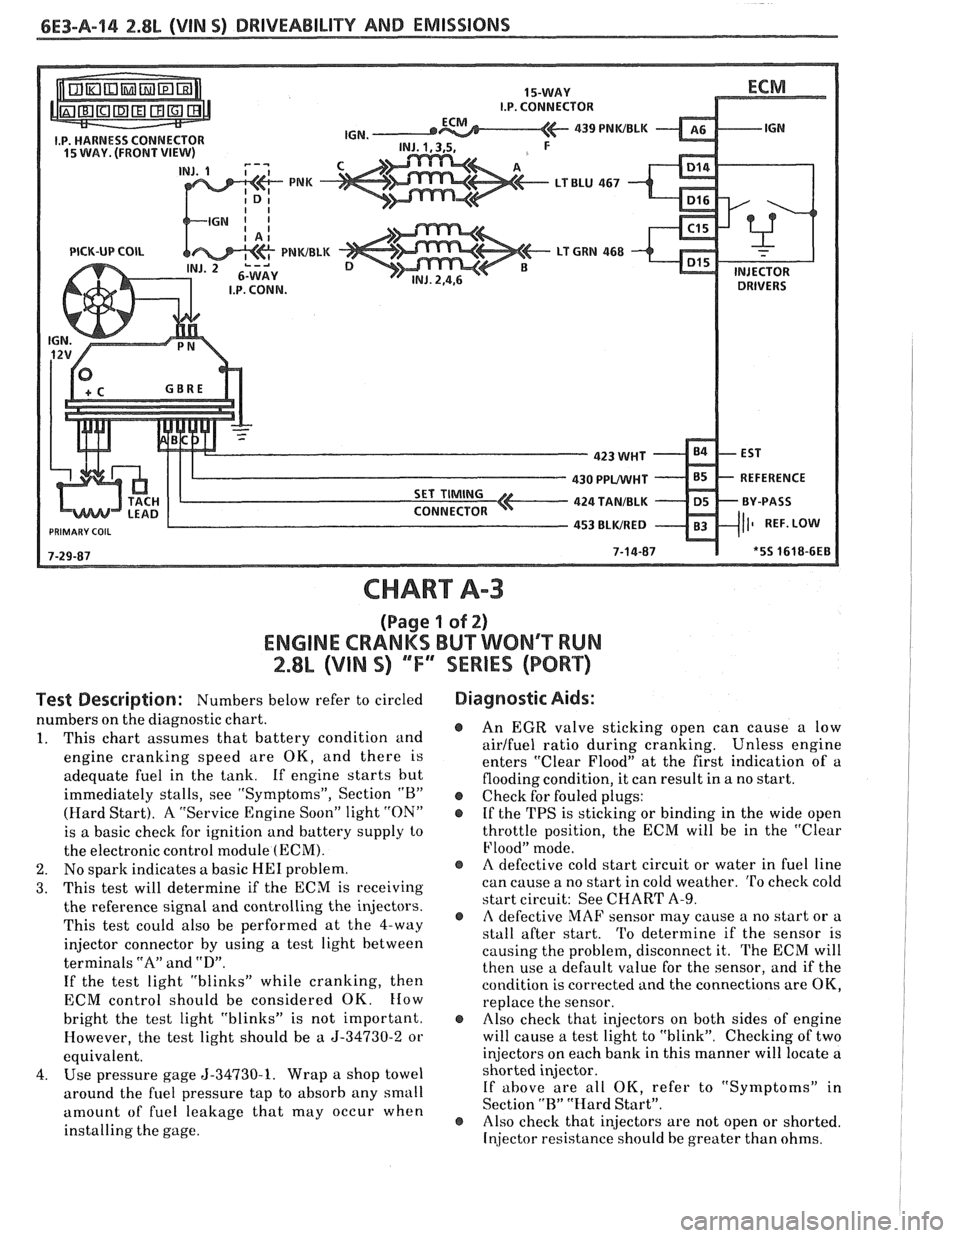
CHART A-3
(Page 1 of 2)
ENGINE CRANKS BUT WON'T RUN
2.8L (VIN S) ""F'" SERIES (PORT)
Test Description: Numbers below refer to circled
numbers on the diagnostic chart.
1. This chart
assunles that battery condition and
engine cranking speed are OK, and there is
adequate fuel in the tank. If engine starts but
immediately stalls, see "Symptoms", Section
"B"
(Hard Start). A "Service Engine Soon" light "ON"
is a basic check for ignition and battery supply to
the electronic control module
(ECM).
2. No sparlc indicates a basic HE1 problem.
3. This test will determine if the ECM is receiving
the reference signal and controlling the injectors.
This test could also be performed at the 4-way
injector connector by using a test light between
terminals
"A" and "D".
If the test light "blinks" while cranking, then
ECM control should be considered OK.
How
bright the test light "blinks" is not important.
However, the test light should be a
5-34730-2 or
equivalent.
4. Use pressure gage 5-34730-1. Wrap a shop towel
around the fuel pressure tap to absorb any small
amount of fuel leakage that may occur when
installing the gage.
Diagnostic Aids:
@ An EGR valve sticking open can cause a low
airlfuel ratio during cranking. Unless engine
enters "Clear Flood" at the first indication of a
flooding condition, it can result in a no start.
@ Check for fouled plugs:
@ If the TPS is sticking or binding in the wide open
throttle position, the ECM will be in the "Clear
Flood" mode.
@ A defective cold start circuit or water in fuel line
can cause a no start in cold weather.
To check cold
start circuit: See CHART
A-9.
e A defective MAF sensor may cause a no start or a
stall after start. 'I'o determine if the sensor is
causing the problem, disconnect it. The ECM will
then use a default value for the sensor, and if the
condition is corrected and the connections are OK,
replace the sensor.
@ Also check that injectors on both sides of engine
will cause a test light to "blink". Checking of two
injectors on each bank in this manner will locate a
shorted injector.
If
above are all OK, refer to "Symptoms" in
Section
"R" "Hard Start".
@ Also checlc that injectors are not open or shorted.
Injector resistance should be greater than ohms.
Page 677 of 1825
6E3-A-24 2.8L (WIN 5) DRIVEABILITY AND EMISSIONS
OXYGEN ( 02) SENSOR
-
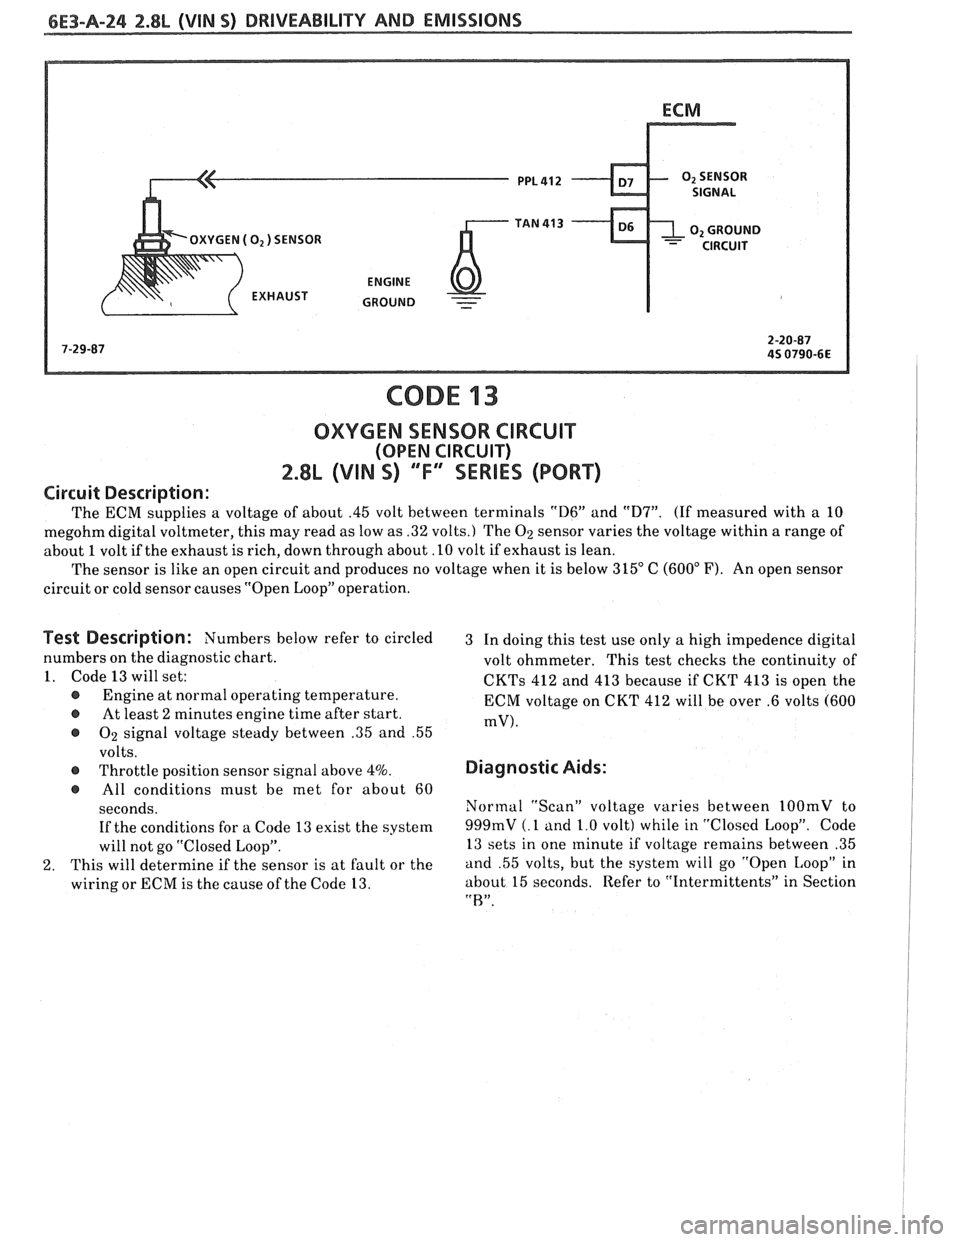
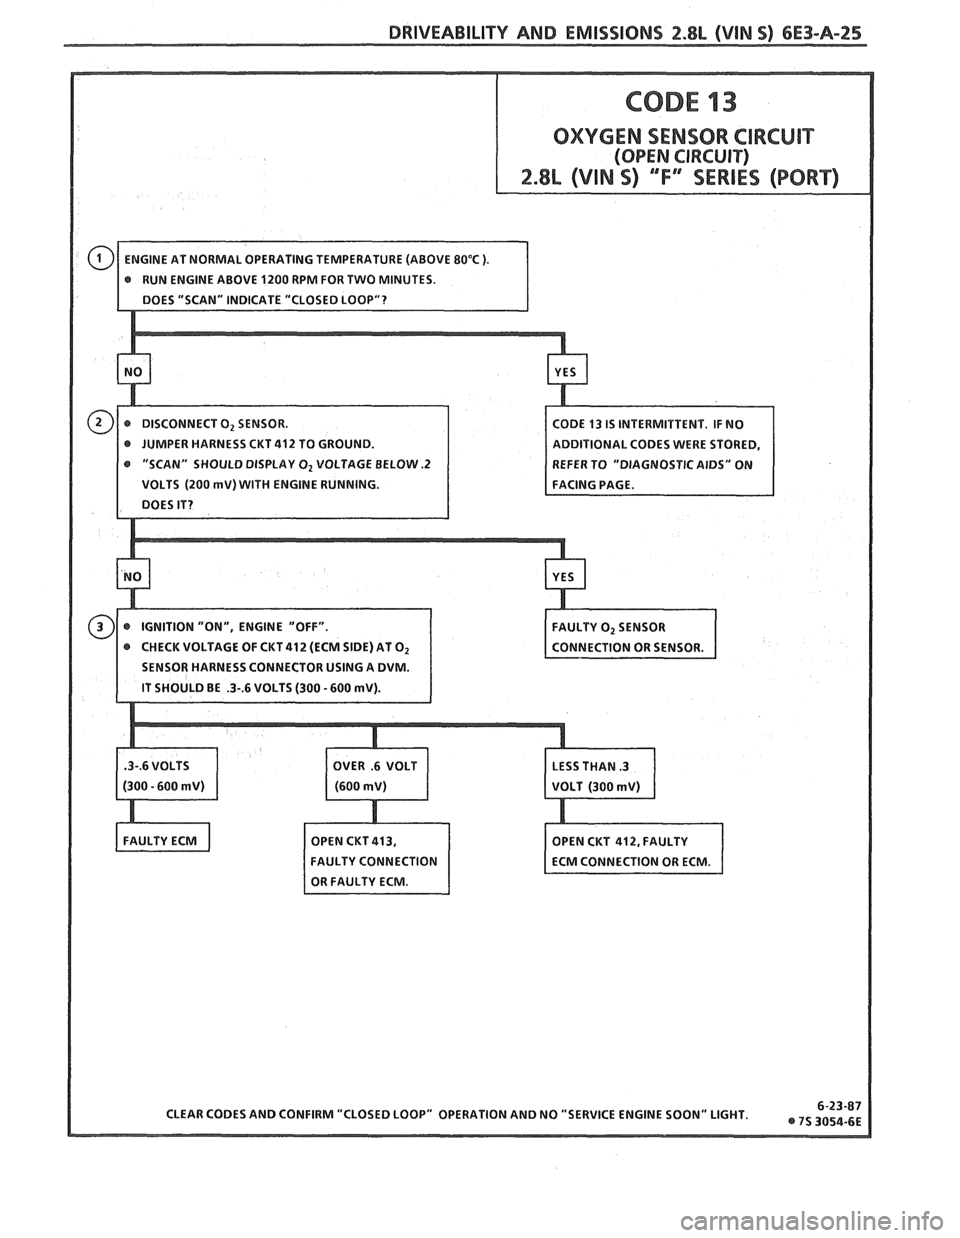
CODE 13
OXYGEN SENSOR CIRCUIT
(OPEN CIRCUIT)
2.8L (VIN S) ""FXSERlES (PORT)
Circuit Description:
The ECM supplies a voltage of about .45 volt between terminals "D6" and "D7". (If measured with a 10
megohm digital voltmeter, this may read as low as .32 volts.) The
02 sensor varies the voltage within a range of
about
1 volt if the exhaust is rich, down through about. 10 volt if exhaust is lean.
The sensor is like an open circuit and produces no voltage when it is below 315" C
(600" F). An open sensor
circuit or cold sensor causes "Open Loop" operation.
Pest Description: Numbers below refer to circled
3 In doing this test use only a high impedence digital
numbers on the diagnostic chart.
volt ohmmeter. This test checks the continuity of
1. Code 13 will set:
CKTs 412 and 413 because if CKT 413 is open the @ Engine at normal operating temperature.
ECM voltage on CKT 412 will be over .6 volts (600 @ At least 2 minutes engine time after start. mV). @ 02 signal voltage steady between .35 and .55
volts.
@ Throttle position sensor signal above 4%.
@ All conditions must be met for about 60
seconds. If the conditions for a Code 13 exist the system
will not go "Closed Loop".
2. This will determine if the sensor is at fault or the
wiring or ECM is the cause of the Code 13.
Diagnostic Aids:
Normal "Scan" voltage varies between 1OOmV to
999mV (.1 and 1.0 volt) while in "Closed Loop".
Code
13 sets in one minute if voltage remains between .35
and .55 volts, but the system will go "Open Loop" in
about 15 seconds, Refer to "Intermittents" in Section
"R".
Page 678 of 1825
DRIVEABILITY AND EMISSIONS 2.8L (VIN 5) 6E3-A-25
OXYGEN SENSOR CIRCUIT
ODE 13 IS INTERMITTENT. IF NO
@ JUMPER HARNESS CKT 412 TO GROUND. DDlTlONAL CODES WERE STORED,
"SCAN" SHOULD DISPLAY
O2 VOLTAGE BELOW .2
VOLTS (200 mV) WITH ENGINE RUNNING.
CHECK VOLTAGE OF CKT
412 (ECM SIDE) AT O2
SENSOR HARNESS CONNECTOR USING A DVM.
Page 679 of 1825
6E3-A-26 2.8L (VIN 5) DRIVEABILITY AND EMISSIONS
4-WAY CONNECTOR
(REAR OF ENGINE) COOLANT SENSOR
AND MAT
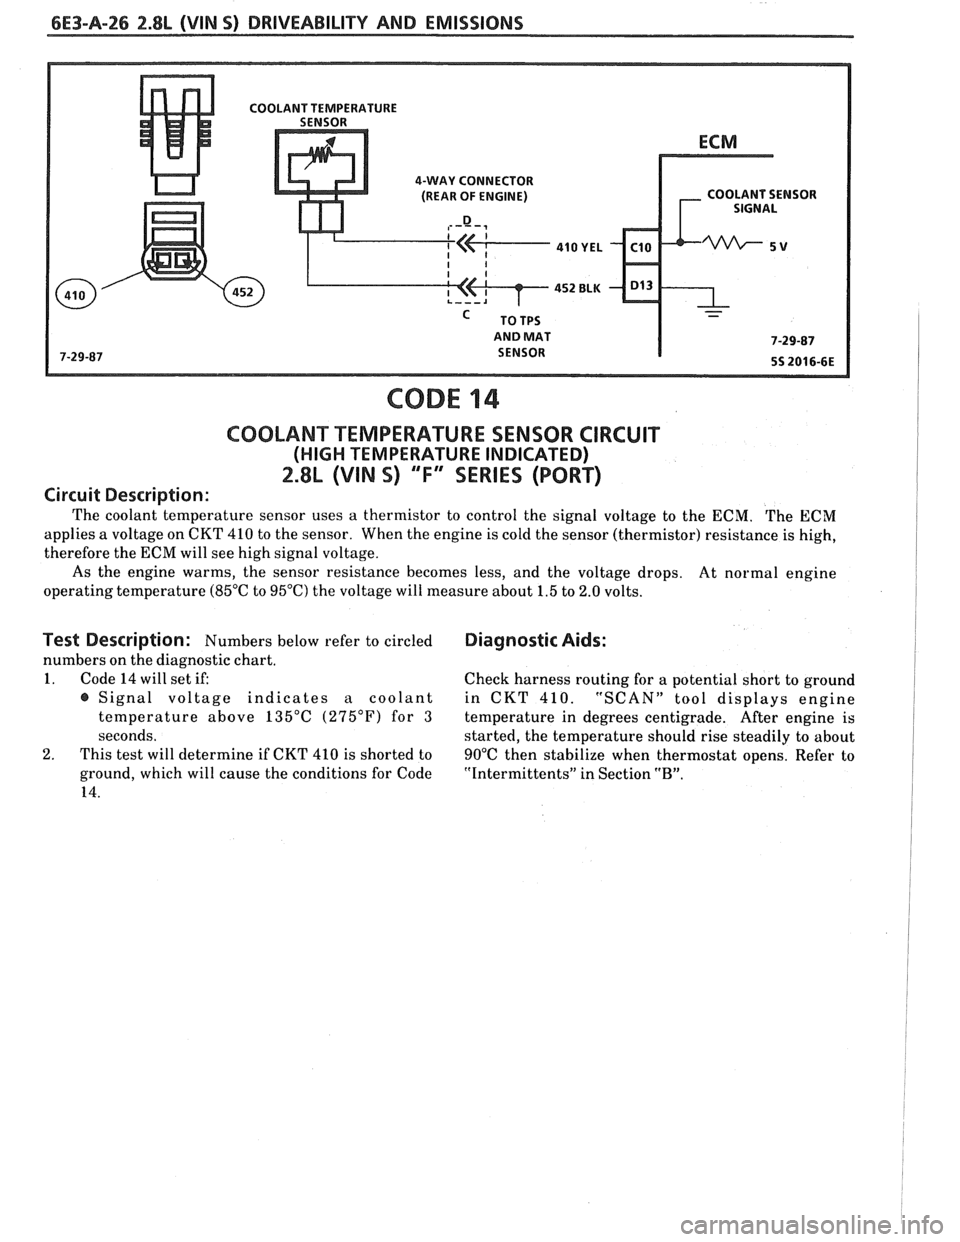
CODE 14
COOLANT TEMPERATURE SENSOR CIRCUIT
(HIGH TEMPERATURE INDICATED)
2.8L (VIN S) ""F-SERIES (PORT)
Circuit Description:
The coolant temperature sensor uses a thermistor to control the signal voltage to the ECM. The ECM
applies a voltage on CKT 410 to the sensor. When the engine is cold the sensor (thermistor) resistance is high,
therefore the ECM will see high signal voltage.
As the engine warms, the sensor resistance becomes less, and the voltage drops.
At normal engine
operating temperature (85°C to 95°C) the voltage will measure about 1.5 to 2.0 volts.
Test Description: Numbers below refer to circled Diagnostic Aids:
numbers on the diagnostic chart.
1. Code 14 will set if:
Check harness routing for a potential short to ground
@ Signal voltage indicates a coolant in CKT 410. "SCAN" tool displays engine
temperature above 135°C (275°F) for
3 temperature in degrees centigrade. After engine is
seconds. started, the temperature should rise steadily to about
2. This test will determine if CKT 410 is shorted to
90°C then stabilize when thermostat opens. Refer to
ground, which will cause the conditions for Code
"Intermittents" in Section "B".
14.