1988 PONTIAC FIERO sensor
[x] Cancel search: sensorPage 571 of 1825
6EZ-C1-16 DRIVEABILITY AND EMISSIONS - 5.OL (VIN E)
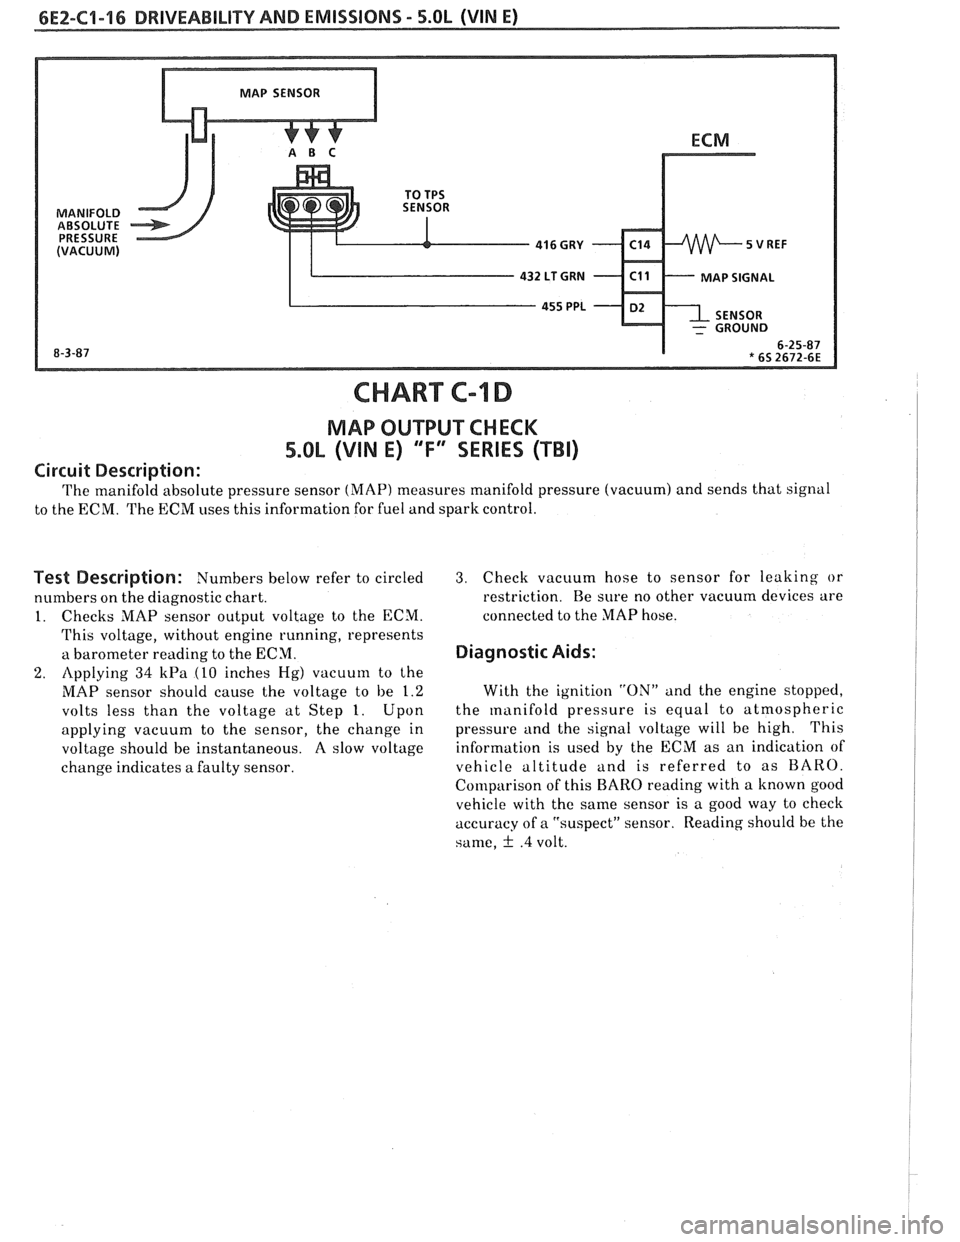
MAP SIGNAL
CHART C-l D
MAP OUTPUT CHECK
5.OL (VIN E) 'T" SERIES (TBI)
Circuit Description:
The manifold absolute pressure sensor (MAP) measures manifold pressure (vacuum) and sends that signal
to the ECM. The ECM uses this information for fuel and spark control.
Test Description: Numbers below refer to circled
numbers on the diagnostic chart.
1. Checks MAP sensor output voltage to the ECM.
This voltage, without engine running, represents
a barometer reading to the ECM.
2. Applying 34 kPa (10 inches Hg) vacuum to the
MAP sensor should cause the voltage to be 1.2
volts less than the voltage at Step 1. Upon
applying vacuum to the sensor, the change in
voltage should be instantaneous. A slow voltage
change indicates
a faulty sensor.
3. Check vacuum hose to sensor for leaking or
restriction. Re sure no other vacuum devices are
connected to the MAP hose.
Diagnostic Aids:
With the ignition "ON" and the engine stopped,
the
manifold pressure is equal to atmospheric
pressure and the signal voltage will be high. This
information is used by the ECM as an indication of
vehicle altitude and is referred to as BARO.
Comparison of this
BARO reading with a known good
vehicle with the same sensor is a good way to check
accuracy of a "suspect" sensor. Reading should be the
same,
f .4 volt.
Page 576 of 1825
DRIVEABILIW AND EMISSIONS - 5.OL (VIN E) 6E2-62-1
SECTION C2
FUEL CONTROL SYSTEM
TBI MODEL 228
CONTENTS
GENERAL DESCRIPTION . . . . . . . . . . . . . . . C2-1
PURPOSE ......................... C2-1
MODES OF OPERATION . . . . . . . . . . . . . . C2-1
Starting Mode . . . . . . . . . . . . . . . . . . . C2-1
Clear Flood Mode . . . . . . . . . . . . . . . . C2-2
RunMode . . . . . . . . . . . . . . . . . . . . . . C2-2
Open Loop . . . . . . . . . . . . . . . . . . . . . . C2-2
Closed Loop . . . . . . . . . . . . . . . . . . . . . C2-2
Acceleration Mode . . . . . . . . . . . . . . . C2-2
Deceleration Mode . . . . . . . . . . . . . . . C2-2
Battery Correction Mode . . . . . . . . . . . C2-2
Fuel Cut Off Mode . . . . . . . . . . . . . . . . C2-2
FUEL CONTROL SYSTEM COMPONENTS
. . . C2-2
BASIC SYSTEM OPERATION . . . . . . . . . . . C2-3
THROTTLE BODY INJECTION (TBI) UNIT. . . C2-3
Fuel Injectors . . . . . . . . . . . . . . . . . . . . C2-3
Pressure Regulator . . . . . . . . . . . . . . . C2-3
ldle Air Control (IAC) Valve . . . . . . . . . . C2-4
Throttle Position Sensor (TPS) . . . . . . . . C2-4
FUEL PUMP.. . . . . . . . . . . . . . . . . . . . . . . C2-5
FUEL PUMP ELECTRICAL CIRCUIT . . . . . . . C2-5
DIAGNOSIS . . . . . . . . . . . . . . . . . . . . . . * C2-5
FUEL CONTROL . . . . . . . . . . . . . . . . . . . . C2-5
GENERAL DESCRIPTION
PURPOSE
The basic function of the fuel control system is to
control fuel delivery to the engine. Fuel is delivered to
the engine by
a throttle body injection ('FBI) unit.
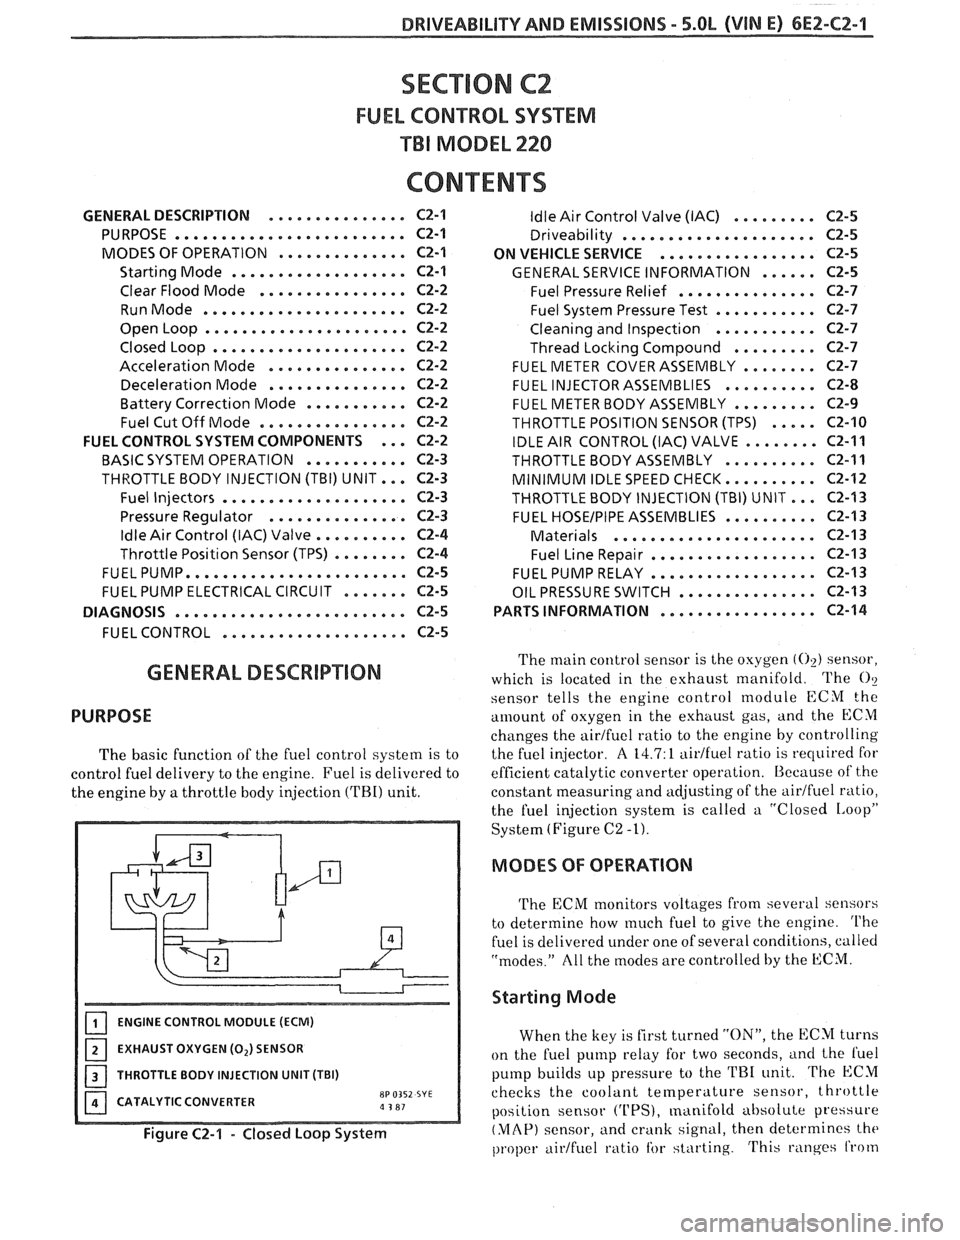
ENGINE CONTROL MODULE (ECM)
EXHAUST OXYGEN (0,) SENSOR
I 1 THROTTLE BODY INJECTION UNIT (TBI)
CATALYTIC CONVERTER
8P 0352 SYE a 3 81
Figure C2-1 - Closed Loop System
ldle Air Control Valve (IAC) . . . . . . . . . C2-5
Driveability . . . . . . . . . . . . . . . . . . . .. C2-5
ON VEHICLE SERVICE
. . . . . . . . . . . . . . . . . C2-5
GENERAL SERVICE INFORMATION . . . . . . C2-5
Fuel Pressure Relief . . . . . . . . . . . . . . . C2-7
Fuel System Pressure Test . . . . . . . . . . . C2-7
Cleaning and Inspection . . . . . . . . . . . C2-7
Thread Locking Compound . . . . . . . . . C2-7
FUEL METER COVER ASSEMBLY . . . . . . . . C2-7
FUEL INJECTOR ASSEMBLIES . . . . . . . . . . C2-8
FUEL METER BODY ASSEMBLY . . . . . . . . . C2-9
THROTTLE POSITION SENSOR (TPS) . . . . . C2-10
IDLE AIR CONTROL (IAC) VALVE . . . . . . . . C2-11
THROTTLEBODYASSEMBLY .......... C2-11
MINIMUM IDLE SPEED CHECK.. . . . . . . . . C2-12
THROTTLE BODY INJECTION (TBI) UNIT.. . C2-I3
FUEL HOSEIPIPE ASSEMBLIES . . . . . . . . . . C2-13
Materials . . . . . . . . . . . . . . . . . . . . . . C2-13
Fuel Line Repair . . . . . . . . . . . . . . . . . . C2-13
FUEL PUMP RELAY . . . . . . . . . . . . . . . . . . C2-13
OIL PRESSURE SWITCH . . . . . . . . . . . . . . . C2-13
PARTS INFORMATION
. . . . . . . . . . . . . . . . . C2-14
The main control sensor is the oxygen (02) sensor,
which is located in the exhaust manifold. The
O?
sensor tells
the engine control module ECM the
amount of osygen in the exhttust gas, and the ECM
changes the airtfuel ratio to the engine by controlling
the fuel injector.
A 14.7: 1 aidfuel ratio is required for
efficient catalytic converter operation. Because of the
constant measuring and adjusting of the
airlfuel ratio,
the fuel injection system is called a "Closed
IAoopP
System (Figure C2 -1).
MODES OF OPERATION
The ECM monitors voltages from several sensors
to determine how
much fuel to give the engine. The
fuel is delivered under one of several conditions, called
"modes." All the modes are controlled by the ECM.
Starting Mode
When the key is first turned "ON", the ECM turns
on the fuel pump relay for two seconds,
i~nd the l'uel
pump builds up pressure to the TRI unit. The ECM
checks the coolant
temperature sensor, throttle
position sensor
('UPS), manifold absolute pressure
(MAP) sensor, and crank signal, then determines the
proper airtfuel ratio tbr starting. This ranges from
Page 577 of 1825
6EZ-C2-2 DRIVEABILITY AND EMISSIONS - 5.8b (VIN E)
1.5:1 at -36°C (-33°F) to 14.7:1, at 94°C (201°F)
running temperature.
The ECM controls the amount of fuel delivered in
the starting mode by changing how long the injector is
turned "ON" and "OFF". This
is done by "pulsing" the
injector for very short times.
Clear Flood Mode
If the engine floods, clear it by pushing the
accelerator pedal down all the way. The ECM then
pulses the injector at a
20:1 airlfuel ratio, and holds
this injector rate as long as the throttle stays wide
open, and the engine is below 600 rpm. If the throttle
position becomes less than
80%, the ECM returns to
the starting mode.
Run Mode
The run mode has two conditions called "Open
Loop" and "Closed Loop."
Open Loop
When the engine is first started, and it is above
400 rpm, the system goes into "Open Loop" operation.
In "Open Loop," the ECM ignores the signal from the
(02) sensor, and calculates the airlfuel ratio based on
inputs from the coolant temperature and MAP
sensors.
The system stays in "Open Loop" until the
following conditions are met:
1. The
O2 sensor has varying voltage output,
showing that it is hot enough to operate properly.
(This depends on temperature.)
2. The coolant temperature sensor is above a
specified temperature.
3. A specific amount of time has elapsed after
starting the engine.
Closed Loop
The specific values for the above conditions vary
with different engines, and are stored in the
programmable read only memory (PROM). When
these conditions are met, the system goes into "Closed
Loop" operation. In "Closed Loop," the ECM
calculates the
aidfuel ratio (injector on-time) based on
the signal from the
O2 sensor. This allows the aidfuel
ratio to stay very close to 14.7:1.
Acceleration Mode
The ECM looks at rapid changes in throttle
position and manifold pressure, and provides extra
fuel.
Deceleration Mode
When deceleration occurs, the fuel remaining in
the intake manifold can cause excessive emissions and
backfiring. Again, the ECM looks at changes in
throttle position and manifold pressure and reduces
the amount of fuel. When deceleration is very fast, the
ECM can cut off fuel completely for short periods.
Battery Voltage Correction Mode
When battery voltage is low,
the ECM can
compensate for a wealc spark delivered by the
distributor by:
@ Increasing injector on time of fuel delivered;
@ Increasing the idle rpm.
Fuel Cutoff Mode
No fuel is delivered by the injectors when the
ignition is "OFFJ'. This prevents dieseling. Also, fuel
is not delivered if no reference pulses are seen from
the distributor, which means the engine is not
running.
Fuel cutoff also occurs at high engine
rpm, to protect internal engine components from
damage.
FUEL CON"%ROL SYSXM
COMPONENTS
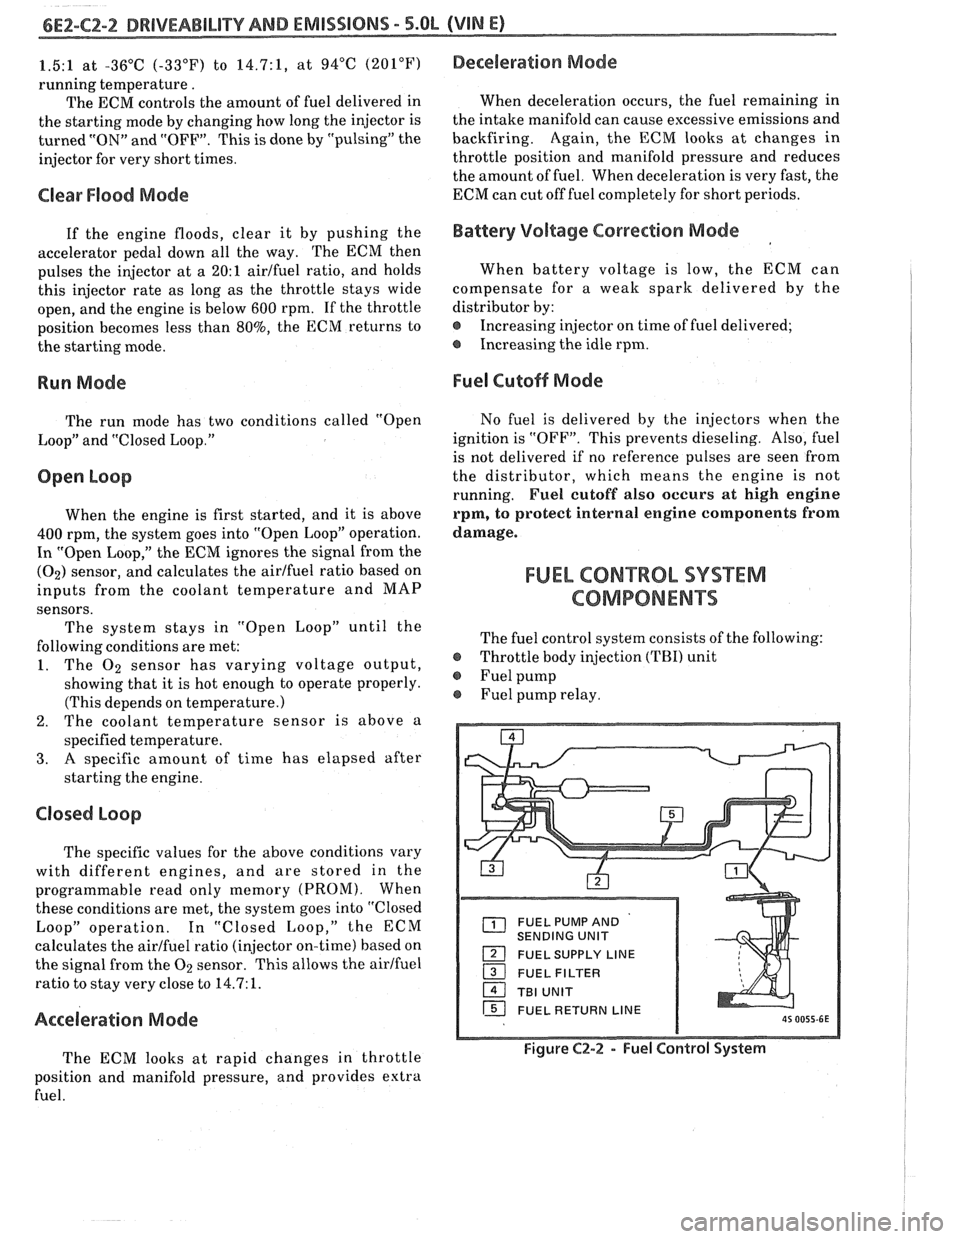
The fuel control system consists of the following:
@ Throttle body injection (TBI) unit
@ Fuel pump
Fuel pump relay.
FUEL PUMP AND
SENDING UNIT
FUEL SUPPLY LINE
16 FUEL RETURN LINE
Figure C2-2 - Fuel Control System
Page 578 of 1825
DRIVEABILITY AND EMlSSlONS - 5.0L (VIN E) 6E2-C2-3
BASIC SYSTEM OPERATION
The fuel control system (Figure C2-2) has an
electric fuel pump, located in the fuel tank with the
gage sending unit, which pumps fuel to the TBI
through the fuel supply line, then through an in-line
fuel filter. The pump is designed to provide
pressurized fuel at about 125
kPa (18 psi). A pressure
regulator in the TBI keeps fuel available to the
injectors at a constant pressure between 62 and 90
kPa (9 and 13 psi). Fuel in excess of injector need is
returned to the fuel tank by
a separate line.
The ECM controls the injectors that are located in
the fuel meter body assembly of the TBI. The injectors
deliver fuel in one of several modes, described above.
In order to properly control the fuel supply, the
fuel pump is operated by the ECM through the fuel
pump relay and oil pressure switch (see "Fuel Pump
Electrical Circuit").
THROTTLE BODY INJECTION (TBI) UNIT
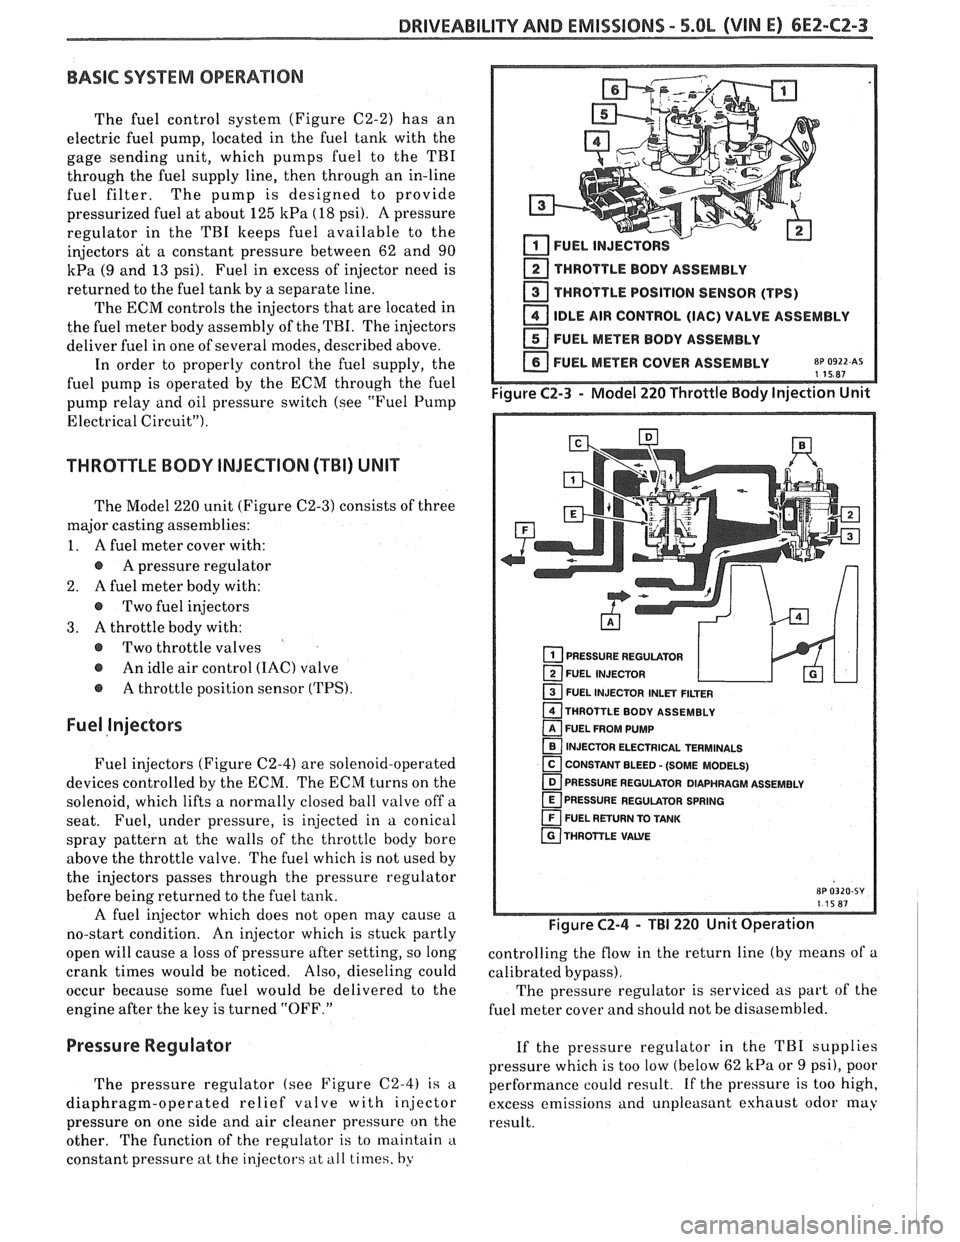
The Model 220 unit (Figure C2-3) consists of three
major casting assemblies:
1. A fuel meter cover with:
A pressure regulator
2.
A fuel meter body with:
@ Two fuel injectors
3. A throttle body with:
@ Two throttle valves
@ An idle air control (IAC) valve
@ A throttle position sensor (TPS).
Fuel Injectors
Fuel injectors (Figure C2-4) are solenoid-operated
devices controlled by the ECM. The ECM turns on the
solenoid, which lifts a normally closed ball valve off a
seat. Fuel, under pressure, is injected in a conical
spray pattern at the walls of
the throttle body bore
above the throttle valve. The fuel which is not used by
the injectors passes through the pressure regulator
before being returned to the fuel tank.
A fuel injector which does not open may cause a
no-start condition. An injector which is stuck partly
open will cause a loss of pressure after setting, so long
crank times would be noticed. Also, dieseling could
occur because some fuel would be delivered to the
engine after the key is turned "OFF."
2 THROTTLE BODY ASSEMBLY
THROTTLE POSITION SENSOR (TPS)
IDLE AIR CONTROL (IAC) VALVE ASSEMBLY
FUEL METER BODY ASSEMBLY
FUEL METER COVER ASSEMBLY
8~ 0922 AS 115R7
PRESSURE REGULATOR
FUEL INJECTOR
1 FUEL INJECTOR INLET FILTER
THROTTLE BODY ASSEMBLY
FUEL FROM PUMP
INJECTOR ELECTRICAL TERMINALS
[ CONSTANT BLEED - (SOME MODELS) - PRESSURE REGULATOR DIAPHRAGM ASSEMBLY
PRESSURE REGULATOR SPRING
FUEL RETURN TO TANK
THROTTLE
VAWE
Figure C2-4 - TBI 220 Unit Operation
controlling the flow in the return line (by means of a
calibrated bypass).
The pressure regulator is serviced as part
of the
fuel meter cover and should not be disasembled.
Pressure Regulator If the pressure regulator in the TBI supplies
pressure which
is too low (below 62 kPa or 9 psi), poor
The pressure regulator (see Figure
C2-4) is a performance could result. if the pressure is too high,
diaphragm-operated relief valve with injector excess emissions and unpleasant exhaust odor
may
pressure on one side and air cleaner pressure on the
result.
other. The function of the regulator is to maintain
'1
constant pressure at the in.jecto1.s at ill1 times, by
Page 579 of 1825
6EZ-C2-4 DRIVEABILITY AND EMISSIONS - 5.OL (VIN El
[isj FUEL METER COVER bL BODY ASSEMBLIES
1 THROTTLE BODY ASSEMBLY
1 IDLE AIR CONTROL VALVE ASSEMBLY - FILTERED AIR INLET
PlNTLE
TWRO$TLE VAWE
VACUUM PORTS - FOR ENGINE OR EMISSION
CONTROLS
8P 0319-SY 111 5W7
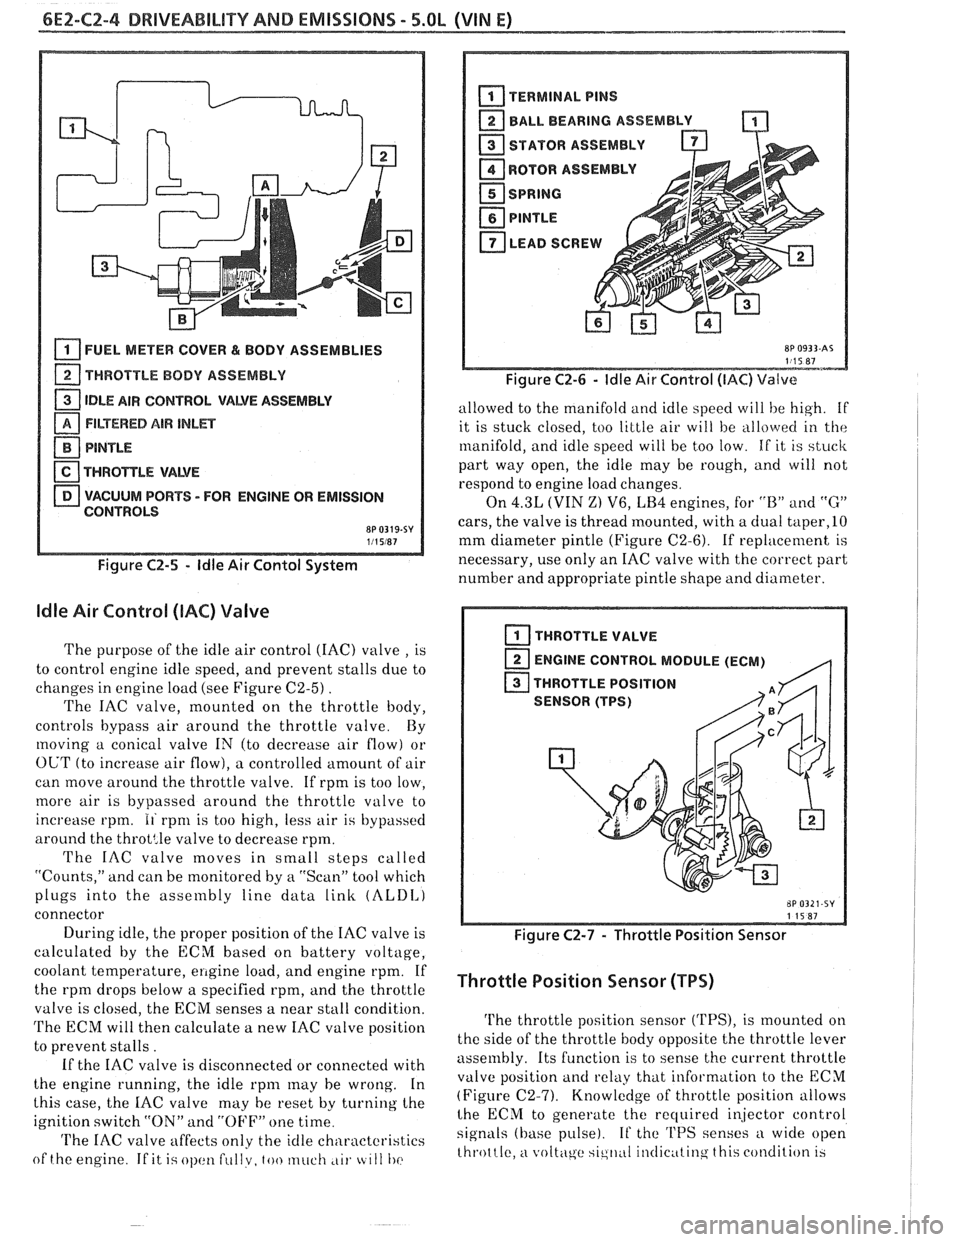
Figure C2-5 - ldle Air Contol System
ldle Air Control (IAC) Valve
The purpose of the idle air control (IAC) valve , is
to control engine idle speed, and prevent stalls due to
changes in engine load (see Figure
C2-5) .
The IAC valve, mounted on the throttle body,
controls bypass air around the throttle valve By
moving a conical valve IN (to decrease air flow) or
OUT (to increase air flow), a controlled amount of air
can move around the throttle valve. If rpm is too low,
more air is bypassed around the throttle valve to
increase rpm.
11 rpnl is too high, less air is bypassed
around the
throt:le valve to decrease rpm.
The IAC valve moves in small steps called
"Counts," and can be monitored by
a "Scan" tool which
plugs into the assembly line data
link (ALDI,)
connector
During idle, the proper position of the IAC valve is
calculated by the ECM based on battery voltage,
coolant temperature,
ellgine load, and engine rpm. If
the rpm drops below a specified rpm, and the throttle
valve is closed, the ECM senses a near stall condition.
The ECM will then calculate a new IAC valve position
to prevent stalls.
If the IAC valve is disconnected or connected with
the engine running, the idle
rpnl may he wrong. In
this case, the
IAC valve may he reset by turning the
ignition switch "ON" and
"OFF" one time
'I'he IAC valve affects only the idle characteristics
of the engine
If it i.; ol)cltl fullv, too much ,LII. tc 111 I)(>
BALL BEARING ASSEMBLY -
STATOR ASSEMBLY
ROTOR
ASSEMBL
I
SPRING
PlNTLE
LEAD SCREW A
Figure C2-6 - ldle Air Control (IAC) Valve
allowed to the manifold and idle speed will he high. if
it is stuck closed, too little air will be
allo\verl in the
manifold, and idle speed will be too low. If it is stuck
part way open, the idle may be rough, and will not
respond to engine load changes.
On
4.3L (VIN Z) V6, LB4 engines, for "B" and "G"
cars, the valve is thread mounted, with a dual taper,lO
mm diameter pintle (Figure C2-6). If replacement is
necessary, use only an IAC valve with the correct part
number and appropriate pintle shape and diameter.
I THROTTLE VALVE
ENGINE CONTROL MODULE (ECM)
,q
THROTTLE POSITION
SENSOR (TPS)
Figure C2-7 - Throttle Position Sensor
Throttle Position Sensor (TPS)
The throttle position sensor ('I'PS), is mounted on
the side of the throttle body opposite the throttle lever
assembly. Its function is to sense the current throttle
valve position
and relkly that information to the ECM
(Figure (22-7). Knowledge of throttle position allows
lhe ECM to generate the recluired i~jector control
signals (base pulse). If the 'I'PS senses a wide open
throttle,
a voltc\ge sic,ll,~I il~tlic~ttinq this condition 13
Page 581 of 1825
6E2-C2-6 DRIVEABILITY AND EMISSIONS - S.OL (VIN E)
PARTS
M
IDENTIFICATION
ode1 220 TBI
Screw Assembly - Fuel Mete1
Cover Attaching - Long
Screw Assembly
- Fuel Mete1
Cover Attaching - Short
Fuel Meter Cover Assembly
Gasket
- Fuel Meter Cover
Gasket
- Fuel Meter Outlet
Seal
- Pressure Regulator
Pressure Regulator
Injector
- Fuel
Filter
- Fuel lnjector lnlet
O-ring
- Fuel lnjector - Lower
O-ring
-Fuel lnjector - Upper
Washer
- Fuel lnjector
Screw Assembly - Fuel Metel
Body - Throttle Body
Attaching
Fuel Meter Body Assembly
Gasket -Throttle Body to
Fuel Meter Body
Gasket
- Air Cleaner
O-ring
- Fuel Return Line
Nut
- Fuel Outlet
O-ring
- Fuel lnlet Line
Nut
- Fuel lnlet
Gasket
- Fuel Outlet Nut
Gasket
- Fuel lnlet Nut
Screw Assembly
- TPS
Attaching Retainer
- TPS Attaching
Screw
Sensor
- Throttle Position
Plug
-Idle Stop Screw
Screw Assembly
- ldle Stop
Spring
- ldle Stop Screw
Throttle Body Assembly
Gasket
- Flange
Valve Assembly
- ldle Air
Control
Gasket
- ldle Air Control
Valve Assembly
0-Ring
- IACV
Screw Assembly
- IACV
Attaching
8P 0115-XV
Figure C2-8 - Model 220 TBI Parts Identification
Page 582 of 1825
DRIVEABILITY AND EMISSIONS - 5.BL (VIN E) 6E2-CZ-7
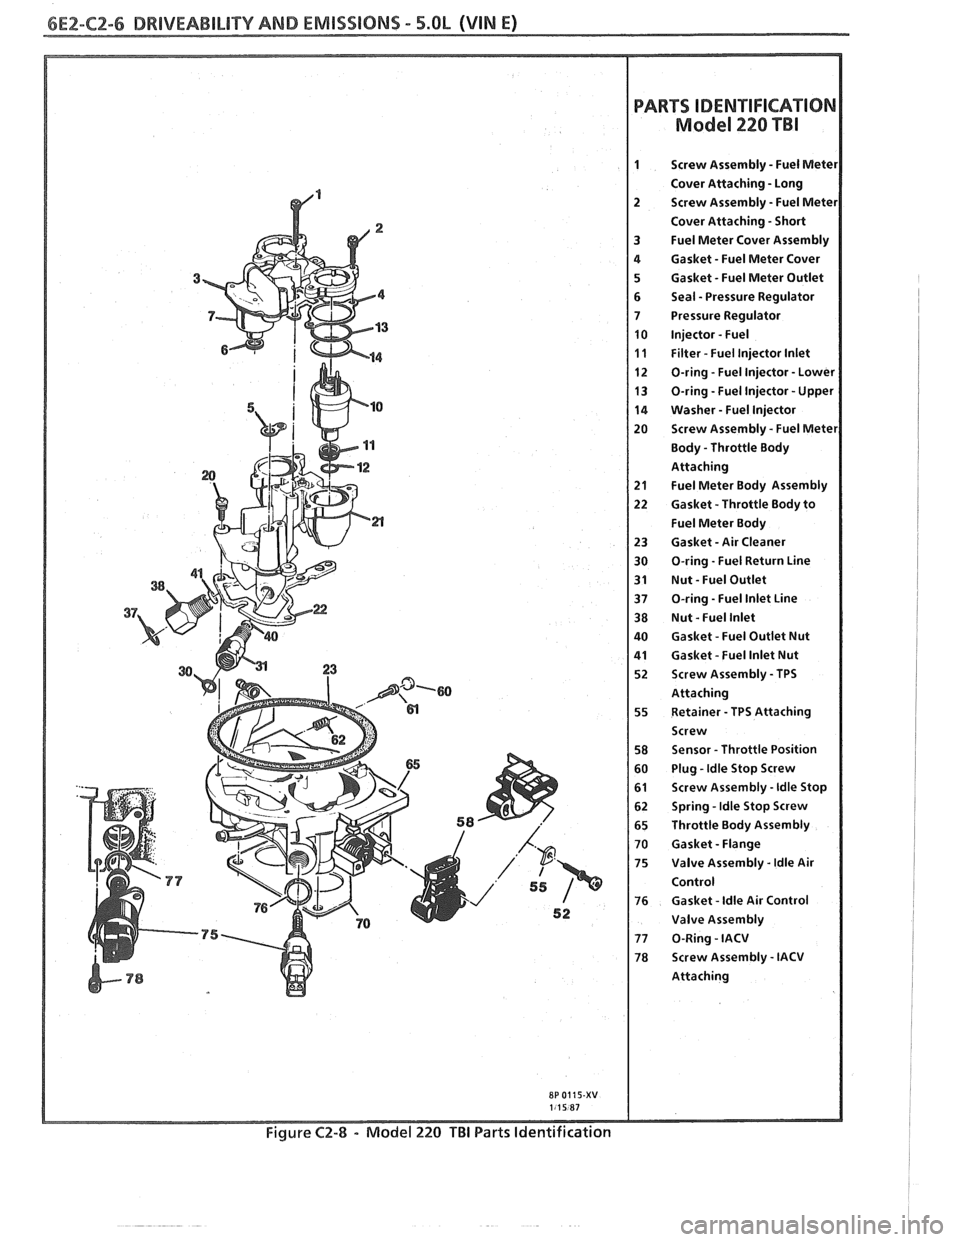
Refer to the disassembled view (Figure C2-8) for
identification of parts during repair procedures.
Service repair of individual components is performed
without removing the TBI unit from the engine. If
removed, it is essential that care is taken to prevent
damage to the throttle valve or sealing surface while
performing any service.
Whenever service is performed on the TBI or any
of its components, first remove the air cleaner, adapter
and air cleaner gaskets. Discard the gaskets and
replace them with new ones before replacing the air
cleaner after service is complete.
When disconnecting the fuel lines, be sure to use a
backup wrench
(J-29698-A, or BT8251-A, or
equivalent) to keep the TBI nuts from turning.
Fuel Pressure Relief
The TBI Model 220 on this engine contains a
constant bleed feature in the pressure regulator that
relieves pressure. Therefore, no special pressure relief
procedure is required.
Fuel System Pressure Pest
A fuel system pressure test is part of several of the
diagnostic charts and symptom checks. To perform
this test, follow this procedure:
1. Turn engine "OFF" to relieve fuel pressure.
2. Remove air cleaner and plug THERMAC vacuum
port on TBI.
3. Uncouple fuel supply flexible hose in engine
compartment. Install fuel pressure gage
J-29658AlBT8205 and adapter 29658A-85
between steel line and flexible hose.
4. Tighten gage in line to ensure no leaks occur
during testing.
5. Start car and observe fuel pressure reading. It
should be 62-90
kPa (9-13 psi); if not, refer to
CHART A-7.
6. Relieve fuel pressure.
7. Remove fuel pressure gage.
8. Reinstall fuel line.
9. Start car and check for fuel leaks.
10. Remove plug from vacuum port and install air
cleaner with new gasket.
Cleaning and inspection
All TBI component parts, with the exception of
those noted below, should be cleaned in a cold
immersion cleaner such as Carbon
X (X-55) or
equivalent.
NOTICE: The throttle position sensor ('I'PS), idle air
control
(IAC) valve, pressure regulator
diaphragm assembly, fuel injectors or other
components containing
rubber,should NOT be placed in a solvent
or cleaner bath. A chemical reaction will
cause these parts to swell, harden or
distort. Do not soak the throttle body with
the above parts attached. If the throttle
body assembly requires cleaning, soaking
time in the cleaner should be kept to a
minimum. Some models have hidden
throttle shaft dust seals that could lose
their effectiveness by extended soaking.
1. Clean all metal parts thoroughly and blow dry
with shop air. Be sure that all fuel and air
passages are free of dirt or burrs.
2. Inspect mating casting surfaces for damage that
could affect gasket sealing.
Thread Locking Compound
Service repair kits are supplied with a small vial
of thread locking compound with directions for use. If
material is not available, use Loctite 262, or
GM part
number 10522624, or equivalent.
NOTICE: Do not use a higher strength locking
compound than recommended, since to do
so could make removing the screw
extremely difficult, or result in damaging
the screw head.
FUEL METER COVER ASSEMBLY
Replacement (Figure
C2-9)
The fuel meter cover assembly contains the fuel
pressure regulator assembly. The regulator has been
adjusted at the factory and should only be serviced as
a complete preset assembly.
CAUTION: DO NOT remove the four screws
securing the pressure regulator to
the fuel meter cover. The fuel
pressure regulator includes a large
spring under heavy compression
which, if accidentally released,
could cause personal injury.
Disassembly might also result in a
fuel leak between the diaphragm
and the regulator container.
Remove or Disconnect
I. Electrical connectors to fuel injectors. (Squeeze
plastic tabs and pull straight up.)
2. Long
and short fuel meter cover screw assemblies.
3. Fuel meter cover assembly.
Page 585 of 1825
6E2-CZ-10 DRlVEABlLlTV AND EMISSIONS - 5.OL (WIN E)
FUEL METER BODY ASSEMBLY
THROTTLE BODY TO FUEL METER BODY GASKET
- 13 FUEL OUTLET NUT CASKET
1 FUEL OUTLET NUT - 1 FUEL$ETURN LlNE "Ow RING
1 FUEL INLET LlNE "Ow RlNG
FUEL INLET NUT
1 FUEL INLET NUT GASKET
1 THROTTLE BODY ASSEMBLY
FUEL
MmER BODY - TWROmLE BODY AWACHING
SCREW ASSEMBLY
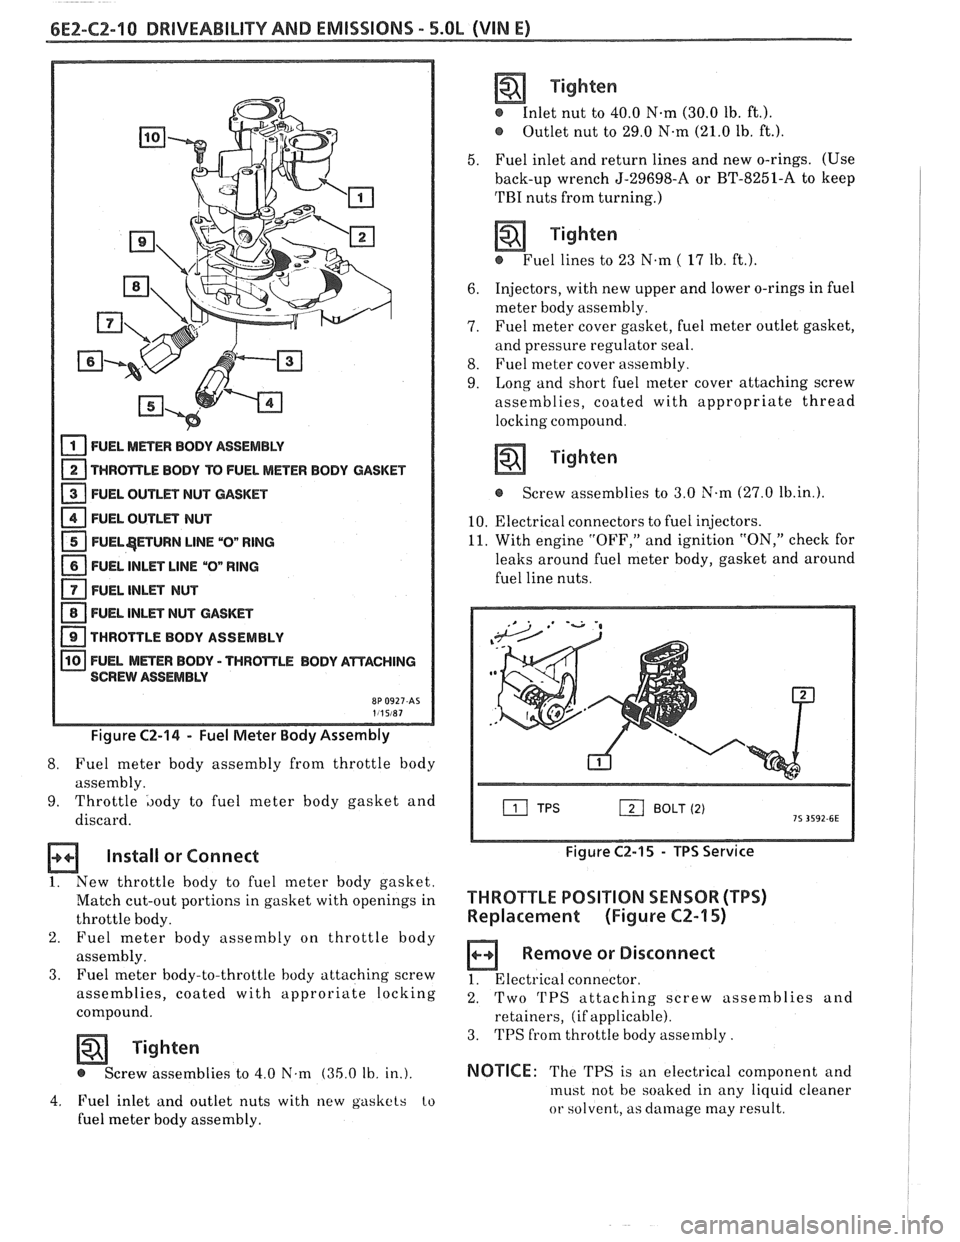
Figure C2-14 - Fuel Meter Body Assembly
8. Fuel
meter body assembly from throttle body
assembly.
9. Throttle ,)ody to fuel meter body gasket and
discard.
a Install or Connect
1. New throttle hody to fuel meter body gasket.
Match cut-out portions in gasket with openings in
throttle body.
2. Fuel meter body assembly on throttle body
assembly.
3. Fuel meter body-to-throttle hody attaching screw
assemblies, coated with approriate locking
compound.
Tighten
@ Screw assemblies to 4.0 N.m (35.0 Ib. in.).
4. Fuel inlet and outlet nuts with new gaskets to
fuel meter body assembly.
Tighten
e Inlet nut to 40.0 N.m (30.0 lb. ft.).
Outlet nut to 29.0 N.m (21.0 lb. ft.).
5. Fuel inlet and return lines and new o-rings. (Use
back-up wrench J-29698-A or BT-8251-A to keep
TBI nuts from turning.)
Tighten
@ Fuel lines to 23 N.m ( 17 lb. ft.).
6. Injectors,
with new upper and lower o-rings in fuel
meter body assembly.
7. Fuel meter cover gasket, fuel meter outlet gasket,
and pressure regulator seal.
8. Fuel meter cover assembly.
9. Long and short fuel meter cover attaching screw
assemblies, coated with appropriate thread
locking compound.
Tighten
e Screw assemblies to 3.0 N.m (27.0 lb.in.1.
10. Electrical connectors to fuel injectors.
11. With engine "OFF," and ignition "ON," check for
leaks around fuel meter body, gasket and around
fuel line nuts.
12] BOLT (2)
Figure C2-15 - TPS Service
THROTTLE POSITION SENSOR (TPS)
Replacernent (Figure CZ-15)
Remove or Disconnect
1. Electrical connector.
2. Two 'I'PS attaching screw assemblies and
retainers, (if applicable).
3. TPS from throttle body assembly.
NOTICE: The TPS is an electrical component and
must not be soaked in any liquid cleaner
or solvent, as damage may result.