Page 971 of 1865
DISASSEMBLY 7B
Outlet pipe
83U07B-168
83U07B-169
83U07B-170
3. Remove the governor outlet pipe, governor inlet
pipe, and O-rings.
4. Remove the 2-3 accumulator piston assembly and
O-rings.
5. Remove the bearing housing.
(1) Remove the bolt indicated in the figure.
(2) Remove the roll pin with a pin punch.
(3) Remove the bearing housing by tapping light-
ly with a plastic hammer.
6. Remove the idle gear assembly and output gear
assembly by tapping out from the torque convert-
er side.
83U07B-171
7B-105
Page 973 of 1865

INSPECTION AND REPAIR 7B
INSPECTION AND REPAIR
PRECAUTION
(1) Several of the parts resemble each other; organize them so that they do not get mixed up.
(2) Clean each part with cleaning oil, clean out the oil holes and oil passages with compressed air,
and check that there are no obstructions.
(3) When using cleaning oil and compressed air, wear protective eyewear.
(4) If a clutch plate or brake band is replaced with a new one, soak it in ATF for 2 hours or more
before installing.
(5) Before assembly, apply ATF to all seal rings, rotating parts, and sliding parts.
(6) All seals, gaskets and roll pins must be replaced with new ones during assembly.
(7) Use petroleum jelly, not grease where required.
(8) When it is necessary to replace a bushing, replace the assembly which includes that bushing.
76G07B-217
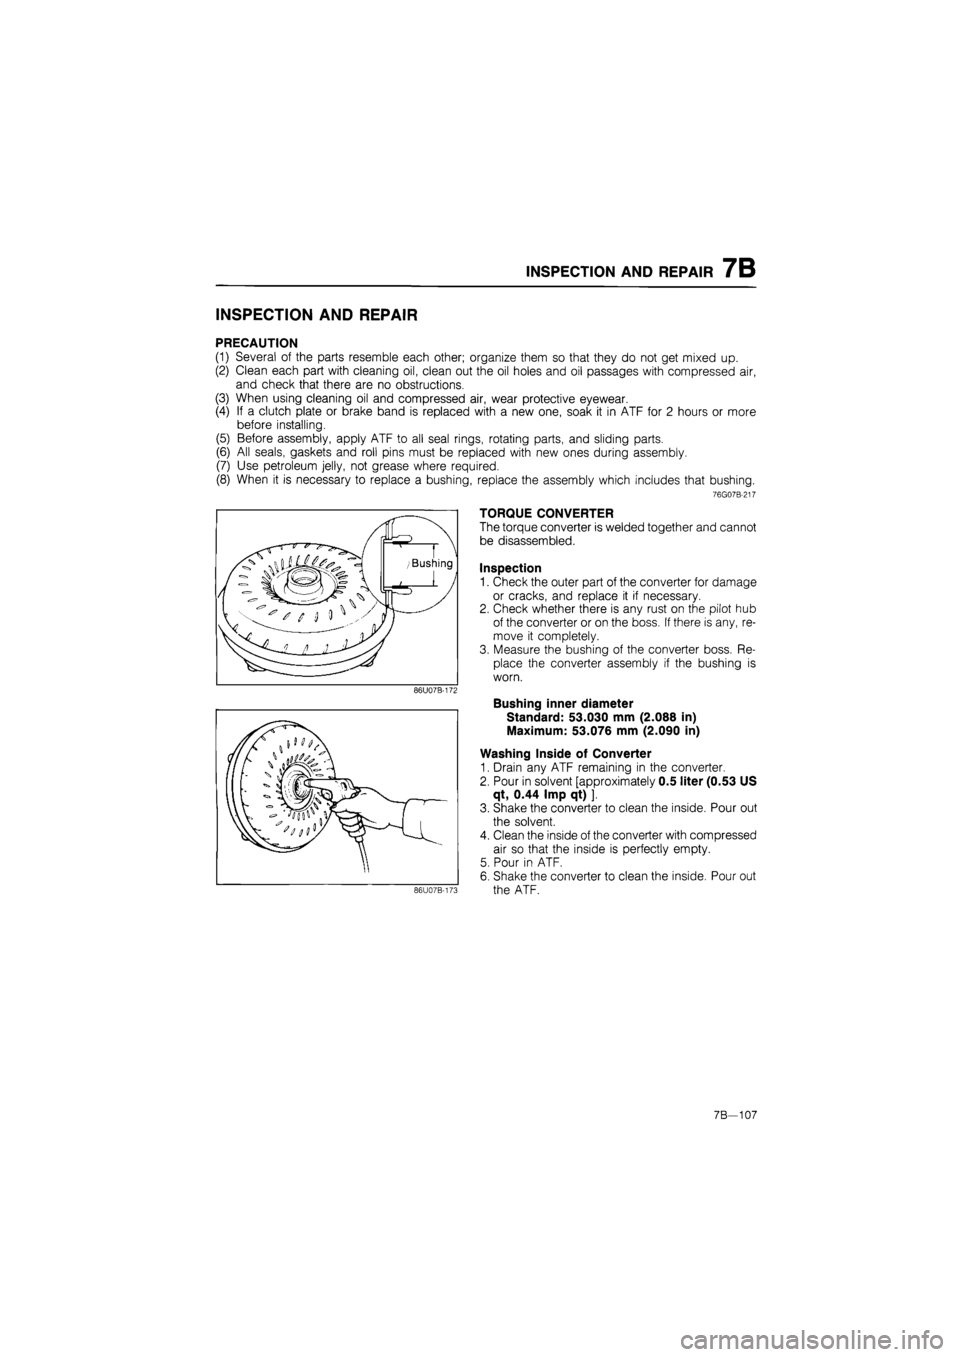
TORQUE CONVERTER
The torque converter is welded together and cannot
be disassembled.
Inspection
1. Check the outer part of the converter for damage
or cracks, and replace it if necessary.
2. Check whether there is any rust on the pilot hub
of the converter or on the boss. If there is any, re-
move it completely.
3. Measure the bushing of the converter boss. Re-
place the converter assembly if the bushing is
worn.
Bushing inner diameter
Standard: 53.030 mm (2.088 in)
Maximum: 53.076 mm (2.090 in)
Washing Inside of Converter
1. Drain any ATF remaining in the converter.
2. Pour in solvent [approximately 0.5 liter (0.53 US
qt, 0.44 Imp qt) ].
3. Shake the converter to clean the inside. Pour out
the solvent.
4. Clean the inside of the converter with compressed
air so that the inside is perfectly empty.
5. Pour in ATF.
6. Shake the converter to clean the inside. Pour out
the ATF.
7B—107
Page 976 of 1865
7B INSPECTION AND REPAIR
Assembly
1. Install the valve and spring into the oil pump body,
and check that the valve moves smoothly.
2. Install the plug.
Tightening torque:
24—35 Nm (2.4—3.6 m-kg, 17—26 ft-lb)
86U07B-178
86U07B-179
/iiiMd ill
I
o (II m IP
f©
vA /J o " /1 °
Q® //joj / // ° r o t
3. Install the cam ring and pivot roller onto the oil
pump body.
4. Install the rotor onto the oil pump body.
86U07B-180
5. Install the vanes into the rotor as shown.
86U07B-181
7B—110
Page 978 of 1865
7B INSPECTION AND REPAIR
86U07B-186
86U07B-187
11. Install the oil pump cover to the oil pump body.
Tighten the bolts in sequence.
Tightening torque:
8—11 Nm (82—112 cm-kg, 71—97 in-lb)
12. Install the oil pump shaft and check for smooth oil
pump operation.
13. Install the seal rings.
14. Apply petroleum jelly to the bearing race
to
secure
it to the oil pump cover; then install it on the oil
pump cover.
Bearing race outer diameter:
88.0 mm (3.46 in)
86U07B-188
7B—112
Page 1009 of 1865
INSPECTION AND REPAIR 7B
P
0©
1(9
© © Q
86U07B-282
86U07B-283
86U07B-284
6. Install the N-R accumulator gasket and plate; then
tighten the plate.
Tightening torque:
6—8
N
m (66—80 cm-kg, 57—69 in-lb)
7. Apply ATF to the O-rings, and install them onto the
piston; then install the 1-2 accumulator piston and
1-2 accumulator springs.
8. Install the 1-2 accumulator gasket and plate; then
tighten the plate.
Tightening torque:
6—8 N-m (66—80 cm-kg, 57—69 in-lb)
9. Install the bypass spring, bypass valve, stopper
plug, and stopper pin.
10. Install the servo control spring, servo control valve,
stopper plug, and stopper pin.
11. Install the 2-3 timing valve, 2-3 timing spring, and
retainer.
86U07B-285
7B—143
Page 1012 of 1865
7B INSPECTION AND REPAIR
2. Install the throttle return spring as shown.
3. Install the throttle cam assembly to the main con-
trol body.
Tightening torque:
8—11 N-m (80—110 cm-kg, 69—95 in-lb)
86U07B-290
4. Install the throttle modulator spring, throttle modu-
lator valve, stopper plug, and stopper pin.
5. Install the throttle backup spring, throttle back
valve, and retainer.
6. Install the 3-4 shift spring, 3-4 shift valve, stopper
plug, and stopper pin.
386U07B-291
7. Install the 2-3 shift spring, 2-3 shift valve, stopper
plug, and stopper pin.
8. Install the 1-2 shift spring, 1-2 shift valve, stopper
plug, and stopper pin.
86U07B-292
9. Install the low reducing valve, low reducing spring,
and retainer.
10. Install the pressure modifier valve, pressure modi-
fier spring, stopper plug, and stopper pin.
86U07B-293
7B—146
Page 1019 of 1865
INSPECTION AND REPAIR 7B
76G07B-157
76G07B-158
76G07B-159
13. Install the front control body on the premain con-
trol body.
14. Loosely tighten the bolts.
Note
Match the bolt head letter as shown.
15. Install the control valve body mounting bolts as
shown for alignment.
16. Tighten the mounting bolts.
(1) Tighten the front control body.
Tightening torque:
6—8
N
m (66—80 cm-kg, 57—69 in-lb)
76G07B-160
7B—153
Page 1020 of 1865
7B INSPECTION AND REPAIR
(2) Tighten the rear control body.
Tightening torque:
6—8 N-m (66—80 cm-kg, 57—69 in-lb)
86U07B-319
Install the 3-4 solenoid valve and lock-up solenoid
valve along with new O-rings and oil strainers.
Tightening torque:
6—8 N-m (66—80 cm-kg, 57—69 in-lb)
76G07B-161
18. Install the
1
-2 solenoid valve and 2-3 solenoid valve
along with new O-rings and oil strainers.
Tightening torque:
6—8 N-m (66—80 cm-kg, 57—69 in-lb)
76G07B-162
7B-154