Page 1570 of 1865
REAR DOORS 1 4
REAR DOORS
STRUCTURAL VIEW
Sedan and Hatchback
86U14X-046
1. Regulator handle
(manual type)
2. Arm rest
3. Power window switch
4. Inner handle cover
5. Door trim
6. Belt line molding
7. Door screen
8. Door lock
9. Outer handle
10. Regulator (power type)
11. Regulator (manual type)
12. Glass guide
13. Glass
14. Weatherstrip
15. Weatherstrip
16. Door checker
17. Door
18. Weatherstrip
19. Sail inner garnish
20. Sail outer garnish
14—19
Page 1588 of 1865
MOLDING AND GARNISH 1 4
MOLDING AND GARNISH
STRUCTURAL VIEW
Coupe/MX-6
Sedan
76G14X-012
1. Windshield molding 6. Rear window lower molding 11. Rear window upper
2. Windshield lower molding 7. Rear window side molding molding
3. Drip molding 8. Bonnet molding 12. Center pillar garnish
4. Beltline molding 9. Front lower molding 13. Rear finisher
5. Quarter window molding 10. Trunk lid molding 14. Sail garnish
14—37
Page 1589 of 1865
1 4 MOLDING AND GARNISH
WINDSHIELD MOLDING
Removal and Installation
1. Remove the windshield molding. (Refer to page
14-48)
2. Install the windshield molding. (Refer to page
14-51)
76G14X035
WINDSHIELD LOWER MOLDING
Removal and Installation
1. Remove the wiper arms.
2. Remove the lower molding screws and the lower
molding.
3. Install in the reverse order of removal.
86U14X-086
DRIP MOLDING
Removal and Installation
1. Insert a screwdriver between the roof rail and drip
molding and slightly loosen the end of the molding.
Note
Be careful not to scratch the molding.
2. Remove the molding by twisting upward with both
hands.
3. Install in the reverse order of removal.
86U14X-087
BELTLINE MOLDING
Removal and Installation
1. Remove the door mirror.
2. Remove the screw from the end of the beltline
molding, then pull the molding up to remove it.
3. Install in the reverse order of removal.
86U14X-088
14-38
Page 1591 of 1865

14 MOLDING AND GARNISH
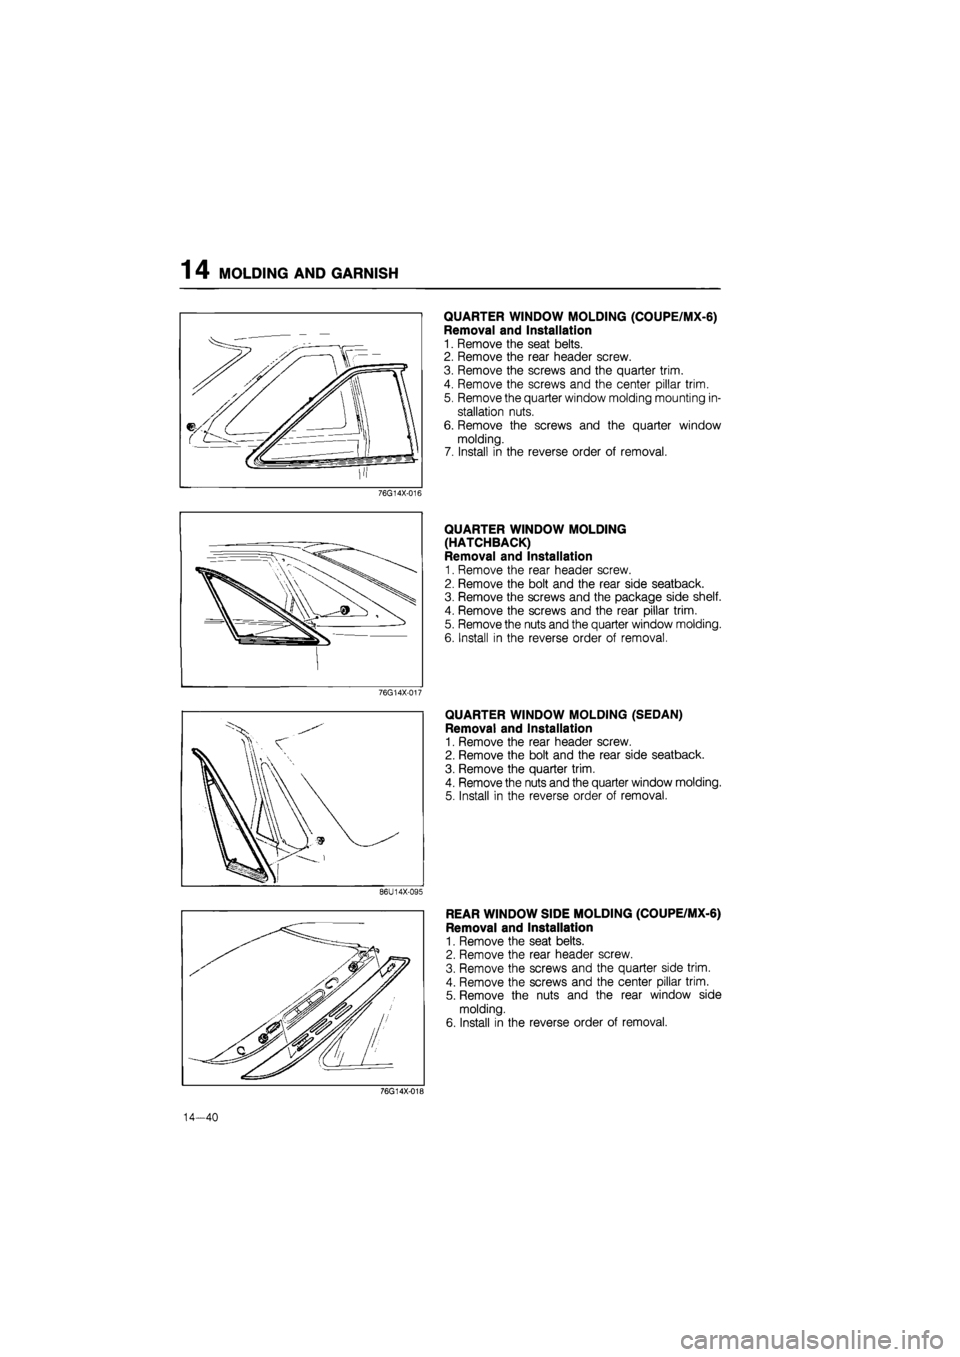
QUARTER WINDOW MOLDING (COUPE/MX-6)
Removal and Installation
1. Remove the seat belts.
2. Remove the rear header screw.
3. Remove the screws and the quarter trim.
4. Remove the screws and the center pillar trim.
5. Remove the quarter window molding mounting in-
stallation nuts.
6. Remove the screws and the quarter window
molding.
7. Install in the reverse order of removal.
76G14X-016
QUARTER WINDOW MOLDING
(HATCHBACK)
Removal and Installation
1. Remove the rear header screw.
2. Remove the bolt and the rear side seatback.
3. Remove the screws and the package side shelf.
4. Remove the screws and the rear pillar trim.
5. Remove the nuts and the quarter window molding.
6. Install in the reverse order of removal.
76G14X-017
QUARTER WINDOW MOLDING (SEDAN)
Removal and Installation
1. Remove the rear header screw.
2. Remove the bolt and the rear side seatback.
3. Remove the quarter trim.
4. Remove the nuts and the quarter window molding.
5. Install in the reverse order of removal.
86U14X-095
REAR WINDOW SIDE MOLDING (COUPE/MX-6)
Removal and Installation
1. Remove the seat belts.
2. Remove the rear header screw.
3. Remove the screws and the quarter side trim.
4. Remove the screws and the center pillar trim.
5. Remove the nuts and the rear window side
molding.
6. Install in the reverse order of removal.
76G14X-018
14-40
Page 1592 of 1865
MOLDING AND GARNISH 1 4
TRUNK LID MOLDING
(SEDAN AND HATCHBACK)
Removal and Installation
1. Remove the rear finisher.
2. Remove the nuts and screws and remove the trunk
lid molding.
3. Install in the reverse order of removal.
CENTER PILLAR GARNISH
(SEDAN AND HATCHBACK)
Removal and Installation
1. Remove the seat belts.
2. Remove the front header trim.
3. Remove the center pillar trim.
4. Remove the nuts with a deep socket wrench, then
remove the garnish.
5. Install in the reverse order of removal.
76G14X020
REAR FINISHER (COUPE/MX-6 AND SEDAN)
Removal and Installation
1. Remove the nuts and the rear finisher.
2. Install in the reverse order of removal.
76G14X-021
REAR FINISHER (HATCHBACK)
Removal and Installation
1. Remove the hatchback door side trims.
2. Remove the hatchback door lower trim.
3. Remove the hatchback door screen.
4. Remove the nuts and the rear finisher.
5. Install in the reverse order of removal.
76G14X-022
14—41
Page 1603 of 1865
1 4 REAR WINDOW GLASS
REAR WINDOW GLASS
STRUCTURAL VIEW
Sedan
86U14X-125
1. Rear package tray 4. Rear window side molding 7. Rear window glass
2. Rear header trim 5. Rear window lower molding 8. Spacer
3. Rear pillar trim 6. Rear window upper 9. Seat belt bolts
molding
Note
Use window tool set (49 0305 870A) to remove and install the glass.
14-52
Page 1604 of 1865
REAR WINDOW GLASS 1 4
76G14X-046
1. Seat belt bolts
2. Rear side trim
3. Rear header trim
4. Rear pillar trim
5. Rear window side molding
6. Rear package tray
7. Rear window upper
molding
8. Rear window lower molding
9. Rear window glass
10. Spacer
11. Clips
14—53
Page 1605 of 1865
14 REAR WINDOW GLASS
86U14X-127
76G14X-034
/W Af/
wAfii
A
86U14X-129
REMOVAL
1. Disconnect the negative battery cable.
2. Disconnect the defogger connector.
3. Remove the seat belts.
4. Remove the screws and the quarter trim.
5. Remove the screws and the center pillar trim.
6. Remove the screws and the rear header.
7. Remove the nuts and the rear window side
molding.
8. Remove the fasteners and the rear package tray.
86U14X-130
14—54