1987 MAZDA 626 air conditioning
[x] Cancel search: air conditioningPage 2 of 1865
Mazda
626
Workshop
Manual
FOREWORD
This workshop manual is intended for use
by service technicians of authorized Mazda
dealers to help them service Mazda vehicles.
This manual can be also useful in diagnosing
certain problems and performing some repair
and maintenance on Mazda vehicles.
For proper repair and maintenance, it is im-
portant to be thoroughly familiarized with this
manual. It is recommended that this manual al-
ways be kept in a handy place for quick and
easy reference.
All the contents of this manual, including pho-
tographs, drawings, and specifications, are the
latest available at the time of printing. As modifi-
cations affecting repair or maintenance occur,
relevant information supplementary to this
volume will be made available at Mazda deal-
ers. This manual should be kept up-to-date.
Mazda Motor Corporation reserves the right
to alter the specifications and contents of this
manual without obligation or advance notice.
All rights reserved. No part of this book may
be reproduced or utilized in any form or by any
means, electronic or mechanical, including
photocopying, recording, or by any informa-
tion storage and retrieval system, without per-
mission in writing.
Mazda Motor Corporation
HIROSHIMA JAPAN
Refer to the following wiring diagrams if
necessary.
Refer to From No.
5095-10-87 G L.H.D.
5096-10-87 G R.H.D.
5096-20-871 Germany
5095-30-871 French
CONTENTS
Title Section
General Information G
Pre-Delivery Inspection and Scheduled
Maintenance 0
Gasoline F6, F8, FE 1A
Engine
Gasoline
FE (DOHC) 1B
Diesel RF-CX, RF-N 1C
Lubrication System
Gasoline 2A
Lubrication System
Diesel 2B I
Cooling System
Gasoline 3A 1
Cooling System
Diesel 3B
Carburetor F6, F8, FE 4A
Fuel and Emission Fuel FE 4B I
Control Systems Injection FE (DOHC) 4C
Diesel RF-CX, RF-N 4D j
Engine Electrical System 5
Clutch 6
Manual 7A
Transaxle
Automatic
EC-AT
and
4-Speed
7B
3-Speed 7C
Front and Rear Axles 9
Steering System 10
Braking System 11
Wheels and Tires 12
Suspension 13
Body 14 |
Body Electrical System 15
Air Conditioning System 16
Technical Data 30
Special Tools 40
© 1987 Mazda Motor Corporation
PRINTED IN JAPAN, JULY'87 ©
1163-10-87G
expert22 flna http://rutracker.org
Page 1784 of 1865
16
AIR CONDITIONING
SYSTEM
OUTLINE 16— 2
AIR DISTRIBUTION 16— 2
AIR CONDITIONING COMPONENTS 16— 4
TROUBLESHOOTING GUIDE 16— 5
CIRCUIT DIAGRAM 16— 6
REFRIGERATION SYSTEM 16— 8
COMPRESSOR 16—13
ON-VEHICLE INSPECTION 16—13
REMOVAL OF COMPRESSOR 16—13
DISASSEMBLY OF MAGNETIC
CLUTCH 16—14
DISASSEMBLY OF COMPRESSOR 16—16
ASSEMBLY OF COMPRESSOR 16—18
ASSEMBLY OF MAGNETIC CLUTCH 16—20
PERFORMANCE TEST OF
COMPRESSOR 16—22
INSTALLATION OF COMPRESSOR 16—23
CONDENSER 16—24
ON-VEHICLE INSPECTION 16—24
REMOVAL OF CONDENSER 16—24
INSTALLATION OF CONDENSER.. 16—24
RECEIVER-DRIER 16—25
ON-VEHICLE INSPECTION 16—25
REMOVAL OF RECEIVER-DRIER... 16—25
INSTALLATION OF
RECEIVER-DRIER 16—25
COOLING UNIT 16—26
ON-VEHICLE INSPECTION OF
EXPANSION VALVE 16—26
REMOVAL OF COOLING UNIT 16—26
DISASSEMBLY OF COOLING UNIT 16—27
INSPECTION OF EVAPORATOR.... 16—27
ASSEMBLY OF COOLING UNIT.... 16—27
INSTALLATION OF COOLING UNIT 16—28
REFRIGERANT LINES 16—29
ON-VEHICLE INSPECTION 16—29
REPLACEMENT OF REFRIGERANT
LINES 16—29
A/C RELAY 16—30
REMOVAL OF RELAY 16—30
INSPECTION OF A/C RELAY 16—30
INSTALLATION OF A/C RELAY 16—30
THERMOSTAT 16—30
ON-VEHICLE INSPECTION 16—30
REMOVAL OF THERMOSTAT 16-30
INSTALLATION OF THERMOSTAT. 16—30
REFRIGERANT PRESSURE SWITCH 16—31
76G16X-001
Page 1787 of 1865
16 OUTLINE
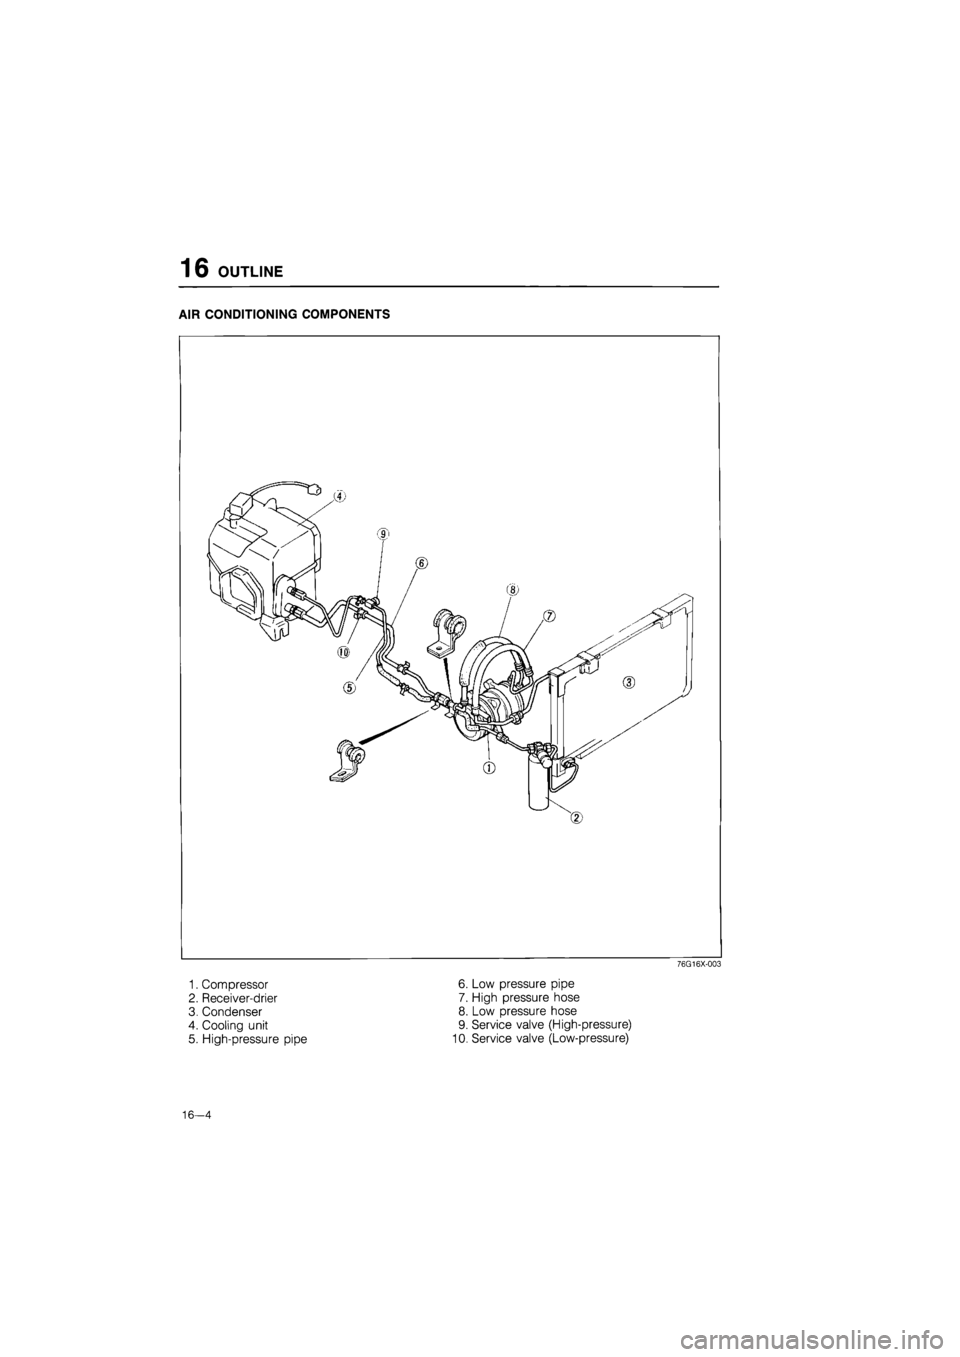
AIR CONDITIONING COMPONENTS
76G16X-003
1. Compressor 6. Low pressure pipe
2. Receiver-drier 7. High pressure hose
3. Condenser 8. Low pressure hose
4. Cooling unit 9. Service valve (High-pressure)
5. High-pressure pipe 10. Service valve (Low-pressure)
16—4
Page 1792 of 1865
OUTLINE 16
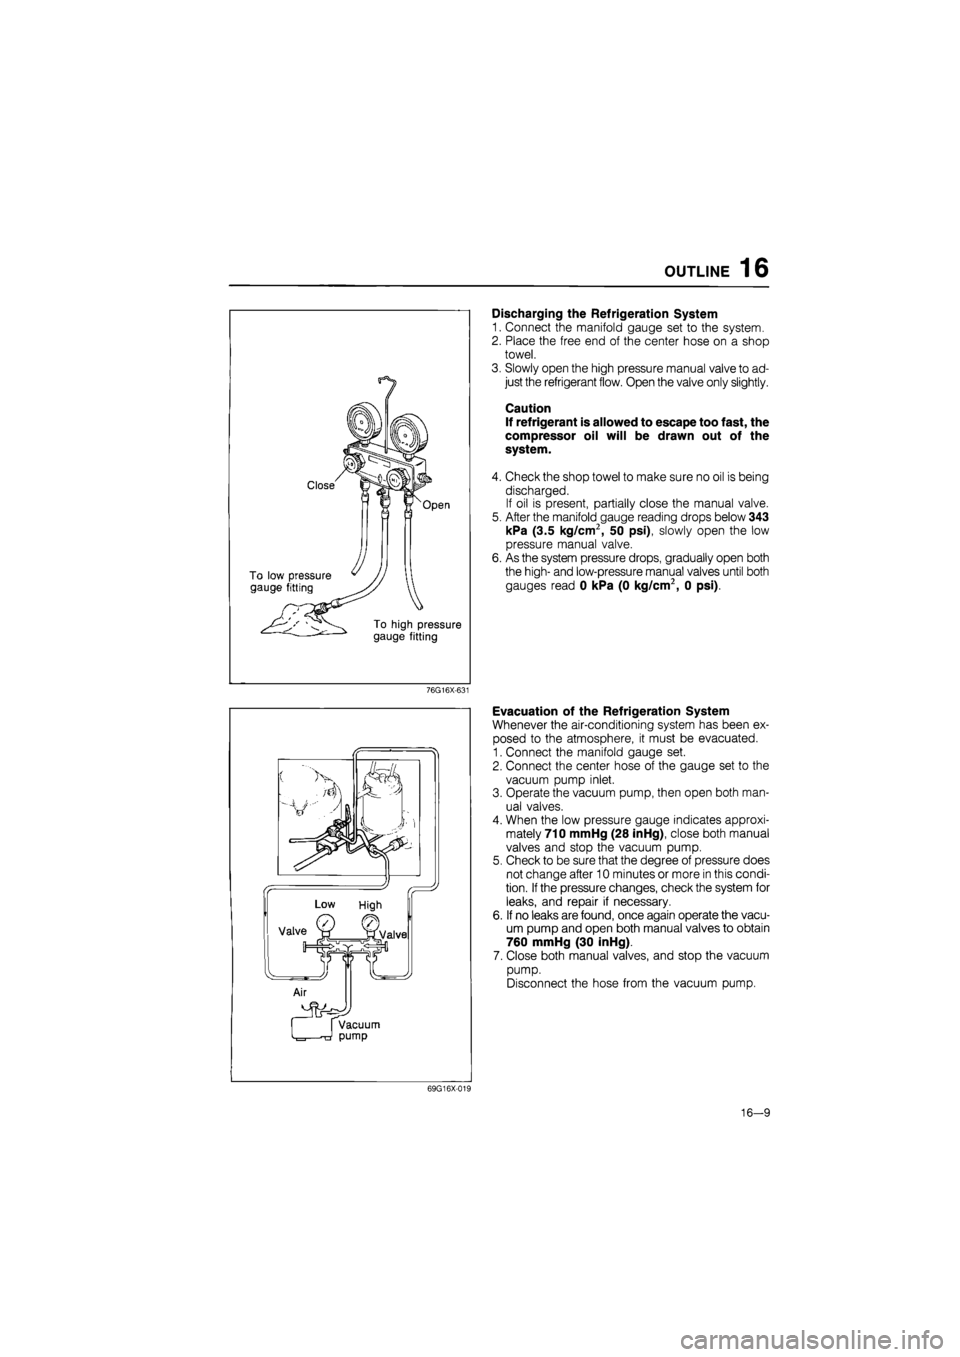
Discharging the Refrigeration System
1. Connect the manifold gauge set to the system.
2. Place the free end of the center hose on a shop
towel.
3. Slowly open the high pressure manual valve to ad-
just the refrigerant flow. Open the valve only slightly.
Caution
If refrigerant is allowed to escape too fast, the
compressor oil will be drawn out of the
system.
4. Check the shop towel to make sure no oil is being
discharged.
If oil is present, partially close the manual valve.
5. After the manifold gauge reading drops below 343
kPa (3.5 kg/cm2, 50 psi), slowly open the low
pressure manual valve.
6. As the system pressure drops, gradually open both
the high- and low-pressure manual valves until both
gauges read 0 kPa (0 kg/cm2, 0 psi).
76G16X-631
Evacuation of the Refrigeration System
Whenever the air-conditioning system has been ex-
posed to the atmosphere, it must be evacuated.
1. Connect the manifold gauge set.
2. Connect the center hose of the gauge set to the
vacuum pump inlet.
3. Operate the vacuum pump, then open both man-
ual valves.
4. When the low pressure gauge indicates approxi-
mately 710 mmHg (28 inHg), close both manual
valves and stop the vacuum pump.
5. Check to be sure that the degree of pressure does
not change after 10 minutes or more in this condi-
tion.
If
the pressure changes, check the system for
leaks, and repair if necessary.
6. If no leaks are found, once again operate the vacu-
um pump and open both manual valves to obtain
760 mmHg (30 inHg).
7. Close both manual valves, and stop the vacuum
pump.
Disconnect the hose from the vacuum pump.
69G16X-019
16-9
Page 1795 of 1865
16 OUTLINE
Thermometer (Dry)
Thermometer
(Dry & Wet)
76G16X-633
69G16X-024
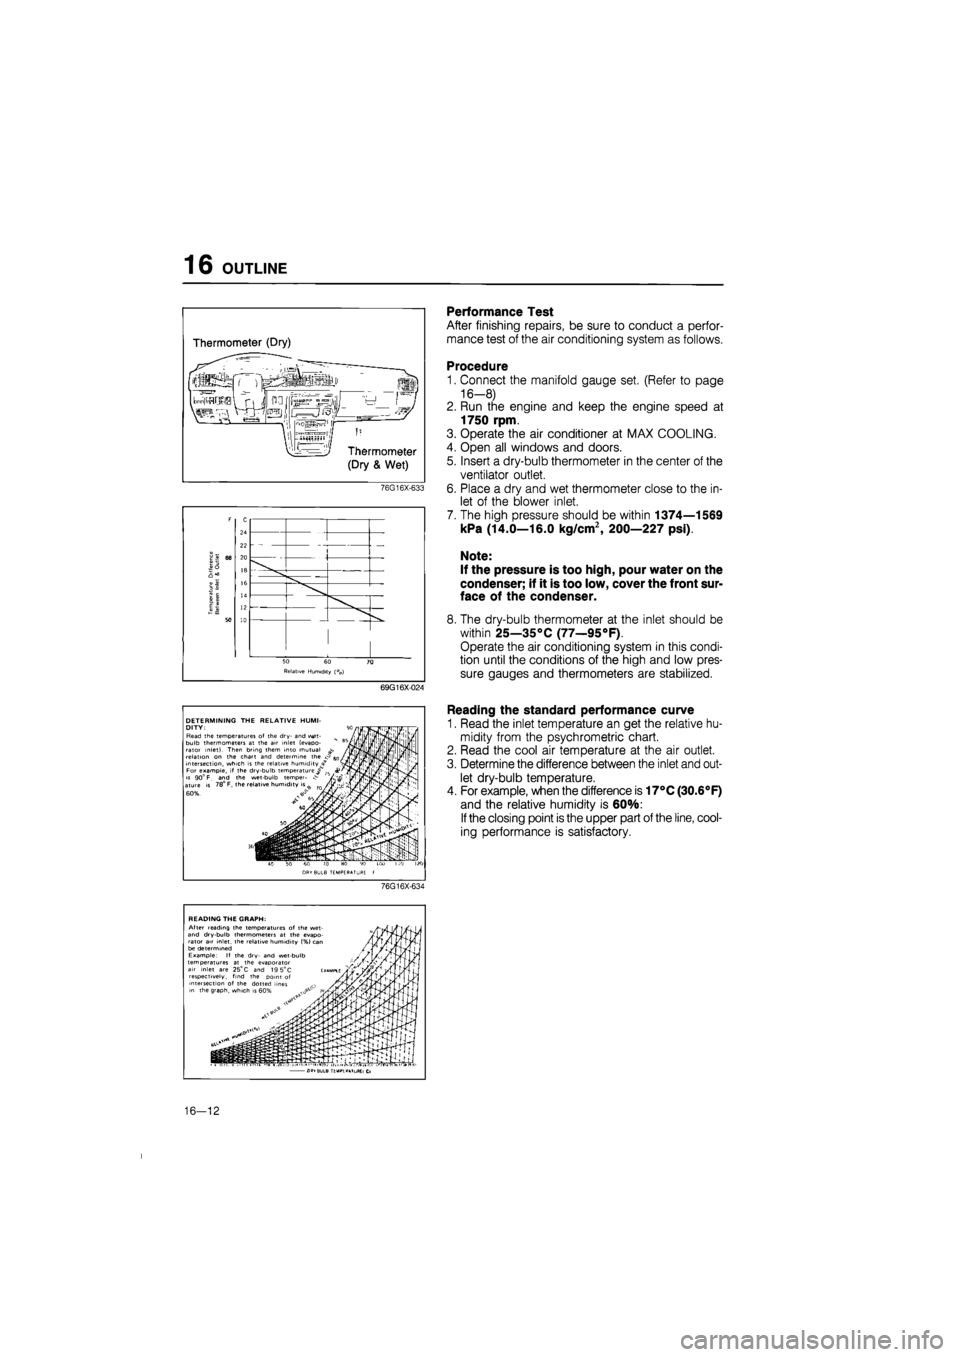
DETERMINING THE RELATIVE HUMI-DITY: Read the temperatures of the dry- and v^et-bulb thermometers at the air inlet (evapo-rator inlet). Then bring them into mutual relation on the chart and determine the intersection, which is the relative humidity^ For exampie, if the dry-bulb temperature^ is 90° F. and the wet-bulb temper- ^ ature is 78° F, the relative humidity is ^ 60%.
DRV BUL8 TEMPERATURE
Performance Test
After finishing repairs, be sure to conduct a perfor-
mance test of the air conditioning system as follows.
Procedure
1. Connect the manifold gauge set. (Refer to page
16-8)
2. Run the engine and keep the engine speed at
1750 rpm.
3. Operate the air conditioner at MAX COOLING.
4. Open all windows and doors.
5. Insert a dry-bulb thermometer in the center of the
ventilator outlet.
6. Place a dry and wet thermometer close to the in-
let of the blower inlet.
7. The high pressure should be within 1374—1569
kPa (14.0—16.0 kg/cm2, 200—227 psi).
Note:
If the pressure is too high, pour water on the
condenser; if it is too low, cover the front sur-
face of the condenser.
8. The dry-bulb thermometer at the inlet should be
within 25—35°C (77—95°F).
Operate the air conditioning system in this condi-
tion until the conditions of the high and low pres-
sure gauges and thermometers are stabilized.
Reading the standard performance curve
1. Read the inlet temperature an get the relative hu-
midity from the psychrometric chart.
2. Read the cool air temperature at the air outlet.
3. Determine the difference between the inlet and out-
let dry-bulb temperature.
4. For example, when the difference is 17°C (30.6°F)
and the relative humidity is 60%:
If
the closing point is the upper part of the line, cool-
ing performance is satisfactory.
76G16X-634
READING THE GRAPH: After reading the temperatures of the wet-and dry-bulb thermometers at the evapo-rator air inlet, the relative humidity (%} can be determined Example: If the dry- and wet-bulb temperatures at the evaporator air inlet are 25°
C
and 19 5°C respectively, find the point of intersection of the dotted lines in the graph, which is
• i
•.p-I--!1. fi -GL^TIULB ': "'.L .T.L CL
16—12
Page 1807 of 1865
16 CONDENSER
CONDENSER
ON-VEHICLE INSPECTION
1. Check the condenser fins for blockage or damage.
If the fins are clogged, clean them with compressed air.
If the fins are bent, straighten them with a screwdriver or pair of pliers.
2. Check the condenser fittings for leakage.
Repair or replace, if necessary.
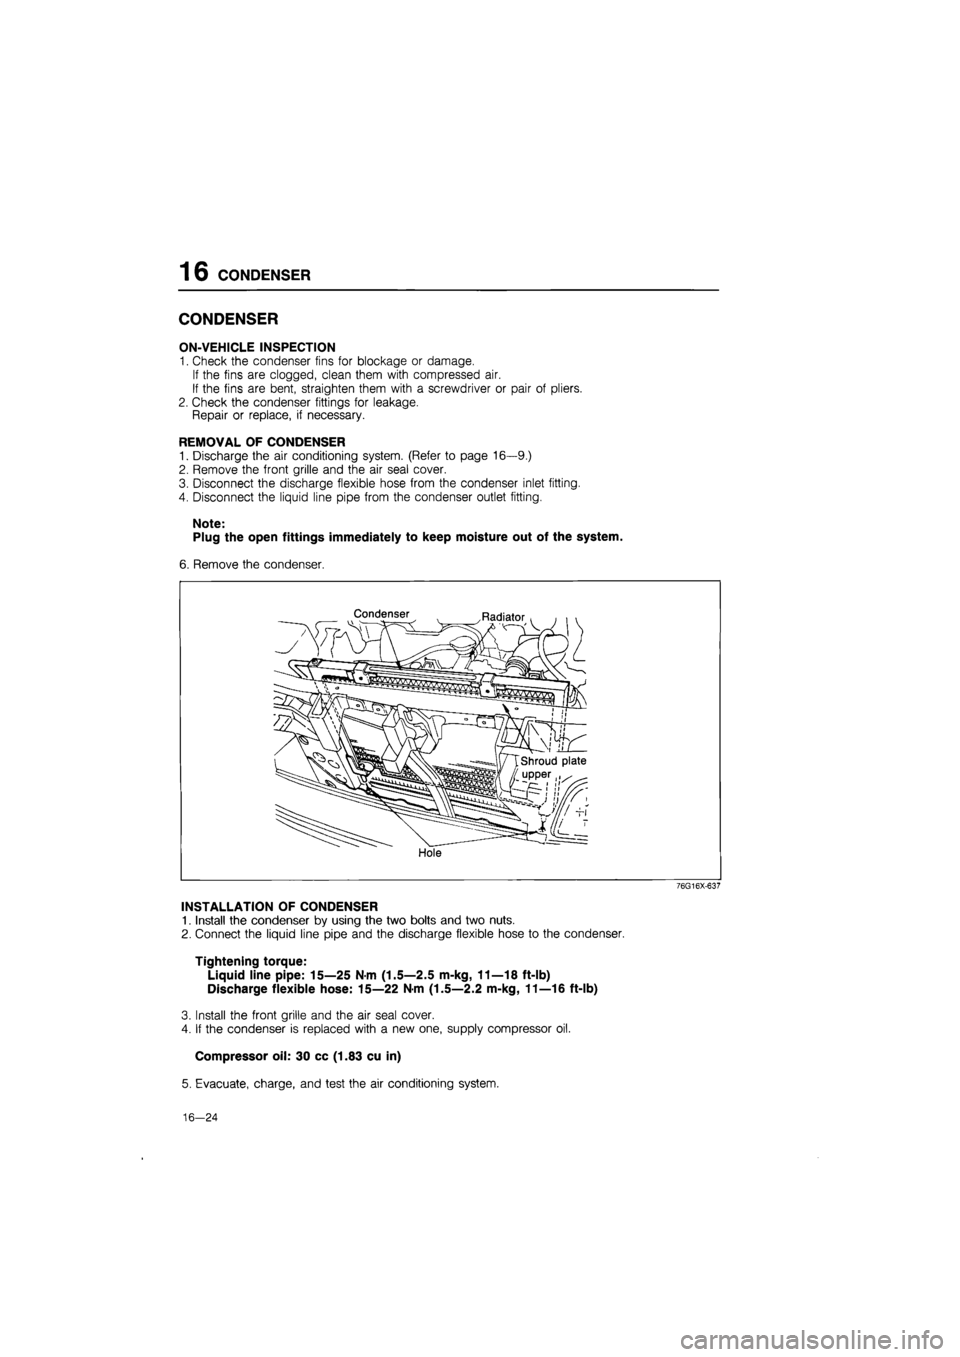
REMOVAL OF CONDENSER
1. Discharge the air conditioning system. (Refer to page 16—9.)
2. Remove the front grille and the air seal cover.
3. Disconnect the discharge flexible hose from the condenser inlet fitting.
4. Disconnect the liquid line pipe from the condenser outlet fitting.
Note:
Plug the open fittings immediately to keep moisture out of the system.
6. Remove the condenser.
Condenser Radiator
Hole
76G16X-637
INSTALLATION OF CONDENSER
1. Install the condenser by using the two bolts and two nuts.
2. Connect the liquid line pipe and the discharge flexible hose to the condenser.
Tightening torque:
Liquid line pipe: 15—25 Nm (1.5—2.5 m-kg, 11—18 ft-lb)
Discharge flexible hose: 15—22 N-m (1.5—2.2 m-kg, 11—16 ft-lb)
3. Install the front grille and the air seal cover.
4. If the condenser is replaced with a new one, supply compressor oil.
Compressor oil: 30 cc (1.83 cu in)
5. Evacuate, charge, and test the air conditioning system.
16—24
Page 1808 of 1865
RECEIVER-DRIER 16
RECEIVER-DRIER
ON-VEHICLE INSPECTION
1. Use a leak detector to check the sight glass, the
fusible plug, and the fittings for leakage.
Repair or replace, if necessary.
2. Check the receiver-drier for clogging.
a) Run the engine at fast idle with the air conditioner
on.
b) Check both inlet and outlet temperatures.
If there is a great difference between the two tem-
peratures, replace the receiver-drier.
76G16X-622
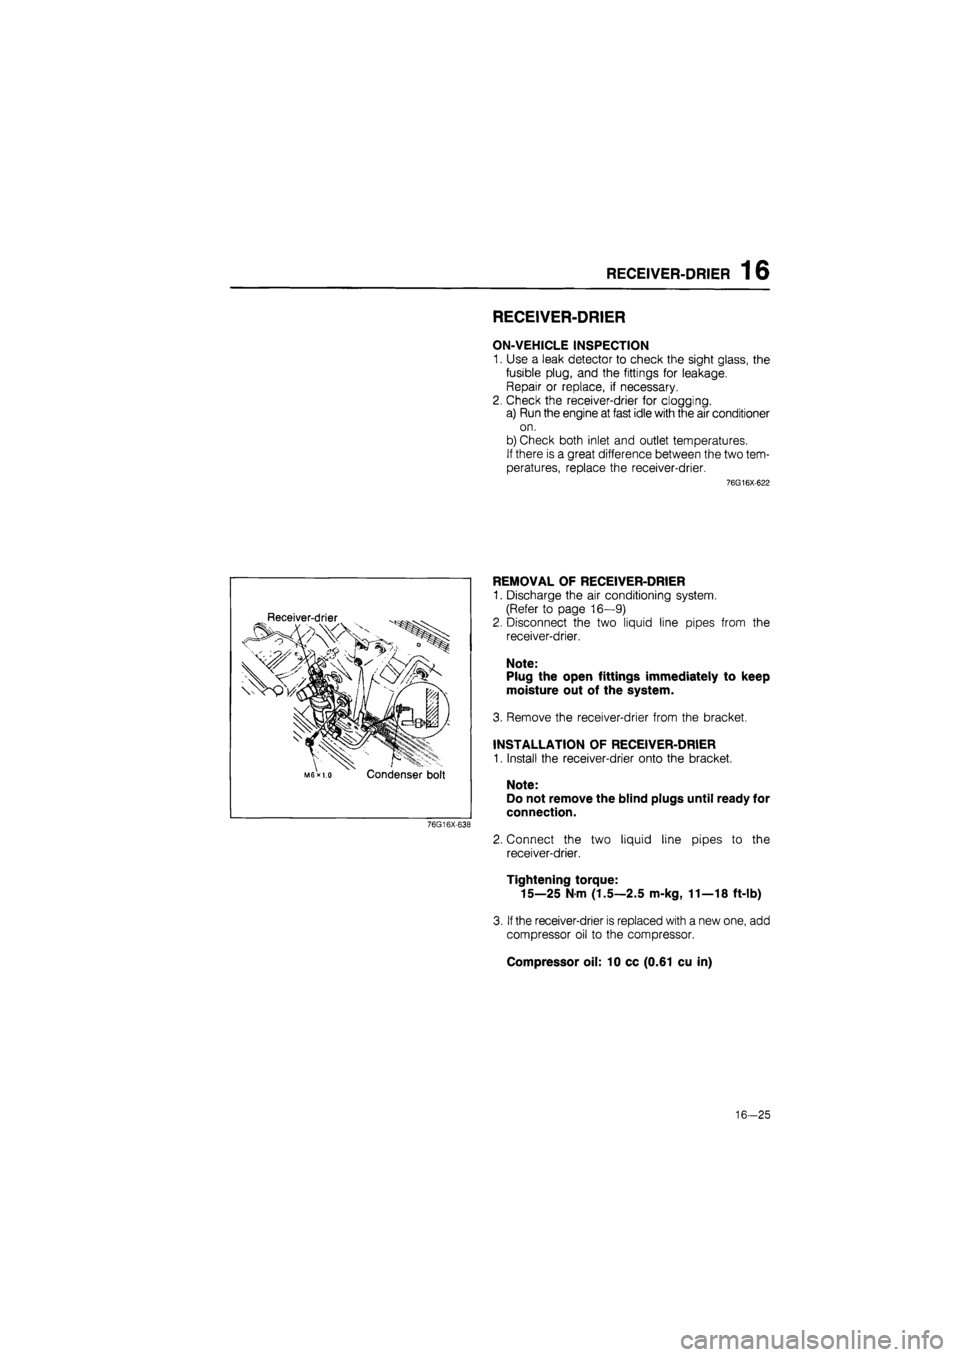
Receiver-drier
Condenser bolt
76G16X-638
REMOVAL OF RECEIVER-DRIER
1. Discharge the air conditioning system.
(Refer to page 16—9)
2. Disconnect the two liquid line pipes from the
receiver-drier.
Note:
Plug the open fittings immediately to keep
moisture out of the system.
3. Remove the receiver-drier from the bracket.
INSTALLATION OF RECEIVER-DRIER
1. Install the receiver-drier onto the bracket.
Note:
Do not remove the blind plugs until ready for
connection.
2. Connect the two liquid line pipes to the
receiver-drier.
Tightening torque:
15—25 N m (1.5—2.5 m-kg, 11—18 ft-lb)
3.
If
the receiver-drier is replaced with a new one, add
compressor oil to the compressor.
Compressor oil: 10 cc (0.61 cu in)
16-25
Page 1809 of 1865
16 COOLING UNIT
COOLING UNIT
ON-VEHICLE INSPECTION OF EXPANSION
VALVE
1. Connect the manifold gauge set to the gauge fit-
tings on the low- and high-pressure pipes.
2. Operate the engine at 1,500 rpm and the air con-
ditioner at MAX. COOLING.
3. Check the low and high pressures.
Normal pressures are:
Low: 197—294 kPa
(2—3 kg/cm2, 28—43 psi)
High: 1472—1765 kPa
(15—18 kg/cm2, 210—260 psi)
If pressure is not as specified, replace the expansion
valve.
76G16X-623
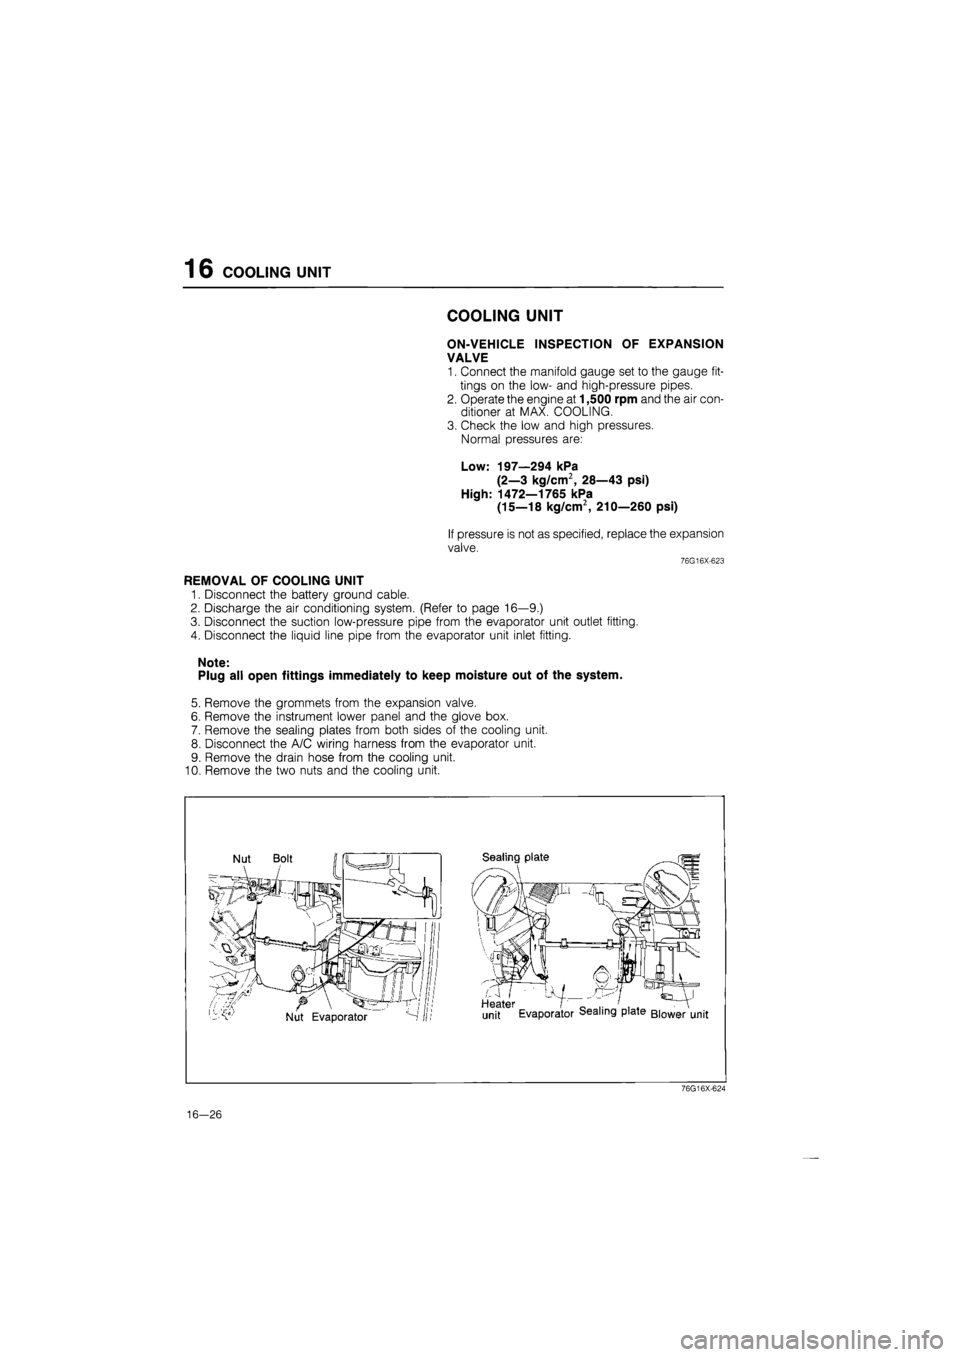
REMOVAL OF COOLING UNIT
1. Disconnect the battery ground cable.
2. Discharge the air conditioning system. (Refer to page 16—9.)
3. Disconnect the suction low-pressure pipe from the evaporator unit outlet fitting.
4. Disconnect the liquid line pipe from the evaporator unit inlet fitting.
Note:
Plug all open fittings immediately to keep moisture out of the system.
5. Remove the grommets from the expansion valve.
6. Remove the instrument lower panel and the glove box.
7. Remove the sealing plates from both sides of the cooling unit.
8. Disconnect the A/C wiring harness from the evaporator unit.
9. Remove the drain hose from the cooling unit.
10. Remove the two nuts and the cooling unit.
76G16X-624
16-26