Page 392 of 878
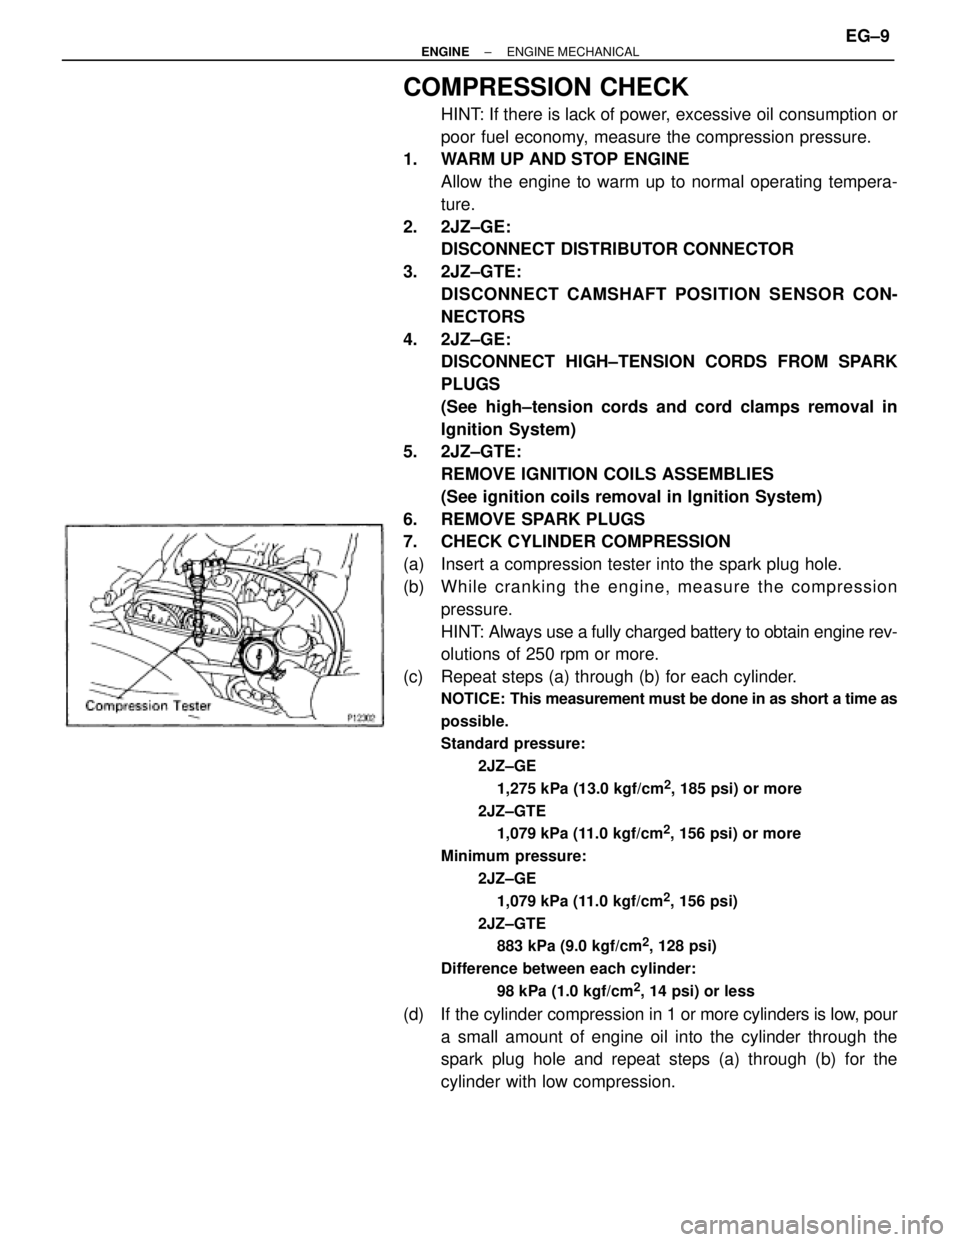
COMPRESSION CHECK
HINT: If there is lack of power, excessive oil consumption or
poor fuel economy, measure the compression pressure.
1. WARM UP AND STOP ENGINE
Allow the engine to warm up to normal operating tempera-
ture.
2. 2JZ±GE:
DISCONNECT DISTRIBUTOR CONNECTOR
3. 2JZ±GTE:
DISCONNECT CAMSHAFT POSITION SENSOR CON-
NECTORS
4. 2JZ±GE:
DISCONNECT HIGH±TENSION CORDS FROM SPARK
PLUGS
(See high±tension cords and cord clamps removal in
Ignition System)
5. 2JZ±GTE:
REMOVE IGNITION COILS ASSEMBLIES
(See ignition coils removal in Ignition System)
6. REMOVE SPARK PLUGS
7. CHECK CYLINDER COMPRESSION
(a) Insert a compression tester into the spark plug hole.
(b) Wh ile cra n kin g th e en g in e , me a su re th e co mp re ssio n
pressure.
HINT: Always use a fully charged battery to obtain engine rev-
olutions of 250 rpm or more.
(c) Repeat steps (a) through (b) for each cylinder.
NOTICE: This measurement must be done in as short a time as
possible.
Standard pressure:
2JZ±GE
1,275 kPa (13.0 kgf/cm
2, 185 psi) or more
2JZ±GTE
1,079 kPa (11.0 kgf/cm
2, 156 psi) or more
Minimum pressure:
2JZ±GE
1,079 kPa (11.0 kgf/cm
2, 156 psi)
2JZ±GTE
883 kPa (9.0 kgf/cm
2, 128 psi)
Difference between each cylinder:
98 kPa (1.0 kgf/cm
2, 14 psi) or less
(d) If the cylinder compression in 1 or more cylinders is low, pour
a small amount of engine oil into the cylinder through the
spark plug hole and repeat steps (a) through (b) for the
cylinder with low compression.
± ENGINEENGINE MECHANICALEG±9
Page 393 of 878
wIf adding oil helps the compression, it is likely that the
piston rings and/or cylinder bore are probably worn or
damaged.
wIf pressure stays low, a valve may be sticking or seating
improper, or there may be leakage past the gasket.
8. REINSTALL SPARK PLUGS
9. 2JZ±GE:
RECONNECT HIGH±TENSION CORDS TO SPARK
PLUGS
(See high±tension cords and cord clamps installation in
Ignition System)
10. 2JZ±GTE:
REINSTALL IGNITION COILS ASSEMBLIES
(See ignition coils installation in Ignition System)
11. 2JZ±GE:
RECONNECT DISTRIBUTOR CONNECTOR
12. 2JZ±GTE:
RECONNECT CAMSHAFT POSITION SENSOR CONNEC-
TORS EG±10
± ENGINEENGINE MECHANICAL
Page 394 of 878
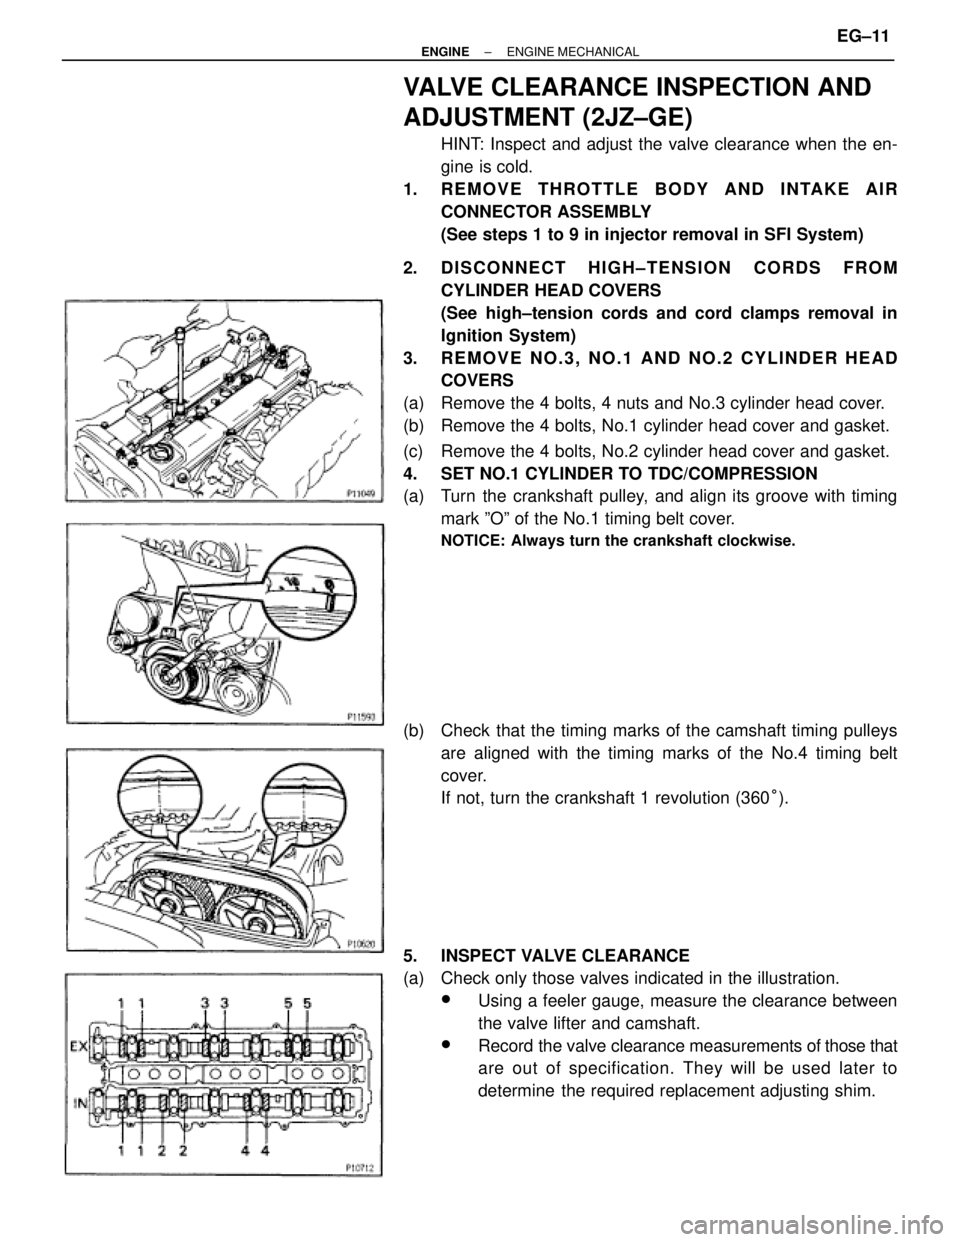
VALVE CLEARANCE INSPECTION AND
ADJUSTMENT (2JZ±GE)
HINT: Inspect and adjust the valve clearance when the en-
gine is cold.
1. REMOVE THROTTLE BODY AND INTAKE AIR
CONNECTOR ASSEMBLY
(See steps 1 to 9 in injector removal in SFI System)
2. DISCONNECT HIGH±TENSION CORDS FROM
CYLINDER HEAD COVERS
(See high±tension cords and cord clamps removal in
Ignition System)
3. REMOVE NO.3, NO.1 AND NO.2 CYLINDER HEAD
COVERS
(a) Remove the 4 bolts, 4 nuts and No.3 cylinder head cover.
(b) Remove the 4 bolts, No.1 cylinder head cover and gasket.
(c) Remove the 4 bolts, No.2 cylinder head cover and gasket.
4. SET NO.1 CYLINDER TO TDC/COMPRESSION
(a) Turn the crankshaft pulley, and align its groove with timing
mark ºOº of the No.1 timing belt cover.
NOTICE: Always turn the crankshaft clockwise.
(b) Check that the timing marks of the camshaft timing pulleys
are aligned with the timing marks of the No.4 timing belt
cover.
If not, turn the crankshaft 1 revolution (360°).
5. INSPECT VALVE CLEARANCE
(a) Check only those valves indicated in the illustration.
wUsing a feeler gauge, measure the clearance between
the valve lifter and camshaft.
wRecord the valve clearance measurements of those that
are out of specification. They will be used later to
determine the required replacement adjusting shim.
± ENGINEENGINE MECHANICALEG±11
Page 399 of 878
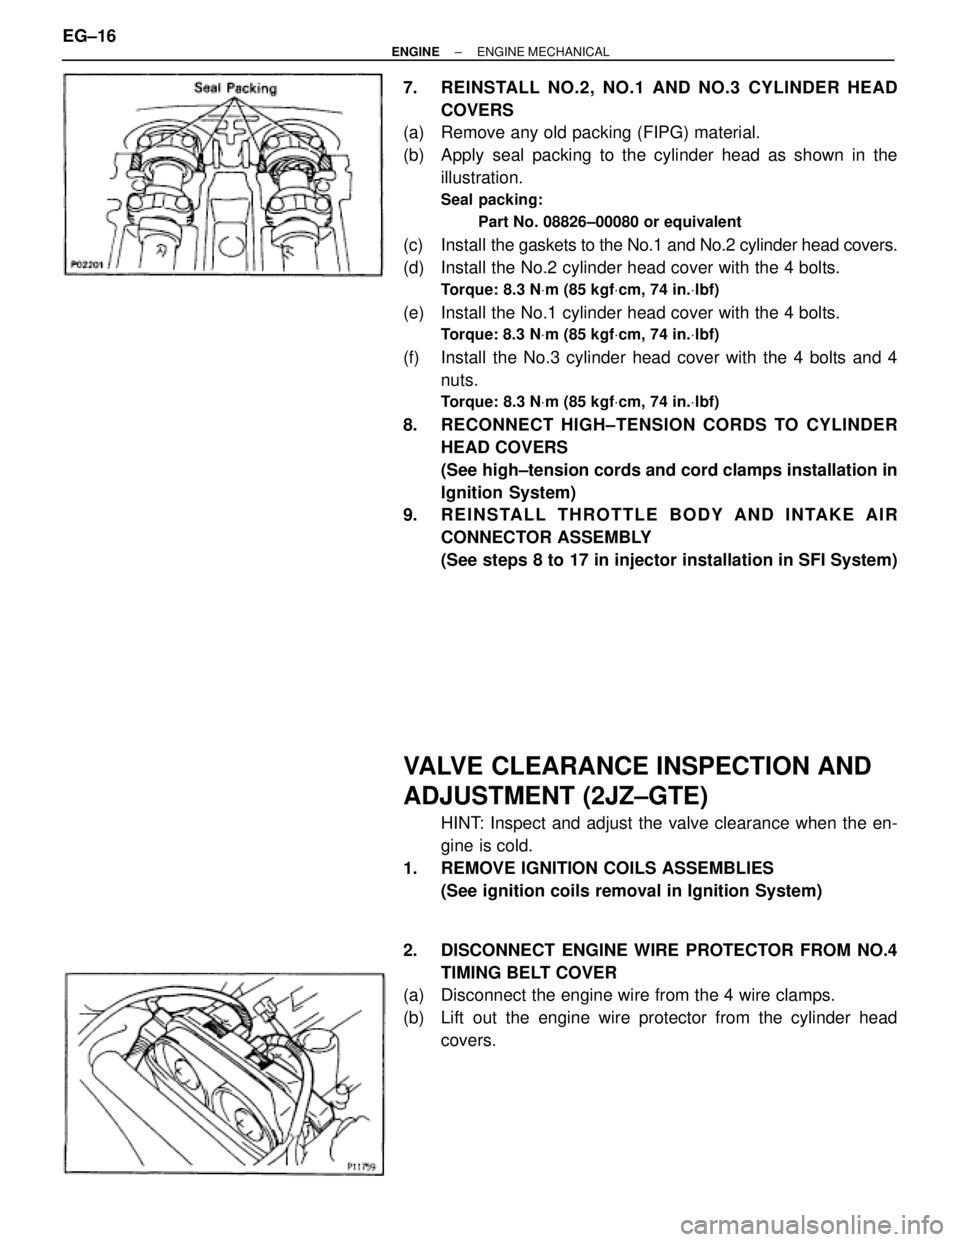
7. REINSTALL NO.2, NO.1 AND NO.3 CYLINDER HEAD
COVERS
(a) Remove any old packing (FIPG) material.
(b) Apply seal packing to the cylinder head as shown in the
illustration.
Seal packing:
Part No. 08826±00080 or equivalent
(c) Install the gaskets to the No.1 and No.2 cylinder head covers.
(d) Install the No.2 cylinder head cover with the 4 bolts.
Torque: 8.3 NVm (85 kgfVcm, 74 in.Vlbf)
(e) Install the No.1 cylinder head cover with the 4 bolts.
Torque: 8.3 NVm (85 kgfVcm, 74 in.Vlbf)
(f) Install the No.3 cylinder head cover with the 4 bolts and 4
nuts.
Torque: 8.3 NVm (85 kgfVcm, 74 in.Vlbf)
8. RECONNECT HIGH±TENSION CORDS TO CYLINDER
HEAD COVERS
(See high±tension cords and cord clamps installation in
Ignition System)
9. REINSTALL THROTTLE BODY AND INTAKE AIR
CONNECTOR ASSEMBLY
(See steps 8 to 17 in injector installation in SFI System)
VALVE CLEARANCE INSPECTION AND
ADJUSTMENT (2JZ±GTE)
HINT: Inspect and adjust the valve clearance when the en-
gine is cold.
1. REMOVE IGNITION COILS ASSEMBLIES
(See ignition coils removal in Ignition System)
2. DISCONNECT ENGINE WIRE PROTECTOR FROM NO.4
TIMING BELT COVER
(a) Disconnect the engine wire from the 4 wire clamps.
(b) Lift out the engine wire protector from the cylinder head
covers. EG±16
± ENGINEENGINE MECHANICAL
Page 401 of 878
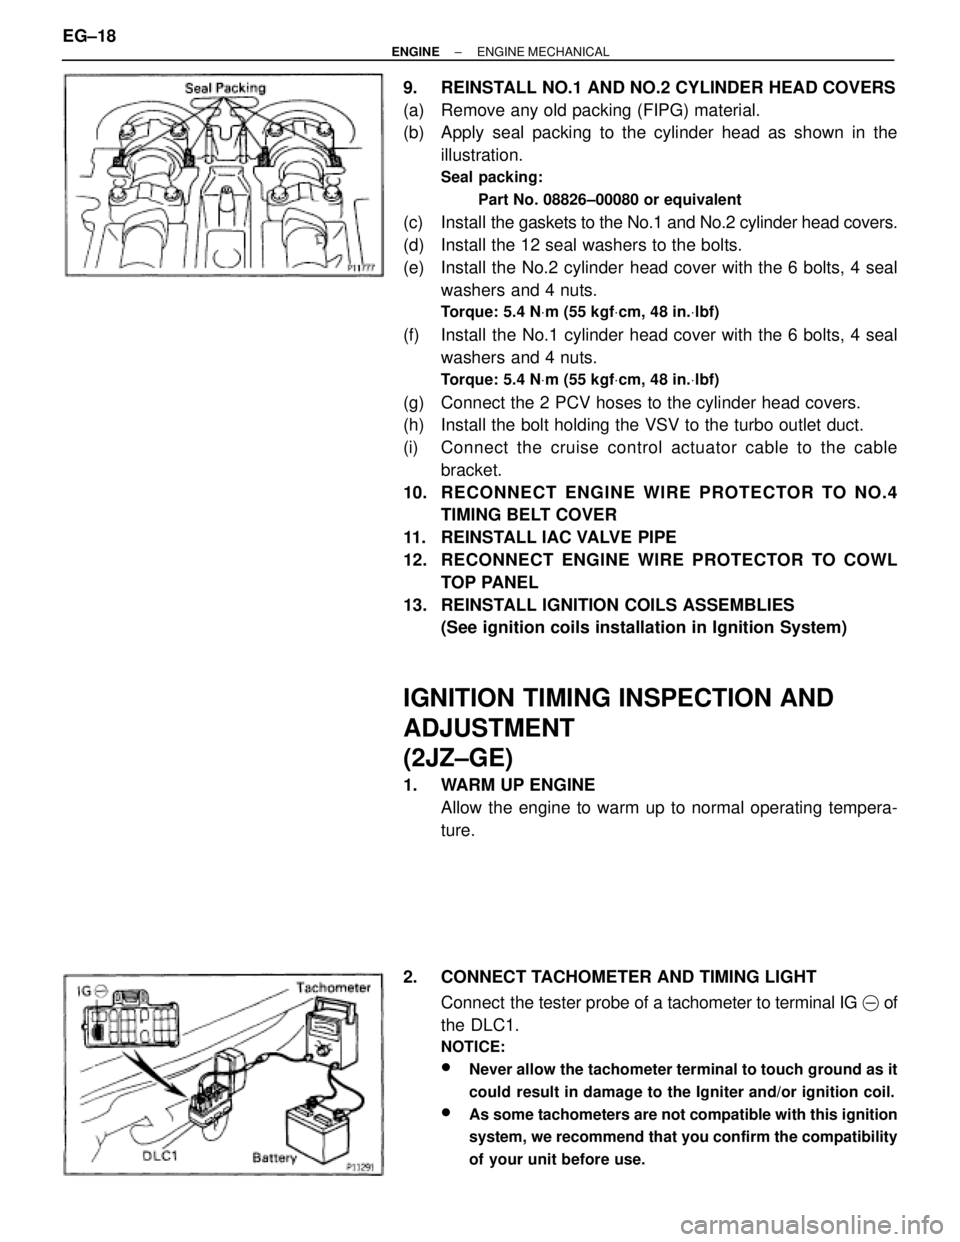
9. REINSTALL NO.1 AND NO.2 CYLINDER HEAD COVERS
(a) Remove any old packing (FIPG) material.
(b) Apply seal packing to the cylinder head as shown in the
illustration.
Seal packing:
Part No. 08826±00080 or equivalent
(c) Install the gaskets to the No.1 and No.2 cylinder head covers.
(d) Install the 12 seal washers to the bolts.
(e) Install the No.2 cylinder head cover with the 6 bolts, 4 seal
washers and 4 nuts.
Torque: 5.4 NVm (55 kgfVcm, 48 in.Vlbf)
(f) Install the No.1 cylinder head cover with the 6 bolts, 4 seal
washers and 4 nuts.
Torque: 5.4 NVm (55 kgfVcm, 48 in.Vlbf)
(g) Connect the 2 PCV hoses to the cylinder head covers.
(h) Install the bolt holding the VSV to the turbo outlet duct.
(i) Connect the cruise control actuator cable to the cable
bracket.
10. RECONNECT ENGINE WIRE PROTECTOR TO NO.4
TIMING BELT COVER
11. REINSTALL IAC VALVE PIPE
12. RECONNECT ENGINE WIRE PROTECTOR TO COWL
TOP PANEL
13. REINSTALL IGNITION COILS ASSEMBLIES
(See ignition coils installation in Ignition System)
IGNITION TIMING INSPECTION AND
ADJUSTMENT
(2JZ±GE)
1. WARM UP ENGINE
Allow the engine to warm up to normal operating tempera-
ture.
2. CONNECT TACHOMETER AND TIMING LIGHT
Connect the tester probe of a tachometer to terminal IG � of
the DLC1.
NOTICE:
wNever allow the tachometer terminal to touch ground as it
could result in damage to the Igniter and/or ignition coil.
wAs some tachometers are not compatible with this ignition
system, we recommend that you confirm the compatibility
of your unit before use.
EG±18± ENGINEENGINE MECHANICAL
Page 402 of 878
3. CHECK IDLE SPEED
(a) Race the engine speed at 2,500 rpm for approx. 90 seconds.
(b) Check the idle speed.
Idle speed:
700 + 50 rpm
4. ADJUST IGNITION TIMING
(a) Using SST, connect terminals TE1 and E1 of the DLC 1.
SST 09843±18020
(b) Using a timing light, check the ignition timing.
Ignition timing:
10 + 2° BTDC @ idle
(Transmission in neutral position)
(c) Loosen the nut, and adjust by turning the distributor.
Ignition timing:
10° BTDC @ idle
(Transmission in neutral position)
(d) Tighten the nut, and recheck the ignition timing.
Torque: 19 NVm (195 kgfVcm, 14 ftVlbf)
(e) Remove the SST from the DLC1.
SST 09843±18020
5. FURTHER CHECK IGNITION TIMING
Ignition timing:
7±19° BTDC @ idle
(Transmission in neutral position)
HINT: The timing mark moves in a range between 75 and 195.
6. DISCONNECT TACHOMETER AND TIMING LIGHT
± ENGINEENGINE MECHANICALEG±19
Page 403 of 878
IGNITION TIMING INSPECTION
(2JZ±GTE)
1. WARM UP ENGINE
Allow the engine to warm up to normal operating tempera-
ture.
2. CONNECT TACHOMETER AND TIMING LIGHT
(See step 2 in ignition timing inspection and adjustment
(2JZ±GE))
3. CHECK IDLE SPEED
(a) Race the engine speed at 2,500 rpm for approx. 90 seconds.
(b) Check the idle speed.
Idle speed:
650 + 50 rpm
4. CHECK IGNITION TIMING
(a) Using SST, connect terminals TE1 and E1 of the DLC 1.
SST 09843±18020
(b) Open the igniter connector cover and remove the green lead
wire.
(c) Connect the timing light clip to the green lead wire.
NOTICE:
wUse a timing light that can detect the primary signal.
wAfter finishing the inspection, make sure the lead wire is
stored inside the connector cover.
EG±20± ENGINEENGINE MECHANICAL
Page 404 of 878
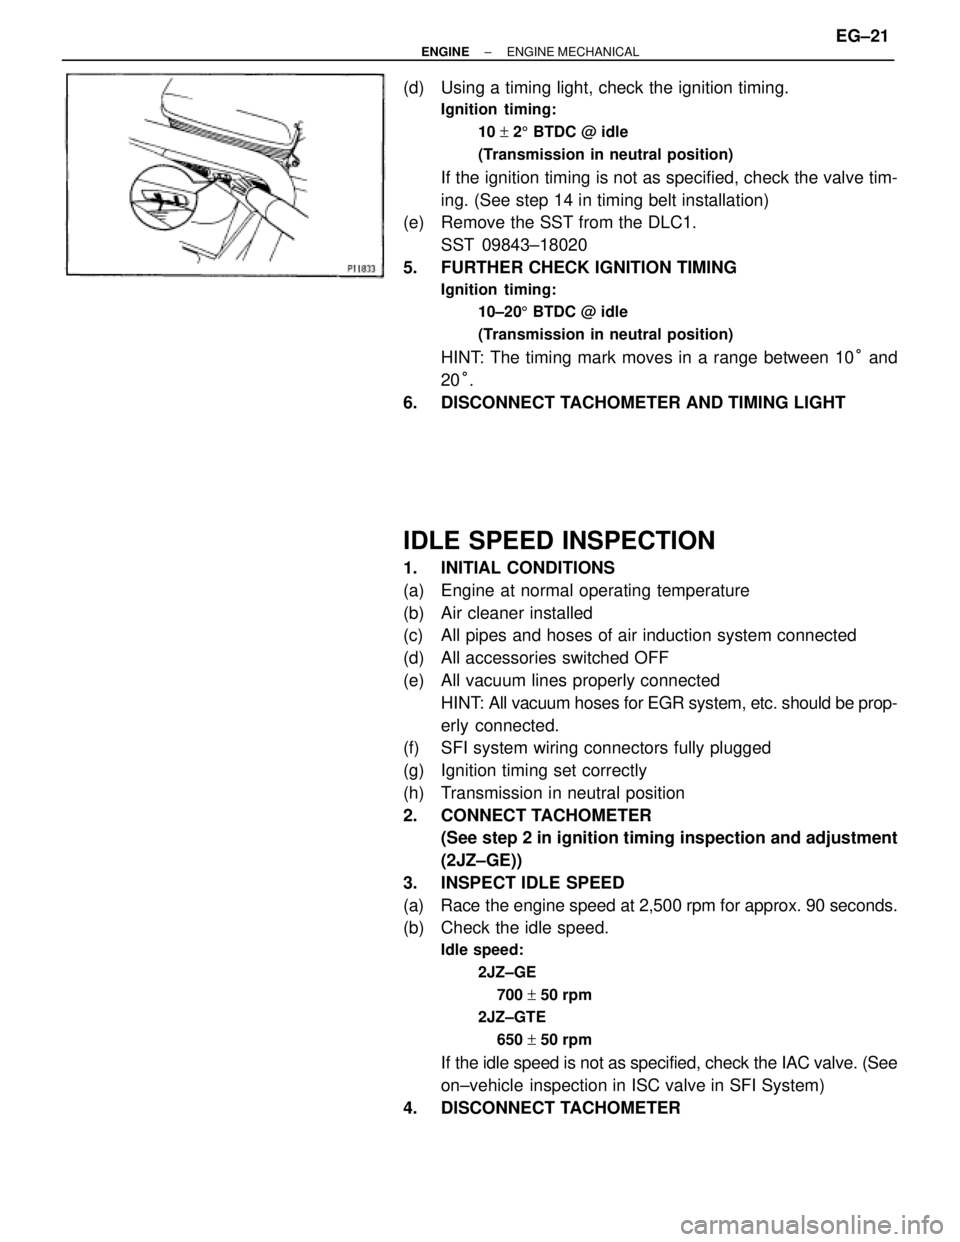
(d) Using a timing light, check the ignition timing.
Ignition timing:
10 + 25 BTDC @ idle
(Transmission in neutral position)
If the ignition timing is not as specified, check the valve tim-
ing. (See step 14 in timing belt installation)
(e) Remove the SST from the DLC1.
SST 09843±18020
5. FURTHER CHECK IGNITION TIMING
Ignition timing:
10±205 BTDC @ idle
(Transmission in neutral position)
HINT: The timing mark moves in a range between 10° and
20°.
6. DISCONNECT TACHOMETER AND TIMING LIGHT
IDLE SPEED INSPECTION
1. INITIAL CONDITIONS
(a) Engine at normal operating temperature
(b) Air cleaner installed
(c) All pipes and hoses of air induction system connected
(d) All accessories switched OFF
(e) All vacuum lines properly connected
HINT: All vacuum hoses for EGR system, etc. should be prop-
erly connected.
(f) SFI system wiring connectors fully plugged
(g) Ignition timing set correctly
(h) Transmission in neutral position
2. CONNECT TACHOMETER
(See step 2 in ignition timing inspection and adjustment
(2JZ±GE))
3. INSPECT IDLE SPEED
(a) Race the engine speed at 2,500 rpm for approx. 90 seconds.
(b) Check the idle speed.
Idle speed:
2JZ±GE
700 + 50 rpm
2JZ±GTE
650 + 50 rpm
If the idle speed is not as specified, check the IAC valve. (See
on±vehicle inspection in ISC valve in SFI System)
4. DISCONNECT TACHOMETER
± ENGINEENGINE MECHANICALEG±21