Page 187 of 878

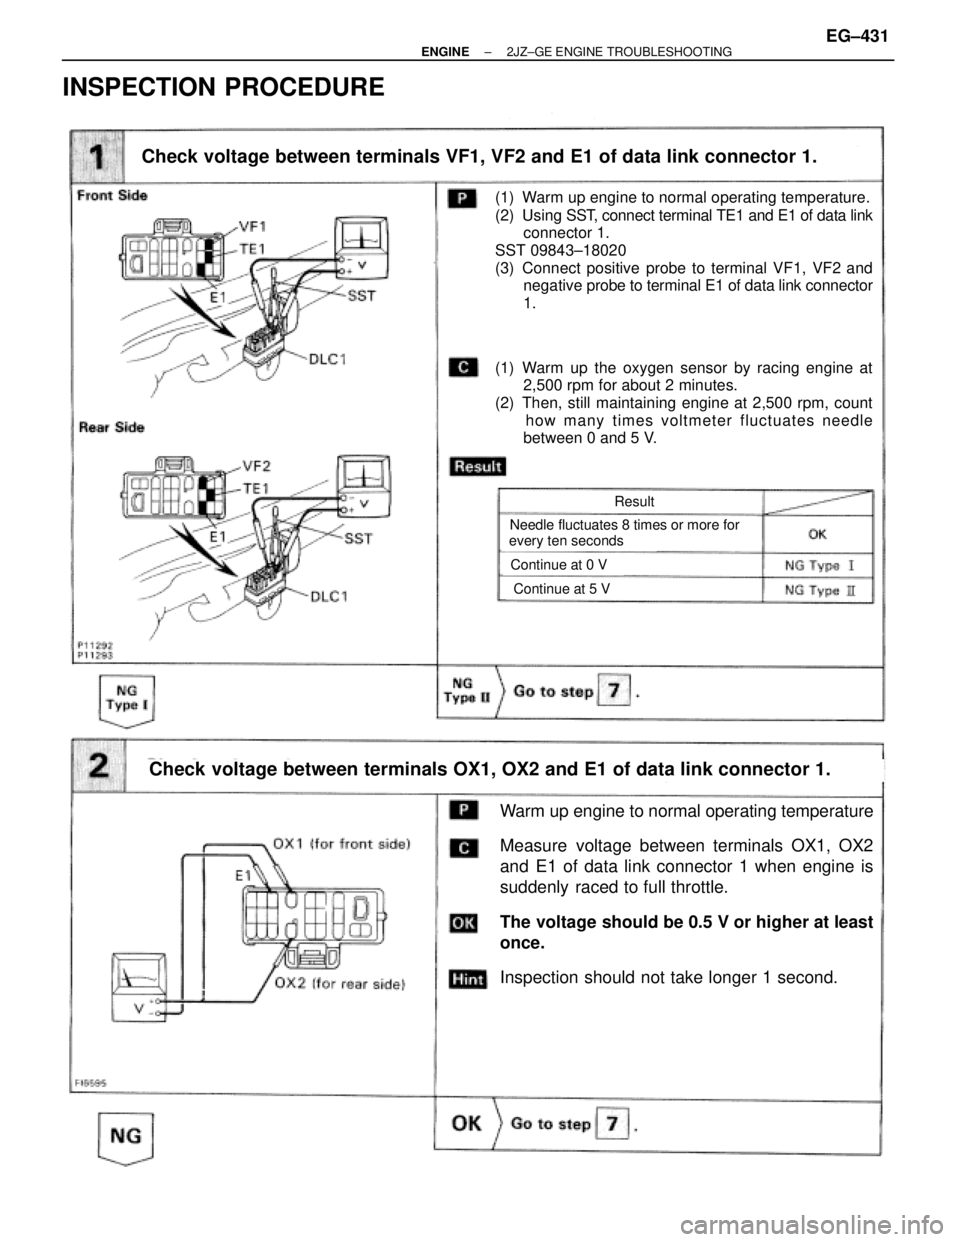
(1) Warm up engine to normal operating temperature.
(2) Using SST, connect terminal TE1 and E1 of data link
connector 1.
SST 09843±18020
(3) Connect positive probe to terminal VF1, VF2 and
negative probe to terminal E1 of data link connector
1.
(1) Warm up the oxygen sensor by racing engine at
2,500 rpm for about 2 minutes.
(2) Then, still maintaining engine at 2,500 rpm, count
how many times voltmeter fluctuates needle
between 0 and 5 V.
Warm up engine to normal operating temperature
Measure voltage between terminals OX1, OX2
and E1 of data link connector 1 when engine is
suddenly raced to full throttle.
The voltage should be 0.5 V or higher at least
once.
Inspection should not take longer 1 second.
Check voltage between terminals OX1, OX2 and E1 of data link connector 1.
Check voltage between terminals VF1, VF2 and E1 of data link connector 1.
Needle fluctuates 8 times or more for
Result
every ten seconds
Continue at 0 V
Continue at 5 V
INSPECTION PROCEDURE
± ENGINE2JZ±GE ENGINE TROUBLESHOOTINGEG±431
Page 188 of 878

EG±47
2
IG±4
EG±33
EG±190
EG±457
EG±438
EG±424
EG±426
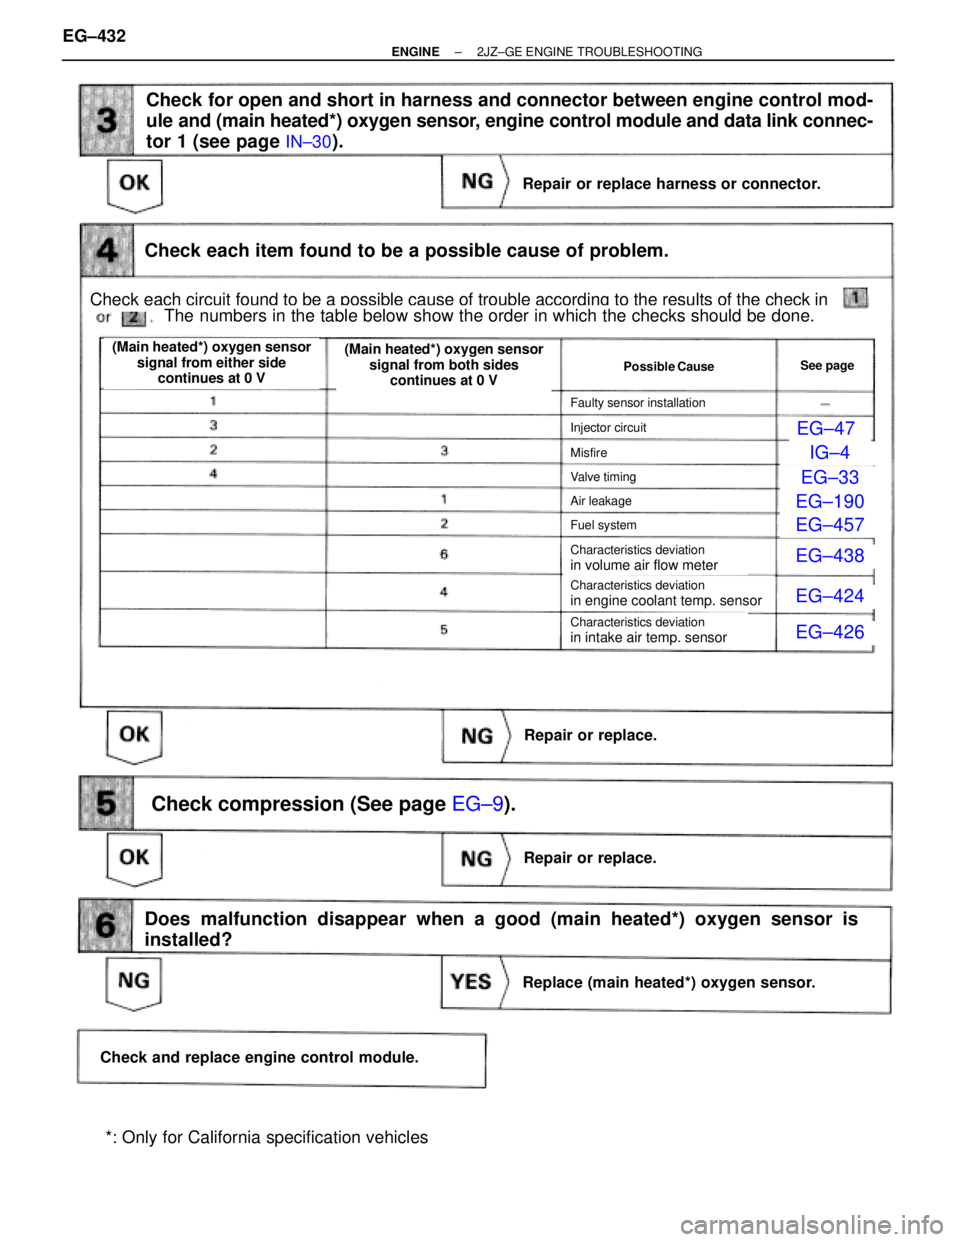
Check for open and short in harness and connector between engine control mod-
ule and (main heated*) oxygen sensor, engine control module and data link connec-
tor 1 (see page
IN±30).
Check each item found to be a possible cause of problem.
Repair or replace harness or connector.
Repair or replace.
Repair or replace.
Replace (main heated*) oxygen sensor.
Check and replace engine control module.
Does malfunction disappear when a good (main heated*) oxygen sensor is
installed?
Check compression (See page EG±9).
Check each circuit found to be a possible cause of trouble according to the results of the check in
The numbers in the table below show the order in which the checks should be done.
(Main heated*) oxygen sensor
signal from either side
continues at 0 V(Main heated*) oxygen sensor
signal from both sides
continues at 0 V
Possible CauseSee page
Faulty sensor installation
Injector circuit
Misfire
Valve timing
Air leakage
Fuel system
Characteristics deviation
in volume air flow meter
Characteristics deviation
in engine coolant temp. sensor
Characteristics deviation
in intake air temp. sensor
*: Only for California specification vehicles EG±432
± ENGINE2JZ±GE ENGINE TROUBLESHOOTING
Page 189 of 878

EG±4
72
IG±4
EG±33
EG±19
0
EG±457
EG±438
EG±424
EG±426
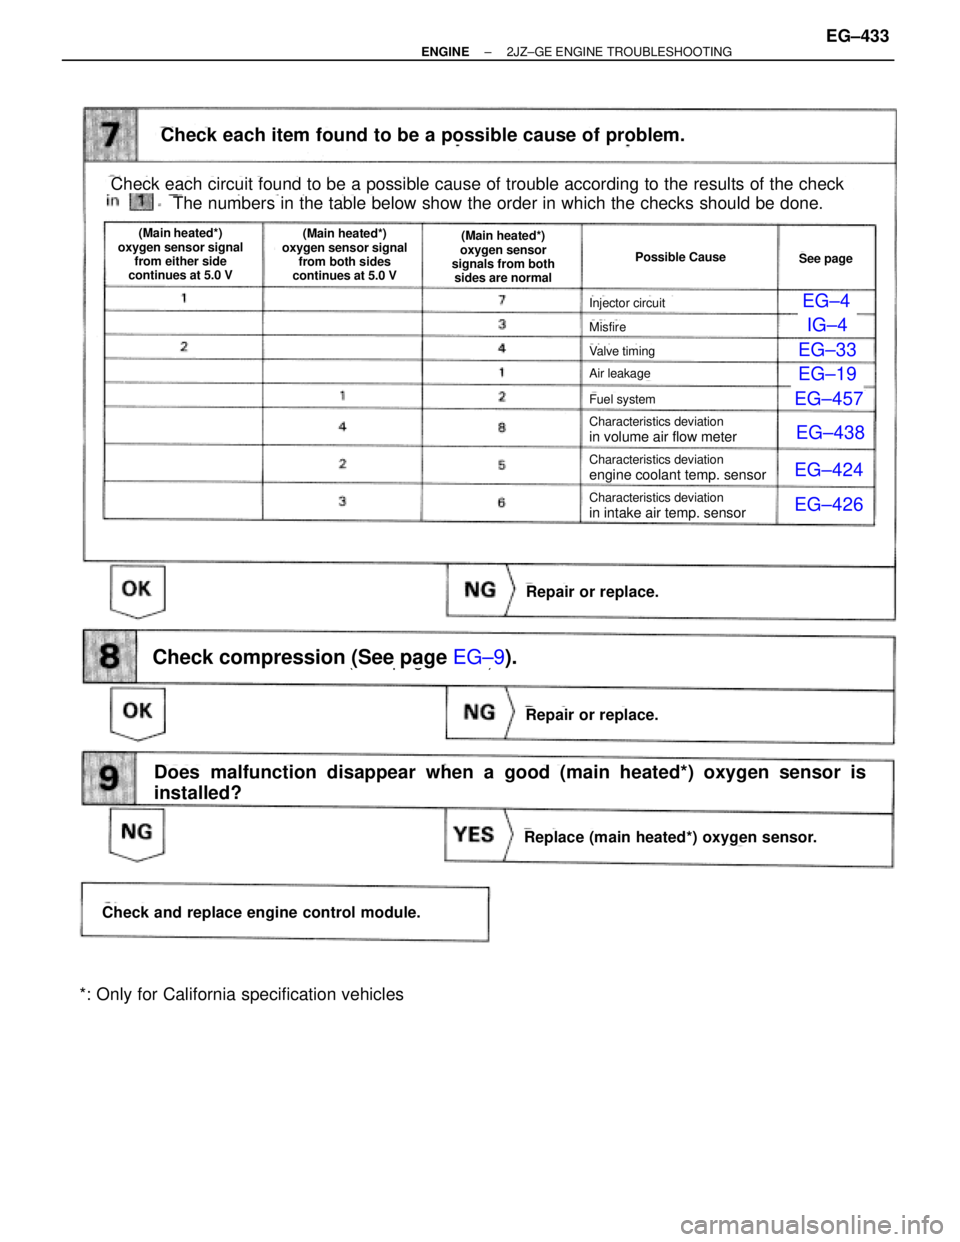
(See page EG±9).
Check each item found to be a possible cause of problem.
Repair or replace.
Check each circuit found to be a possible cause of trouble according to the results of the check
The numbers in the table below show the order in which the checks should be done.
(Main heated*)
oxygen sensor signal
from either side
continues at 5.0 V
Possible Cause
Injector circuit
Misfire
Valve timing
Air leakage
Fuel system
Characteristics deviation
in volume air flow meter
Characteristics deviation
in volume air flow meter
Characteristics deviation
engine coolant temp. sensor
(Main heated*)
oxygen sensor signal
from both sides
continues at 5.0 V(Main heated*)
oxygen sensor
signals from both
sides are normal
See page
Characteristics deviation
in intake air temp. sensor
Repair or replace.
Replace (main heated*) oxygen sensor.
Check and replace engine control module.
Does malfunction disappear when a good (main heated*) oxygen sensor is
installed?
Check compression (See page EG±9).
*: Only for California specification vehicles
± ENGINE2JZ±GE ENGINE TROUBLESHOOTINGEG±433
Page 191 of 878

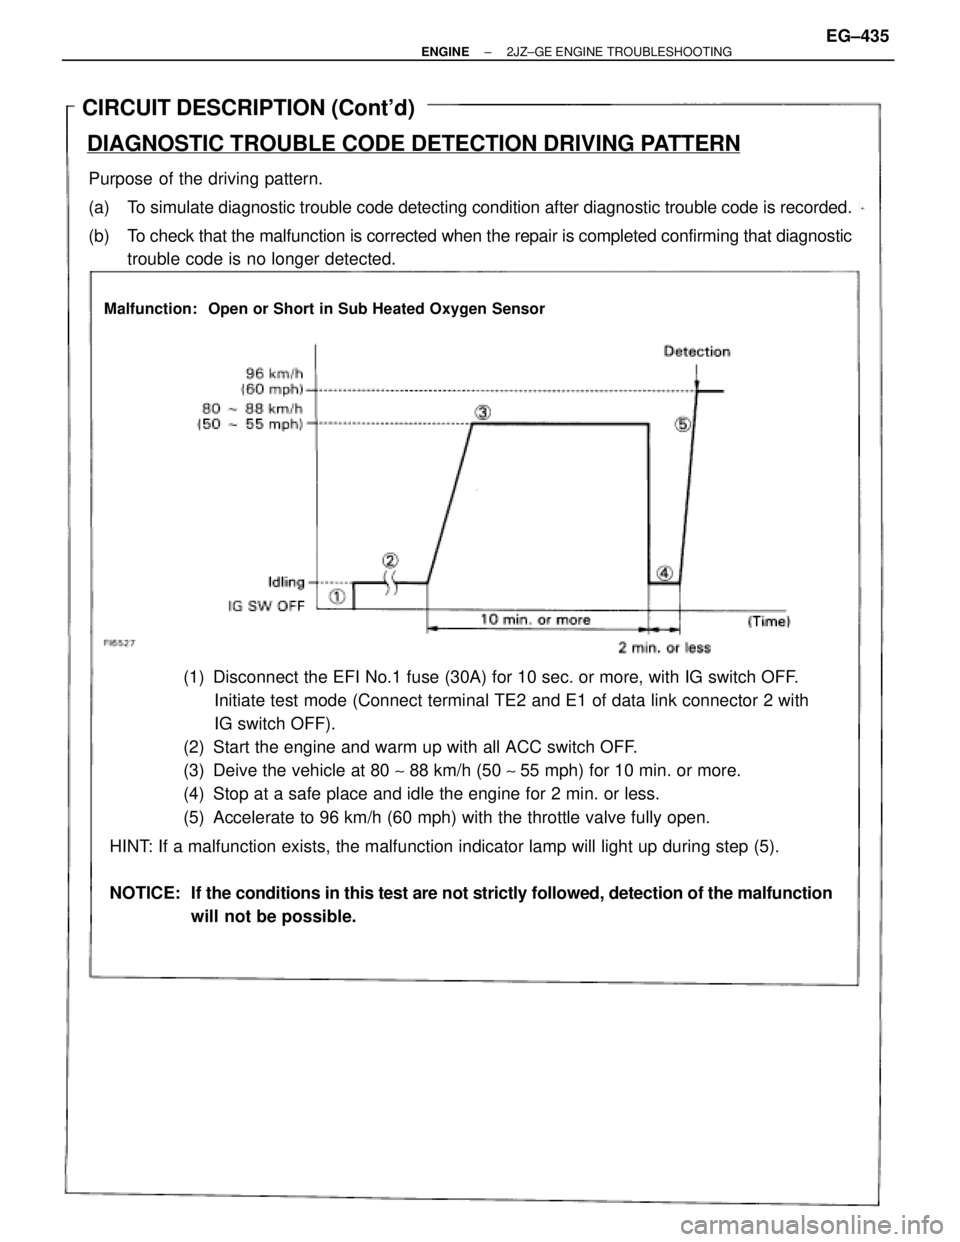
CIRCUIT DESCRIPTION (Cont'd)
DIAGNOSTIC TROUBLE CODE DETECTION DRIVING PATTERN
Purpose of the driving pattern.
(a) To simulate diagnostic trouble code detecting condition after diagnostic trouble code is recorded.
(b) To check that the malfunction is corrected when the repair is completed confirming that diagnostic
trouble code is no longer detected.
(1) Disconnect the EFI No.1 fuse (30A) for 10 sec. or more, with IG switch OFF.
Initiate test mode (Connect terminal TE2 and E1 of data link connector 2 with
IG switch OFF).
(2) Start the engine and warm up with all ACC switch OFF.
(3) Deive the vehicle at 80 ~ 88 km/h (50 ~ 55 mph) for 10 min. or more.
(4) Stop at a safe place and idle the engine for 2 min. or less.
(5) Accelerate to 96 km/h (60 mph) with the throttle valve fully open.
HINT: If a malfunction exists, the malfunction indicator lamp will light up during step (5).
NOTICE: If the conditions in this test are not strictly followed, detection of the malfunction
will not be possible.
Malfunction: Open or Short in Sub Heated Oxygen Sensor
± ENGINE2JZ±GE ENGINE TROUBLESHOOTINGEG±435
Page 192 of 878
(See page EG±404)
INSPECTION PROCEDURE
HINT: When other codes are output in addition to 27 at the same time, check the circuits for other codes
first.
Check voltage between terminal HT3 of engine control module connector and
body ground.
(1) Connect SST (check harness ªAº).
(See page EG±404)
SST 09990±01000
(2) Turn ignition switch ON.
Measure voltage between terminal HT3 of engine
control module connector and body ground.
Voltage: 9 Ð 14 V EG±436
± ENGINE2JZ±GE ENGINE TROUBLESHOOTING
Page 193 of 878
Check sub heated oxygen sensor heater.
Disconnect sub heated oxygen sensor connector.
(See page EG±250)
Measure resistance between terminals 1 and 2 of
sub heated oxygen sensor connector.
Resistance: 11 Ð 16 � at 20°C (68°F)
Check for open and short in harness and connector between EFI main relay and
engine control module (See page
IN±30).
Replace sub heated oxygen sensor.
Repair or replace harness or connector.
Check and replace engine control module.
Check voltage between terminal HT3 of engine control module connector and
body ground.
Warm up engine to normal operating temperature.
Measure voltage between terminal HT3 of engine
control module connector and body ground, when
engine is idling and racing at 3,500 rpm.
Replace sub heated oxygen sensor.
Check and replace engine control module.
*: It is probable the oxygen sensor has
deteriorated.
Usually, this cannot be confirmed by visual
inspection.
± ENGINE2JZ±GE ENGINE TROUBLESHOOTINGEG±437
Page 195 of 878
INSPECTION PROCEDURE
(See page EG±404)
Check voltage between terminals KS and E1 of engine control module
connector.
Connect SST (check harness ªAº).
(See page EG±404)
SST 09990±01000
Measure voltage between terminals KS and E1 of
engine control module connector while engine is
cranked.
Voltage: 2.0 Ð 4.0 V
(Neither 0 V nor 5 V)
INSPECTION USING OSCILLOSCOPE
Check for open and short in harness and connector between engine control
module and volume air flow meter (See page
IN±30).
When diagnostic trouble code 31 is displayed,
check and replace engine control module.
Repair or replace harness or connector.
�During cranking or idling, measure waveform
between terminals KS and E1 of engine control
module.
HINT: The correct waveform is as shown
.
± ENGINE2JZ±GE ENGINE TROUBLESHOOTINGEG±439
Page 196 of 878
Disconnect volume air flow meter connector and check voltage between
terminals KS and E1 of engine control module connector.
(1) Disconnect the volume air flow meter connec±
tor.
(2) Turn ignition switch ON.
Measure voltage between terminals KS and E1 of
engine control module connector.
Voltage: 4.5 Ð 5.5 V
(1) Disconnect the volume air flow meter connec±
tor.
(2) Turn ignition switch ON.
Measure voltage between terminals VCC and E1
of engine control module connector.
Voltage: 4.5 Ð 5.5 V
Disconnect volume air flow meter connector and check voltage between
terminals VCC and E1 of engine control module connector.
Check and replace engine control module.
Replace volume air flow meter.
Check and replace engine control module.
EG±440± ENGINE2JZ±GE ENGINE TROUBLESHOOTING