Page 1295 of 2389
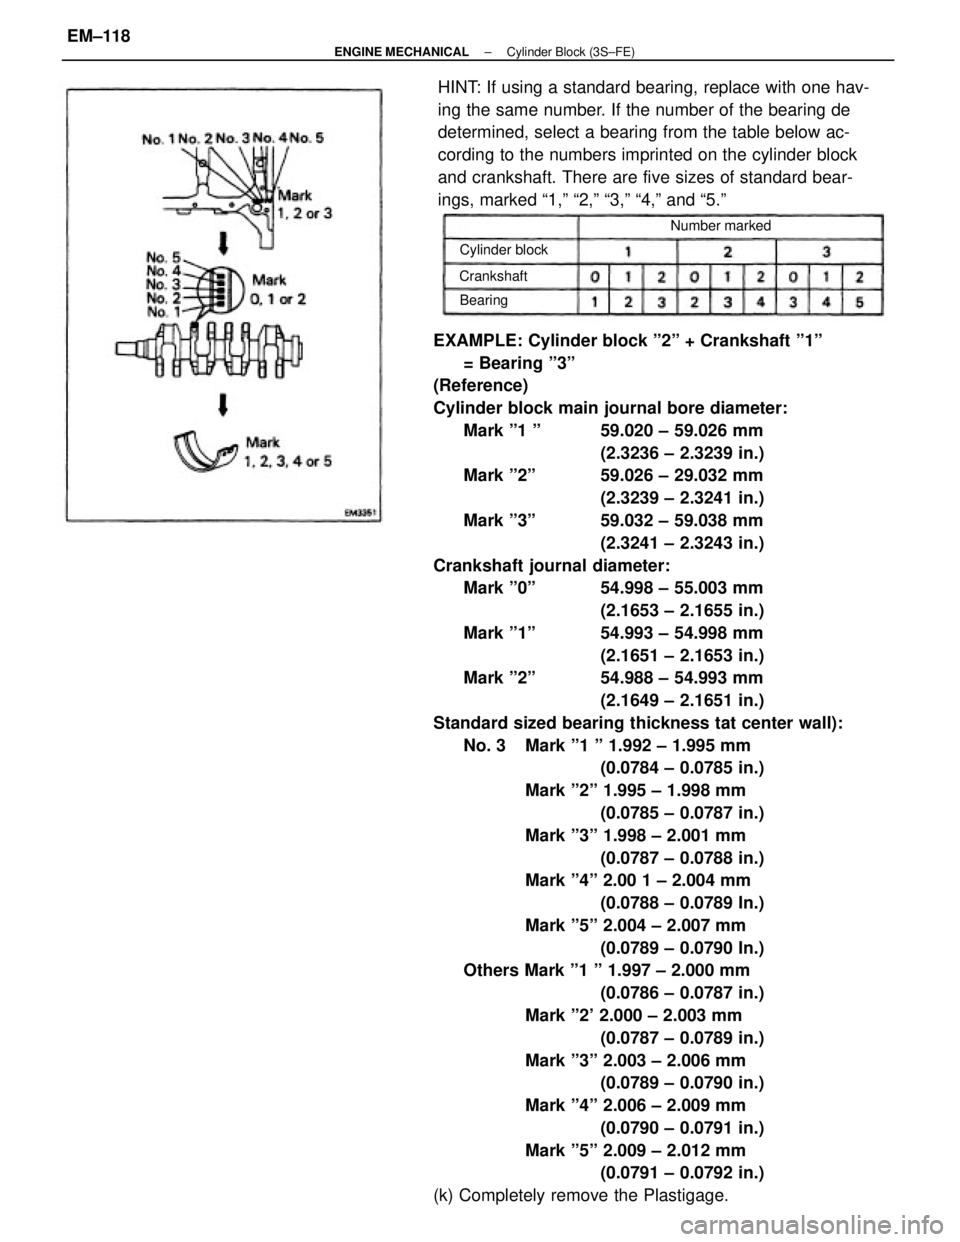
EXAMPLE: Cylinder block º2º + Crankshaft º1º
= Bearing º3º
(Reference)
Cylinder block main journal bore diameter:
Mark º1 º 59.020 ± 59.026 mm
(2.3236 ± 2.3239 in.)
Mark º2º 59.026 ± 29.032 mm
(2.3239 ± 2.3241 in.)
Mark º3º 59.032 ± 59.038 mm
(2.3241 ± 2.3243 in.)
Crankshaft journal diameter:
Mark º0º 54.998 ± 55.003 mm
(2.1653 ± 2.1655 in.)
Mark º1º 54.993 ± 54.998 mm
(2.1651 ± 2.1653 in.)
Mark º2º 54.988 ± 54.993 mm
(2.1649 ± 2.1651 in.)
Standard sized bearing thickness tat center wall):
No. 3 Mark º1 º 1.992 ± 1.995 mm
(0.0784 ± 0.0785 in.)
Mark º2º 1.995 ± 1.998 mm
(0.0785 ± 0.0787 in.)
Mark º3º 1.998 ± 2.001 mm
(0.0787 ± 0.0788 in.)
Mark º4º 2.00 1 ± 2.004 mm
(0.0788 ± 0.0789 In.)
Mark º5º 2.004 ± 2.007 mm
(0.0789 ± 0.0790 In.)
Others Mark º1 º 1.997 ± 2.000 mm
(0.0786 ± 0.0787 in.)
Mark º2' 2.000 ± 2.003 mm
(0.0787 ± 0.0789 in.)
Mark º3º 2.003 ± 2.006 mm
(0.0789 ± 0.0790 in.)
Mark º4º 2.006 ± 2.009 mm
(0.0790 ± 0.0791 in.)
Mark º5º 2.009 ± 2.012 mm
(0.0791 ± 0.0792 in.)
(k) Completely remove the Plastigage.HINT: If using a standard bearing, replace with one hav-
ing the same number. If the number of the bearing de
determined, select a bearing from the table below ac-
cording to the numbers imprinted on the cylinder block
and crankshaft. There are five sizes of standard bear-
ings, marked ª1,º ª2,º ª3,º ª4,º and ª5.º
Number marked
Cylinder block
Crankshaft
Bearing
± ENGINE MECHANICALCylinder Block (3S±FE)EM±118
Page 1296 of 2389
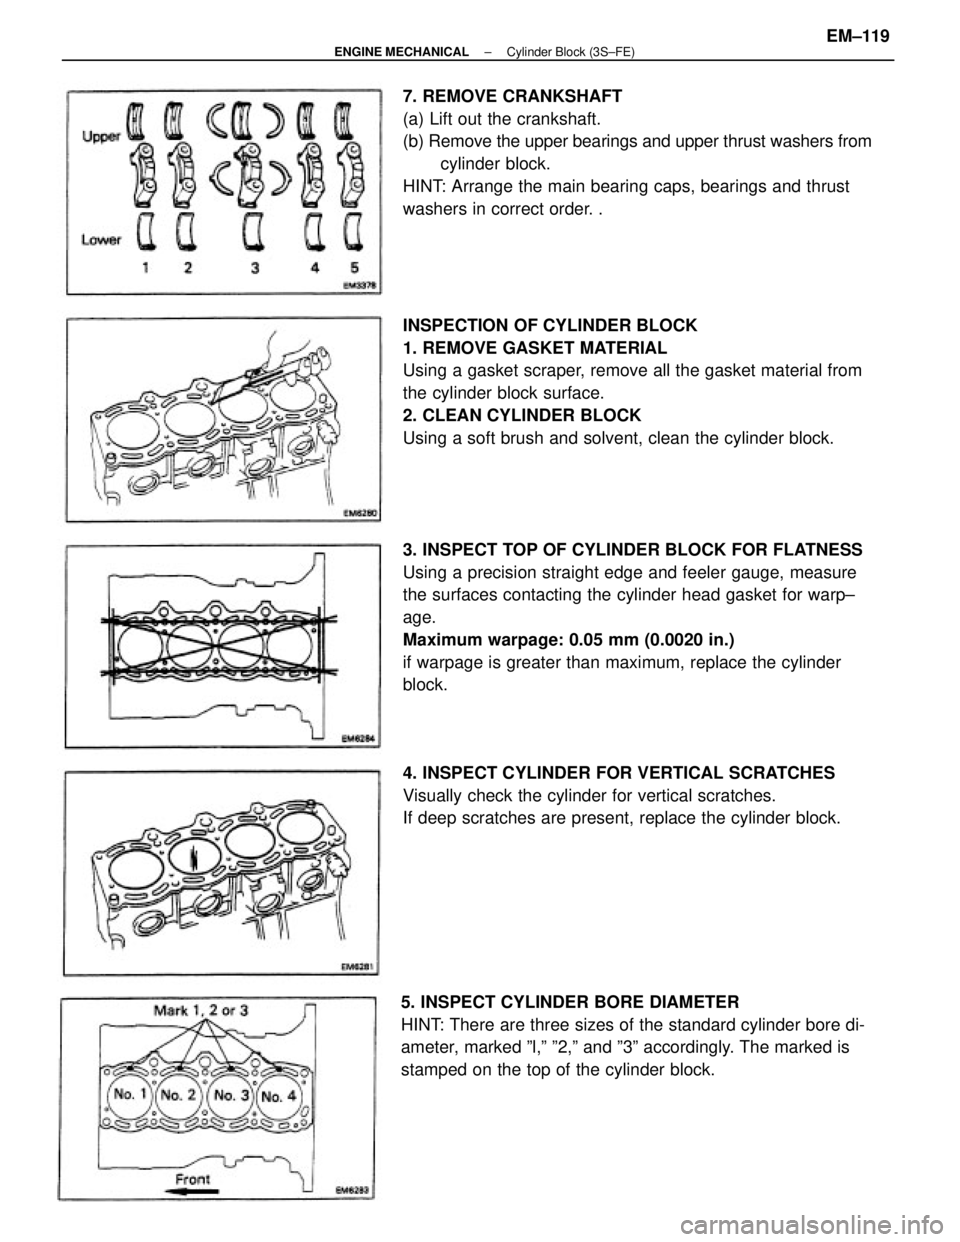
INSPECTION OF CYLINDER BLOCK
1. REMOVE GASKET MATERIAL
Using a gasket scraper, remove all the gasket material from
the cylinder block surface.
2. CLEAN CYLINDER BLOCK
Using a soft brush and solvent, clean the cylinder block.
3. INSPECT TOP OF CYLINDER BLOCK FOR FLATNESS
Using a precision straight edge and feeler gauge, measure
the surfaces contacting the cylinder head gasket for warp±
age.
Maximum warpage: 0.05 mm (0.0020 in.)
if warpage is greater than maximum, replace the cylinder
block. 7. REMOVE CRANKSHAFT
(a) Lift out the crankshaft.
(b) Remove the upper bearings and upper thrust washers from
cylinder block.
HINT: Arrange the main bearing caps, bearings and thrust
washers in correct order. .
5. INSPECT CYLINDER BORE DIAMETER
HINT: There are three sizes of the standard cylinder bore di-
ameter, marked ºl,º º2,º and º3º accordingly. The marked is
stamped on the top of the cylinder block.4. INSPECT CYLINDER FOR VERTICAL SCRATCHES
Visually check the cylinder for vertical scratches.
If deep scratches are present, replace the cylinder block.
± ENGINE MECHANICALCylinder Block (3S±FE)EM±119
Page 1297 of 2389
Using a cylinder gauge, measure the cylinder bore di-
ameter at positions A, B and C in the thrust axial direc-
tions.
Standard diameter:
Mark º1 º 86.000 ± 86.010 mm
(3.3858 ± 3.3862 in.)
Mark º2º 86.010 86.020 mm
(3.3862 ± 3.3866 in.)
Mark º3º 86.020 ± 86.030 mm
(3.3866 3.3870 in.)
Maximum diameter: 86.23 mm (3.3949 in.)
If the diameter is greater than maximum, replace the
cylinder block.
DISASSEMBLY OF PISTON AND
CONNECTING ROD ASSEMBLIES
1. CHECK FIT BETWEEN PISTON AND PISTON PIN
Try to move the piston back and forth on the piston pin.
If any movement is felt, replace the piston and pin as a set. 6. REMOVE CYLINDER RIDGE
If the wear is less than 0.2 mm (0.008 in.), use a ridge ream-
er to machine the piston ring ridge at the top of the cylinder.
2. REMOVE PISTON RINGS
(a) Using a piston ring expander, remove the two compression
rings.
± ENGINE MECHANICALCylinder Block (3S±FE)EM±120
Page 1298 of 2389
INSPECTION OF PISTON AND CONNECTING
ROD ASSEMBLIES
1. CLEAN PISTON
(a) Using a gasket scraper, remove the carbon from the
piston top. 3. DISCONNECT CONNECTING ROD FROM PISTON
Using SST, press out the piston pin from the piston.
SST 09221±25024 (09221±00020,09221±00030,
09221±00060,09221±00160,09221±00170)
HINT:
wThe piston and pin are a matched set.
wArrange the pistons, pins, rings, connecting rods and
bearings in correct order. (b) Remove the two side rails and oil ring expander by
hand.
HINT: Arrange the rings in correct order only.
(b) Using a groove cleaning broken ring, clean the piston
ring grooves.
± ENGINE MECHANICALCylinder Block (3S±FE)EM±121
Page 1299 of 2389
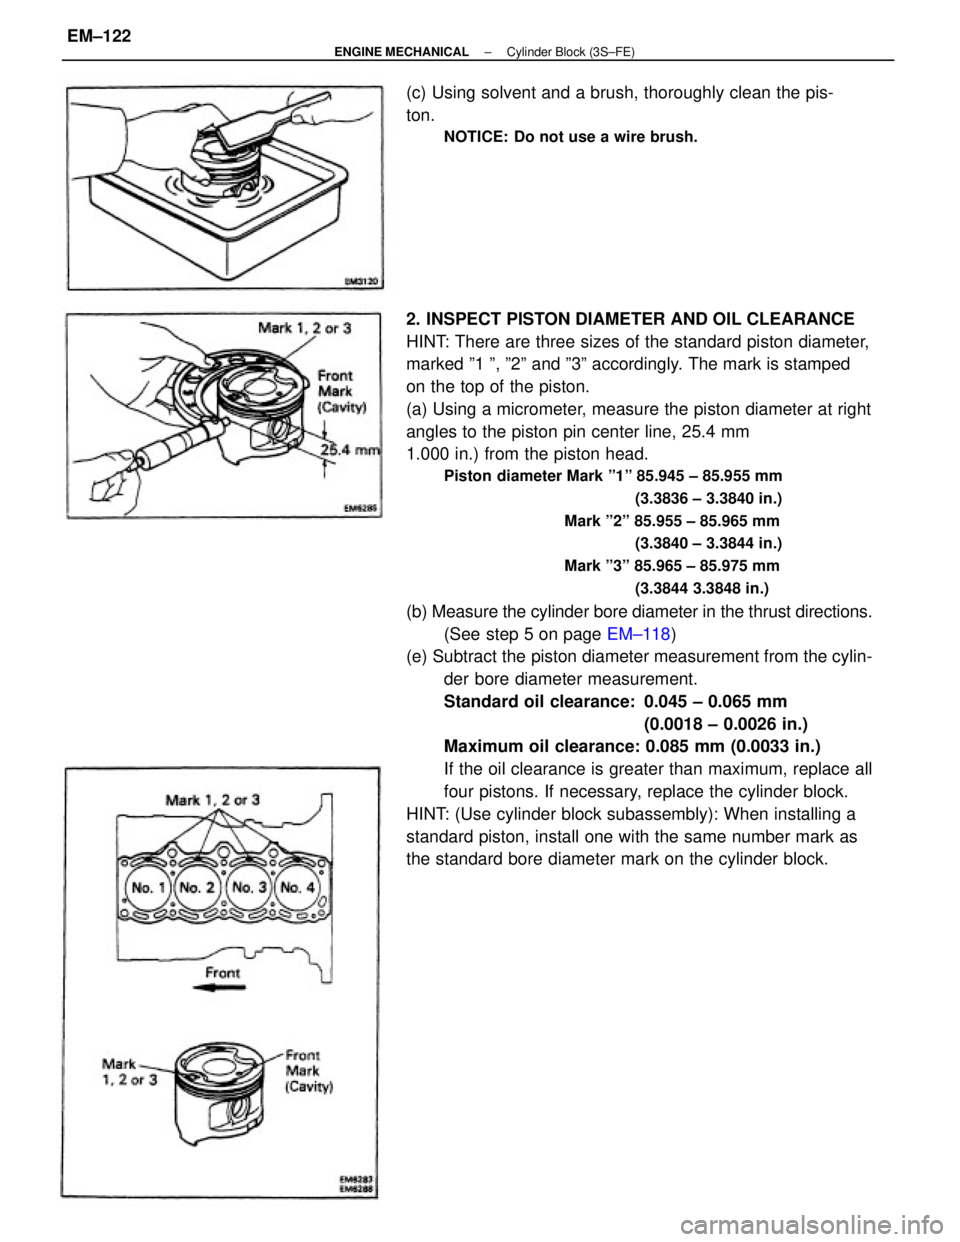
2. INSPECT PISTON DIAMETER AND OIL CLEARANCE
HINT: There are three sizes of the standard piston diameter,
marked º1 º, º2º and º3º accordingly. The mark is stamped
on the top of the piston.
(a) Using a micrometer, measure the piston diameter at right
angles to the piston pin center line, 25.4 mm
1.000 in.) from the piston head.
Piston diameter Mark º1º 85.945 ± 85.955 mm
(3.3836 ± 3.3840 in.)
Mark º2º 85.955 ± 85.965 mm
(3.3840 ± 3.3844 in.)
Mark º3º 85.965 ± 85.975 mm
(3.3844 3.3848 in.)
(b) Measure the cylinder bore diameter in the thrust directions.
(See step 5 on page EM±118)
(e) Subtract the piston diameter measurement from the cylin-
der bore diameter measurement.
Standard oil clearance: 0.045 ± 0.065 mm
(0.0018 ± 0.0026 in.)
Maximum oil clearance: 0.085 mm (0.0033 in.)
If the oil clearance is greater than maximum, replace all
four pistons. If necessary, replace the cylinder block.
HINT: (Use cylinder block subassembly): When installing a
standard piston, install one with the same number mark as
the standard bore diameter mark on the cylinder block. (c) Using solvent and a brush, thoroughly clean the pis-
ton.
NOTICE: Do not use a wire brush.
± ENGINE MECHANICALCylinder Block (3S±FE)EM±122
Page 1300 of 2389
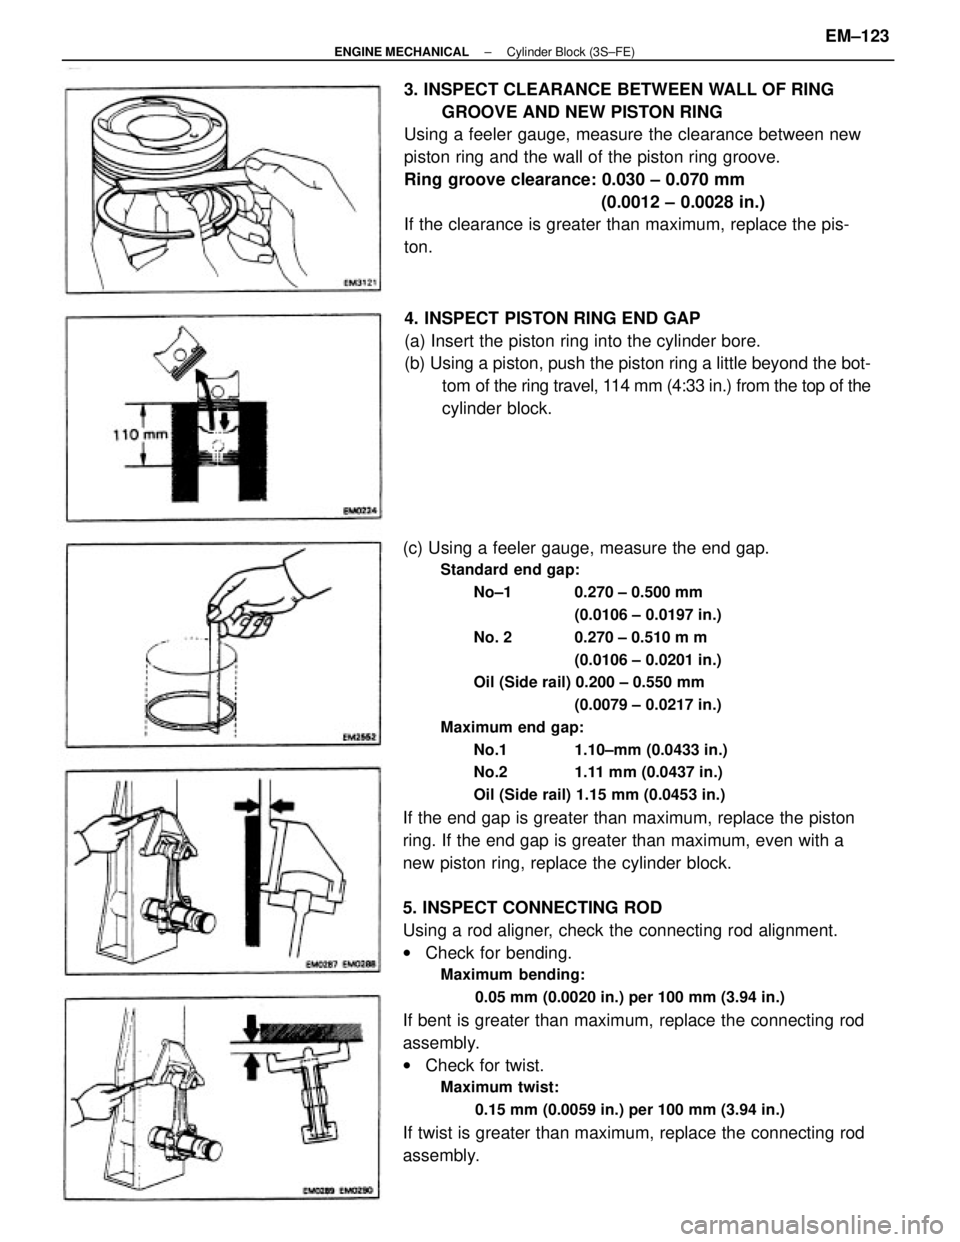
(c) Using a feeler gauge, measure the end gap.
Standard end gap:
No±1 0.270 ± 0.500 mm
(0.0106 ± 0.0197 in.)
No. 2 0.270 ± 0.510 m m
(0.0106 ± 0.0201 in.)
Oil (Side rail) 0.200 ± 0.550 mm
(0.0079 ± 0.0217 in.)
Maximum end gap:
No.1 1.10±mm (0.0433 in.)
No.2 1.11 mm (0.0437 in.)
Oil (Side rail) 1.15 mm (0.0453 in.)
If the end gap is greater than maximum, replace the piston
ring. If the end gap is greater than maximum, even with a
new piston ring, replace the cylinder block.
5. INSPECT CONNECTING ROD
Using a rod aligner, check the connecting rod alignment.
wCheck for bending.
Maximum bending:
0.05 mm (0.0020 in.) per 100 mm (3.94 in.)
If bent is greater than maximum, replace the connecting rod
assembly.
wCheck for twist.
Maximum twist:
0.15 mm (0.0059 in.) per 100 mm (3.94 in.)
If twist is greater than maximum, replace the connecting rod
assembly.3. INSPECT CLEARANCE BETWEEN WALL OF RING
GROOVE AND NEW PISTON RING
Using a feeler gauge, measure the clearance between new
piston ring and the wall of the piston ring groove.
Ring groove clearance: 0.030 ± 0.070 mm
(0.0012 ± 0.0028 in.)
If the clearance is greater than maximum, replace the pis-
ton.
4. INSPECT PISTON RING END GAP
(a) Insert the piston ring into the cylinder bore.
(b) Using a piston, push the piston ring a little beyond the bot-
tom of the ring travel, 114 mm (4:33 in.) from the top of the
cylinder block.
± ENGINE MECHANICALCylinder Block (3S±FE)EM±123
Page 1301 of 2389
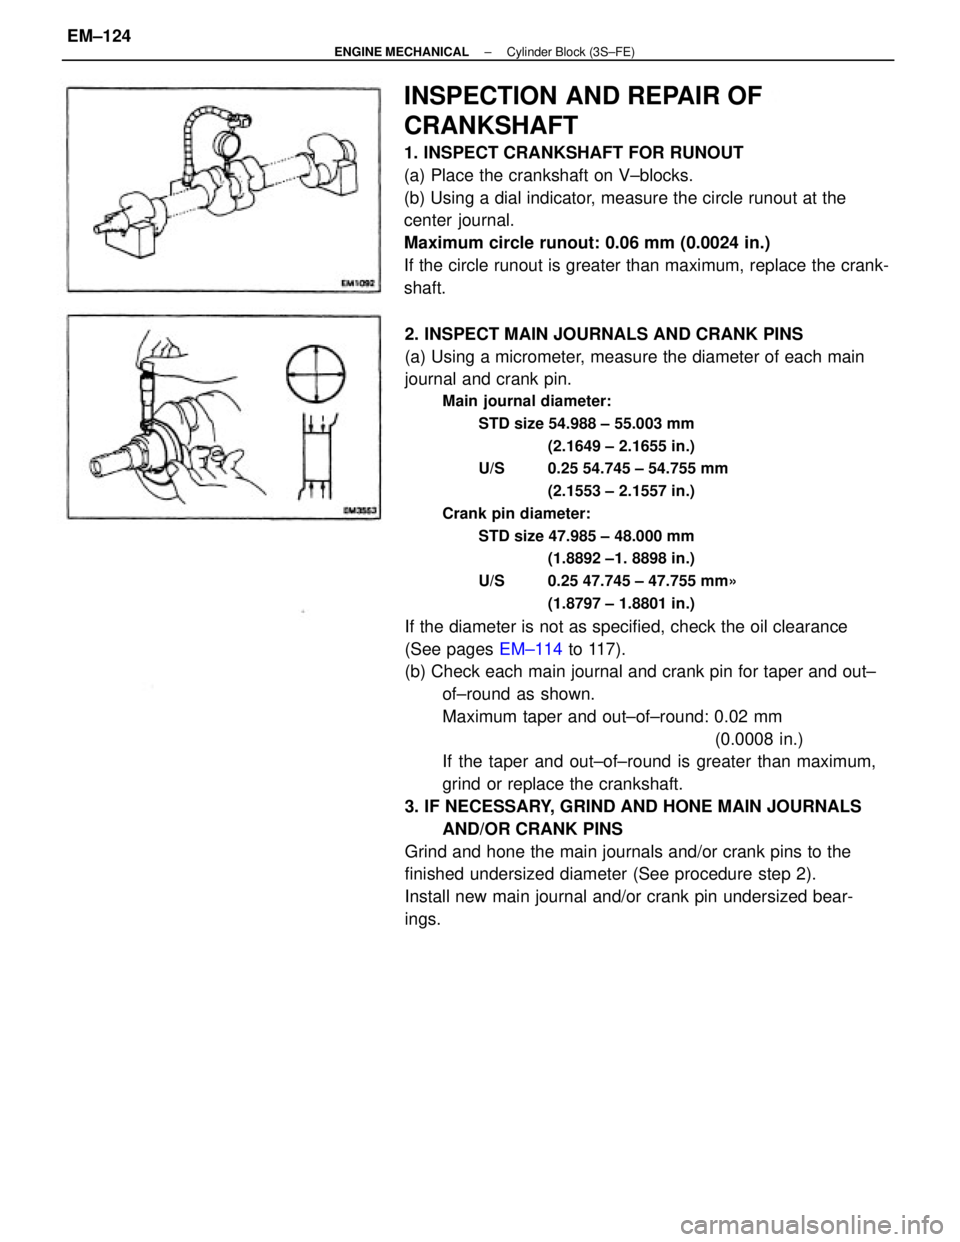
2. INSPECT MAIN JOURNALS AND CRANK PINS
(a) Using a micrometer, measure the diameter of each main
journal and crank pin.
Main journal diameter:
STD size 54.988 ± 55.003 mm
(2.1649 ± 2.1655 in.)
U/S 0.25 54.745 ± 54.755 mm
(2.1553 ± 2.1557 in.)
Crank pin diameter:
STD size 47.985 ± 48.000 mm
(1.8892 ±1. 8898 in.)
U/S 0.25 47.745 ± 47.755 mm»
(1.8797 ± 1.8801 in.)
If the diameter is not as specified, check the oil clearance
(See pages EM±114 to 117).
(b) Check each main journal and crank pin for taper and out±
of±round as shown.
Maximum taper and out±of±round: 0.02 mm
(0.0008 in.)
If the taper and out±of±round is greater than maximum,
grind or replace the crankshaft.
3. IF NECESSARY, GRIND AND HONE MAIN JOURNALS
AND/OR CRANK PINS
Grind and hone the main journals and/or crank pins to the
finished undersized diameter (See procedure step 2).
Install new main journal and/or crank pin undersized bear-
ings.
INSPECTION AND REPAIR OF
CRANKSHAFT
1. INSPECT CRANKSHAFT FOR RUNOUT
(a) Place the crankshaft on V±blocks.
(b) Using a dial indicator, measure the circle runout at the
center journal.
Maximum circle runout: 0.06 mm (0.0024 in.)
If the circle runout is greater than maximum, replace the crank-
shaft.
± ENGINE MECHANICALCylinder Block (3S±FE)EM±124
Page 1302 of 2389
B. If oil pump is installed to the cylinder block:
(a) Using a knife, cut off the oil seal lip.
(b) Using a screwdriver, pry out the oil seal.
CAUTION: Be careful not to damage the crankshaft.
Tape the screwdriver tip.
(b) Using SST and a hammer, tap in a new oil seal until its
surface is flush with the oil pump case edge.
SST 09226±10010
(c) Apply MP grease to the oil seal lip.
(c) Apply MP grease to a new oil seal lip.
(d) Using SST and a hammer, tap in the oil seal until its sur-
face is flush with the oil pump case edge.
SST 09226±10010 1. REPLACE CRANKSHAFT FRONT OIL SEAL
A. If oil pump is removed from cylinder block:
(a) Using screwdriver and hammer, tap out the oil seal.
REPLACEMENT OF CRANKSHAFT OIL
SEALS
HINT: There are two methods (A and B) to replace the oil
seal as follows:
± ENGINE MECHANICALCylinder Block (3S±FE)EM±125