Page 1479 of 2389
Lever
Lever is not locked
TERMINAL AND CONNECTOR REPAIR±HOW TO INSTALL AND REMOVE SPECIAL CONNECTORS
B±50
60
Wire Harness Repair Manual (RM1022E)
(4)Cut the connection of the connector.
NOTICE:
Do not hold the wire harness to pull it.
2.Connect the connector
(1)Connect the connector in the condition that the lever
is fully lifted up.
HINT: If the lever is locked at the lower position, follow
the procedure [Case 3]. (1) to (3) and lift the lever up fully.
(2)Hold the connector to prevent it from slip off and push
it down until you hear a click to lock it.
(3)Confirm that the lever is securely fitted
Page 1837 of 2389
ELECTRONIC SPARK ADVANCE (ESA)
The ECU is programmed with data for optimum ignition timing
under any and all operating conditions. Using data provided
by sensors which monitor various engine functions (rpm, in-
take air volume, eng. temperature, etc.) the microcomputer
(ECU) triggers the spark at precisely the right instant.
IGNITION SYSTEM CIRCUIT
± IGNITION SYSTEMIgnition System CircuitIG±4
Page 1864 of 2389

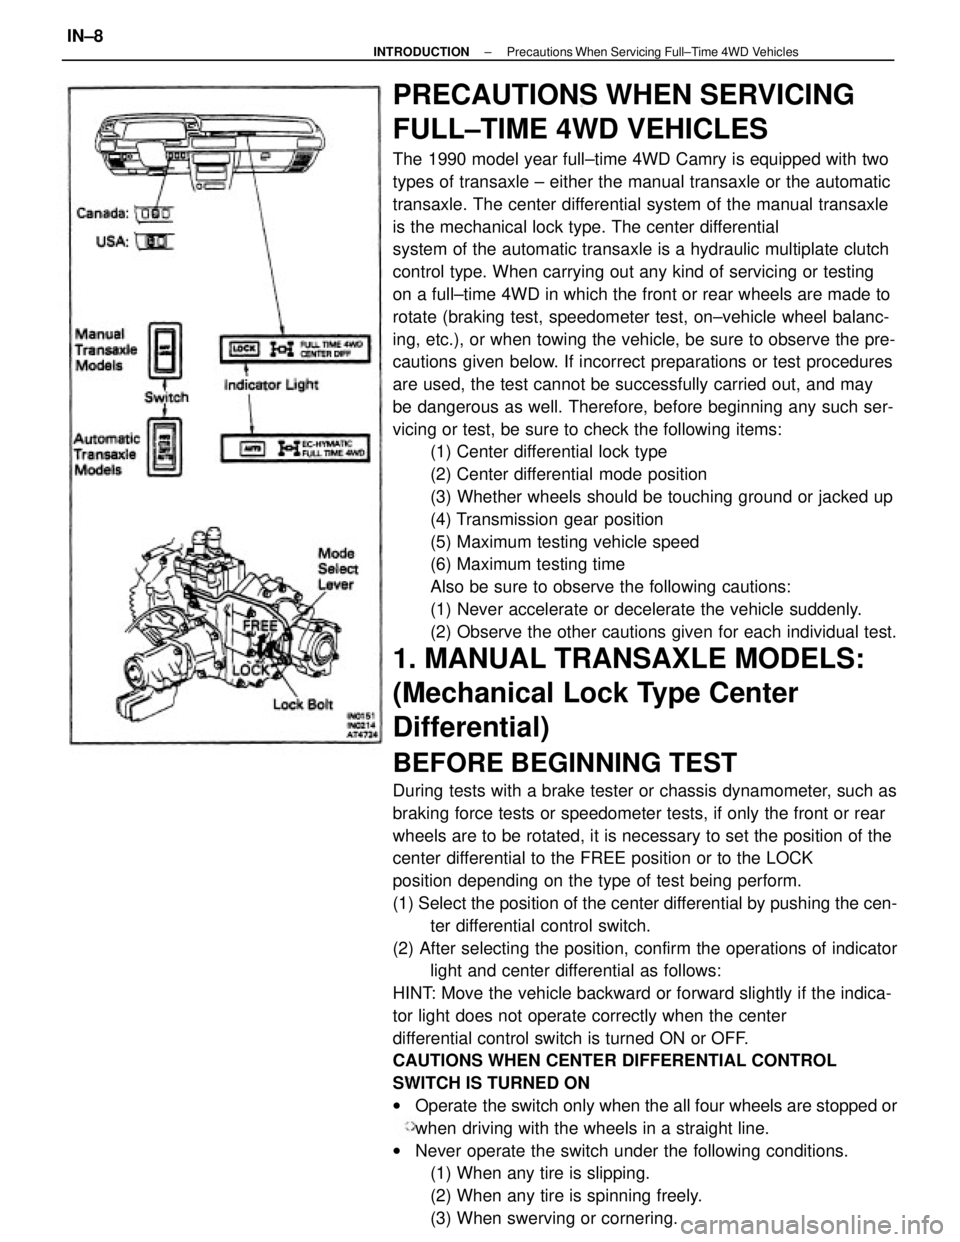
PRECAUTIONS WHEN SERVICING
FULL±TIME 4WD VEHICLES
The 1990 model year full±time 4WD Camry is equipped with two
types of transaxle ± either the manual transaxle or the automatic
transaxle. The center differential system of the manual transaxle
is the mechanical lock type. The center differential
system of the automatic transaxle is a hydraulic multiplate clutch
control type. When carrying out any kind of servicing or testing
on a full±time 4WD in which the front or rear wheels are made to
rotate (braking test, speedometer test, on±vehicle wheel balanc-
ing, etc.), or when towing the vehicle, be sure to observe the pre-
cautions given below. If incorrect preparations or test procedures
are used, the test cannot be successfully carried out, and may
be dangerous as well. Therefore, before beginning any such ser-
vicing or test, be sure to check the following items:
(1) Center differential lock type
(2) Center differential mode position
(3) Whether wheels should be touching ground or jacked up
(4) Transmission gear position
(5) Maximum testing vehicle speed
(6) Maximum testing time
Also be sure to observe the following cautions:
(1) Never accelerate or decelerate the vehicle suddenly.
(2) Observe the other cautions given for each individual test.
1. MANUAL TRANSAXLE MODELS:
(Mechanical Lock Type Center
Differential)
BEFORE BEGINNING TEST
During tests with a brake tester or chassis dynamometer, such as
braking force tests or speedometer tests, if only the front or rear
wheels are to be rotated, it is necessary to set the position of the
center differential to the FREE position or to the LOCK
position depending on the type of test being perform.
(1) Select the position of the center differential by pushing the cen-
ter differential control switch.
(2) After selecting the position, confirm the operations of indicator
light and center differential as follows:
HINT: Move the vehicle backward or forward slightly if the indica-
tor light does not operate correctly when the center
differential control switch is turned ON or OFF.
CAUTIONS WHEN CENTER DIFFERENTIAL CONTROL
SWITCH IS TURNED ON
wOperate the switch only when the all four wheels are stopped or
when driving with the wheels in a straight line.
wNever operate the switch under the following conditions.
(1) When any tire is slipping.
(2) When any tire is spinning freely.
(3) When swerving or cornering.
± INTRODUCTIONPrecautions When Servicing Full±Time 4WD VehiclesIN±8
Page 1865 of 2389

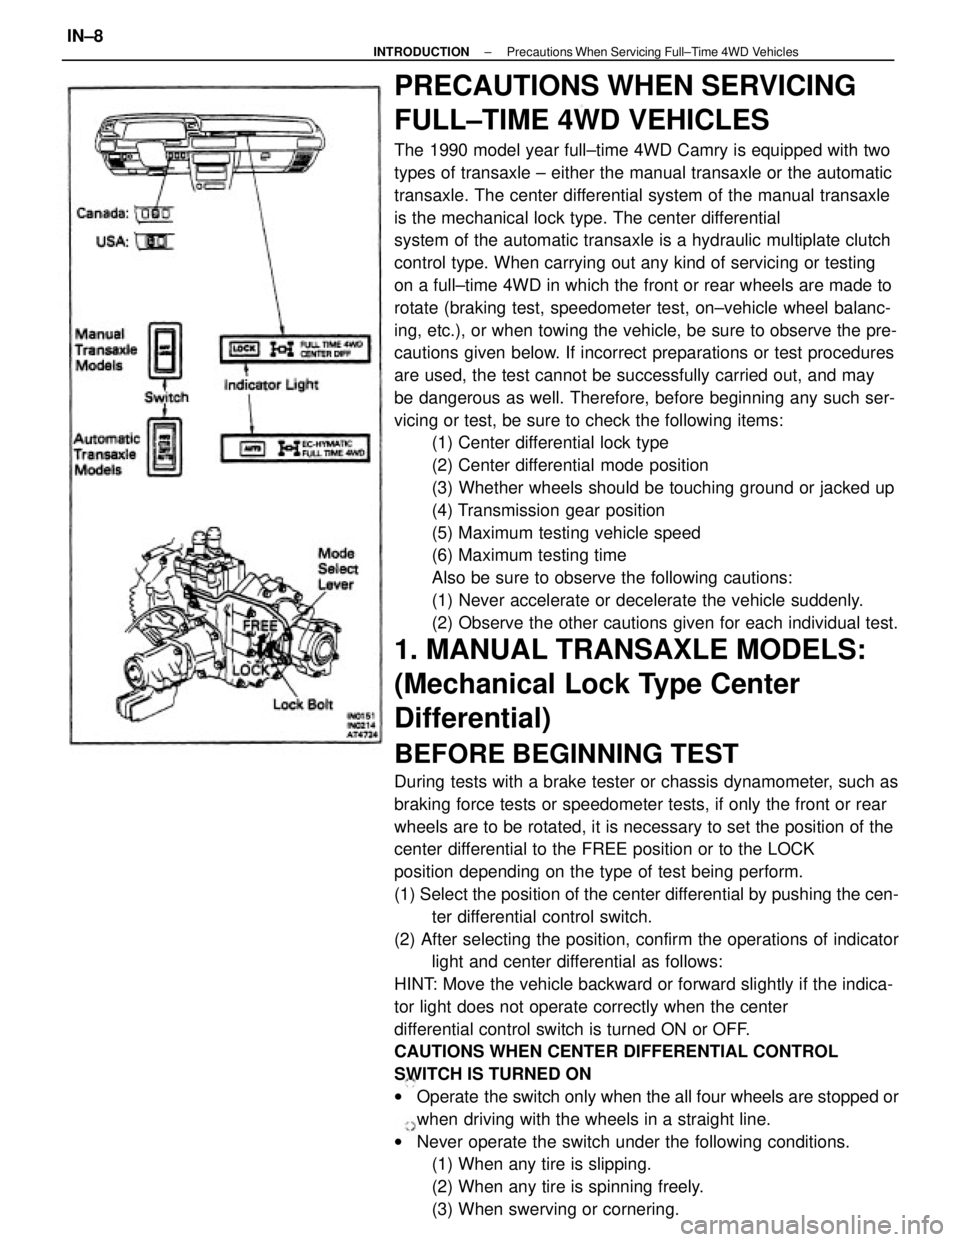
PRECAUTIONS WHEN SERVICING
FULL±TIME 4WD VEHICLES
The 1990 model year full±time 4WD Camry is equipped with two
types of transaxle ± either the manual transaxle or the automatic
transaxle. The center differential system of the manual transaxle
is the mechanical lock type. The center differential
system of the automatic transaxle is a hydraulic multiplate clutch
control type. When carrying out any kind of servicing or testing
on a full±time 4WD in which the front or rear wheels are made to
rotate (braking test, speedometer test, on±vehicle wheel balanc-
ing, etc.), or when towing the vehicle, be sure to observe the pre-
cautions given below. If incorrect preparations or test procedures
are used, the test cannot be successfully carried out, and may
be dangerous as well. Therefore, before beginning any such ser-
vicing or test, be sure to check the following items:
(1) Center differential lock type
(2) Center differential mode position
(3) Whether wheels should be touching ground or jacked up
(4) Transmission gear position
(5) Maximum testing vehicle speed
(6) Maximum testing time
Also be sure to observe the following cautions:
(1) Never accelerate or decelerate the vehicle suddenly.
(2) Observe the other cautions given for each individual test.
1. MANUAL TRANSAXLE MODELS:
(Mechanical Lock Type Center
Differential)
BEFORE BEGINNING TEST
During tests with a brake tester or chassis dynamometer, such as
braking force tests or speedometer tests, if only the front or rear
wheels are to be rotated, it is necessary to set the position of the
center differential to the FREE position or to the LOCK
position depending on the type of test being perform.
(1) Select the position of the center differential by pushing the cen-
ter differential control switch.
(2) After selecting the position, confirm the operations of indicator
light and center differential as follows:
HINT: Move the vehicle backward or forward slightly if the indica-
tor light does not operate correctly when the center
differential control switch is turned ON or OFF.
CAUTIONS WHEN CENTER DIFFERENTIAL CONTROL
SWITCH IS TURNED ON
wOperate the switch only when the all four wheels are stopped or
when driving with the wheels in a straight line.
wNever operate the switch under the following conditions.
(1) When any tire is slipping.
(2) When any tire is spinning freely.
(3) When swerving or cornering.
± INTRODUCTIONPrecautions When Servicing Full±Time 4WD VehiclesIN±8
Page 1872 of 2389

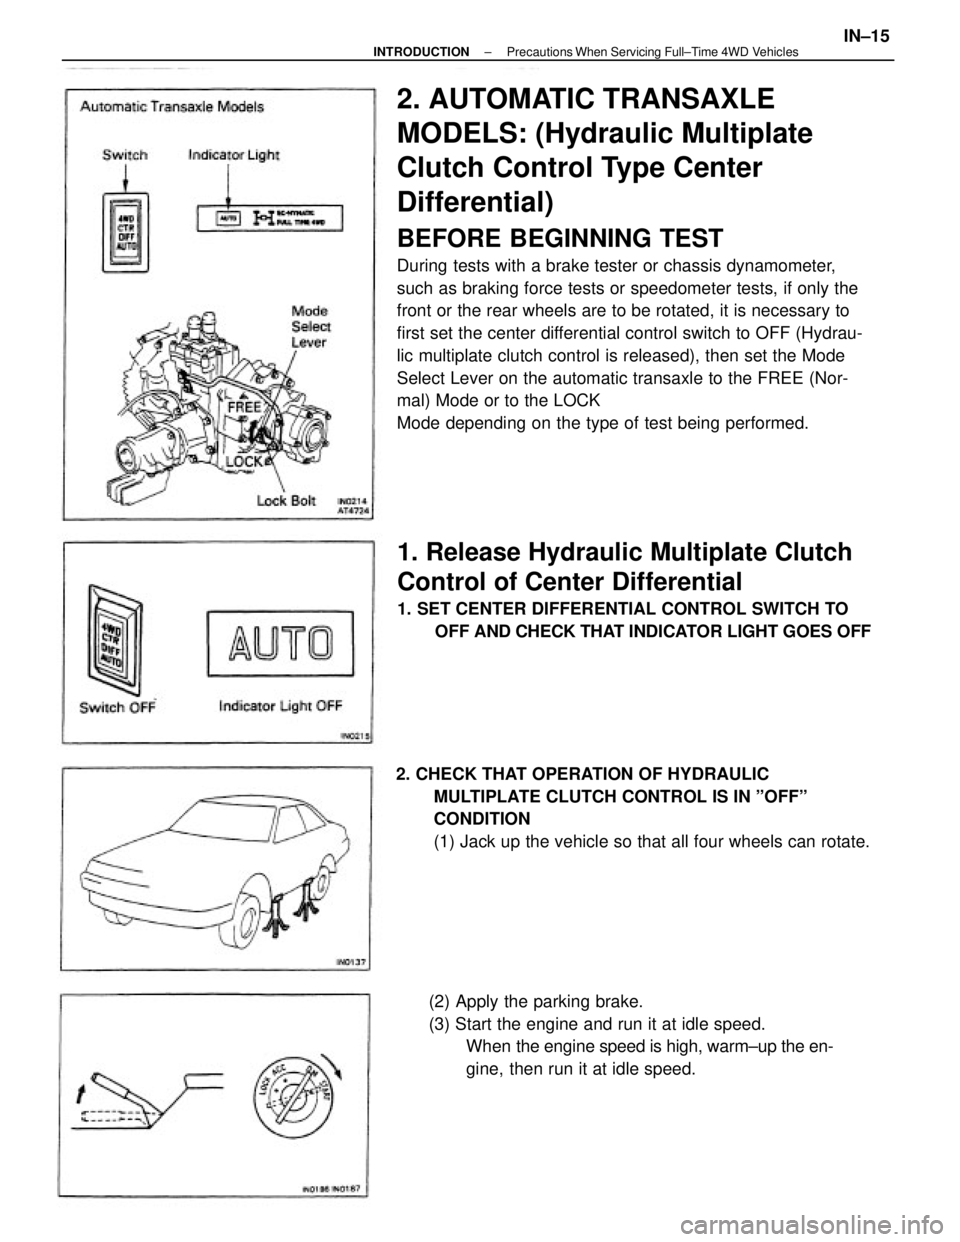
2. AUTOMATIC TRANSAXLE
MODELS: (Hydraulic Multiplate
Clutch Control Type Center
Differential)
BEFORE BEGINNING TEST
During tests with a brake tester or chassis dynamometer,
such as braking force tests or speedometer tests, if only the
front or the rear wheels are to be rotated, it is necessary to
first set the center differential control switch to OFF (Hydrau-
lic multiplate clutch control is released), then set the Mode
Select Lever on the automatic transaxle to the FREE (Nor-
mal) Mode or to the LOCK
Mode depending on the type of test being performed.
1. Release Hydraulic Multiplate Clutch
Control of Center Differential
1. SET CENTER DIFFERENTIAL CONTROL SWITCH TO
OFF AND CHECK THAT INDICATOR LIGHT GOES OFF
2. CHECK THAT OPERATION OF HYDRAULIC
MULTIPLATE CLUTCH CONTROL IS IN ºOFFº
CONDITION
(1) Jack up the vehicle so that all four wheels can rotate.
(2) Apply the parking brake.
(3) Start the engine and run it at idle speed.
When the engine speed is high, warm±up the en-
gine, then run it at idle speed.
± INTRODUCTIONPrecautions When Servicing Full±Time 4WD VehiclesIN±15
Page 1875 of 2389

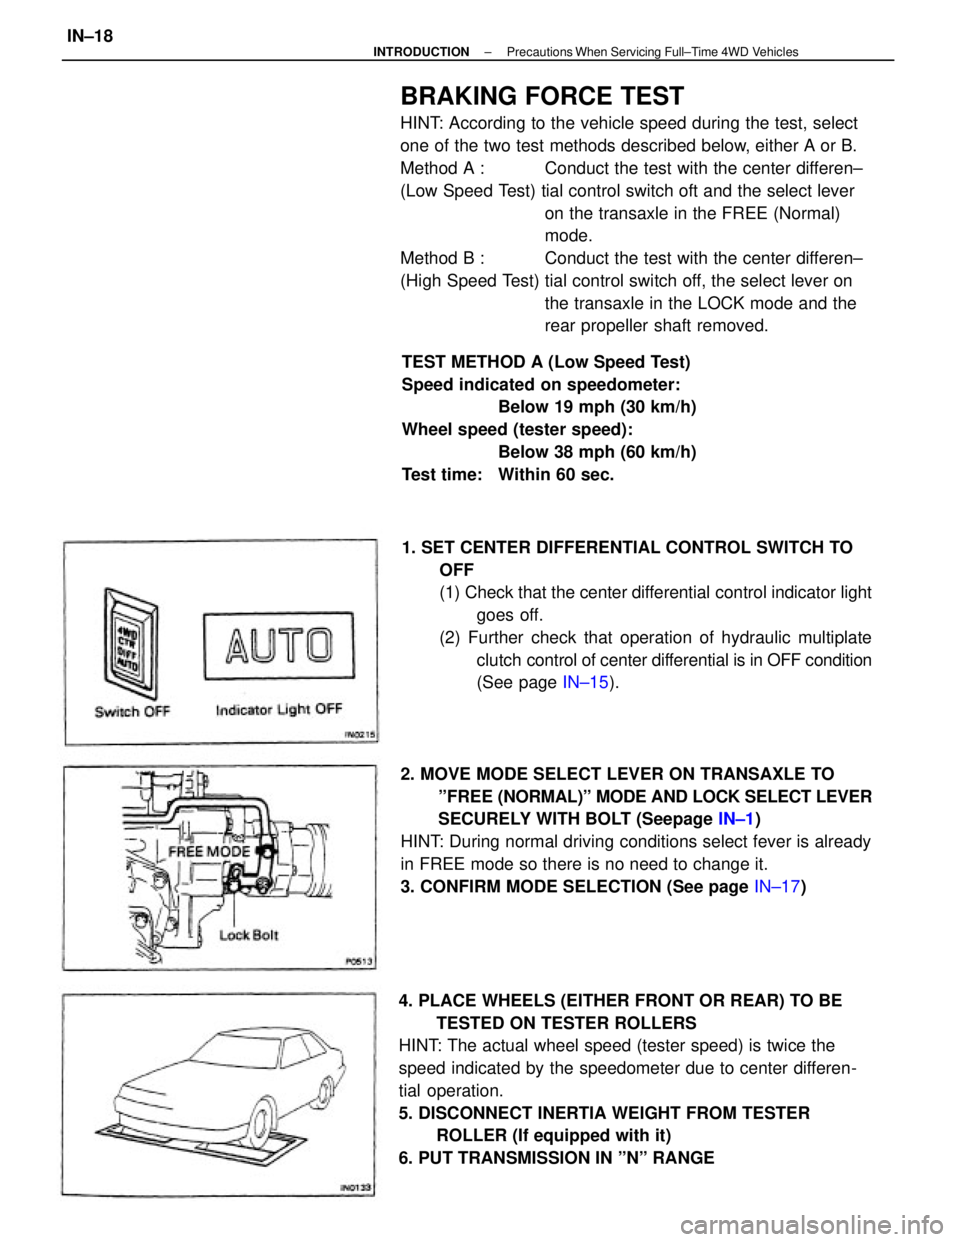
BRAKING FORCE TEST
HINT: According to the vehicle speed during the test, select
one of the two test methods described below, either A or B.
Method A : Conduct the test with the center differen±
(Low Speed Test) tial control switch oft and the select lever
on the transaxle in the FREE (Normal)
mode.
Method B : Conduct the test with the center differen±
(High Speed Test) tial control switch off, the select lever on
the transaxle in the LOCK mode and the
rear propeller shaft removed.
4. PLACE WHEELS (EITHER FRONT OR REAR) TO BE
TESTED ON TESTER ROLLERS
HINT: The actual wheel speed (tester speed) is twice the
speed indicated by the speedometer due to center differen-
tial operation.
5. DISCONNECT INERTIA WEIGHT FROM TESTER
ROLLER (If equipped with it)
6. PUT TRANSMISSION IN ºNº RANGE1. SET CENTER DIFFERENTIAL CONTROL SWITCH TO
OFF
(1) Check that the center differential control indicator light
goes off.
(2) Further check that operation of hydraulic multiplate
clutch control of center differential is in OFF condition
(See page IN±15).
2. MOVE MODE SELECT LEVER ON TRANSAXLE TO
ºFREE (NORMAL)º MODE AND LOCK SELECT LEVER
SECURELY WITH BOLT (Seepage IN±1)
HINT: During normal driving conditions select fever is already
in FREE mode so there is no need to change it.
3. CONFIRM MODE SELECTION (See page IN±17) TEST METHOD A (Low Speed Test)
Speed indicated on speedometer:
Below 19 mph (30 km/h)
Wheel speed (tester speed):
Below 38 mph (60 km/h)
Test time: Within 60 sec.
± INTRODUCTIONPrecautions When Servicing Full±Time 4WD VehiclesIN±18
Page 1876 of 2389
![TOYOTA CAMRY V20 1986 Service Information TEST METHOD B (High Speed Test)
[Vehicle speed: Over 38 mph (60 km/h)]
1. SET CENTER DIFFERENTIAL CONTROL SWITCH TO
OFF
(1) Check that the center differential control indicator light
goes oft.
(2) Fur TOYOTA CAMRY V20 1986 Service Information TEST METHOD B (High Speed Test)
[Vehicle speed: Over 38 mph (60 km/h)]
1. SET CENTER DIFFERENTIAL CONTROL SWITCH TO
OFF
(1) Check that the center differential control indicator light
goes oft.
(2) Fur](/manual-img/14/57449/w960_57449-1875.png)
TEST METHOD B (High Speed Test)
[Vehicle speed: Over 38 mph (60 km/h)]
1. SET CENTER DIFFERENTIAL CONTROL SWITCH TO
OFF
(1) Check that the center differential control indicator light
goes oft.
(2) Further check that the operation of the hydraulic multi-
plate clutch control of the center differential is in
OFF condition.
(See page IN±15)
2. MOVE MODE SELECT LEVER ON TRANSAXLE TO ºLOCKº
MODE AND LOCK IT SECURELY WITH BOLT
(See page IN±16)
3. CONFIRM MODE SELECTION
(See page IN±17) 7. OPERATE TESTER ROLLERS AND MEASURE
BRAKING FORCE WITH ENGINE AT IDLE
HINT: Since different types of tester are used, such as spe-
cialized brake testers and combination testers with built in
chassis dynamometer, speedometer tester, brake tester, etc.,
conduct the test in accordance with the instructions furnished
for the tester model used.
4. REMOVE REAR PROPELLER SHAFT
Make matching marks on each end of the propeller shaft,
then remove it.8. AFTER FINISHING TEST, RETURN CENTER
DIFFERENTIAL CONTROL SWITCH TO ºAUTOº AND
CHECK THAT INDICATOR LIGHT GOES ON
± INTRODUCTIONPrecautions When Servicing Full±Time 4WD VehiclesIN±19
Page 1878 of 2389
![TOYOTA CAMRY V20 1986 Service Information SPEEDOMETER TEST OR OTHER TESTS
[Using Speedometer Tester or Chassis Dynamometer]
1. SET CENTER DIFFERENTIAL CONTROL SWITCH TO
OFF
(1) Check that the center differential control indicator light
goes TOYOTA CAMRY V20 1986 Service Information SPEEDOMETER TEST OR OTHER TESTS
[Using Speedometer Tester or Chassis Dynamometer]
1. SET CENTER DIFFERENTIAL CONTROL SWITCH TO
OFF
(1) Check that the center differential control indicator light
goes](/manual-img/14/57449/w960_57449-1877.png)
SPEEDOMETER TEST OR OTHER TESTS
[Using Speedometer Tester or Chassis Dynamometer]
1. SET CENTER DIFFERENTIAL CONTROL SWITCH TO
OFF
(1) Check that the center differential control indicator light
goes oft.
(2) Further check that the operation of the hydraulic
multiplate clutch control of the center differential is in
OFF condition.
(See page IN±15)
2. MOVE MODE SELECT LEVER ON TRANSAXLE TO ºLOCKº
MODE AND LOCK IT SECURELY WITH BOLT (See page
IN±16)
3. CONFIRM MODE SELECTION
(See page IN±17)
8. DISCONNECT INERTIA WEIGHT FROM TESTER ROLL-
ER (If equipped with it)
9. TEST VEHICLE
(1) Start the engine.
(2) Put the transmission in D range, then gradually in-
crease the speed as the test in conducted.
(3) After the test is finished, reduce the speed gradually
and stop the engine. 4. REMOVE REAR PROPELLER SHAFT
Make matching marks on each end of the rear propeller
shaft, then remove it.
5. PLACE FRONT WHEELS ON TESTER ROLLERS
6. CHOCK REAR WHEELS
7. APPLY PARKING BRAKE
10. AFTER FINISHING TEST, INSTALL REAR PROPELLER
SHAFT
Align the matching marks made on the rear propeller shaft
before removal, then install it.
± INTRODUCTIONPrecautions When Servicing Full±Time 4WD VehiclesIN±21