Page 525 of 885
REAR AXLE AND SUSPENSTON - Rear Suspension (FWD)RA,l7
Rear Shock Absorber
(See page RA-l61
REMOVAL OF REAR SHOCK ABSORBER
1. REMOVE SHOCK ABSORBER COVER AND PACKAGE
TRAY BRACKET
2. REMOVE BRAKE TUBE
(a) Using SST, disconnect the brake tube from the wheel
cylinder.
ssT 09751 -3601 1
(b) Using SST, remove the brake tube from the flexible
hose.
ssT 09751 -3601 1
3. DISCONNECT FLEXIBLE HOSE FROM SHOCK
ABSORBER
4. LOOSEN NUT HOLDING SUSPENSION SUPPORT TO
SHOCK ABSORBER
h) Remove the dust cover from the suspension support.
(b) Loosen the nut. Do not remove the nut yet.
5. DISCONNECT SHOCK ABSORBER FROM AXLE
CARRIER
Remove the bolts and nuts holding the shock absorber to
the axle carrier and disconnect the absorber.
6. REMOVE SHOCK ABSORBER FROM BODY
Remove the nuts holding the shock absorber to the body
and remove the shock absorber.
Page 528 of 885
RA.20REAR AXLE AND SUSPENSION - Rear Suspension (FWD)
4. TOROUE NUT HOLDING SUSPENSION SUPPORT TO
SHOCK ABSORBER
(a) Torque the nut.
Torque: 500 kg-cm (36 ft-lb, 49 N'ml
(b) Install the dust cover on the suspension support'
5. INSTALL FLEXIBLE HOSE TO SHOCK ABSORBER
BRACKET
6. INSTALL BRAKE TUBE
Torque: 155 kg-cm (1 1 ft-lb, 15 N'm)
7. FILL BRAKE RESERVOIR WITH BRAKE FLUID AND
BLEED BRAKE SYSTEM (See page BR-7)
8. CHECK REAR WHEEL ALIGNMENT (See page RA-3)
9. INSTALL PACKAGE TRAY BRACKET AND SHOCK
ABSORBER
Suspension Arm
(See page RA-l6)
REMOVAL OF SUSPENSION ARM
1. JACK UP VEHICLE
Jack up the vehicle and support the body with stands.
2. REMOVE NO.2 SUSPENSION ARM
(a) Remove the bolt and nut holding the suspension arm
to the axle carrier.
(b) Remove the cam and bolt holding the suspension
arm to the body and remove the suspension arm.
NOTE: (1) Remember where the cam plate mark is
when removing the suspension arm.
Ql When removing, loosen the bolt. Do not turn
the cam.
Page 530 of 885
a
REAR AXLE AND SUSPENSION
(d Connect the suspension arm to the axle carrier with
the bolt and nut. Do not torque the bolt yet.
NOTE: When connecting the suspension arm, insert the
lip of the nut into the hole on the suspension.
2. INSTALL NO.2 SUSPENSION ARM
(a) Place the suspension arm in position.
(b) lnstall the cam and bolt holding the suspension arm
to the body. Do not torque the bolt yet.
(c) Align the cam plate mark at the same position it was
before removal.
(d) Install the bolt and nut holding the suspension arm to
the axle carrier. Do not torque the bolt yet.
NOTE: Be sure the lip of the nut is resting on the flange
of the suspension arm, not over it.
3. TOROUE SUSPENSION ARM SETTING BOLTS
(a) Remove the stands and bounce the vehicle to stabi-
lize the suspension.
(d Torque the setting bolts with the vehicle weight on
the suspension.
Torque: 89O kg-cm (64 ft-lb, 87 N.ml
4. CHECK REAR WHEEL ALTGNMENT (See page RA-31
Page 531 of 885
REAR AXLE AND SUSPENSION - Rear Suspension (FWD)RA-23
Strut Rod
(See page RA-l61
REMOVAL OF STRUT ROD
1. JACK UP VEHICLE (See page RA-2OI
2. REMOVE STRUT ROD
(a) Remove the bolt and nut holding the strut rod to the
axle carrier.
b) Remove the bolt and nut holding the strut rod to the
body and remove the strut rod.
INSTALLATION OF STRUT ROD
1. INSTALL STRUT ROD
(a) Connect the strut rod to the body with the bolt and
nut Do not torque the bolt yet.
NOTE: Be sure the lip of the nut is resting on the flange
of the bracket.
(b) Connect the strut rod to the axle carrier with the bolt
and nut. Do not torque the bolt yet.
NOTE: When connecting the strut rod, align the lip of
the nut with the groove on the bracket.
2. TOROUE STRUT ROD SETTING BOLTS
(a) Remove the stands and bounce the vehicle to stabil-
ize the suspension.
(b) Torque the setting bolts with the vehicle weight on
the suspension.
Torque: 890 kg-cm (64 ft-lb, 87 N'ml
3. CHECK REAR WHEEL ALIGNMENT (See page RA-31
Page 533 of 885
REAR AXLE AND SUSPENSION - Rear Axle Shaft (4WD)RA-25
WheelBrake Drum
Rear Axle Shaft
Bearing
[g-cm (tt-tu, trl'm)l : Tightening torque
<): Non-reusable part
YV?@ dmi
-r-/
oEnd Gasket | | | WBearins outer Retainer
O Retainer Casret | |Ilnner Retainerl
REAR AXLE SHAFT (4WD)
COMPONENTS
REMOVAL OF REAR AXLE SHAFT
1. REMOVE WHEEL AND BRAKE DRUM
2. REMOVE FOUR BACKING PLATE MOUNTING NUTS
REMOVE REAR AXLE
Using SST, pull out the rear axle.
ssr 09520-ooo31
CAUTION: When pulling out the rear axle, be careful
not to damage the oil seal.
Page 535 of 885

REAR AXLE AND SUSPENSION - Rear Axle Shaft (4WD)RA..27
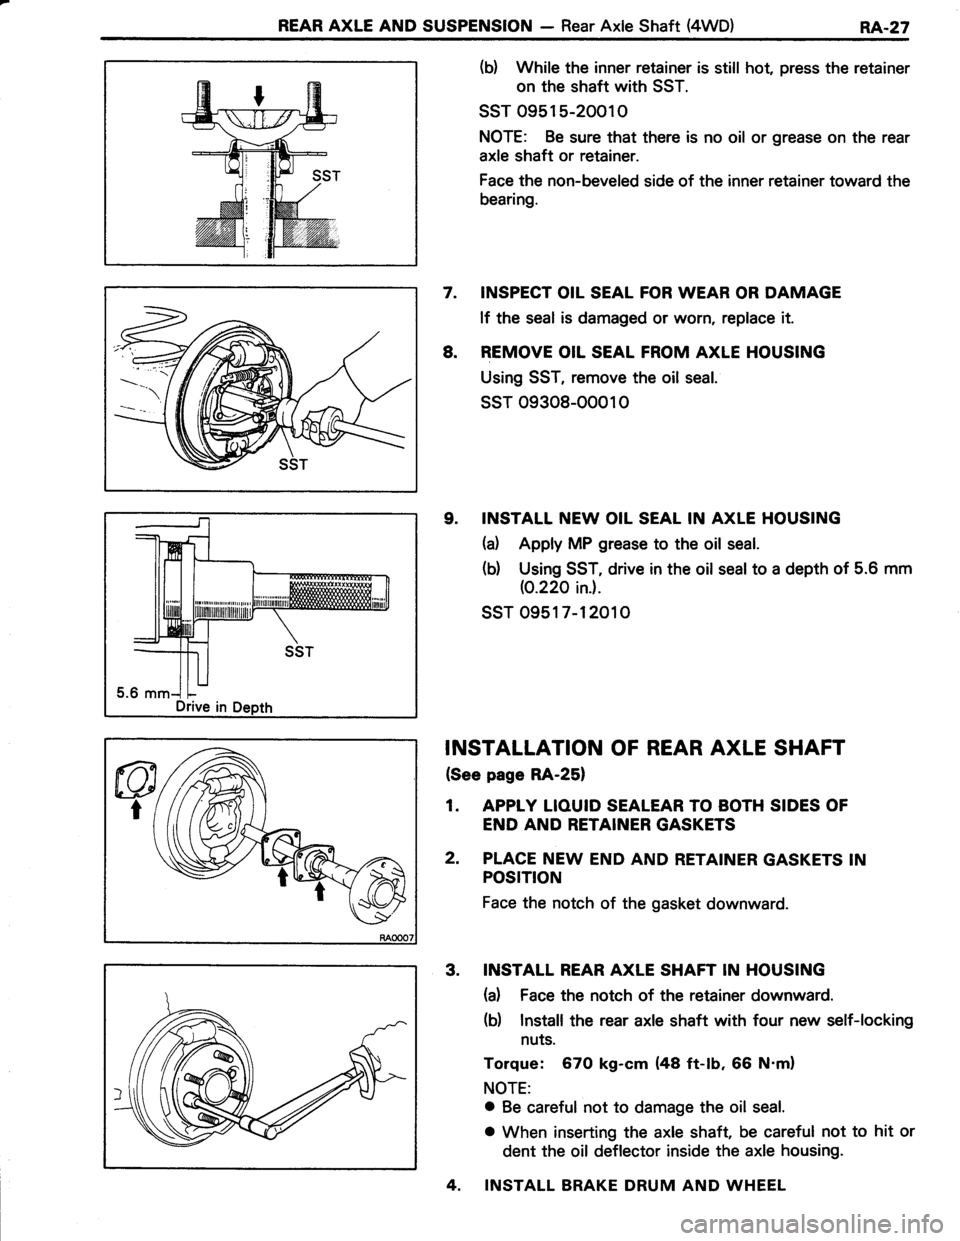
(b) While the inner retainer is still hot, press the retainer
on the shaft with SST.
ssT 0951 5-20010
NOTE: Be sure that there is no oil or grease on the rear
axle shaft or retainer.
Face the non-beveled side of the inner retainer toward the
bearing.
7. INSPECT OIL SEAL FOR WEAR OR DAMAGE
lf the seal is damaged or worn, replace it.
8. REMOVE OIL SEAL FROM AXLE HOUSING
Using SST, remove the oil seal.
ssT 09308-00010
9. INSTALL NEW OIL SEAL IN AXLE HOUSING
(d Apply MP grease to the oil seal.
(b) Using SST, drive in the oil seal to a depth of 5.6 mm
(0.220 ini.
ssr 0951 7-12010
INSTALLATION OF REAR AXLE SHAFT
{See page RA-25}
1. APPIY LIOUID SEALEAR TO BOTH SIDES OF
END AND RETAINER GASKETS
2. PLACE NEW END AND RETAINER GASKETS IN
POSTTtON
Face the notch of the gasket downward.
3. INSTALL REAR AXLE SHAFT IN HOUSING
(a) Face the notch of the retainer downward.
(b) Install the rear axle shaft with four new self-locking
nuts.
Torque: 670 kg-cm (48 ft-tb, 66 N'm)
NOTE:
o Be careful not to damage the oil seal.
o When inserting the axle shaft, be careful not to hit or
dent the oil deflector inside the axle housing.
4. INSTALL BRAKE DRUM AND WHEEL
Drive in
Page 561 of 885

BR-2BRAKE SYSTEM - Precautions, Troubleshooting
PRECAUTIONS
1. Care must be taken to replace each part properly as it
could affect the performance of the brake system and
result in a driving hazard. Replace the parts with parts
of the same part number or equivalent.
2, ltnis very important to keep parts and the area clean
wltsn repairing the brake system.
TROUBLESHOOTING
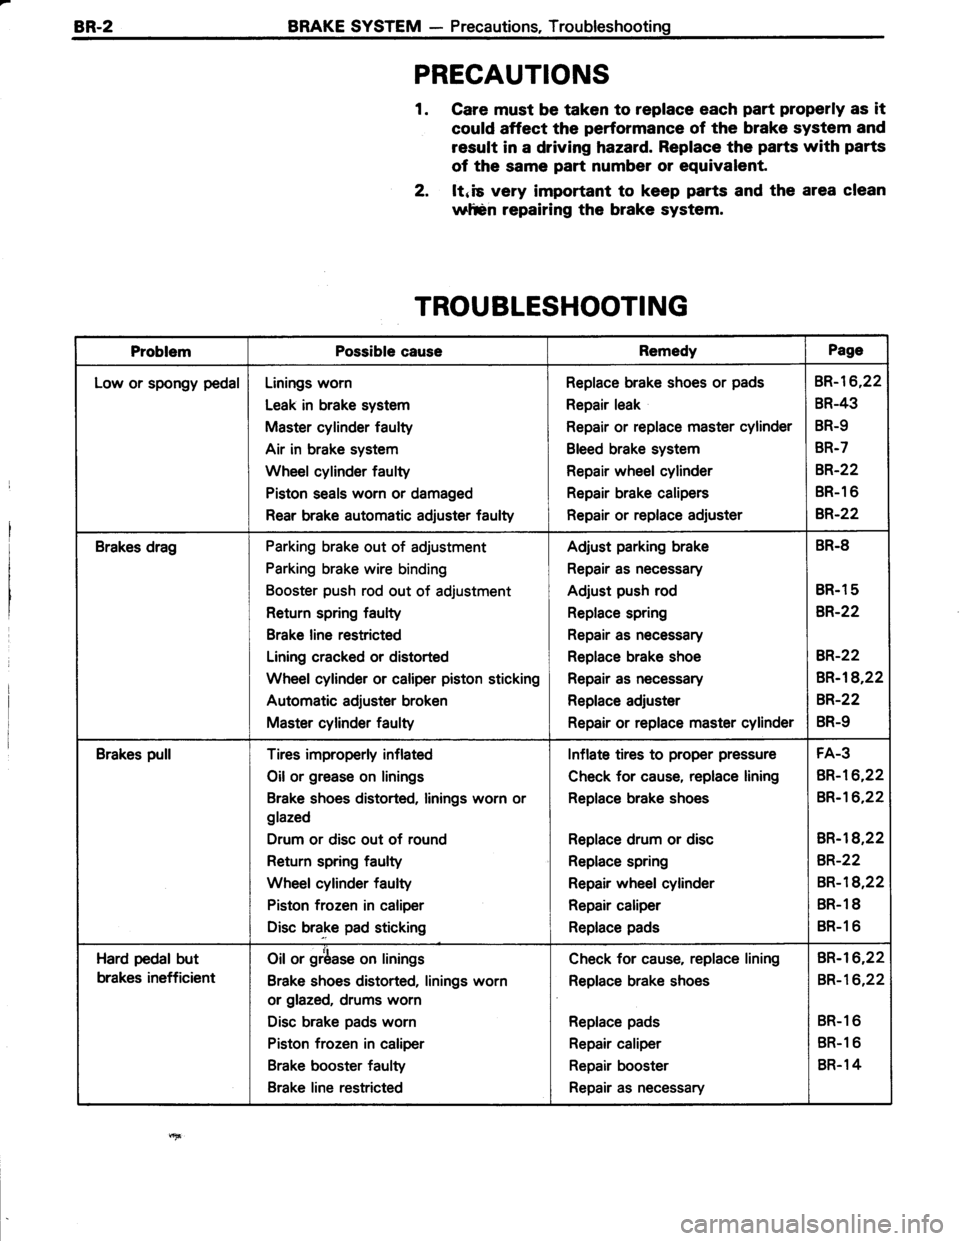
ProblemPossible causeRemedyPage
Low or spongy pedalLinings worn
Leak in brake system
Master cylinder faulty
Air in brake system
Wheel cylinder faulty
Piston seals worn or damaged
Rear brake automatic adiuster faulty
Replace brake shoes or pads
Repair leak
Repair or replace master cylinder
Bleed brake system
Repair wheel cylinder
Repair brake calipers
Repair or replace adjuster
BR-16,22
BR-43
BR-9
BR-7
8R.22
BR-1 6
B,R.22
Brakes dragParking brake out of adjustment
Parking brake wire binding
Booster push rod out of adjustment
Return spring faulty
Brake line restricted
Lining cracked or distorted
Wheel cylinder or caliper piston sticking
Automatic adjuster broken
Master cylinder faulty
Adjust parking brake
Repair as necessary
Adjust push rod
Replace spring
Repair as necessary
Replace brake shoe
Repair as necessary
Replace adjuster
Repair or replace master cylinder
BR.8
BR.1 5
BR-22
BR-22
BR-18,22
BR-22
BR-9
Brakes pullTires improperly inflated
Oil or grease on linings
Brake shoes distorted, linings worn or
glazed
Drum or disc out of round
Return spring faulty
Wheel cylinder faulty
Piston frozen in caliper
Disc brake pad sticking
Inflate tires to proper pressure
Check for cause, replace lining
Replace brake shoes
Replace drum or disc
Replace spring
Repair wheel cylinder
Repair caliper
Replace pads
FA-3
BR-16,22
BR-16,22
BR-l8,22
BR-22
BR-18,22
BR.1 8
BR-1 6
Hard pedal but
brakes inefficient
Oil or grbase on linings
Brake shoes distorted, linings worn
or glazed, drums worn
Disc brake pads worn
Piston frozen in caliper
Brake booster faulty
Brake line restricted
Check for cause, replace lining
Replace brake shoes
Replace pads
Repair caliper
Repair booster
Repair as necessary
BR-I6,22
BR-16,22
BR-1 6
BR-1 6
BR.1 4
Page 562 of 885

BRAKE SYSTEM - TroubleshootingBR.3
TROU BLESHOOTING (Cont'd)
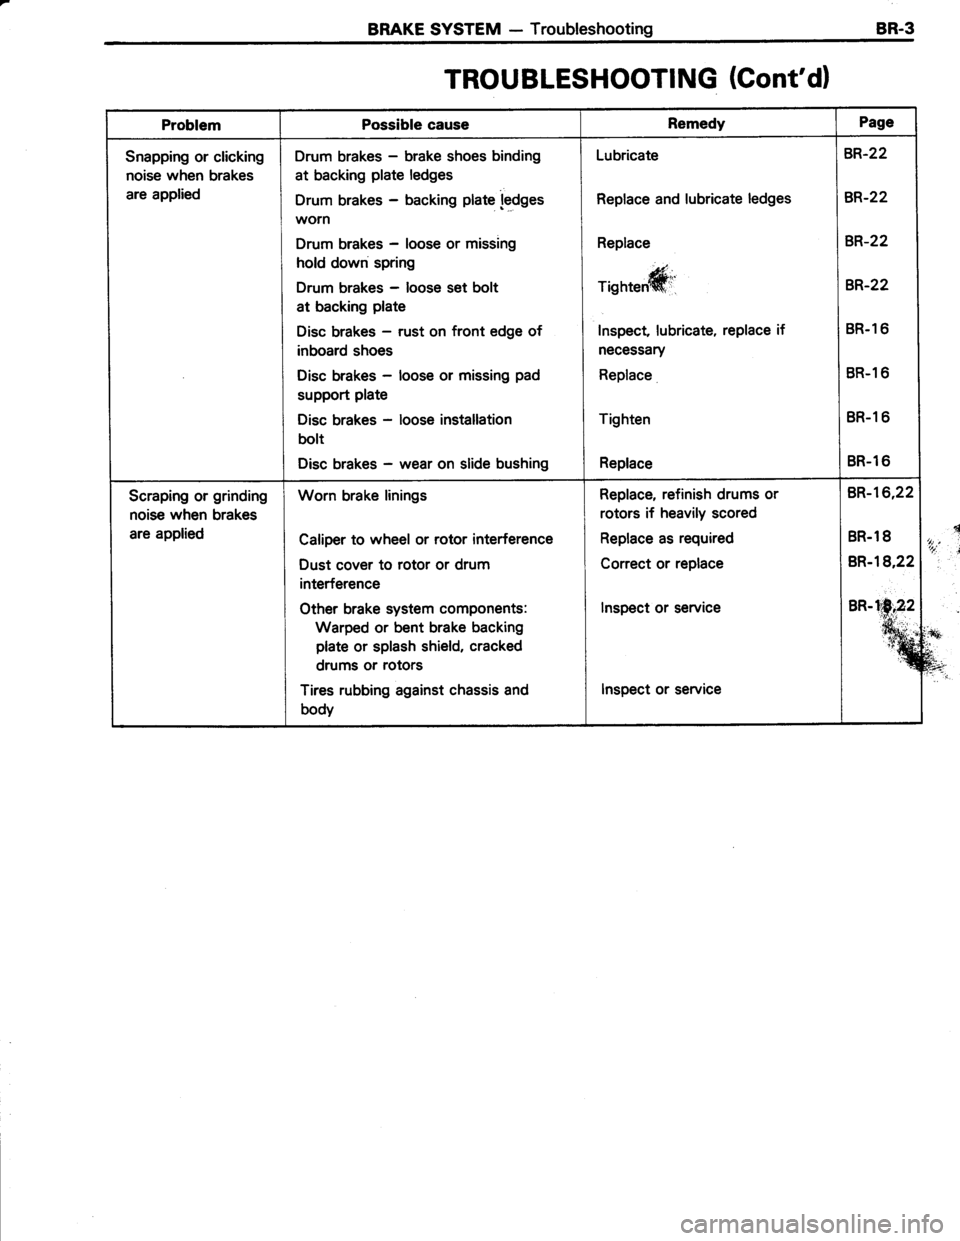
ProblemPossible causeRemedyPage
r+i
:?*
a?"t
Snapping or clicking
noise when brakes
are applied
Drum brakes - brake shoes binding
at backing plate ledges
Drum brakes - backing plate ledgesworn
Drum brakes - loose or missing
hold down spring
Drum brakes - loose set bolt
at backing plate
Disc brakes - rust on front edge of
inboard shoes
Disc brakes - loose or missing pad
support plate
Disc brakes - loose installation
bolt
Disc brakes - wear on slide bushing
Lubricate
Replace and lubricate ledges
Replace
E,
Tisnteffit'
Inspect lubricate, replace if
necessary
Replace
Tighten
Replace
BR-22
BR-22
BR-22
BR-22
BR.1 6
BR-1 6
BR-1 6
BR-1 6
Scraping or grinding
noise when brakes
are applied
Worn brake linings
Caliper to wheel or rotor interference
Dust cover to rotor or drum
interference
other brake system components:
Warped or bent brake backing
plate or splash shield, cracked
drums or rotors
Tires rubbing against chassis and
body
Replace, refinish drums or
rotors if heavily scored
Replace as required
Correct or replace
lnspect or service
Inspect or service
BR-16,22
BR.1 8
BR-l8,22
BR-h1N,22
%