Page 552 of 885
RA-/14 REAR AXLE AND SUSPENSION - Four Link Type Rear Suspension (4WD)
5. REMOVE COIL SPRING
(a) Begin to lower the rear axle housing.
NOTE: Be careful not to pull the brake line and parking
brake cable.
(b) While lowering the rear axle housing, remove the coil
spring and the upper and lower insulators.
INSTALLATION OF COIL SPRING AND
SHOCK ABSORBER
1. PUT LOWER INSULATOR ON AXLE HOUSING
2, PUT UPPER INSULATOR ON COIL SPRING
3. INSTALL COIL SPRING
4. CHECK POSITION OF LOWER INSULATOR
(a) Jack up the rear axle housing.
(b) Check that the lower insulator is installed correctly.
lf the insulator is not in correct position, reinstall the
coil spring.
Page 561 of 885

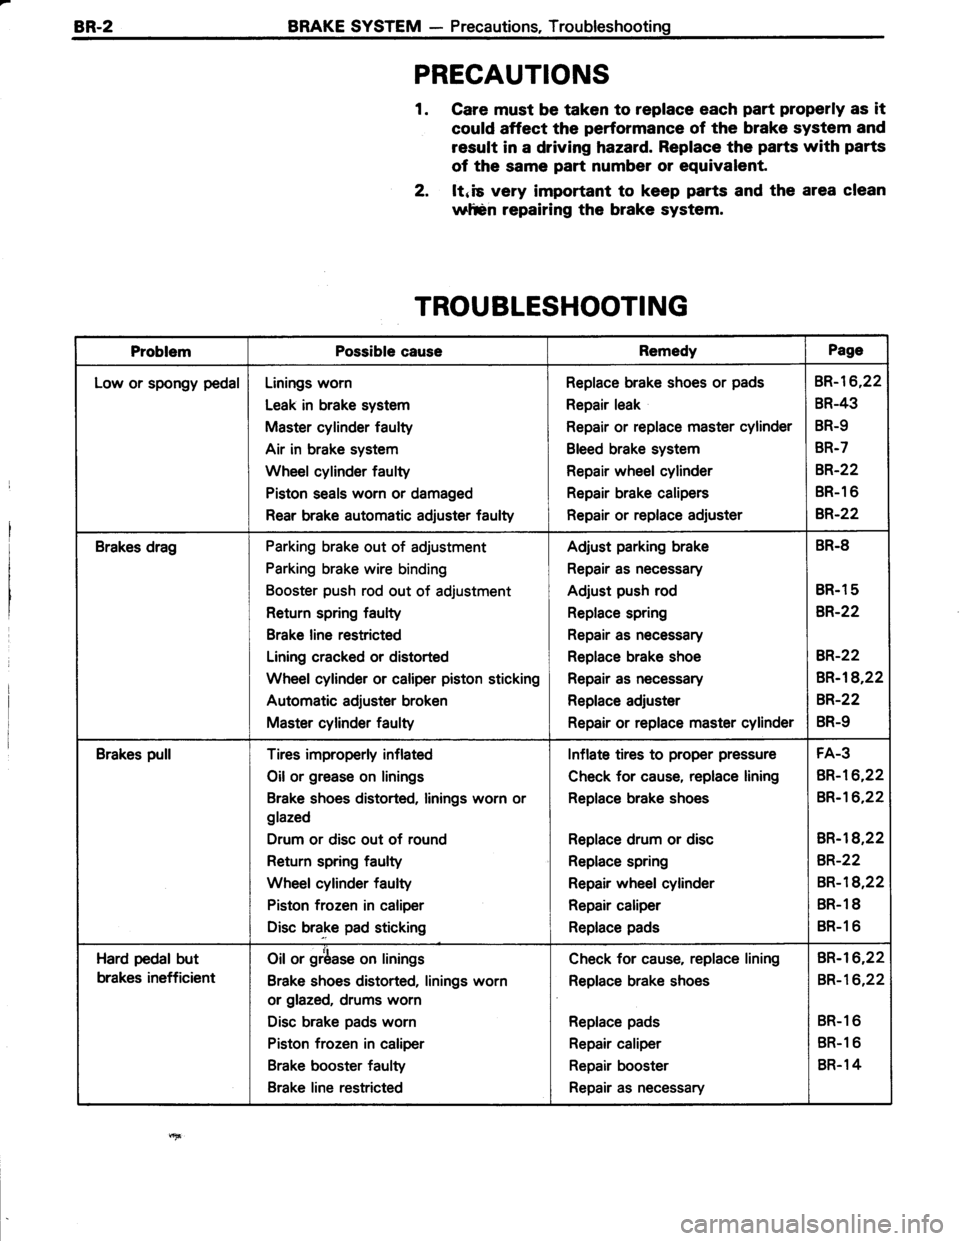
BR-2BRAKE SYSTEM - Precautions, Troubleshooting
PRECAUTIONS
1. Care must be taken to replace each part properly as it
could affect the performance of the brake system and
result in a driving hazard. Replace the parts with parts
of the same part number or equivalent.
2, ltnis very important to keep parts and the area clean
wltsn repairing the brake system.
TROUBLESHOOTING
ProblemPossible causeRemedyPage
Low or spongy pedalLinings worn
Leak in brake system
Master cylinder faulty
Air in brake system
Wheel cylinder faulty
Piston seals worn or damaged
Rear brake automatic adiuster faulty
Replace brake shoes or pads
Repair leak
Repair or replace master cylinder
Bleed brake system
Repair wheel cylinder
Repair brake calipers
Repair or replace adjuster
BR-16,22
BR-43
BR-9
BR-7
8R.22
BR-1 6
B,R.22
Brakes dragParking brake out of adjustment
Parking brake wire binding
Booster push rod out of adjustment
Return spring faulty
Brake line restricted
Lining cracked or distorted
Wheel cylinder or caliper piston sticking
Automatic adjuster broken
Master cylinder faulty
Adjust parking brake
Repair as necessary
Adjust push rod
Replace spring
Repair as necessary
Replace brake shoe
Repair as necessary
Replace adjuster
Repair or replace master cylinder
BR.8
BR.1 5
BR-22
BR-22
BR-18,22
BR-22
BR-9
Brakes pullTires improperly inflated
Oil or grease on linings
Brake shoes distorted, linings worn or
glazed
Drum or disc out of round
Return spring faulty
Wheel cylinder faulty
Piston frozen in caliper
Disc brake pad sticking
Inflate tires to proper pressure
Check for cause, replace lining
Replace brake shoes
Replace drum or disc
Replace spring
Repair wheel cylinder
Repair caliper
Replace pads
FA-3
BR-16,22
BR-16,22
BR-l8,22
BR-22
BR-18,22
BR.1 8
BR-1 6
Hard pedal but
brakes inefficient
Oil or grbase on linings
Brake shoes distorted, linings worn
or glazed, drums worn
Disc brake pads worn
Piston frozen in caliper
Brake booster faulty
Brake line restricted
Check for cause, replace lining
Replace brake shoes
Replace pads
Repair caliper
Repair booster
Repair as necessary
BR-I6,22
BR-16,22
BR-1 6
BR-1 6
BR.1 4
Page 565 of 885

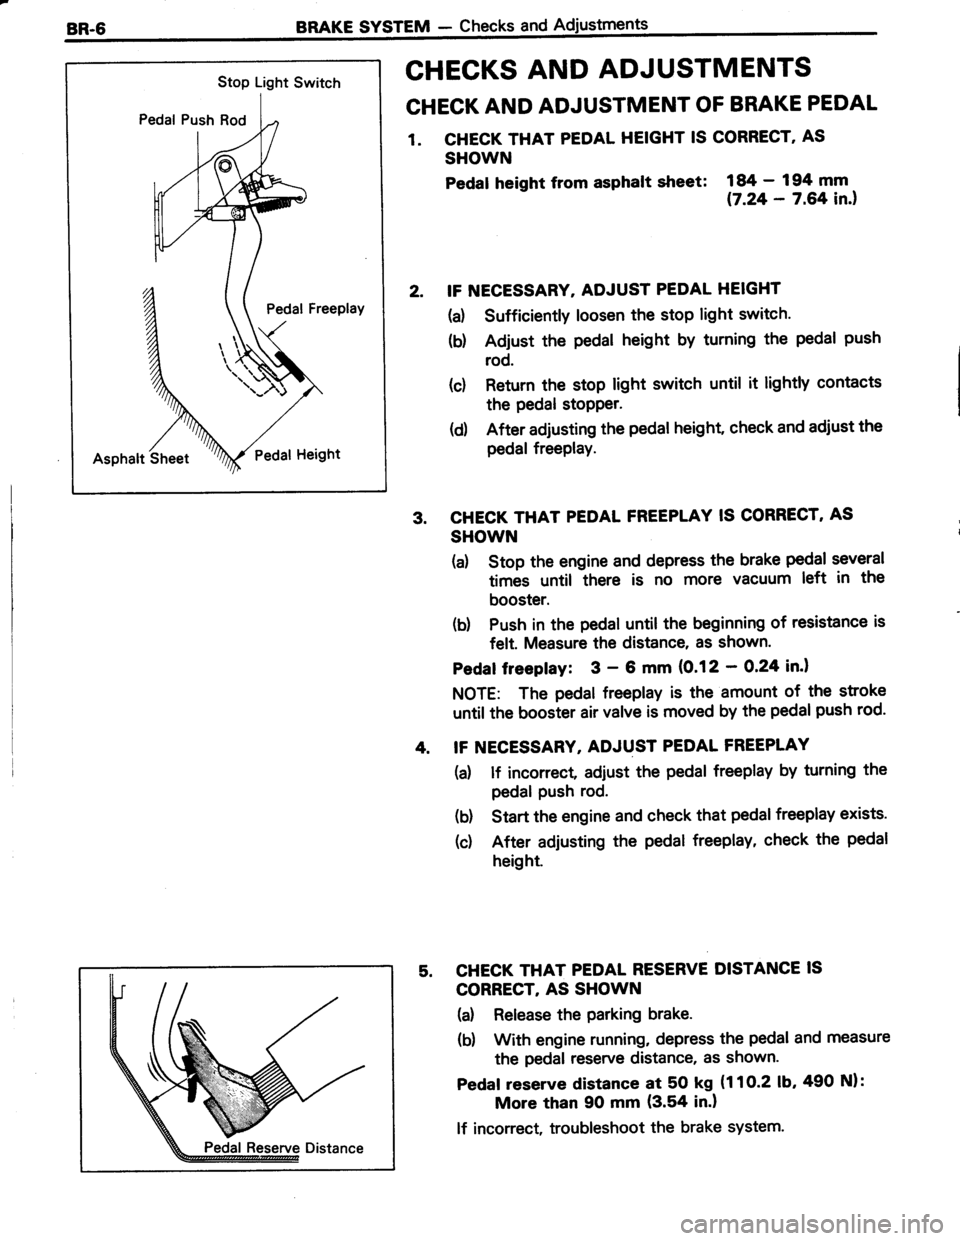
Stop Light Switch
Pedal Push Rod
Pedal Freeplay
Asphalt SheetPedat Height
BRAKE SYSTEM - Checks and
CHECKS AND ADJUSTMENTS
CHECK AND ADJUSTMENT OF BRAKE PEDAL
1. CHECK THAT PEDAL HEIGHT IS CORRECT' AS
SHOWN
Pedat heisht from asphalt slreet:
i#;:?ifil.,
IF NECESSARY. ADJUST PEDAL HEIGHT
(a) Sufficiently loosen the stop light switch.
(b) Adjust the pedal height by turning the pedal push
rod.
(c) Return the stop light switch until it lightly contacts
the pedal stopper.
(d) After adjusting the pedal height, check and adiust the
pedal freePlay.
CHECK THAT PEDAL FREEPLAY IS CORRECT, AS
SHOWN
(a) Stop the engine and depress the brake pedal several
times until there is no more vacuum left in the
booster.
(b) Push in the pedal until the beginning of resistance is
felt. Measure the distance, as shown'
Pedaf freepfay: 3 - 6 mm (0.12 - O,24 in.l
NOTE: The pedal freeplay is the amount of the stroke
until the booster air valve is moved by the pedal push rod.
IF NECESSARY, ADJUST PEDAL FREEPLAY
(a) lf incorrect adiust the pedal freeplay by turning the
pedal Push rod.
(b) Start the engine and check that pedal freeplay exists.
(c) After adjusting the pedal freeplay, check the pedal
height.
CHECK THAT PEDAL RESERVE DISTANCE IS
CORRECT, AS SHOWN
(a) Release the parking brake.
(b) With engine running, depress the pedal and measure
the pedal reserve distance, as shown.
Pedaf reserve distance at 50 kg (1 1 O-2 1b,490 Nl:
More than 90 mm (3.54 in.l
lf incorrect, troubleshoot the brake system.
Page 567 of 885
BR.8BRAKE SYSTEM - Checks and Adjustments
CHECK AND ADJUSTMENT OF PARKING
BRAKE
1. CHECK THAT PARKING BRAKE LEVER TRAVEL
IS CORRECT
Pull the parking brake lever all the way up, and count the
number of clicks.
Parking brake lever travel at 2O kg (44.1 lb, 196 Nl:
Sedan 5-Sclicks
Wagon 6-Sclicks
2. IF NECESSARY, ADJUST PARKING BRAKE
NOTE: Before adjusting the parking brake, make sure
that the rear brake shoe clearance has been adjusted.
For shoe clearance adjustment, see pages BR-28, 35 and
42.
(a) Remove the console box.
(d Loosen the lock nut and turn the adjusting nut until
the travel is correct.
(d Tighten the lock nut and install the console box.
*r .;"
Page 582 of 885
BRAKE SYSTEM - Rear Brake (Sedan)BR-23
REMOVE SHOE RETURN SPRING
Using a screwdriver, remove the return spring.
REMOVE SHOE RETURN SPRING CLAMP
Using a screwdriver, remove the clamp.
REMOVE FRONT SHOE
(a) Remove the hold-down spring, retainers and pin.
(b) Disconnect the anchor spring from the front shoe
and remove it.
REMOVE ANCHOR SPRING
8. REMOVE REAR SHOE
(d Remove the hold-down spring, retainers and pin.
(b) Using pliers, disconnect the parking brake cable from
the lever and remove the rear shoe together with the
strut.
9. REMOVE STRUT FROM REAR SHOE
(a) Remove the adjusting lever spring.
(b) Remove the strut.
10. REMOVE PARKING BRAKE LEVER AND AUTOMATIC
ADJUSTING LEVER FROM REAR SHOE
Using a screwdriver, pry out the C-washer and remove the
shim and levers.
4.
5.
6.
7.
Page 585 of 885
a
BR-26BRAKE SYSTEM - Rear Brake {Sedan)
5. APPLY HIGH TEMPERATURE GREASE TO
FOLLOWING PARTS:
(a) Backing plate and brake shoe contact points
(b) Anchor plate and brake shoe contact points
(c) Strut and adjusting bolt contact points
(d) Strut and brake shoe contact points
6. INSTALL PARKING BRAKE LEVER AND AUTOMATIC
ADJUSTING LEVER TO REAR SHOE
(d Temporarily install the levers with the shim and a
new C-washer.
(d Using a feeler gauge, measure the clearance between
the shoe and lever.
Standard clearance: O - 0.35 mm (O - 0.0138 in.l
lf not within specification, adjust with a shim.
Shim thicknesses mm (in.)
0.2 (0.008) | 0.5 (0.020)
0.3 (0.012) | 0.6 (0.024)
0.4 (0.016) | 0.s (0.035)
(cl Using pliers, stake the C-washer.
INSTALL STRUT ONTO REAR SHOE
Set the strut in place and intall the adjusting lever spring.
7.
wl
Page 586 of 885
BRAKE SYSTEM - Rear Brake (Sedan)B,R.27
Left-hand Threads
oa)"
oVo
Right-hand Threads
Right Wheel
Front
+
Front
r+
Left Wheel
8. INSTALL REAR SHOE
CAUTION: Do not allow grease to get on the rubbing
face
(a) Using pliers, connect the parking brake cable to the
lever.
(b) Set the rear shoe in place with the end of the shoe
inserted in the wheel cylinder and the other end in the
anchor plate.
(c) Install the pin and the shoe hold-down spring.
9. INSTALL FRONT SHOE
GAUTION: Do not allow grease to get on the rubbing
face
(a) Install the anchor spring between the front and rear
shoes.
(b) Set the front shoe in place with the end of the shoe
inserted in the wheel cylinder and the strut in place.
(c) Install the shoe hold-down spring, retainers and pin.
INSTALL SHOE RETURN SPRING CLAMP
INSTALL SHOE RETURN SPRING
Using a screwdriver, install the return spring.
10.
11.
Page 587 of 885
8R.28BRAKE SYSTEM - Rear Brake (Sedan)
12. CHECK OPERATION OF AUTOMATIC ADJUSTER
MECHANISM
(a) Move the parking brake lever of the rear shoe back
and forth, as shown. Check that the adjusting bolt
turns.
lf the bolt does not turn, check for incorrect installation of
the rear brakes.
(b) Adjust the strut length to the shortest possible
amount.
(d lnstall the drum.
(d) Pull the parking brake lever all the way up.
13. CHECK CLEARANCE BETWEEN BRAKE SHOES AND
DRUM
h) Remove the drum.
(b) Measure the brake drum inside diameter and
diameter of the brake shoes. Check that the
difference between the diameters is the correct shoe
clearance.
Shoe clearance: 0.6 mm (0.O24 in.l
lf incorrect check the parking brake system.
14. INSTALL BRAKE DRUM AND ADJUST PRELOAD
(See page RA-61
15. INSTALL REAR WHEEL
16. FILL BRAKE RESERVOIR WITH BRAKE FLUID
AND BLEED BRAKE SYSTEM (See page BR-71
17. CHECK FOR FLUID LEAKAGE
ffi6
V\Fsz'