Page 476 of 885
PR-z PROPELLER SHAFT - Precautions, Troubleshooting, Propeller Shaft
PRECAUTIONS
1. As the universal ioint is a non-disassembly type' the
propeller shaft or intermediate shaft must be replaced
as an assembly in the event of universalioint trouble.
2. Be careful not to grip the propeller shaft tube too tight-
ly in the vise as this will cause deformation.
TROUBLESHOOTING
ProblemPossible causeRemedyPage
NoiseSleeve yoke spline worn
Center bearing worn
Spider bearing worn or stuck
Replace intermediate shaft
Replace center bearing
Replace intermediate shaft or
propeller shaft
PR-3
PR-3
PR-3
VibrationPropeller shaft runout
Propeller shaft unbalance
Transmission extension housing rear
bushing worn
Sleeve yoke spline stuck
Center bearing height imProPer
Replace propeller shaft
Balance propeller shaft
Replace bushing
Replace intermediate shaft
Adjust bearing height
PR-3
PR-3
TA.4O
PR-3
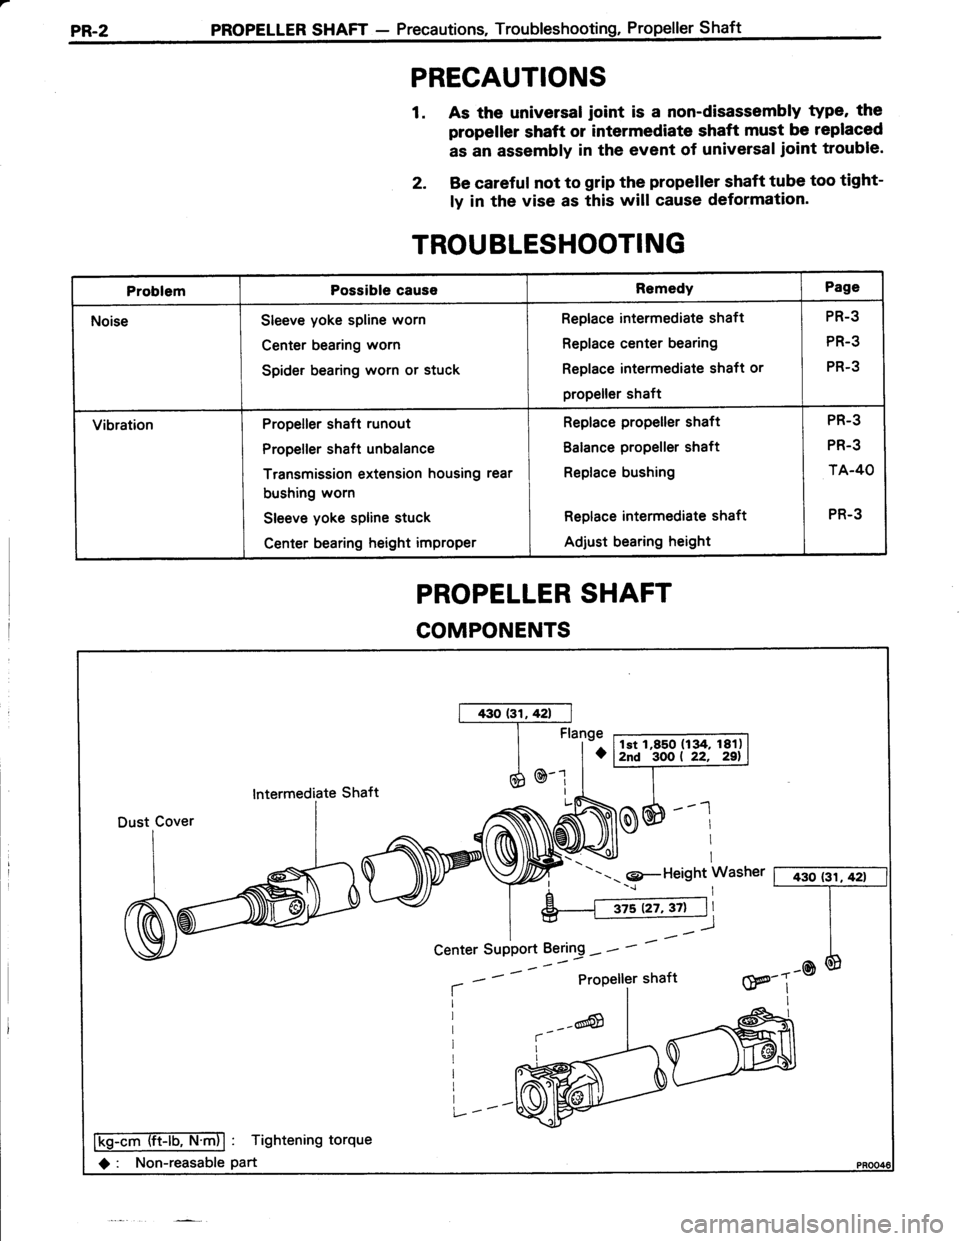
PROPELLER SHAFT
COMPONENTS
lntermediate Shaft
---- 9-Height Washer [ 430 (3il42t
aProPeller shaftw---@III
Ffiffiiib-ntnl : Tightening torque
O : Non-reasable part
Center SuPPort Bering - -
Page 479 of 885
PROPELLER SHAFT - Propeller ShaftPR.5
ASSEMBLY AND INSTALLATION OF
PROPELLER SHAFT
(See page PR-21
NOTE: When replacing parts, install them facing as
shown in the illustration.
fl
rthffihP
tuldi€?ih
1. INSTALL CENTER SUPPORT BEARING ON
INTERMEDIATE SHAFT
lnstall the center support bearing with the cutout on the
rear side.
2. INSTALL FTANGE YOKE ON INTERMEDIATE SHAFT
ta) Apply MP grease to the splines of the intermediate
shaft.
(b) Align the matchmarks on the yoke and shaft and
install them.
(c) Using SST to hold the flange, tighten down a
nut to press the bearing into position.
ssT 09330-ooo20
Torque: 1,850 kg-cm (134 ft-lb, 181 N.ml
(d) Loosen the nut.
(e) Torque the nut again.
Torque: 300 kg-cm (22 ft-\b,29 N.ml
(f) Using a hammer and punch, stake the nut.
Page 480 of 885
PR-6 PROPELLER SHAFT - Propeiler Shaft
SST
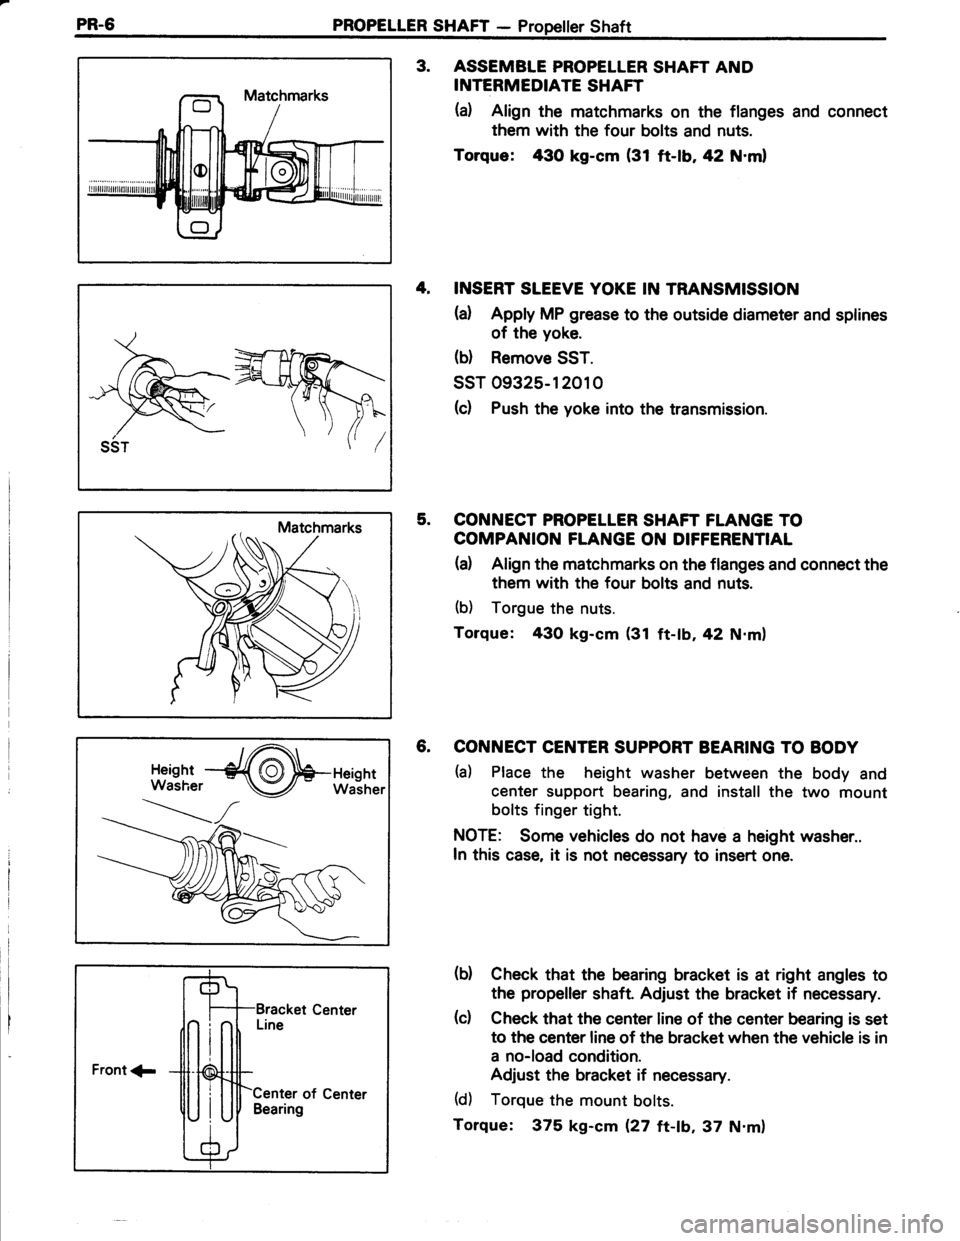
3. ASSEMBTE PROPELLER SHAFT AND
INTERMEDIATE SHAFT
(a) Align the matchmarks on the flanges and connect
them with the four bolts and nuts.
Torque: 430 kg-cm (31 ft-|b,42 N.ml
4, INSERT SLEEVE YOKE IN TRANSMISSION
{a) Apply MP grease to the outsade diameter and splines
of the yoke.
(b) Remove SST.
ssT 09325-12010
(c) Push the yoke into the transmission.
5. CONNECT PROPELLER SHAFT FLANGE TO
COMPANION FLANGE ON DIFFERENTIAL
(a) Align the matchmarks on the flanges and connect the
them with the four bolts and nuts.
(b) Torgue the nuts.
Torque: 43O kg-cm (31 ft-tb,42 N.m)
6. CONNECT CENTER SUPPORT BEARING TO BODY
ta) Place the height washer between the body and
center support bearing, and install the two mount
bolts finger tight.
NOTE: Some vehicles do not have a height washer..
In this case, it is not necessary to insert one.
(b) Check that the bearing bracket is at right angles to
the propeller shaft Adjust the bracket if necessary.
(c) Check that the center line of the center bearing is set
to the center line of the bracket when the vehicle is in
a no-load condition.
Adjust the bracket if necessary.
(d) Torque the mount bolts.
Torque: 375 kg-cm Q7 tt-ab,37 N.m)
Front 1-
Center of CenterBearing
Page 484 of 885
FA.4FRONT AXLE AND SUSPENSION - Front Wheel Alignment
(f) lf the toe-in is not within inspection STD, adjust the
toe-in.
(1) Loosen the clamp.
el Remove the boot clip.
(3) Turn the left and right rack ends an equal
amount to adjust.
Wl Check that the length of the left and right tie
rods are the same.
(5) Torque the tie rod end clamp.
Torque: 195 kg-cm (14 ft-lb, 19 N'ml
(6) Place the boot on the seal and clamp it.
NOTE: Check that the boot is not twisted.
3. INSTALT WHEEL ALIGNMENT EOUIPMENT
Follow the specific instructions of the equipment manu-
facturer.
fuwry'$A=B
Page 485 of 885
FRONT AXLE AND SUSPENSION - Front Wheel AlignmentFA-5
Front Rear (FWDI
Rear (4WD)
More Camber
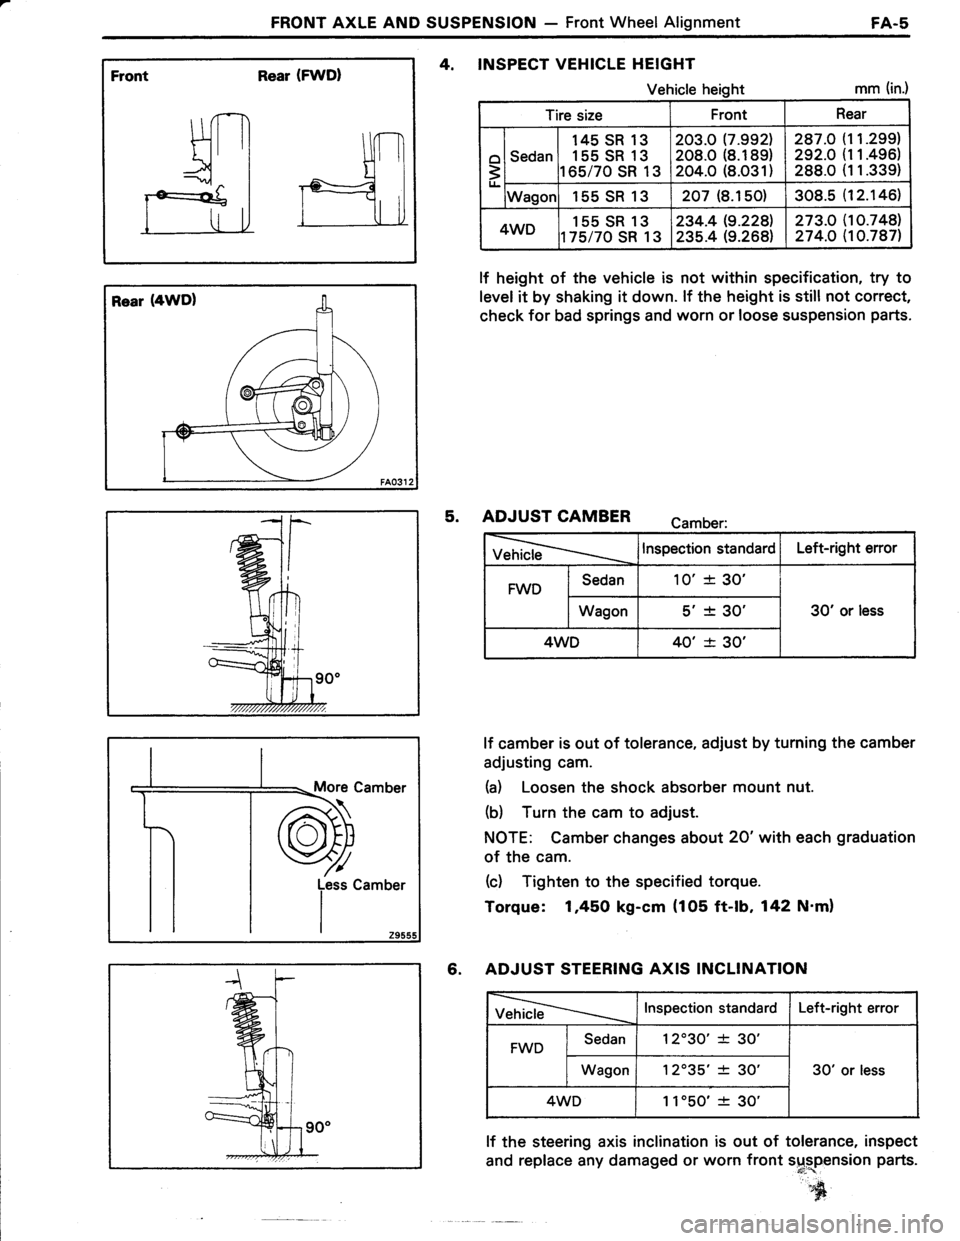
4, INSPECT VEHICLE HEIGHT
Vehicle heightmm (in.)
lf height of the vehicle is not within specification, try to
level it by shaking it down. lf the height is still not correct,
check for bad springs and worn or loose suspension parts.
5. ADJUST CAMBER camber:
VehicleInspection standardLeft-right error
FWDSedan10'+ 30'
30' or lessWagons'� + 30'�
4WD40' -t- 30'
lf camber is out of tolerance, adjust by turning the camber
adjusting cam.
(a) Loosen the shock absorber mount nut.
(b) Turn the cam to adjust.
NOTE: Camber changes about 20'with each graduation
of the cam.
(c) Tighten to the specified torque.
Torque: 1,45O kg-cm {105 ft-lb, 142 N'm)
6. ADJUST STEERING AXIS INCLINATION
VehicleInspection standardLeft-right error
FWDSedan12'30'�* 30'
30' or lessWagon12035'�+ 30'�
4WD1 1'50'� -t- 30'
lf the steering axis inclination is out of tolerance, inspect
and replace any damaged or worn front s$rplnsion parts.
s[
Tire sizeFrontRear
o
3
Sedan
145 SR 13
155 SR 13
165/70 SR 13
203.0 17.9921208.0 (8.189)
204.0 (8.O31)
287.O
292.O
288.0
1 1.299)
11.496)
1 1.339)
Wagor155SR13207 (8.150)308.512.146l.
4WD155 SR 13
t75/70 SR 13
234.419.2281
235.4 (9.268)273.O274.O
10.748)10.787)
Page 486 of 885
FA.6FRONT AXLE AND SUSPENSION - Front Wheel Alignment
Front a-
Spacer
(o
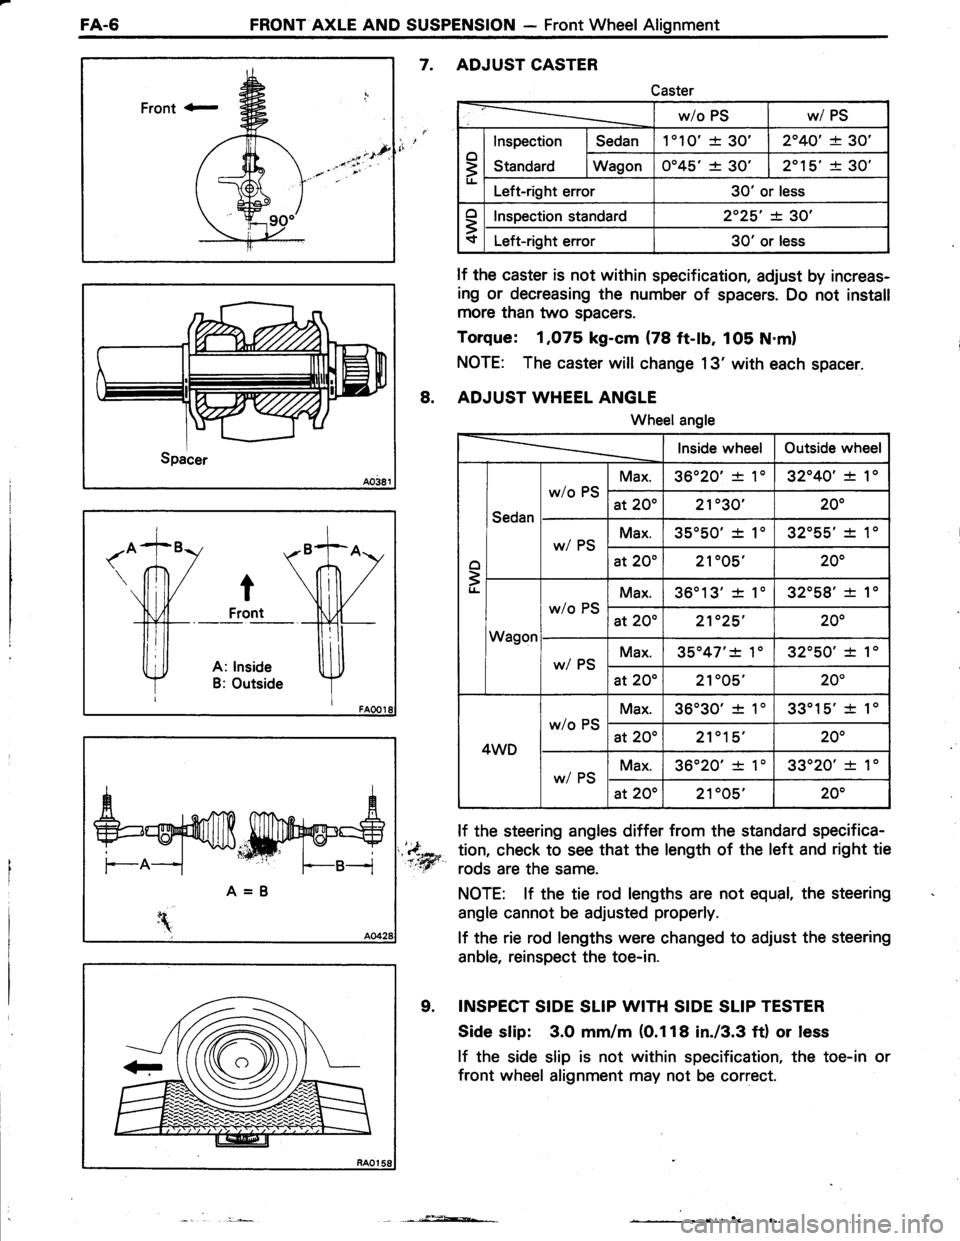
7. ADJUSTCASTER
Caster
w/oPSw/ PS
o
3lt-
Inspection
Standard
Sedan1'10'+ 30'�2"40'� + 30'�
Wagon0045' + 30'2"15'� + 30'�
Left-right error30' or less
o
3
Inspection standard2"25'� -+- 30'�
Left-right error30' or less
1'
lf the caster is not within specification, adjust by increas-
ing or decreasing the number of spacers. Do not install
more than two spacers.
Torque: 1,O75 kg-cm (78 ft-lb, 105 N.ml
NOTE: The caster will change 13' with each spacer.
ADJUST WHEEL ANGLE
Wheelangle
Inside wheelOutside wheel
o
=|'l-
Sedan
w/oPS
Max.36020'� + 1032040'� + 1"
at 2Oo21"30'�200
w/ PSMax.35050'� ! 1032'55'�f 10
at 20o21"05'�20"
Wagon
w/o PS
Max.36013'� + 1032058'�+ 10
at 2Oo21'25'�20"
wi PSMax.35047'�1 1'32050'�= 1"
at 20"21"O9'�20"
4WD
w/o PS
Max.36030'� + 103301s'�+ 10
at 2002'�1"15'�20"
w/ PSMax.36020'�+ 1033020'�+ 1'
at 2Oo21005'�200
lf the steering angles differ from the standard specifica-
,'4o* tion, check to see that the length of the left and right tiet:ry rods are the same.
NOTE: lf the tie rod lengths are not equal, the steering
angle cannot be adjusted propedy.
lf the rie rod lengths were changed to adjust the steering
anble, reinspect the toe-in.
9. INSPECT SIDE SLIP WITH SIDE SLIP TESTER
Side slip: 3.O mm/m (O.118 in./3.3 ft) or less
lf the side slip is not within specification, the toe-in or
front wheel alignment may not be correct.
8.
\
--,-,-j:*-at-
Page 487 of 885
FRONT AXLE AND SUSPENSION - Axle HubFA.7
AXLE HUB
COMPONENTS
1,450 (105, 142)
Disc Brake Caliper
shocknusoruer-----'1 I I i I wheet Bearins
ntdliff*>> q$J d^%J- |
*@r
rie Rod r"o \E
h^
t.''"'lo:'t cam
:-\^'
*9@n^6g1'
i:T:":it:i Y9J'A-
ffi31?yrnnerRacel l*ryDise Brake Dust cover t"'" *1":iHJ"r,""l
Lt^:::l1l"ner Race (NSK rype) -l
a?6,
I
iOuter Oit Seal
Lock Nut Cap
ir
/1"i"
Y&r-A
lSU
Ikg-cm (ft-lb, N.m)l : Tightening torque
O : Non-reusable part
Page 491 of 885
_ l +l i'-:r': : '
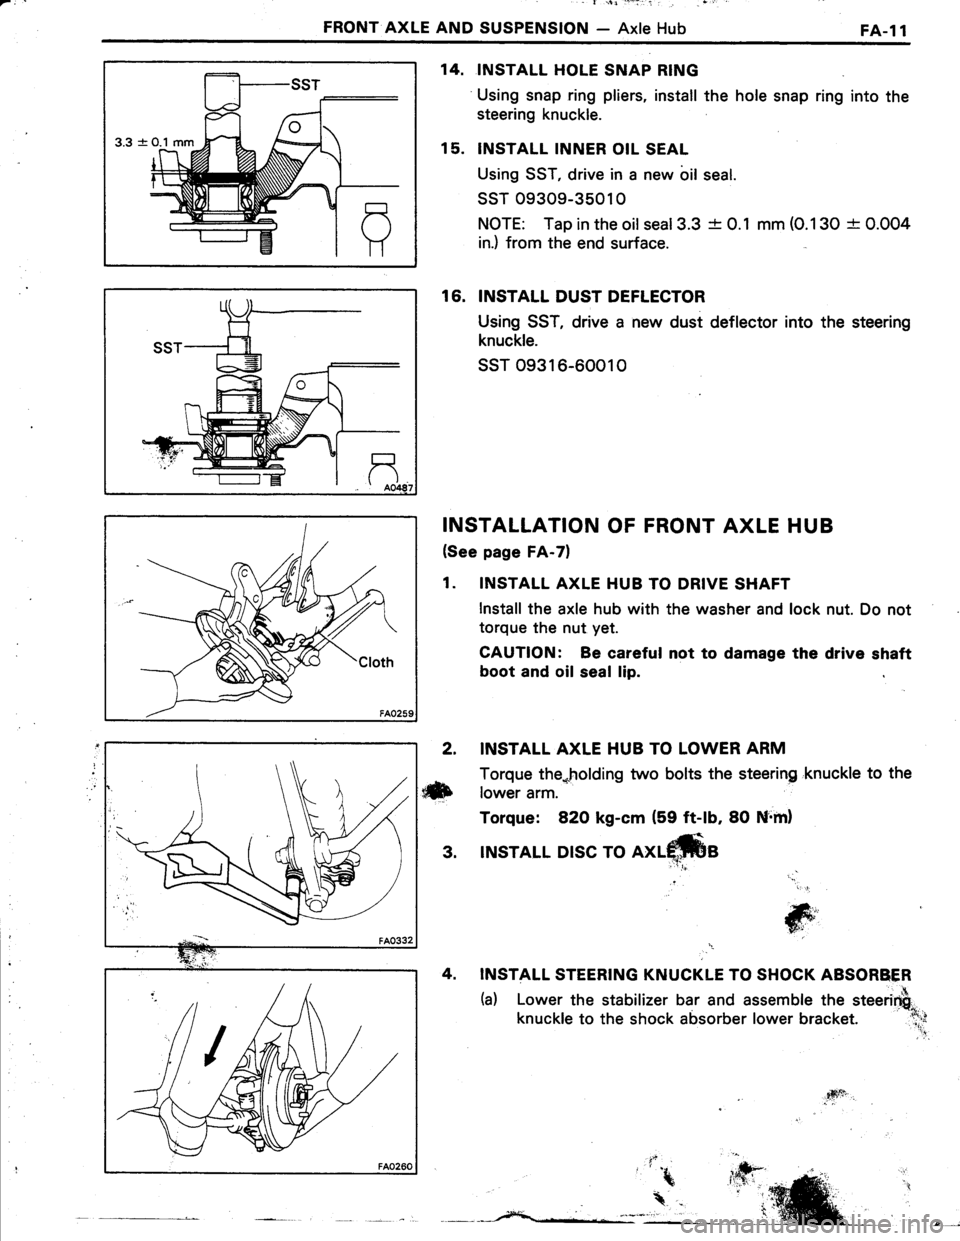
FRONT AXLE AND SUSPENSION - Axle HubFA-l1
3.3 -+
INSTALL HOLE SNAP RING
Using snap ring pliers, install the hole snap ring into the
steering knuckle.
INSTALL INNER OIL SEAL
Using SST, drive in a new bil seal.
ssT 09309-35010
NOTE: Tap in the oilseal3.3 -t- 0.1 mm (O.130 + 0.004
in.) from the end surface.
16. INSTALL DUST DEFLECTOR
Using SST, drive a new dust deflector into the steering
knuckle.
ssT o9316-60010
INSTALLATION OF FRONT AXLE HUB
(See page FA-7)
1. INSTALL AXLE HUB TO DRIVE SHAFT
lnstall the axle hub with the washer and lock nut. Do not
torque the nut yet.
CAUTION: Be careful not to damage the drive shaft
boot and oil seal lip.
14.
15.
2. INSTALL AXLE HUB TO LOWER ARM
Torque the*holding two bolts the steering 'knuckle to the
ilxb rower arm.
Torque: 82O kg-cm (59 ft-lb, 80 Nrml
3. INSTALL DISC TO
INSTALL STEERING KNUCKLE TO SHOCK ABSORBER
(a) Lower the stabilizer bar and assemble the steerirfi"
knuckle to the shock absorber lower bracket. :l;;
'' .!
jG;','
T6i'
4sft