Page 482 of 885

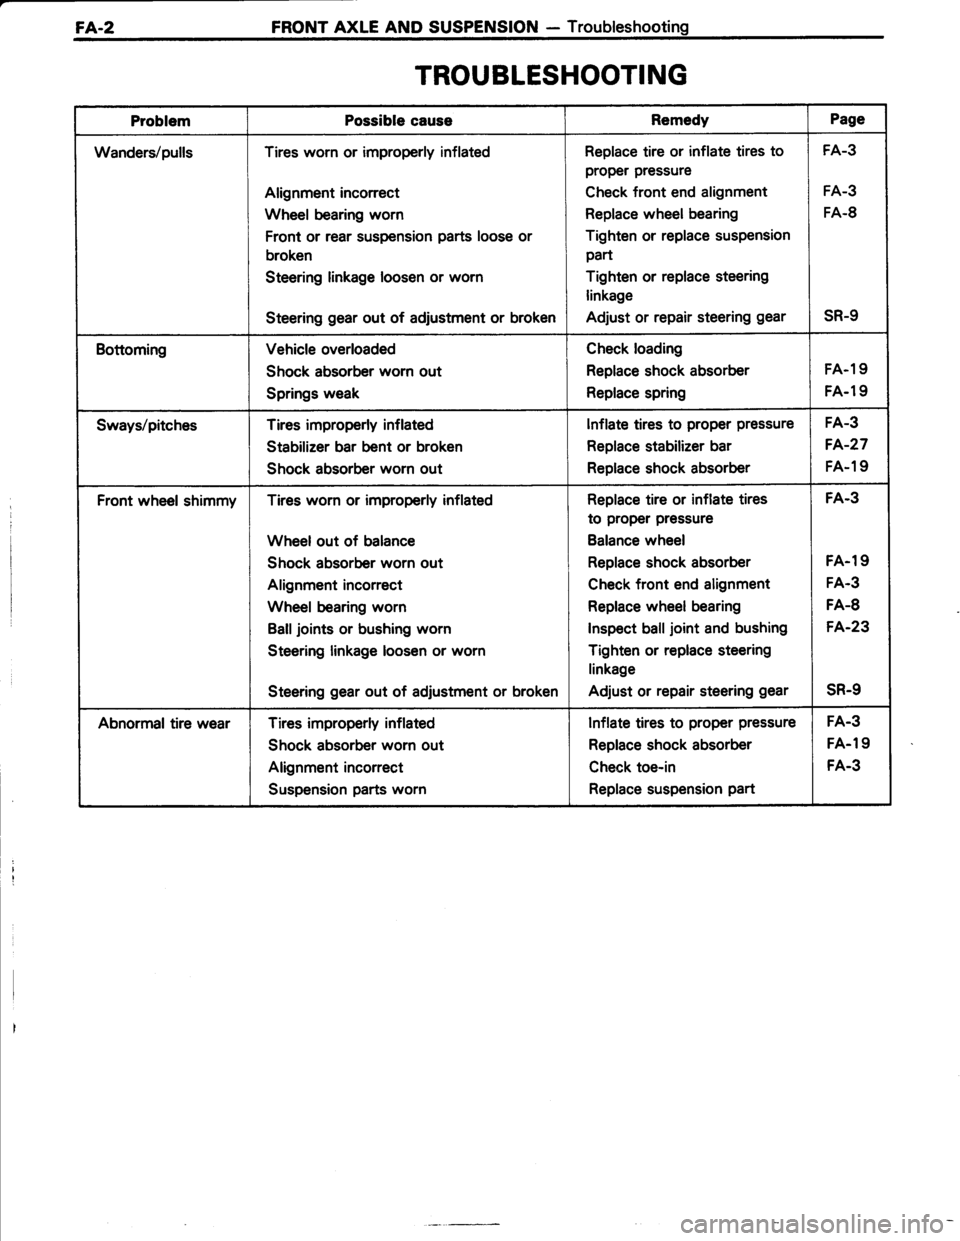
FA.2FRONT AXLE AND SUSPENSION - Troubleshooting
TROUBLESHOOTING
ProblemPossible caussRemedyPage
Wanders/pullsTires worn or improperly inflated
Alignment incorrect
Wheel bearing worn
Front or rear suspension parts loose or
broken
Steering linkage loosen or worn
Steering gear out of adjustment or broken
Replace tire or inflate tires to
proper pressure
Check front end alignment
Replace wheel bearing
Tighten or replace suspension
part
Tighten or replace steering
linkage
Adjust or repair steering gear
FA-3
FA-3
FA.8
sR-9
BottomingVehicle overloaded
Shock absorber worn out
Springs weak
Check loading
Replace shock absorber
Replace spring
FA.19
FA.l9
Sways/pitchesTires improperly inflated
Stabilizer bar bent or broken
Shock absorber worn out
lnflate tires to proper pressure
Replace stabilizer bar
Replace shock absorber
FA-3
FA-27
FA-19
Front wheel shimmyTires worn or improperly inflated
Wheel out of balance
Shock absorber worn out
Alignment incorrect
Wheel bearing worn
Balljoints or bushing worn
Steering linkage loosen or worn
Steering gear out of adjustment or broken
Replace tire or inflate tires
to proper pressure
Balance wheel
Replace shock absorber
Check front end alignment
Replace wheel bearing
Inspect ball joint and bushing
Tighten or replace steering
linkage
Adjust or repair steering gear
FA-3
FA-19
FA.3
FA-8
FA.23
sR-9
Abnormal tire wearTires improperly inflated
Shock absorber worn out
Alignment incorrect
Suspension parts worn
Inflate tires to proper pressure
Replace shock absorber
Check toe-in
Replace suspension part
FA.3
FA-19
FA.3
Page 505 of 885
FRONT AXLE AND SUSPENSION - Front SuspensionFA.28
REPLACEMENT OF LOWER ARM BUSHING
1. REMOVE LOWER ARM BUSHING
(a) Cut off the flange tip of the bushing as is shown in
the figure.
(b) Bend the remaining portions inward with a cold
chisel.
CAUTION: Be careful not to damage the flange.
(c) Bend in the flange tips and pull off the flange with apair of pliers.
(d) Using SST and a press, press out the bushing.
ssT 09726-32010
INSTALL LOWER ARM BUSHING
Using SST and a press, press the bushing into the arm.
ssr 09726-32010
CAUTION: Do not allow grease or oil to get on the
bushing.
2.
Page 532 of 885
RA.24REAR AXLE AND SUSPENSION - Troubleshooting (4WD)
TROUBLESHOOTING (4WD}
ProblemPossible causeRemedyPage
Oil leak at rear axleOil seals worn or damaged
Bearing retainer loose
Rear axle housing cracked
Replace oil seal
Replace retainer
Repair as necessary
RA-25
RA-25
Oil leak at pinion shaftOil level too high or wrong grade
Oil sealworn or damaged
Companion flange loose or damaged
Drain and replace oil
Replace oil seal
Tighten or replace flange
RA-28
RA-28
Noise in rear axleOil level low or wrong grade
Excessive backlash between drive pinion
and ring or side gear
Ring, drive pinion or side gears worn or
chipped
Drive pinion bearing worn
Axle shaft bearing worn
Side bearing loose or worn
Drain and replace oil
Check backlash
Check gears
Replace bearing
Replace bearing
Tighten or replace bearings
RA-28
RA-28
RA-28
RA.25
RA-36
BottomingVehicle overloaded
Shock absorber worn out
Springs weak
Check loading
Replace shock absorber
Replace spring
RA.43
RA.43
Page 534 of 885

RA-26REAR AXLE AND SUSPENSION - Rear Axte Shaft (4WD)
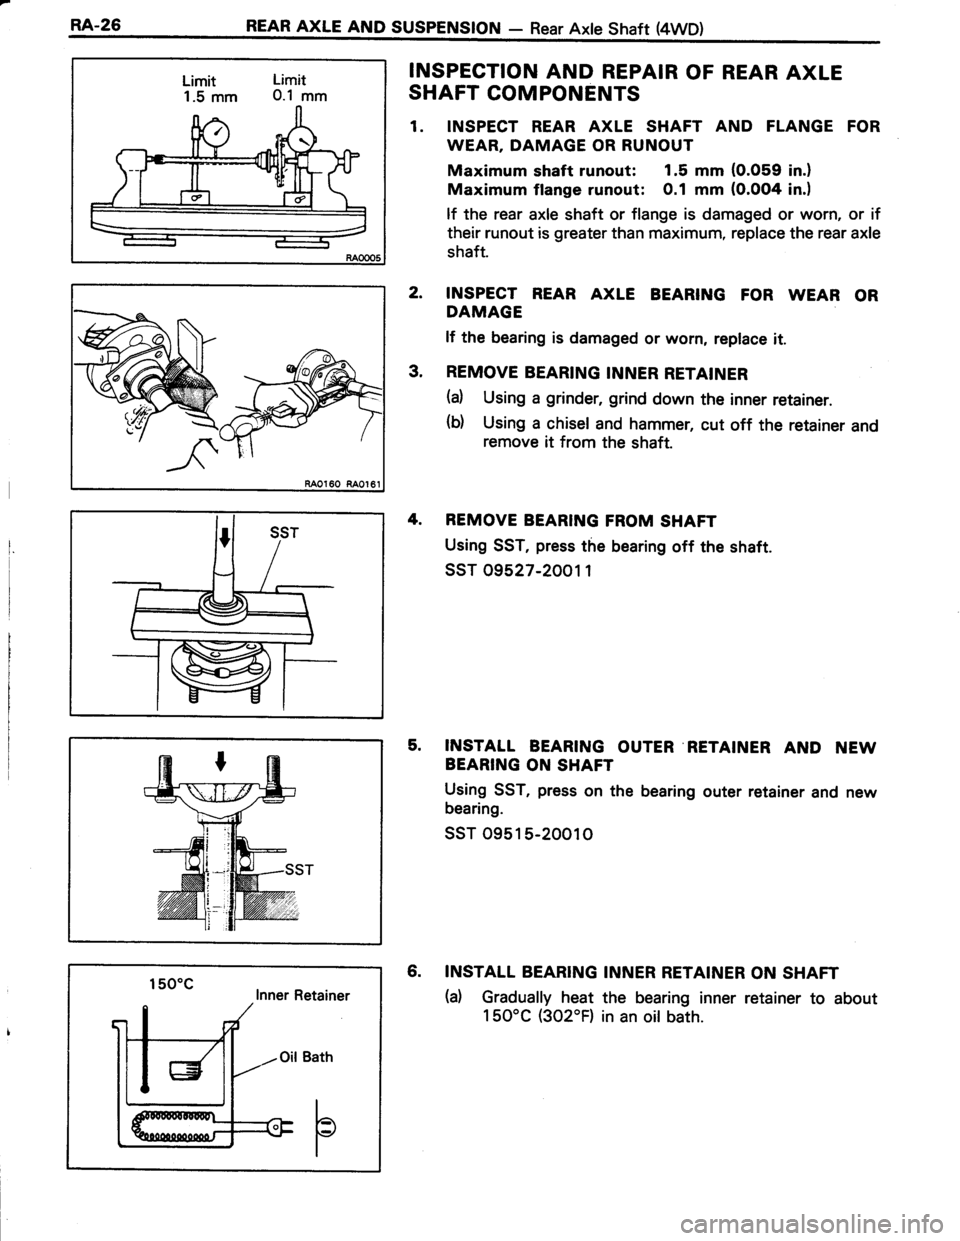
INSPECTION AND REPAIR OF REAR AXLE
SHAFT COMPONENTS
1. INSPECT REAR AXLE SHAFT AND FLANGE FOR
WEAR, DAMAGE OR RUNOUT
Maximum shaft runout: 1.5 mm {0.059 in.}
Maximum flange runout: 0.1 mm (0.0O4 in.)
lf the rear axle shaft or flange is damaged or worn, or if
their runout is greater than maximum, replace the rear axle
shaft.
INSPECT REAR AXLE BEARING FOR WEAR OR
DAMAGE
lf the bearing is damaged or worn, replace it.
REMOVE BEARING INNER RETAINER
(a) Using a grinder, grind down the inner retainer.
(b) Using a chisel and hammet cut off the retainer andremove it from the shaft.
REMOVE BEARING FROM SHAFT
Using SST, press the bearing off the shaft.
ssT 09527-2001 1
INSTALL BEARING OUTER RETAINER AND NEW
BEARING ON SHAFT
Using SST, press on the bearing outer retainer and new
bearing.
ssT 0951 5-20010
6. INSTALL BEARING INNER RETAINER ON SHAFT
(d Gradually heat the bearing inner retainer to about
150'C (302'F) in an oil bath.
2.
3.
150'c lnner Retainer
Page 538 of 885

RA.30REAR AXLE AND SUSPENSION - Differential {4WD)
REMOVAL OF DIFFERENTIAL
(See page RA-28)
1. DRAIN DIFFERENTIAL OIL
2. REMOVE REAR AXLE SHAFT (See page RA-25)
3. DISCONNECT PROPELLER SHAFT FROM
DIFFERENTIAL (See page RA-28)
4. REMOVE DIFFERENTIAL CARRIER ASSEMBLY
DISASSEMBLY OF DIFFERENTIAL
(See page RA-281
NOTE: lf the differential is noisy, perform the following
pre-inspection before disassembly to determine the cause.
lf the differential has severe problems, disassemble and
repair as necessary.
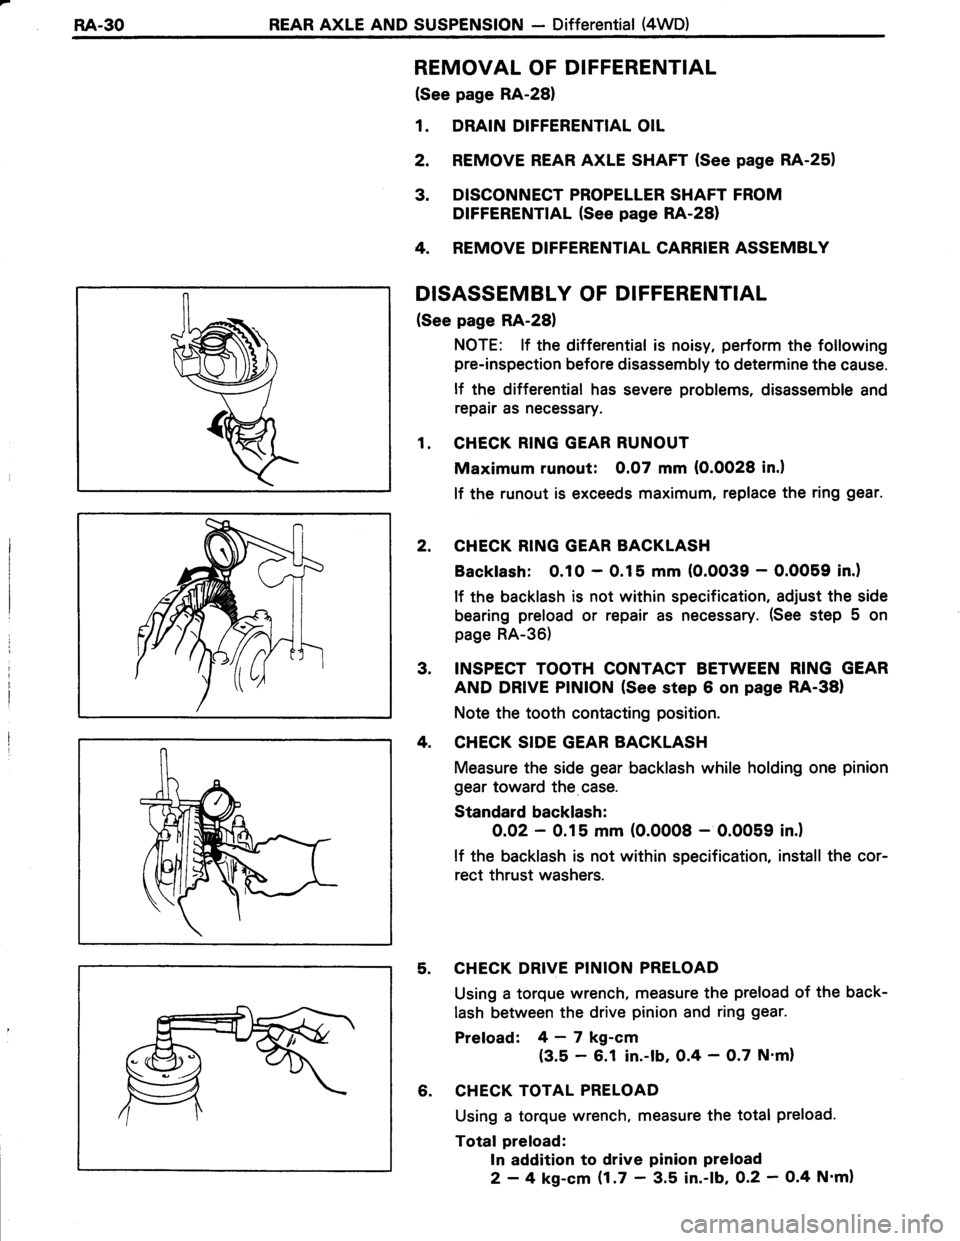
1. CHECK RING GEAR RUNOUT
Maximum runout: 0.07 mm (O.OO28 in.l
lf the runout is exceeds maximum, replace the ring gear.
2. CHECK RING GEAR BACKLASH
Backlash: 0.10 - 0.15 mm (O.OO39 - O.OO59 in.)
lf the backlash is not within specification, adjust the side
bearing preload or repair as necessary. (See step 5 on
page RA-36)
3, INSPECT TOOTH CONTACT BETWEEN RING GEAR
AND DRIVE PINION (See step 6 on page RA-38)
Note the tooth contacting position.
4. CHECK SIDE GEAR BACKLASH
Measure the side gear backlash while holding one pinion
gear toward the case.
Standard backlash:
O.OZ - 0.15 mm (0.0008 - 0.0059 in.)
lf the backlash is not within specification, install the cor-
rect thrust washers.
5. CHECK DRIVE PINION PRELOAD
Using a torque wrench, measure the preload of the back-
lash between the drive pinion and ring gear.
Preload: 4-7 kg-cm
{3.5 - 6.1 in.-lb, 0.4 - O.7 N'm}
6. CHECK TOTAL PRELOAD
Using a torque wrench, measure the total preload.
Total preload:
In addition to drive pinion preload
2 - 4 kg-cm $.7 ' 3.5 in.-lb, O.2 - O.4 N'm)