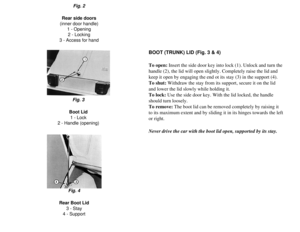
Page 65 of 86
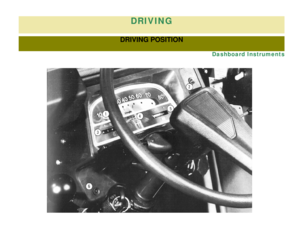
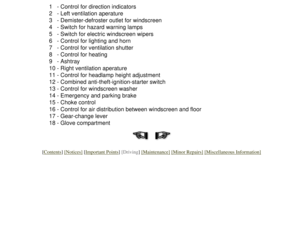
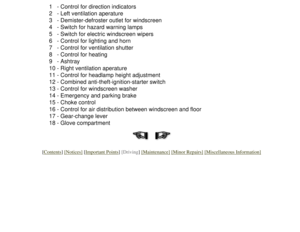
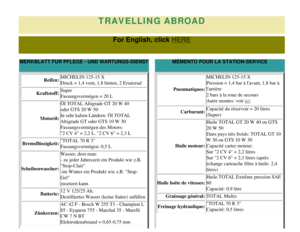
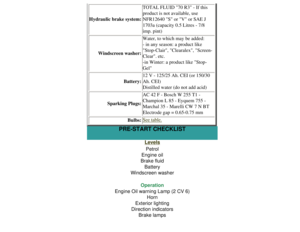
Hydraulic brake system:TOTAL FLUID "70 R3" - If this
product is not available, use
NFR12640 "S" or "V" or SAE J
1703a (capacity 0.5 Litres - 7/8
imp. pint)
Windscreen washer: Water, to which may be added:
- in any season: a product like
"Stop-Clair", "Clearalex", "Screen-
Clear". etc.
-in Winter: a product like "Stop-
Gel"
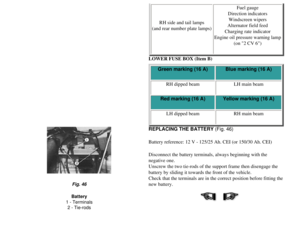
Battery: 12 V - 125/25 Ah. CEI (or 150/30
Ah. CEI)
Distilled water (do not add acid)
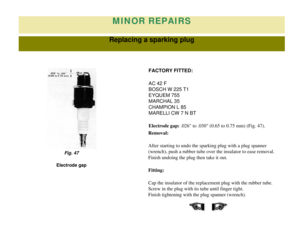
Sparking Plugs: AC 42 F - Bosch W 255 T1 -
Champion L 85 - Eyquem 755 -
Marchal 35 - Marelli CW 7 N BT
Electrode gap = 0.65-0.75 mm
Bulbs:
See table.
PRE-START CHECKLIST
Levels Petrol
Engine oil
Brake fluid Battery
Windscreen washer
Operation
Engine Oil warning Lamp (2 CV 6) Horn
Exterior lighting
Direction indicators Brake lamps
Page 66 of 86
Diverse
Correct setting of rear-view mirrors Tyre pressure
Front grill muff Seat belts
Adjustment of seats
[Contents] [Notices] [Important Points] [Driving] [Maintenance] [Minor Repairs] [Miscellaneous Information]
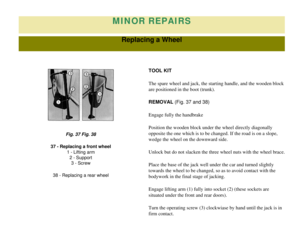
Page 67 of 86

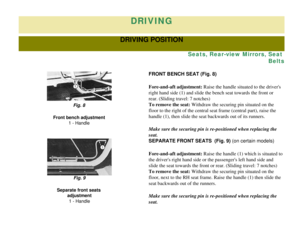
Fore-and-aft adjustment: Raise the handle situated to the drivers
right hand side (1) and slide the bench sea")
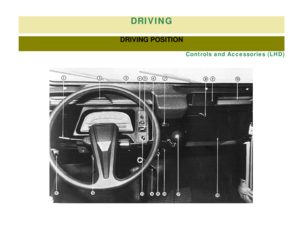
DRIVING
DRIVING POSITION
Seats, Rear-view Mirrors, Seat Belts
FRONT BENCH SEAT (Fig. 8)
Fore-and-aft adjustment: Raise the handle situated to the driver's
right hand side (1) and slide the bench seat towards the front or
rear. (Sliding travel: 7 notches)
To remove the seat: Withdraw the securing pin situated on the
floor to the right of the central seat frame (central part), raise the\
handle (1), then slide the seat backwards out of its runners.
Make sure the securing pin is re-positioned when replacing the
seat.
Fig. 8
Front bench adjustment 1 - Handle
SEPARATE FRONT SEATS (Fig. 9) (on certain models)
Fore-and-aft adjustment: Raise the handle (1) which is situated to
the driver's right hand side or the passenger's left hand side and
slide the seat towards the front or rear. (Sliding travel: 7 notches)
To remove the seat: Withdraw the securing pin situated on the
floor, next to the RH seat frame. Raise the handle (1) then slide the \
seat backwards out of the runners.
Make sure the securing pin is re-positioned when replacing the
seat.
Fig. 9
Separate front seats adjustment
1 - Handle
Page 68 of 86

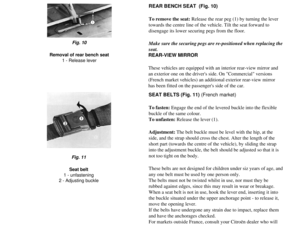
To remove the seat: Release the rear peg (1) by turning the lever
towards the centre line of the vehicle. Tilt the seat forward to
disengage its lower securing pegs from")
REAR BENCH SEAT (Fig. 10)
To remove the seat: Release the rear peg (1) by turning the lever
towards the centre line of the vehicle. Tilt the seat forward to
disengage its lower securing pegs from the floor.
Make sure the securing pegs are re-positioned when replacing the
seat.
Fig. 10
Removal of rear bench seat 1 - Release lever
REAR-VIEW MIRROR
These vehicles are equipped with an interior rear-view mirror and
an exterior one on the driver's side. On "Commercial" versions
(French market vehicles) an additional exterior rear-view mirror
has been fitted on the passenger's side of the car.
SEAT BELTS (Fig. 11) (French market)
To fasten: Engage the end of the levered buckle into the flexible
buckle of the same colour.
To unfasten: Release the lever (1).
Adjustment: The belt buckle must be level with the hip, at the
side, and the strap should cross the chest. Alter the length of the
short part (towards the centre of the vehicle), by sliding the strap
into the adjustment buckle, the belt should be adjusted so that it is
not too tight on the body.
These belts are not designed for children under siz years of age, and
any one belt must be used by one person only.
The belts must not be twisted whilst in use, nor must they be
rubbed against edges, since this may result in wear or breakage.
When a seat belt is not in use, hook the lever end, inserting it into
the buckle situated under the upper anchorage point - to release it,
move the opening lever.
If the belts have undergone any strain due to impact, replace them
and have the anchorages checked.
For markets outside France, consult your Citroën dealer who will
Fig. 11
Seat belt
1 - unfastening
2 - Adjusting buckle
Page 69 of 86
advise you on the legal requirements and fittings.
DRIVING POSITION
Adjust the fore-and-aft position of the bench-seat or of the front
driver's seat to suit the controls.
Adjust the rear-view mirrors to suit the driving position adopted.
Then fasten the seat belt and adjust its length as necessary.
[Contents] [Notices] [Important Points] [Driving] [Maintenance] [Minor Repairs] [Miscellaneous Information]
Page 70 of 86

The device is situated below the dashboard, on the left-hand side of
the steering column.
The successive p")
DRIVING
STARTING
Anti-theft, Ignition, Starter
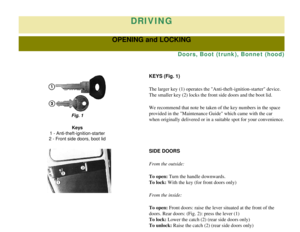
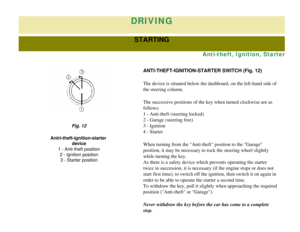
ANTI-THEFT-IGNITION-STARTER SWITCH (Fig. 12)
The device is situated below the dashboard, on the left-hand side of
the steering column.
The successive positions of the key when turned clockwise are as
follows:
1 - Anti-theft (steering locked)
2 - Garage (steering free)
3 - Ignition
4 - Starter
When turning from the "Anti-theft" position to the "Garage"
position, it may be necessary to rock the steering wheel slightly
while turning the key.
As there is a safety device which prevents operating the starter
twice in succession, it is necessary (if the engine stops or does not
start first time), to switch off the ignition, then switch it on again \
in
order to be able to operate the starter a second time.
To withdraw the key, pull it slightly when approaching the required
position ("Anti-theft" or "Garage").
Never withdraw the key before the car has come to a complete
stop.
Fig. 12
Antri-theft-ignition-starter device
1 - Anti-theft position 2 - Ignition position3 - Starter position
Page 71 of 86

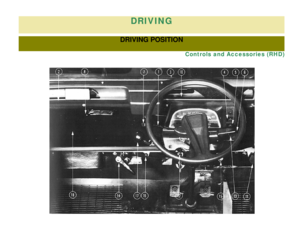
The choke must not be used unless the engine is cold (3).
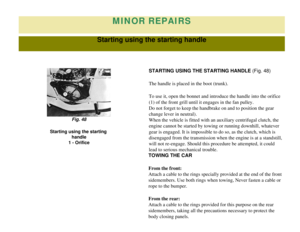
Click here for instructions on using the starting handle.
BEFORE STARTING THE ENGINE
A quick check at the \"P")
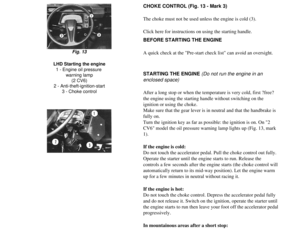
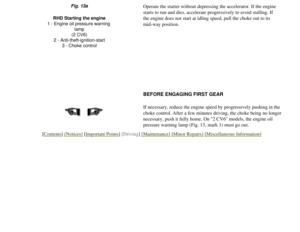
CHOKE CONTROL (Fig. 13 - Mark 3)
The choke must not be used unless the engine is cold (3).
Click here for instructions on using the starting handle.
BEFORE STARTING THE ENGINE
A quick check at the "Pre-start check list" can avoid an oversight.
Fig. 13
LHD Starting the engine 1 - Engine oil pressure warning lamp(2 CV6)
2 - Anti-theft-ignition-start 3 - Choke control
STARTING THE ENGINE (Do not run the engine in an
enclosed space)
After a long stop or when the temperature is very cold, first ?free?
the engine using the starting handle without switching on the
ignition or using the choke.
Make sure that the gear lever is in neutral and that the handbrake is
fully on.
Turn the ignition key as far as possible: the ignition is on. On "2
CV6" model the oil pressure warning lamp lights up (Fig. 13, mark
1).
If the engine is cold:
Do not touch the accelerator pedal. Pull the choke control out fully.
Operate the starter until the engine starts to run. Release the
controls a few seconds after the engine starts (the choke control will \
automatically return to its mid-way position). Let the engine warm
up for a few minutes in neutral without racing it.
If the engine is hot:
Do not touch the choke control. Depress the accelerator pedal fully
and do not release it. Switch on the ignition, operate the starter until\
the engine starts to run then leave your foot off the accelerator pedal \
progressively.
In mountainous areas after a short stop:
Page 72 of 86
Operate the starter without depressing the accelerator. If the engine
starts to run and dies, accelerate progressively to avoid stalling. If
the engine does not start at idling speed, pull the choke out to its
mid-way position.Fig. 13a
RHD Starting the engine
1 - Engine oil pressure warning lamp
(2 CV6)
2 - Anti-theft-ignition-start 3 - Choke control
BEFORE ENGAGING FIRST GEAR
If necessary, reduce the engine speed by progressively pushing in the
choke control. After a few minutes driving, the choke being no longer
necessary, push it fully home. On "2 CV6" models, the engine oil
pressure warning lamp (Fig. 13, mark 1) must go out.
[Contents] [Notices] [Important Points] [Driving] [Maintenance] [Minor Repairs] [Miscellaneous Information]


Windscreen washer: Water, to which may")
![CITROEN 2CV 1975 Owners Manual
Diverse
Correct setting of rear-view mirrors Tyre pressure
Front grill muff Seat belts
Adjustment of seats
[Contents] [Notices] [Important Points] [Driving] [Maintenance] [Minor Repairs] [Miscellaneo](/manual-img/9/56684/w960_56684-65.png "CITROEN 2CV 1975 Owners Manual
Diverse
Correct setting of rear-view mirrors Tyre pressure
Front grill muff Seat belts
Adjustment of seats
[Contents] [Notices] [Important Points] [Driving] [Maintenance] [Minor Repairs] [Miscellaneo")

