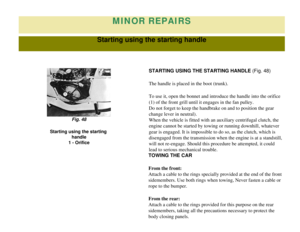
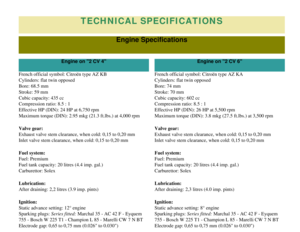
Page 9 of 86
DRIVING
DRIVING POSITION
Dashboard Instruments
Page 10 of 86
 an\
d hazard warning device (6),
the illumination of the following dashboard instruments is controlled by\
the exterior lighting")
With the exception of the warning lamps for engine oil pressure (2) an\
d hazard warning device (6),
the illumination of the following dashboard instruments is controlled by\
the exterior lighting switch.
These instruments do not function when the ignition is off, with the exc\
eption of the hazard warning
device (6).
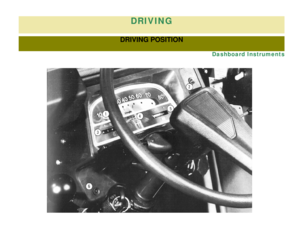
1 - Speedometer: The red marks indicate maximum speed permitted in each gear.
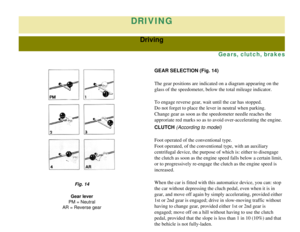
2 - Engine oil pressure warning lamp (2 CV6 only): This lights up when the ignition is switched on
and goes out as soon as the engine is running. If it lights up when driv\
ing, stop the engine
immediately and top up the level of oil if necessary. If the lamp remain\
s alight despite the oil level
being correct, stop again and contact a Citroën dealer.
3 - Fuel gauge: Tank capacity: 4 1/2 Imp. Gal. (20 litres)
4 - Total mileage indicator
5 - Charge indicator: At normal engine running speed, the needle should remain in the white se\
ctor.
If the needle should remain in either of the red sectors, consult a Citr\
oën dealer. It is possible that,
when driving with the headlamps on, the needle may stay in the white cro\
ss-hatched zone - indication
that the battery is insufficiently charged. In normal circumstances, whe\
n driving, the generator should
charge the battery and within two hours the needle should return to the \
white zone. If this does not
occur, consult a Citroën dealer.
6 - Hazard warning lamp: Flashes throughout the operation. If it does not function, check the
direction indicators.
[Contents] [Notices] [Important Points] [Driving] [Maintenance] [Minor Repairs] [Miscellaneous Information]
Page 11 of 86
DRIVING
DRIVING POSITION
Controls and Accessories (RHD)
Page 12 of 86
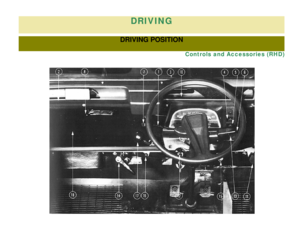
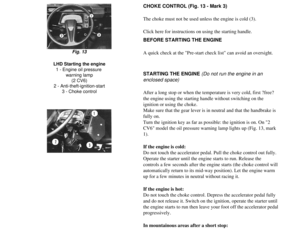
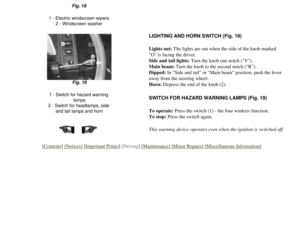
1 - Control for direction indicators
2 - Left ventilation aperature
3 - Demister-defroster outlet for windscreen
4 - Switch for hazard warning lamps
5 - Switch for electric windscreen wipers
6 - Control for lighting and horn
7 - Control for ventilation shutter
8 - Control for heating
9 - Ashtray
10 - Right ventilation aperature
11 - Control for headlamp height adjustment
12 - Combined anti-theft-ignition-starter switch
13 - Control for windscreen washer
14 - Emergency and parking brake
15 - Choke control
16 - Control for air distribution between windscreen and floor
17 - Gear-change lever
18 - Glove compartment
[Contents] [Notices] [Important Points] [Driving] [Maintenance] [Minor Repairs] [Miscellaneous Information]
Page 13 of 86
DRIVING
DRIVING POSITION
Controls and Accessories (LHD)
Page 14 of 86
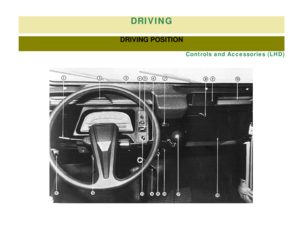
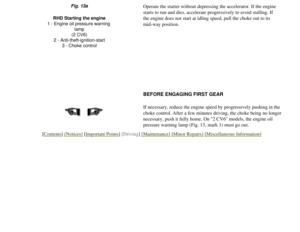
1 - Control for direction indicators
2 - Left ventilation aperature
3 - Demister-defroster outlet for windscreen
4 - Switch for hazard warning lamps
5 - Switch for electric windscreen wipers
6 - Control for lighting and horn
7 - Control for ventilation shutter
8 - Control for heating
9 - Ashtray
10 - Right ventilation aperature
11 - Control for headlamp height adjustment
12 - Combined anti-theft-ignition-starter switch
13 - Control for windscreen washer
14 - Emergency and parking brake
15 - Choke control
16 - Control for air distribution between windscreen and floor
17 - Gear-change lever
18 - Glove compartment
[Contents] [Notices] [Important Points] [Driving] [Maintenance] [Minor Repairs] [Miscellaneous Information]
Page 15 of 86
DRIVING
OPENING and LOCKING
Doors, Boot (trunk), Bonnet (hood)
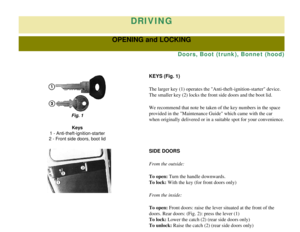
KEYS (Fig. 1)
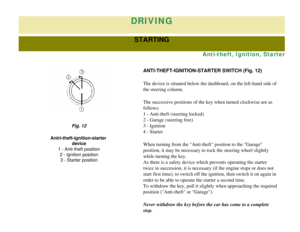
The larger key (1) operates the "Anti-theft-ignition-starter" device.
The smaller key (2) locks the front side doors and the boot lid.
We recommend that note be taken of the key numbers in the space
provided in the "Maintenance Guide" which came with the car
when originally delivered or in a suitable spot for your convenience.
Fig. 1Keys
1 - Anti-theft-ignition-starter
2 - Front side doors, boot lid
SIDE DOORS
From the outside:
To open: Turn the handle downwards.
To lock: With the key (for front doors only)
From the inside:
To open: Front doors: raise the lever situated at the front of the
doors. Rear doors: (Fig. 2): press the lever (1)
To lock: Lower the catch (2) (rear side doors only)
To unlock: Raise the catch (2) (rear side doors only)
Page 16 of 86
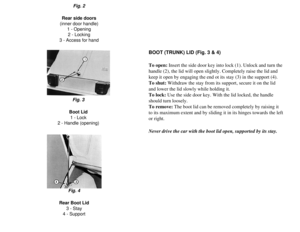
Fig. 2
Rear side doors
(inner door handle) 1 - Opening2 - Locking
3 - Access for hand
BOOT (TRUNK) LID (Fig. 3 & 4)
To open: Insert the side door key into lock (1). Unlock and turn the
handle (2), the lid will open slightly. Completely raise the lid and
keep it open by engaging the end ot its stay (3) in the support (4).\
To shut: Withdraw the stay from its support, secure it on the lid
and lower the lid slowly while holding it.
To lock: Use the side door key. With the lid locked, the handle
should turn loosely.
To remove: The boot lid can be removed completely by raising it
to its maximum extent and by sliding it in its hinges towards the left
or right.
Never drive the car with the boot lid open, supported by its stay.
Fig. 3
Boot Lid 1 - Lock
2 - Handle (opening)
Fig. 4
Rear Boot Lid 3 - Stay
4 - Support


")

")

, Bonnet (hood)
KEYS (Fig. 1)
The larger key (1) operates the \"Anti-theft-ignition-starter\" device.
The smaller key (2) locks the front side doors and t")
 1 - Opening2 - Locking
3 - Access for hand
BOOT (TRUNK) LID (Fig. 3 & 4)
To open: Insert the side door key into lock (1). Unlock and turn the
handle (2), t")