Page 27 of 86

When setting off, apply the brakes a few times to dry out any water
on the brake linings.
Cleaning the Windows
The windows may be cleaned with alcohol or with special
commercial products. Silicone based products are not recommended.
Pivot the windscreen wiper blades to the front and clean them with
a little soapy water without putting pressure on the rubber edges.
Metal Decorative Components
Wash in suds or water to which a little detergent such as Teepol has
been added (2.5 to 3.0 cu. in. per gallon or 10 ro 15 ccm per litre), \
preceded and followed by a thorough rinsing with clean water.
The embellishers in particular should be washed very often since, in
time, mud might damage the surface so that repolishing may
become necessary.
AFter drying with a chamois leather, it is recommended that a
product like "ABEL PROTEGE CHROME", or other proprietary
chrome-polishes, be applied as a protection for the polished metal
finish.
Spots of Tar on the Bodywork
These should be removed as soon as possible.
Do not scrape off and do not use petrol or a spot remover for cloth,
but a special tar remover, such as "ABEL", or other proprietary tar
removers.
Polishing the Paintwork
Polishing is not recommended for metallic paintwork, because of
the risk of rings appearing.
On the other hand, for non-metallic paintwork, it is recommended
to carry out polishing at the end of Winter. For this, the body must
be perfectly clean and dry.
Page 77 of 86
DRIVING
Air Conditioning
Ventilation, heating, de-misting
FRONT VENTILATOR (Fig. 20)
Turn the knob (1) clockwise or anti-clockwise according to the
required output.
Fig. 20
Ventilation shutter 1 - Control knob
FRONT DOOR WINDOWS (Fig. 21)
To partly open them: Press the catch situated on the lower part of
the window frame. The windows will remain partially open during
the journey.
To open them fully: Push the mobile part of the window right up
in order to engage the retaining head in the opening of the upper
exterior lock (1).
To close them: Remove the retaining head from the lock while
operating the control (2) to bring it to the released position (3) t\
hen
close the window.
Page 78 of 86

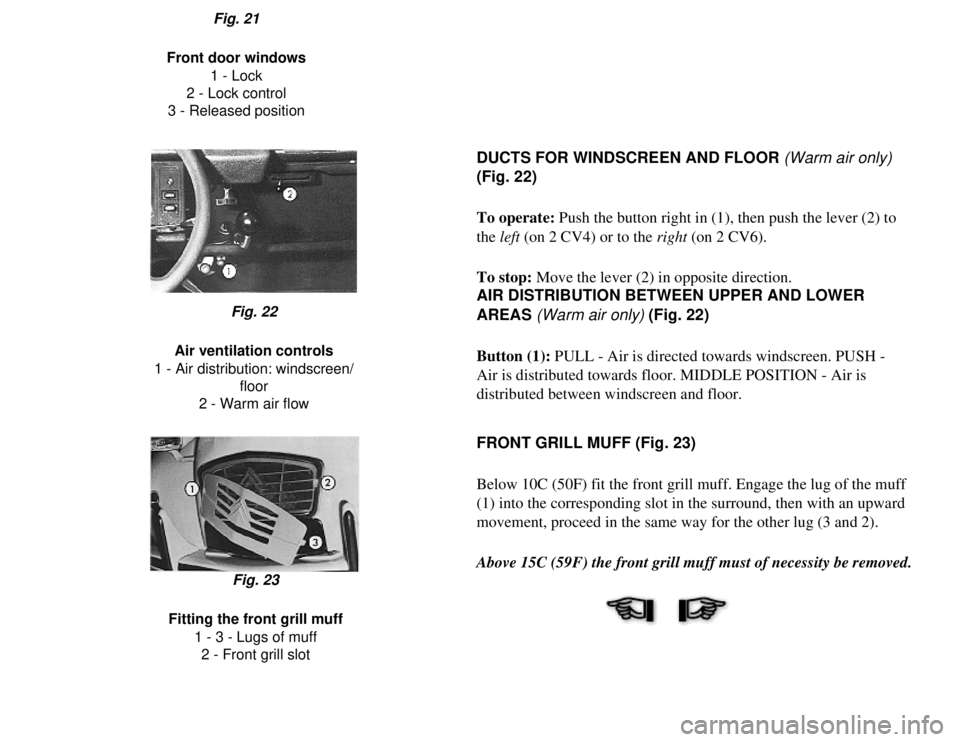
Fig. 21
Front door windows 1 - Lock
2 - Lock control
3 - Released position
DUCTS FOR WINDSCREEN AND FLOOR (Warm air only)
(Fig. 22)
To operate: Push the button right in (1), then push the lever (2) to
the left (on 2 CV4) or to the right (on 2 CV6).
To stop: Move the lever (2) in opposite direction.
AIR DISTRIBUTION BETWEEN UPPER AND LOWER
AREAS (Warm air only) (Fig. 22)
Button (1): PULL - Air is directed towards windscreen. PUSH -
Air is distributed towards floor. MIDDLE POSITION - Air is
distributed between windscreen and floor.
Fig. 22
Air ventilation controls
1 - Air distribution: windscreen/ floor
2 - Warm air flow
FRONT GRILL MUFF (Fig. 23)
Below 10C (50F) fit the front grill muff. Engage the lug of the muff
(1) into the corresponding slot in the surround, then with an upward
movement, proceed in the same way for the other lug (3 and 2).
Above 15C (59F) the front grill muff must of necessity be removed.
Fig. 23
Fitting the front grill muff 1 - 3 - Lugs of muff2 - Front grill slot
Page 80 of 86
DRIVING
Comfort
Folding canvas hood
The canvas hood can be fixed in two positions when open: mid-way
or right back above the rear window.
Half-open
Open the hood from the inside of the vehicle but never when in
motion.
Pivot the locking levers (Fig. 24, Mark 1) to release the retaining
hooks. (2)
Raise the front of the hood so as to disengage it completely (Fig.
25).
Pivot the frame (Fig. 25, Mark 1) while pushing the cross-bar (2)
and tip over the frame towards the centre pillar.
Secure the frame (Fig. 26) by means of the strap (1) and press-stud \
(2).
Fig. 24
Opening the front of the hood
1 - Locking lever
2 - Retaining hook
Fig. 26
Opening the front of the hood 1 - Strap
Page 81 of 86
2 - Press-stud
Fig. 25
Opening the front of the hood 1 - Frame
2 - Cross-bar
Fully open
Open out from the outside once the front of the hood has been
opened:
Remove from the tube of the frame (1), the pins (Fig. 27, Mark 2)
attached to the canvas hood, and tip over the frame towards the
front (3).
Secure it by means of the hooks (Fig. 24, Mark 2).
Free the hood securing plate (Fig. 28, Mark 1) from the lugs (2).
Roll up the hood as far as the rear window and fasten it down by
means of the straps (Fig. 29, Mark 1) and press-studs (2).
Fig. 27
Opening the hood completely 1 - Pivoting frame2 - Retaining pins
3 - Tipping over the frame
Fig. 28
Opening the hood completely 1 - Securing plate2 - Lugs
3 - Securing strap Fig. 29
Opening the hood completely 1 - Securing strap2 - Press-stud
3 - Securing plate
[Contents] [Notices] [Important Points] [Driving] [Maintenance] [Minor Repairs] [Miscellaneous Information]
Page 82 of 86
DRIVING
Comfort
Accessories
ASHTRAY (Fig. 30)
To open: Pull on the movable moulding (1).
To empty: Press on the leaf-spring and withdraw the ashtray.
To replace and close: Reverse the sequence.
Fig. 30
Ashtray
1 - Opening direction
INTERIOR LAMP (Fig. 31)
It is located at the top of the Left hand centre pillar and fitted with \
a
built-in switch.
REAR HAMMOCK FOR PARCELS
It is secured between the rear seat and rear window.
It can be removed with the rear seat so as to enable the maximum
capacity of the boot to be used.
MOVABLE REAR FLOOR (on certain models)
Fig. 31
1 - Interior lamp
Page 86 of 86
G
l Gearbox
l Gear changing
l Gear lever
l Glass (plastic)
l Guarantee
H
l Hazard warning device
l Headlamps, adjustment
l Headlamps, controls
l Heating
l Horns
l Hydraulic fluid
I
l Identification of car
l Ignition
l Interior lamp
l Instruments
l Tyres
l Tyres (wear indicators)
U
l Upholstery, cleaning
V
l Ventilation
W
l Warning lamp
l Washing the car
l Water, battery, windscreen washers
l Weights
l Wheel, changing (brace)
l Wheels, changing round
l Windscreen washer, control
l Windscreen washer, filling
l Windscreen wipers
l Window, cleaning
l Winkers (Direction indicators)
[
Contents] [Notices] [Important Points] [Driving] [Maintenance] [Minor Repairs] [Miscellaneous Information]