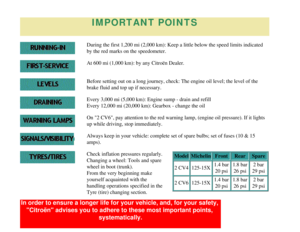
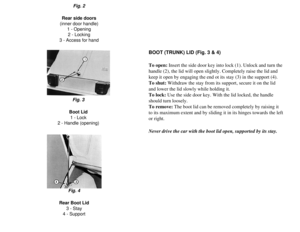
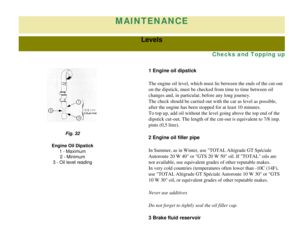
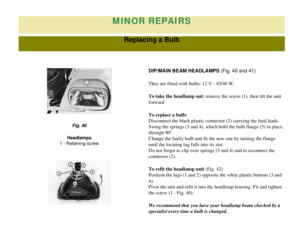
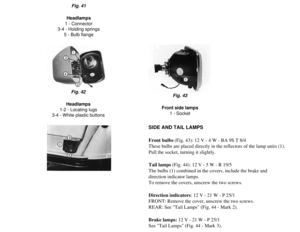
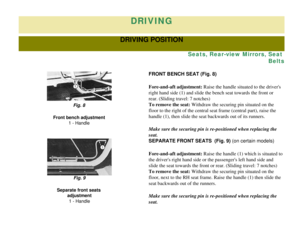
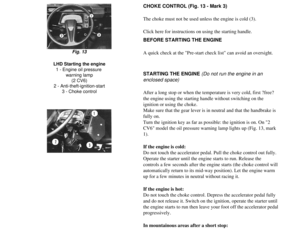
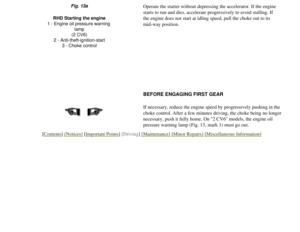
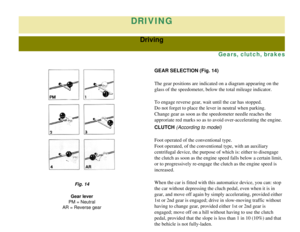
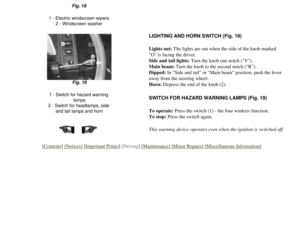
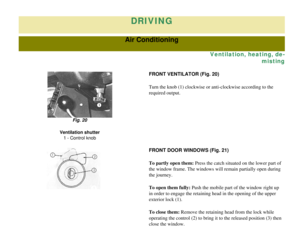
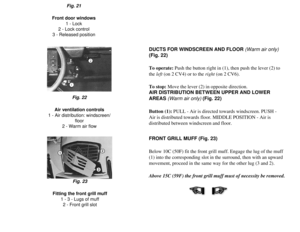
Page 41 of 86
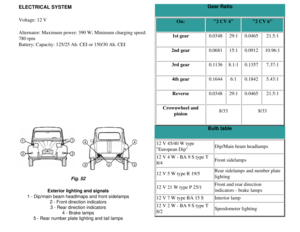
RH side and tail lamps
(and rear number plate lamps) Fuel gauge
Direction indicators Windscreen wipers
Alternator field feed
Charging rate indicator
Engine oil pressure warning lamp (on "2 CV 6")
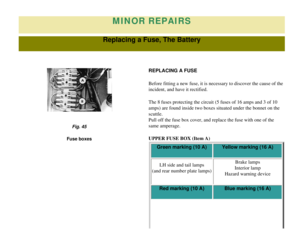
LOWER FUSE BOX (Item B) Green marking (16 A) Blue marking (16 A)
RH dipped beam LH main beam
Red marking (16 A) Yellow marking (16 A)
LH dipped beam RH main beam
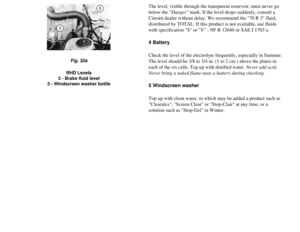
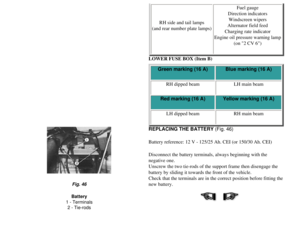
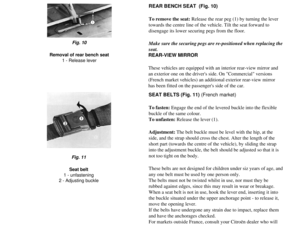
REPLACING THE BATTERY (Fig. 46)
Battery reference: 12 V - 125/25 Ah. CEI (or 150/30 Ah. CEI)
Disconnect the battery terminals, always beginning with the
negative one.
Unscrew the two tie-rods of the support frame then disengage the
battery by sliding it towards the front of the vehicle.
Check that the terminals are in the correct position before fitting the \
new battery.
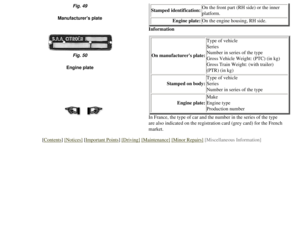
Fig. 46
Battery
1 - Terminals 2 - Tie-rods
Page 42 of 86
[Contents] [Notices] [Important Points] [Driving] [Maintenance] [Minor Repairs] [Miscellaneous Information]
Page 43 of 86
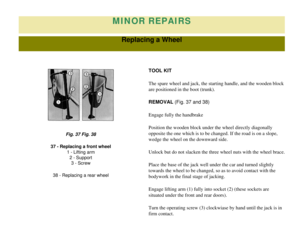
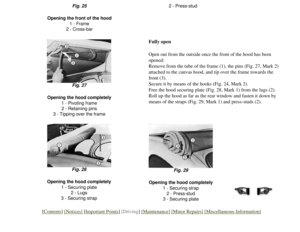
MINOR REPAIRS
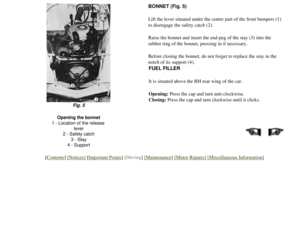
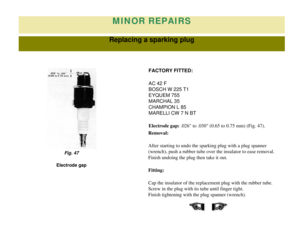
Replacing a sparking plug
FACTORY FITTED:
AC 42 F
BOSCH W 225 T1
EYQUEM 755
MARCHAL 35
CHAMPION L 85
MARELLI CW 7 N BT
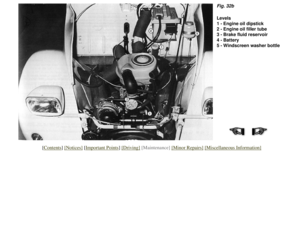
Electrode gap: .026" to .030" (0.65 to 0.75 mm) (Fig. 47).
Removal:
After starting to undo the sparking plug with a plug spanner
(wrench), push a rubber tube over the insulator to ease removal.
Finish undoing the plug then take it out.
Fitting:
Cap the insulator of the replacement plug with the rubber tube.
Screw in the plug with its tube until finger tight.
Finish tightening with the plug spanner (wrench).
Fig. 47
Electrode gap
Page 44 of 86
[Contents] [Notices] [Important Points] [Driving] [Maintenance] [Minor Repairs] [Miscellaneous Information]
Page 45 of 86

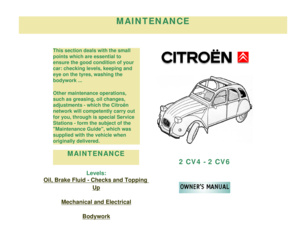
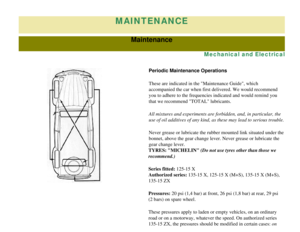
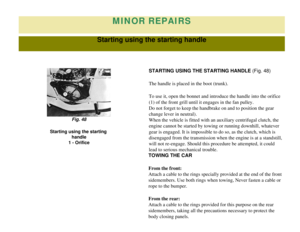
The handle is placed in the boot (trunk).
To use it, open the bonnet and introduce the handle into the or")
MINOR REPAIRS
Starting using the starting handle
STARTING USING THE STARTING HANDLE (Fig. 48)
The handle is placed in the boot (trunk).
To use it, open the bonnet and introduce the handle into the orifice
(1) of the front grill until it engages in the fan pulley.
Do not forget to keep the handbrake on and to position the gear
change lever in neutral).
When the vehicle is fitted with an auxiliary centrifugal clutch, the
engine cannot be started by towing or running downhill, whatever
gear is engaged. It is impossible to do so, as the clutch, which is
disengaged from the transmission when the engine is at a standstill,
will not re-engage. Should this procedure be attempted, it could
lead to serious mechanical trouble.
Fig. 48
Starting using the starting handle
1 - Orifice
TOWING THE CAR
From the front:
Attach a cable to the rings specially provided at the end of the front
sidemembers. Use both rings when towing, Never fasten a cable or
rope to the bumper.
From the rear:
Attach a cable to the rings provided for this purpose on the rear
sidemembers, taking all the precautions necessary to protect the
body closing panels.
Page 46 of 86
DOOR LOCKS FROZEN UP
Maintenance:
At the beginning of the cold season, insert into the door-locks a
small amount of glycerin or anti-freeze, using an oiler or a dropper.
In case of emergency:
Heat the key slightly with a match flame or lighter before inserting
it.
[Contents] [Notices] [Important Points] [Driving] [Maintenance] [Minor Repairs] [Miscellaneous Information]
Page 47 of 86
MISCELLANEOUS INFORMATION
Your attention is particularly drawn
to the sections entitled
"Running-
in" and "Servicing and Guarantee".
If you are travelling abroad, the
translations into 4 languages of the
servicing dats will be of use to you
at service-stations.
These sections will also enable
you, if you so desire, to learn more
about your car by referring to the
section entitled
"General Technical
Specifications".
MISCELLANEOUS 2 CV4 - 2 CV6
Running-in, servicing, guarantee
Driving and running cost
Towing a trailer
Vehicle identification
Replacement parts
Page 48 of 86
Travelling abroad
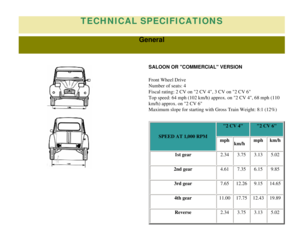
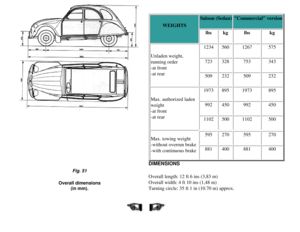
General Technical Specifications
07516
JULY 1975
AZ-KB AZ-KA 2 CV4 2 CV6
[Contents] [Notices] [Important Points] [Driving] [Maintenance] [Minor Repairs] [Miscellaneous Information]


 Fuel gauge
Direction indicators Windscreen wipers
Alternator field feed
Charging rate indicator
Engine oil pressure warning lamp (on \"2 CV 6\")
LOW")
![CITROEN 2CV 1975 Owners Manual
[Contents] [Notices] [Important Points] [Driving] [Maintenance] [Minor Repairs] [Miscellaneous Information]](/manual-img/9/56684/w960_56684-41.png "CITROEN 2CV 1975 Owners Manual
[Contents] [Notices] [Important Points] [Driving] [Maintenance] [Minor Repairs] [Miscellaneous Information]")
 (Fig. 47).
Removal")
![CITROEN 2CV 1975 Owners Manual
[Contents] [Notices] [Important Points] [Driving] [Maintenance] [Minor Repairs] [Miscellaneous Information]](/manual-img/9/56684/w960_56684-43.png "CITROEN 2CV 1975 Owners Manual
[Contents] [Notices] [Important Points] [Driving] [Maintenance] [Minor Repairs] [Miscellaneous Information]")


![CITROEN 2CV 1975 Owners Manual
Travelling abroad
General Technical Specifications
07516
JULY 1975
AZ-KB AZ-KA 2 CV4 2 CV6
[Contents] [Notices] [Important Points] [Driving] [Maintenance] [Minor Repairs] [Miscellaneous Information]](/manual-img/9/56684/w960_56684-47.png "CITROEN 2CV 1975 Owners Manual
Travelling abroad
General Technical Specifications
07516
JULY 1975
AZ-KB AZ-KA 2 CV4 2 CV6
[Contents] [Notices] [Important Points] [Driving] [Maintenance] [Minor Repairs] [Miscellaneous Information]")