1973 DATSUN B110 dimensions
[x] Cancel search: dimensionsPage 141 of 513
BRAKE
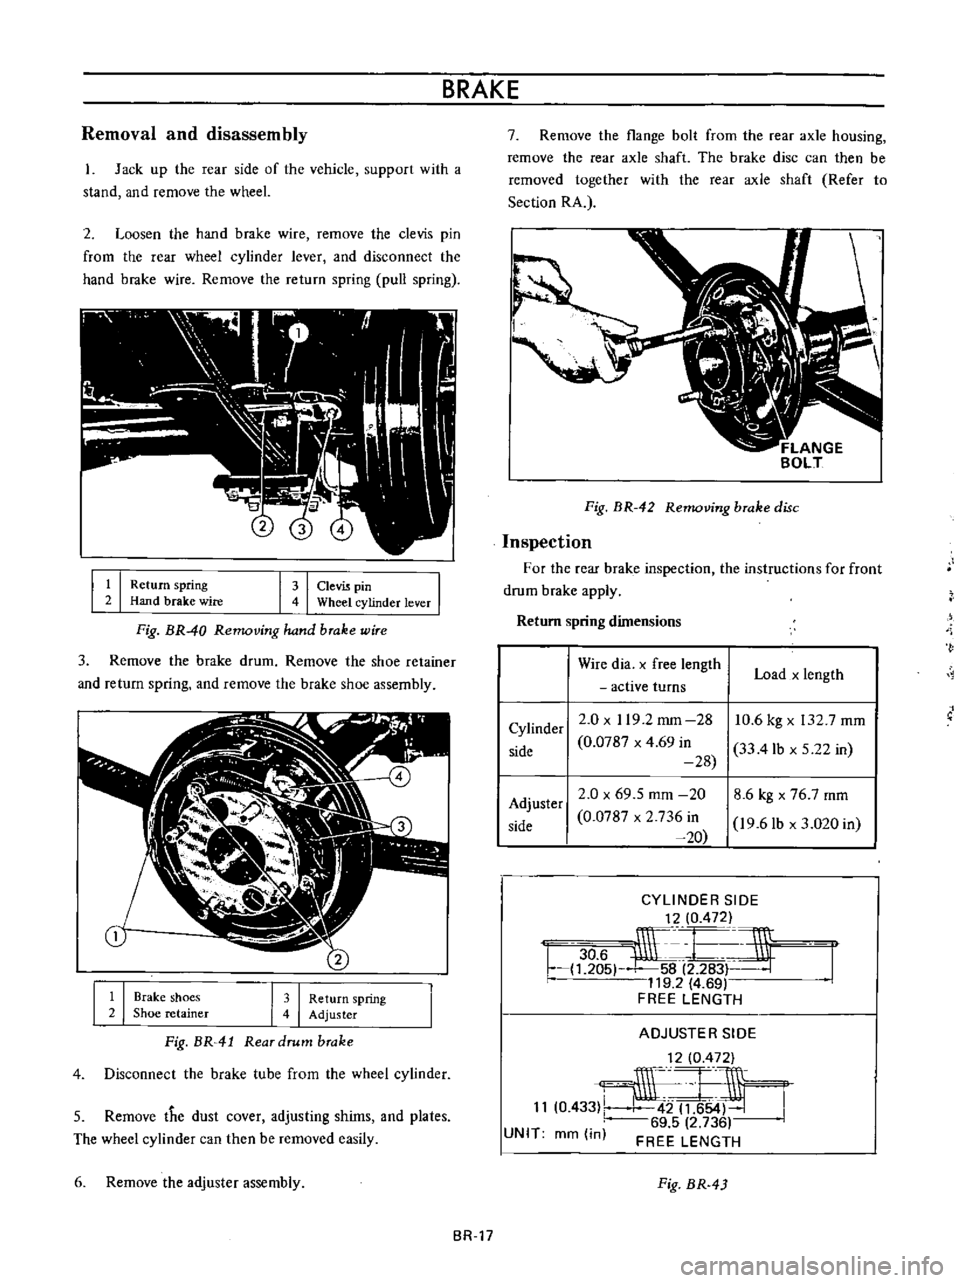
Removal
and
disassembly
1
Jack
up
the
rear
side
of
the
vehicle
support
with
a
stand
and
remove
the
wheeL
2
Loosen
the
hand
brake
wire
remove
the
clevis
pin
from
the
rear
wheel
cylinder
lever
and
disconnect
the
hand
brake
wire
Remove
the
return
spring
pull
spring
I
I
k
re
I
I
l
nlinder
lever
I
Fig
BR
40
Removing
hand
brake
wire
3
Remove
the
brake
drum
Remove
the
shoe
retainer
and
return
spring
and
remove
the
brake
shoe
assembly
I
I
I
I
Brake
shoes
Shoe
retainer
Return
spring
Adjuster
Fig
BR
41
Rear
drum
brake
4
Disconnect
the
brake
tube
from
the
wheel
cylinder
5
Remove
the
dust
cover
adjusting
shims
and
plates
The
wheel
cylinder
can
then
be
removed
easily
6
Remove
the
adjuster
assembly
7
Remove
the
flange
bolt
from
the
rear
axle
housing
remove
the
rear
axle
shaft
The
brake
disc
can
then
be
removed
together
with
the
rear
axie
shaft
Refer
to
Section
RA
Fig
BR
42
Removing
brake
disc
Inspection
For
the
rear
brake
inspection
the
instructions
for
front
drum
brake
apply
Return
spring
dimensions
Wire
dia
x
free
length
active
turns
Load
x
length
Cylinder
side
2
0
x
119
2
mm
28
0
0787
x
4
69
in
28
10
6
kg
x
132
7
mm
33
4lb
x
5
22
in
Adjuster
side
2
0
x
69
5
mm
20
0
0787
x
2
736
in
20
8
6
kg
x
76
7
mm
I9
6lb
d
020
in
CYLINDER
SIDE
t
2
0
472
r
lif
r
1
5
58
2
283F
119
2
4
69
FREE
LENGTH
ADJUSTER
SIDE
1210
472
11
0
433
J54J
69
5
2
736
FREE
LENGTH
UNIT
mm
in
Fig
BR
43
BR
17
Page 147 of 513
BRAKE
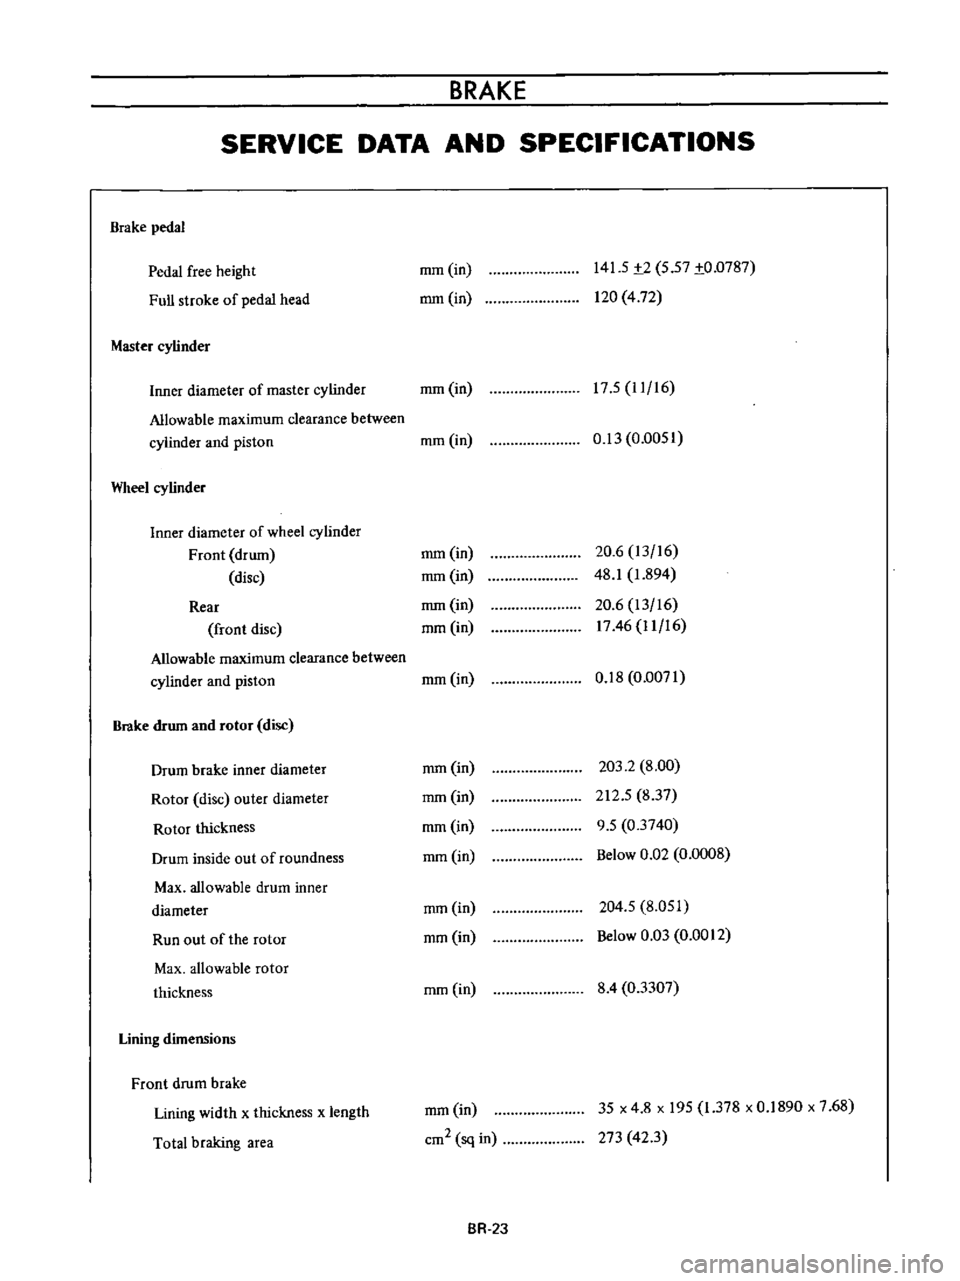
SERVICE
DATA
AND
SPECIFICATIONS
Brake
pedal
Pedal
free
height
Full
stroke
of
pedal
head
Master
cylinder
mm
in
mm
in
141
5
t2
5
57
to
0787
120
4
72
17
5
11
16
Inner
diameter
of
master
cylinder
mm
in
Allowable
maximum
clearance
between
cylinder
and
piston
mm
in
Wheel
cylinder
Inner
diameter
of
wheel
cylinder
Front
drum
disc
Rear
front
disc
Allowable
maximum
clearance
between
cylinder
and
piston
Brake
drum
and
rotor
disc
Drum
brake
inner
diameter
Rotor
disc
outer
diameter
Rotor
thickness
Drum
inside
out
of
roundness
Max
allowable
drum
inner
diameter
Run
out
of
the
rotor
Max
allowable
rotor
thickness
Lining
dimensions
Front
drum
brake
Lining
width
x
thickness
x
length
Total
braking
area
0
13
0
0051
mm
in
mm
in
mm
in
mm
in
20
6
13
16
48
1
1
894
20
6
13
16
1746
11
16
mm
in
0
18
0
0071
mm
in
mm
in
mm
in
mm
in
203
2
8
00
212
5
837
9
5
03740
Below
0
Q2
0
0008
mm
in
mm
in
204
5
8
051
Below
0
03
0
0012
mm
in
8
4
03307
mm
in
cm2
sq
in
35
x
4
8
x
195
1
378
x
0
1890
x
7
68
273
423
BR
2J
Page 199 of 513
BODY
UNDERBODY
ALIGNMENT
CONTENTS
UNDERBODY
GENERAL
SERVICE
INFORMATION
ALIGNMENT
CHECKING
PROCEDURE
BF
9
BF
9
UNDERBODY
GENERAL
SERVICE
INFORMATION
Since
each
underbody
component
directly
affects
the
overall
strength
of
the
body
it
is
essential
that
proper
welding
sealing
and
rust
proofing
techniques
be
observed
during
service
operations
Whenever
the
body
is
repaired
be
sure
to
provide
the
repaired
body
parts
with
rust
proof
In
the
case
of
a
rust
proofmg
critical
underbody
component
it
is
essential
that
a
good
quality
type
air
dry
primer
such
as
corrosion
resistant
zinc
chromate
be
used
Do
not
use
combination
type
primer
surfacers
ALIGNMENT
CHECKING
PROCEDURE
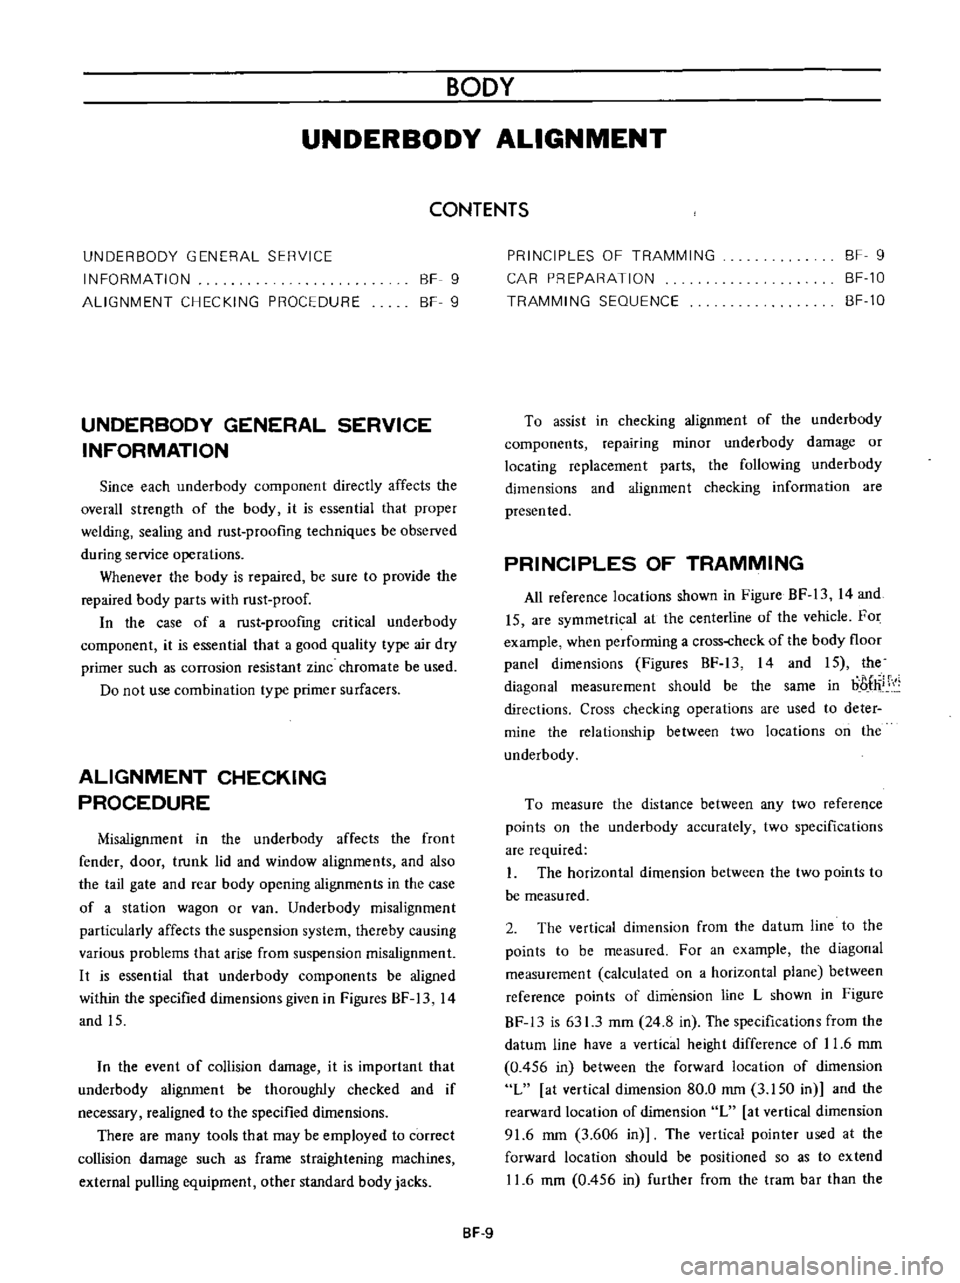
Misalignment
in
the
underbody
affects
the
front
fender
door
trunk
lid
and
window
alignments
and
also
the
tail
gate
and
rear
body
opening
alignments
in
the
case
of
a
station
wagon
or
van
Underbody
misalignment
particularly
affects
the
suspension
system
thereby
causing
various
problems
that
arise
from
suspension
misalignment
It
is
essential
that
underbody
components
be
aligned
within
the
specified
dimensions
given
in
Figures
BF
13
14
and
IS
In
the
event
of
collision
damage
it
is
important
that
underbody
a1ignrnent
be
thoroughly
checked
and
if
necessary
realigned
to
the
specified
dirnensions
There
are
many
tools
that
may
be
ernployed
to
correct
collision
damage
such
as
frame
straightening
machines
external
pulling
equipment
other
standard
body
jacks
PRINCIPLES
OF
TRAMMING
CAR
PREPARATION
TRAMMING
SEQUENCE
BF
9
BF
10
BF
10
To
assist
in
checking
alignment
of
the
underbody
components
repairing
minor
underbody
damage
or
locating
replacement
parts
the
following
underbody
dimensions
and
alignment
checking
information
are
presented
PRINCIPLES
OF
TRAMMING
All
reference
locations
shown
in
Figure
BF
13
14
and
15
are
symmetrical
at
the
centerline
of
the
vehicle
For
example
wheo
performing
a
crosHheck
of
the
body
floor
panel
dimensions
Figures
BF
I3
14
and
IS
the
diagonal
measurement
should
be
the
same
in
boflii
directions
Cross
checking
operations
are
used
to
deter
mine
the
relationship
between
two
locations
on
the
underbody
To
measure
the
distance
between
any
two
reference
points
on
the
underbody
accurately
two
specifications
are
required
I
The
horizontal
dimension
between
the
two
points
to
be
measured
2
The
vertical
dimension
from
the
datum
line
to
the
points
to
be
measured
For
an
example
the
diagonal
measurement
calculated
on
a
horizontal
plane
between
reference
points
of
dimension
line
L
shown
in
Figure
BF
I3
is
631
3
mm
24
8
in
The
specifications
from
the
datum
line
have
a
vertical
height
difference
of
11
6
mm
0
456
in
between
the
forward
location
of
dimension
L
at
vertical
dimension
80
0
mm
3
150
in
and
the
rearward
location
of
dimension
L
at
vertical
dimension
91
6
mm
3
606
in
The
vertical
pointer
used
at
the
forward
location
should
be
positioned
so
as
to
extend
11
6
mm
0
456
in
further
from
the
tram
bar
than
the
BF
9
Page 353 of 513
ENGINE
MECHANICAL
Cylinder
head
recess
diameter
For
standard
insert
Intake
Cylinder
head
recess
diameter
mm
in
For
service
insert
For
standard
insert
Exhaust
For
service
insert
Interference
fit
mm
in
Intake
Exhaust
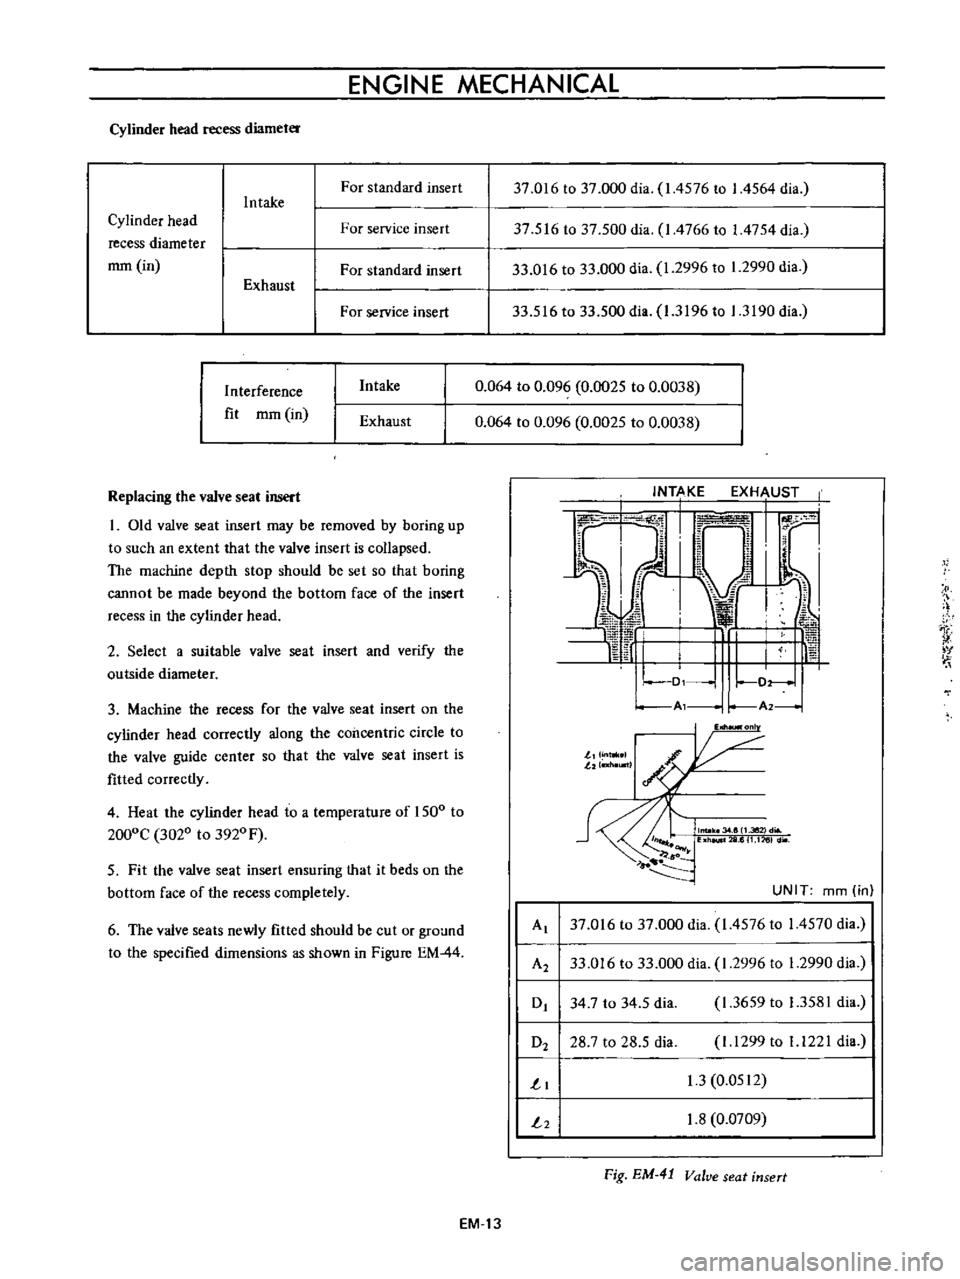
Replacing
the
valve
seat
insert
I
Old
valve
seat
insert
may
be
removed
by
boring
up
to
such
an
extent
that
the
valve
insert
is
collapsed
The
machine
depth
stop
should
be
set
so
that
boring
cannot
be
made
beyond
the
bottom
face
of
the
insert
recess
in
the
cylinder
head
2
Select
a
suitable
valve
seat
insert
and
verify
the
outside
diameter
3
Machine
the
recess
for
the
valve
seat
insert
on
the
cylinder
head
correctly
along
the
concentric
circle
to
the
valve
guide
center
so
that
the
valve
seat
insert
is
fitted
correctly
4
Heat
the
cylinder
head
to
a
temperature
of
1500
to
2000C
3020
to
3920
F
5
Fit
the
valve
seat
insert
ensuring
that
it
beds
on
the
bottom
face
of
the
recess
completely
6
The
valve
seats
newly
fitted
should
be
cut
or
ground
to
the
specified
dimensions
as
shown
in
Figure
EM
44
37
016
to
37
000
dia
1
4576
to
I
4564
dia
37
516
to
37
500
dia
I
4766
to
1
4754
dia
33
016
to
33
000
dia
1
2996
to
1
2990
dia
33
516
to
33
500
dia
1
3196
to
1
3190
dia
0
064
to
0
096
0
0025
to
0
0038
0
064
to
0
096
0
0025
to
0
0038
I
t
v
Al
r
A2
I
onl
J
J
n
llI
lltl
I
G
llW
6
UNIT
mm
in
Al
37
016
to
37
000
dia
1
4576
to
14570
dia
A2
33
016
to
33
000
dia
1
2996
to
1
2990
dia
0
34
7
to
34
5
dia
1
3659
to
1
3581
dia
O2
28
7
to
28
5
dia
I
1299
to
1
1221
dia
1
1
3
0
0512
2
1
8
0
0709
Fig
EM
41
Valve
seat
insert
EM
13
Page 384 of 513
ENGINE
LUBRICATION
SYSTEM
Inspection
and
repair
Clean
the
disassembled
parts
with
cleaning
solvent
and
inspect
for
defects
Inspect
the
drive
rotor
shaft
for
excessive
wear
and
scores
and
check
the
following
clearances
Side
clearance
between
Quter
and
inner
rotors
0
12
mm
0
0047
in
or
below
Tip
clearance
0
04
to
0
I2mm
0
0016
to
0
0047
in
Clearance
between
outer
rotor
and
body
0
15
to
0
21
rom
0
0059
to
0
0083
in
Adjusting
regulator
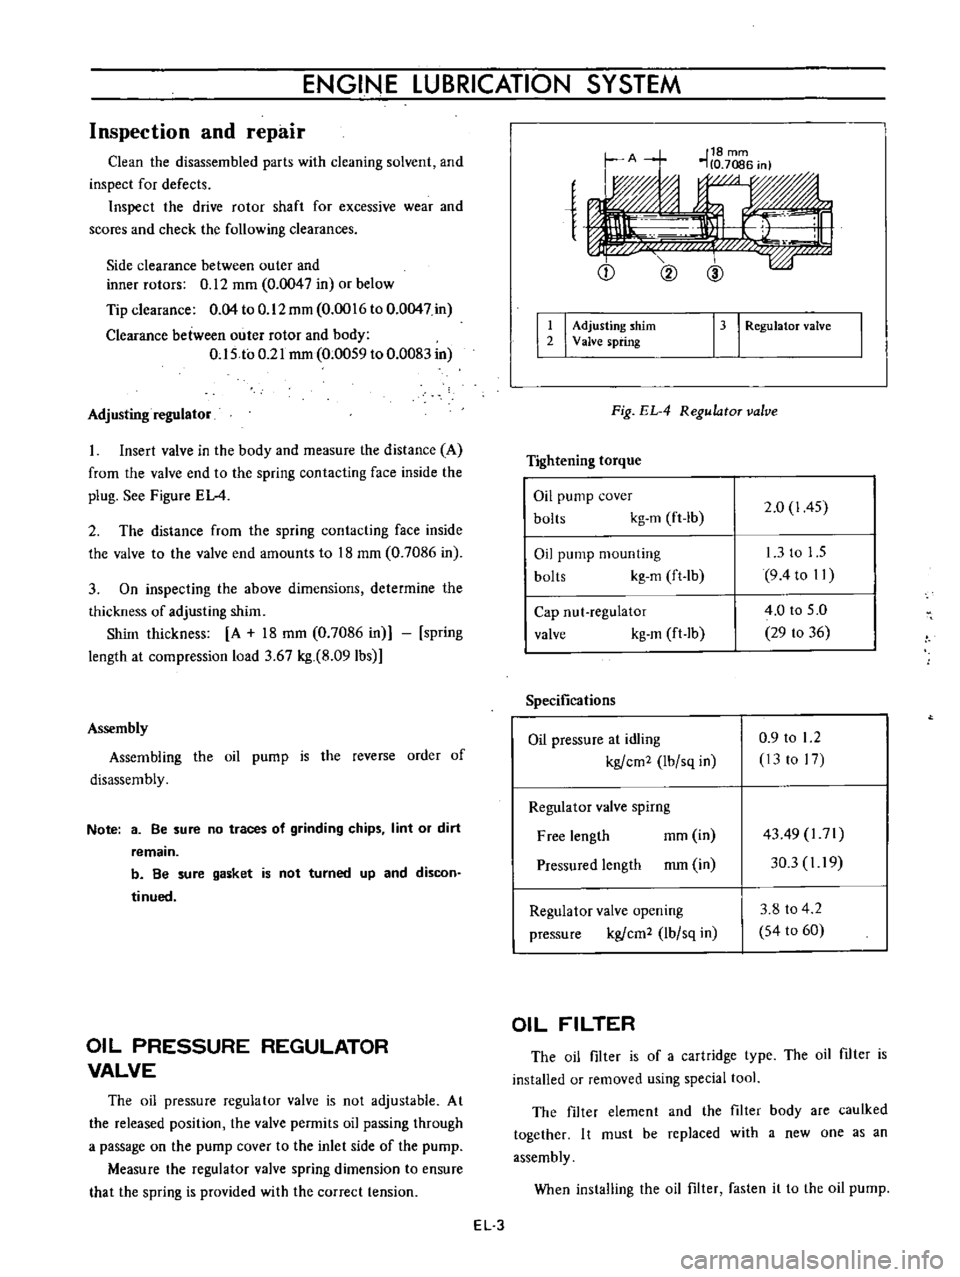
Insert
valve
in
the
body
and
measure
the
distance
A
from
the
valve
end
to
the
spring
contacting
face
inside
the
plug
See
Figure
EL
4
2
The
distance
from
the
spring
contacting
face
inside
the
valve
to
the
valve
end
amounts
to
18
mm
0
7086
in
3
On
inspecting
the
above
dimensions
determine
the
thickness
of
adjusting
shim
Shim
thickness
A
18
mm
0
7086
in
spring
length
at
compression
load
3
67
kg
8
091bs
Assembly
Assembling
the
oil
pump
is
the
reverse
order
of
disassembly
Note
3
Be
sure
no
traces
of
grinding
chips
lint
or
dirt
remain
b
Be
sure
gasket
is
not
turned
up
and
discon
tinued
OIL
PRESSURE
REGULATOR
VALVE
The
oil
pressure
regulator
valve
is
not
adjustable
At
the
released
position
the
valve
permits
oil
passing
through
a
passage
on
the
pump
cover
to
the
inlet
side
of
the
pump
Measure
the
regulator
valve
spring
dimension
to
ensure
that
the
spring
is
provided
with
the
correct
tension
e
Q
@
I
I
Adjusting
shim
2
Valve
spring
13
I
RegulatoT
valve
Fig
EL
4
RegulatoT
valve
Tightening
torque
Oil
pump
cover
bolts
kg
m
ft
lb
2
0
1
45
Oil
pump
mounting
bolts
kg
m
ft
lb
13
to
1
5
9
4to
II
Cap
nut
regulator
valve
kg
m
ft
lb
4
0
to
5
0
29
to
36
Specifications
Oil
pressure
at
idling
kgfcm2
Ibfsq
in
0
9
to
1
2
13
to
17
Regulator
valve
spirng
Free
length
mm
in
Pressured
length
mm
in
4349
l71
30
3
I
19
Regulator
valve
opening
pressure
kgfcm2
lbfsq
in
3
8
to
4
2
54
to
60
OIL
FILTER
The
oil
filter
is
of
a
cartridge
type
The
oil
filter
is
installed
or
removed
using
special
tool
The
filter
element
and
the
filter
body
are
caulked
together
I
t
must
be
replaced
with
a
new
one
as
an
assembly
When
installing
the
oil
filter
fasten
it
to
the
oil
pump
EL
3
Page 390 of 513
ENGINE
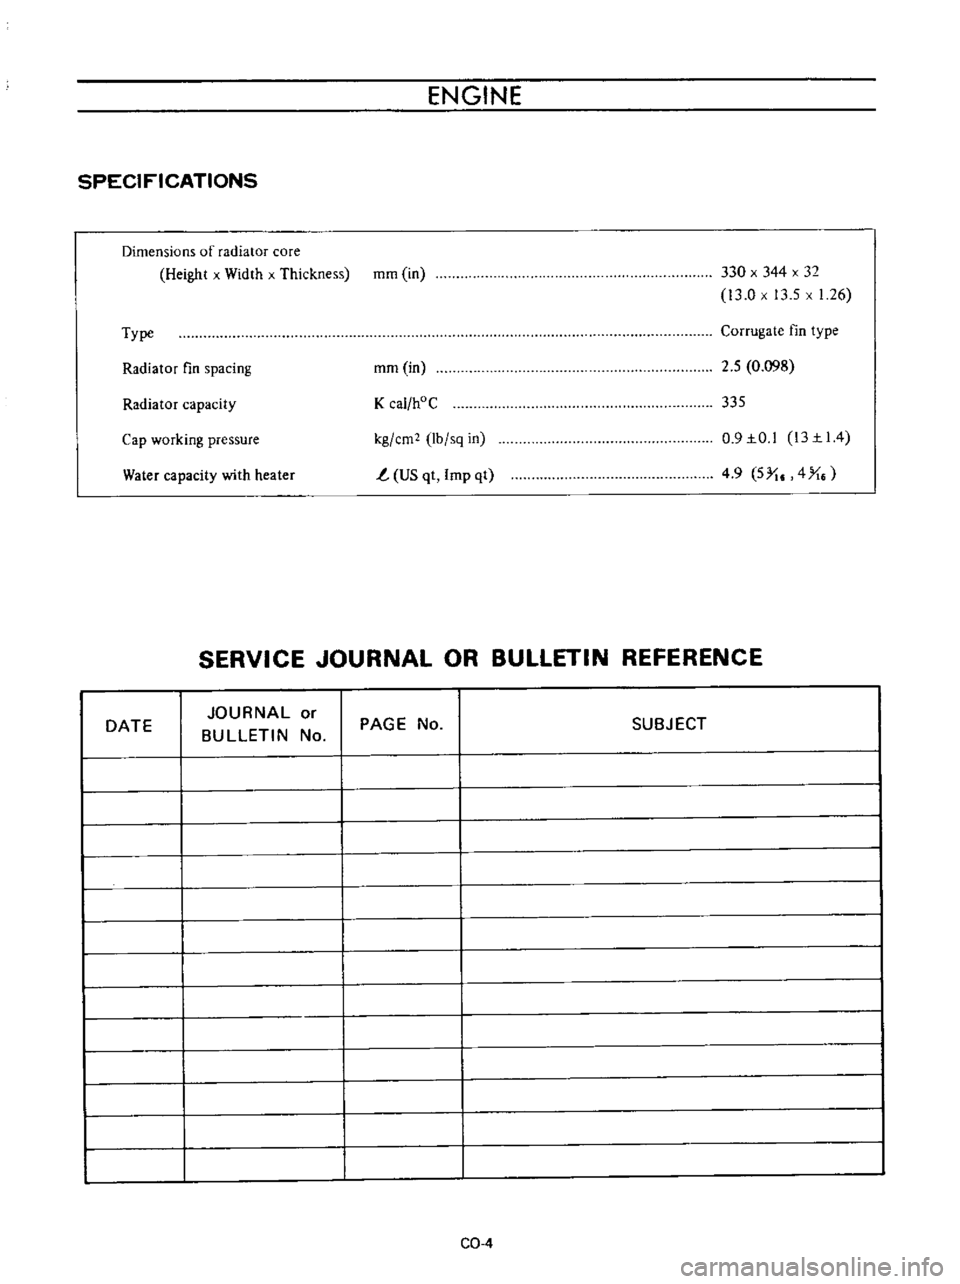
SPECIFICATIONS
Dimensions
of
radiator
core
Height
x
Width
x
Thickness
mm
in
330
x
344
x
32
13
0
x
13
5
x
1
26
Type
Corrugate
fin
type
Radiator
fin
spacing
mm
in
2
5
0
098
Radiator
capacity
K
cal
hoC
335
Water
capacity
with
heater
kg
em
lb
sq
in
t
US
qt
Imp
qt
0
9IO
l
13II4
4
9
5
I
4
X
Cap
working
pressure
SERVICE
JOURNAL
OR
BULLETIN
REFERENCE
DATE
JOURNAL
or
BULLETIN
No
PAGE
No
SUBJECT
CQ
4