1973 DATSUN B110 ESP
[x] Cancel search: ESPPage 168 of 513

CHASSIS
I
l
I
I
2
fa
r
o
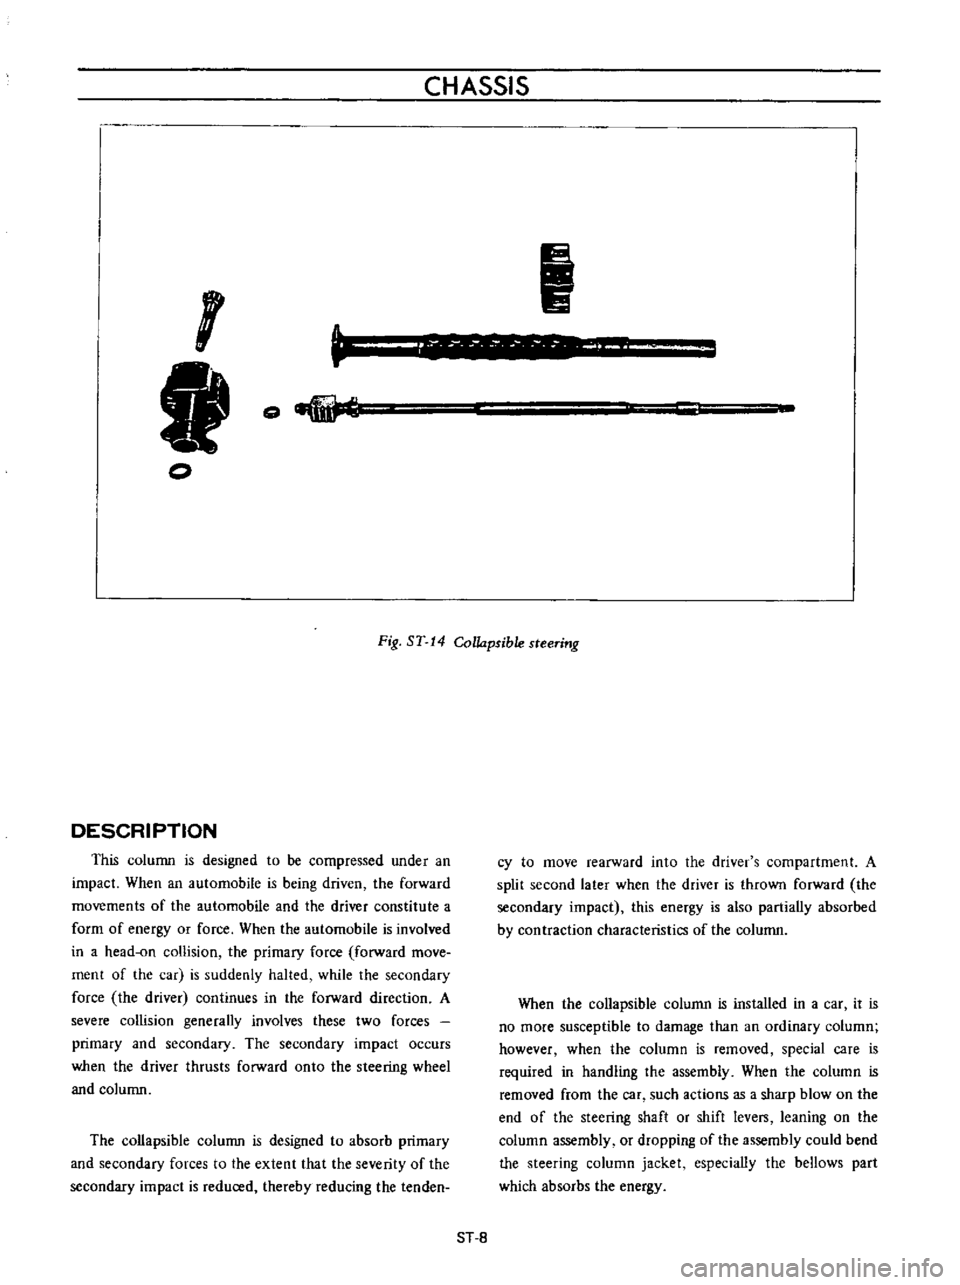
Fig
ST
14
Collapsible
steering
DESCRIPTION
This
column
is
designed
to
be
compressed
under
an
impact
When
an
automobile
is
being
driven
the
forward
movements
of
the
automobile
and
the
driver
constitute
a
form
of
energy
or
force
When
the
automobile
is
involved
in
a
head
on
collision
the
primary
force
forward
move
ment
of
the
car
is
suddenly
halted
while
the
secondary
force
the
driver
continues
in
the
forward
direction
A
severe
collision
generally
involves
these
two
forces
primary
and
secondary
The
secondary
impact
occurs
when
the
driver
thrusts
forward
onto
the
steering
wheel
and
column
The
collapsible
column
is
designed
to
absorb
primary
and
secondary
forces
to
the
extent
that
the
severity
of
the
secondary
impact
is
reduced
thereby
reducing
the
tenden
cy
to
move
rearward
into
the
driver
s
compartment
A
split
second
later
when
the
driver
is
thrown
forward
the
secondary
impact
this
energy
is
also
partially
absorbed
by
contraction
characteristics
of
the
column
When
the
collapsible
column
is
installed
in
a
car
it
is
no
more
susceptible
to
damage
than
an
ordinary
column
however
when
the
column
is
removed
special
care
is
required
in
handling
the
assembly
When
the
column
is
removed
from
the
car
such
actions
as
a
sharp
blow
on
the
end
of
the
steering
shaft
or
shift
levers
leaning
on
the
column
assembly
or
dropping
of
the
assembly
could
bend
the
steering
column
jacket
especially
the
bellows
part
which
absorbs
the
energy
ST
8
Page 170 of 513

CHASSIS
The
construction
of
the
steering
column
is
as
such
that
the
lower
shaft
is
fitted
into
the
upper
tube
when
a
compressing
force
is
applied
to
the
lower
shaft
r
I
1
V
f
7
Steering
torque
is
transmitted
by
the
lower
shaft
and
upper
tube
The
lower
shaft
adopts
a
special
shape
a
circle
with
two
straight
cut
edges
and
the
upper
tube
interior
is
tightly
fitted
against
the
lower
shaft
exterior
toward
the
entire
area
In
addition
four
plastic
pins
completely
eliminate
gap
between
the
lower
shaft
exterior
and
upper
tube
interior
I
I
Jacket
lube
2
Shaft
stopper
I
3
I
Column
coUar
4
Column
shaft
When
a
compressing
force
is
applied
the
above
described
plastic
pins
are
cut
and
the
lower
shaft
is
fitted
into
the
upper
tube
When
the
lower
shaft
is
once
fitted
into
the
upper
tube
the
shaft
end
spreads
and
the
lower
shaft
cannot
be
withdrawn
unless
an
extremely
high
load
is
applied
Fig
ST
1
7
Shaft
stopper
Moreover
for
rearward
column
shaft
projection
the
collar
for
steering
lock
installed
on
the
shaft
runs
against
stoppers
in
three
places
on
the
jacket
tube
which
allows
the
column
shaft
fitting
and
thus
reaIWard
projection
is
prevented
Note
In
no
event
should
an
impact
or
large
power
be
applied
to
the
shaft
with
a
hammer
or
other
matter
during
disassembly
or
reassembly
The
column
shaft
lower
end
and
upper
end
are
supported
respectively
by
two
worm
hearings
and
a
colwnn
bushing
JACKET
TUBE
w
1
U
II
I
II
I
r
liJl
I
I
D
I
1
1
Mesh
tube
I
2
Jacket
tube
Fig
ST
18
Jacket
tube
ST
10
Page 176 of 513

CHASSIS
The
following
tightening
torque
of
nuts
shall
be
adopted
Ball
stud
nut
3
0
to
5
0
kg
m
21
7
to
36
2
ft
lb
Gear
arm
nut
14
kg
m
101
ft
lb
Idler
arm
nut
57
to
6
3
kg
m
41
2
to
45
6
ft
lb
2
Assembly
of
the
idler
assembly
is
accomplished
as
follows
I
Apply
soap
water
on
the
outer
circumference
of
bushing
Press
the
bushing
into
the
idler
arm
carefully
until
the
bushing
protrudes
equally
at
the
both
sides
2
Fit
idler
arm
body
in
the
rubber
bushing
Keep
the
idler
arm
center
line
in
parallel
with
the
chassis
center
line
INSTALLATION
Installation
can
be
accomplished
in
the
reverse
order
of
removal
Pay
attention
to
the
following
points
Set
the
length
of
both
side
rods
to
296
8
mm
11
69
in
It
should
be
done
between
the
ball
stud
centers
2
Check
wheel
alignment
and
if
necessary
adjust
it
ACCIDENT
COLLISION
When
accident
collision
occurs
unfortunately
and
the
vehicle
especially
its
front
unit
is
damaged
conduct
inspection
in
accordance
with
the
following
instruction
Inspect
the
steering
system
particularly
carefully
because
it
is
a
very
important
unit
for
driving
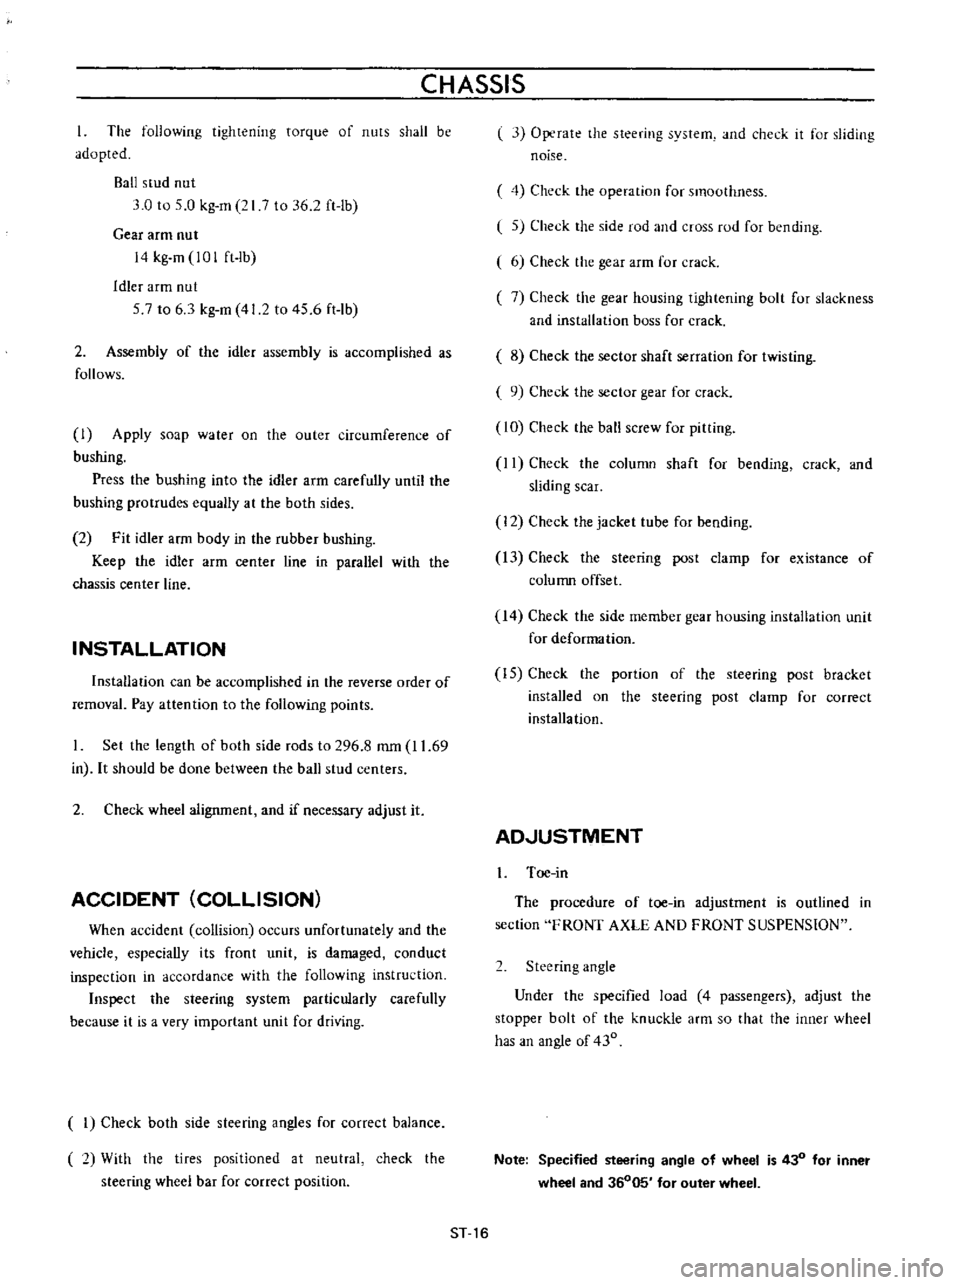
I
Check
both
side
steering
angles
for
correct
balance
2
With
the
tires
positioned
at
neutral
steering
wheel
bar
for
correct
position
check
the
l
3
Operate
the
steering
system
and
check
it
for
sliding
noise
4
Check
the
operation
for
smoothness
l
5
Check
the
side
rod
and
cross
rod
for
bending
6
Check
the
gear
arm
for
crack
7
Check
the
gear
housing
tiglltening
bolt
for
slackness
and
installation
boss
for
crack
8
Check
the
sector
shaft
serration
for
twisting
9
Check
the
sector
gear
for
crack
10
Check
the
ball
screw
for
pitting
II
Check
the
column
shaft
for
bending
crack
and
sliding
scar
12
Check
the
jacket
tube
for
bending
13
Check
the
steering
post
clamp
for
existance
of
column
offset
14
Check
the
side
member
gear
housing
installation
unit
for
deformation
IS
Check
the
portion
of
the
steering
post
bracket
installed
on
the
steering
post
clamp
for
correct
installation
AD
JUSTMENT
I
Toe
in
The
procedure
of
toe
in
adjustment
is
outlined
in
section
FRONT
AXLE
AND
FRONT
SUSPENSION
2
Steering
angle
Under
the
specified
load
4
passengers
adjust
the
stopper
bolt
of
the
knuckle
arm
so
that
the
inner
wheel
has
an
angle
of
430
Note
Specified
steering
angle
of
wheel
is
430
for
inner
wheel
and
36005
for
outer
wheel
ST
16
Page 184 of 513

ENGINE
CONTROL
FUEL
EXHAUST
SYSTEM
For
all
models
fuel
tank
capacity
has
been
increased
in
response
to
the
increased
engine
output
Location
and
mounting
strength
are
improved
for
improvement
of
safety
Sedan
40
l
101
2
US
gal
8
3
4
Imp
gal
Van
38
l
10
US
gal
8
3
8
Imp
gal
Coupe
38
l
10
US
gal
8
3
8
Imp
gal
and
completely
drain
fuel
2
Remove
the
fuel
line
connector
3
Remove
the
luggage
compartment
finishing
4
Remove
four
bolts
used
to
secure
the
fuel
tank
5
Loosen
the
hose
clamp
f
r
II
J
y
I
0
I
V
Ii
i
iJb
Also
for
piping
consideration
has
been
given
on
the
safety
To
be
more
specifically
the
fuel
line
coming
out
from
the
fuel
tank
is
laid
inside
the
rear
side
member
so
that
the
fuel
line
is
protected
from
gravel
and
other
interferences
from
road
In
the
front
floor
section
the
fuel
line
is
laid
inside
a
tunnel
and
thus
fuel
line
reaches
the
engine
compartment
In
addition
the
fuel
strainer
and
fuel
tank
outlet
units
connect
the
fuel
line
with
rubber
hoses
and
for
aU
other
sections
bandy
tube
is
used
Fig
FE
9
Drain
plug
position
Replacement
Remove
the
drain
plug
from
the
fuel
tank
bottom
6
Disconnect
cable
to
the
unit
gauge
7
Dismount
the
fuel
tank
f
I
Y
L
ll
C
jjhrr
@
Fig
FE
10
Fuel
tank
14nit
installation
FE
5
Page 243 of 513

n
YR
f
f1
JC
1
r
8bD
l
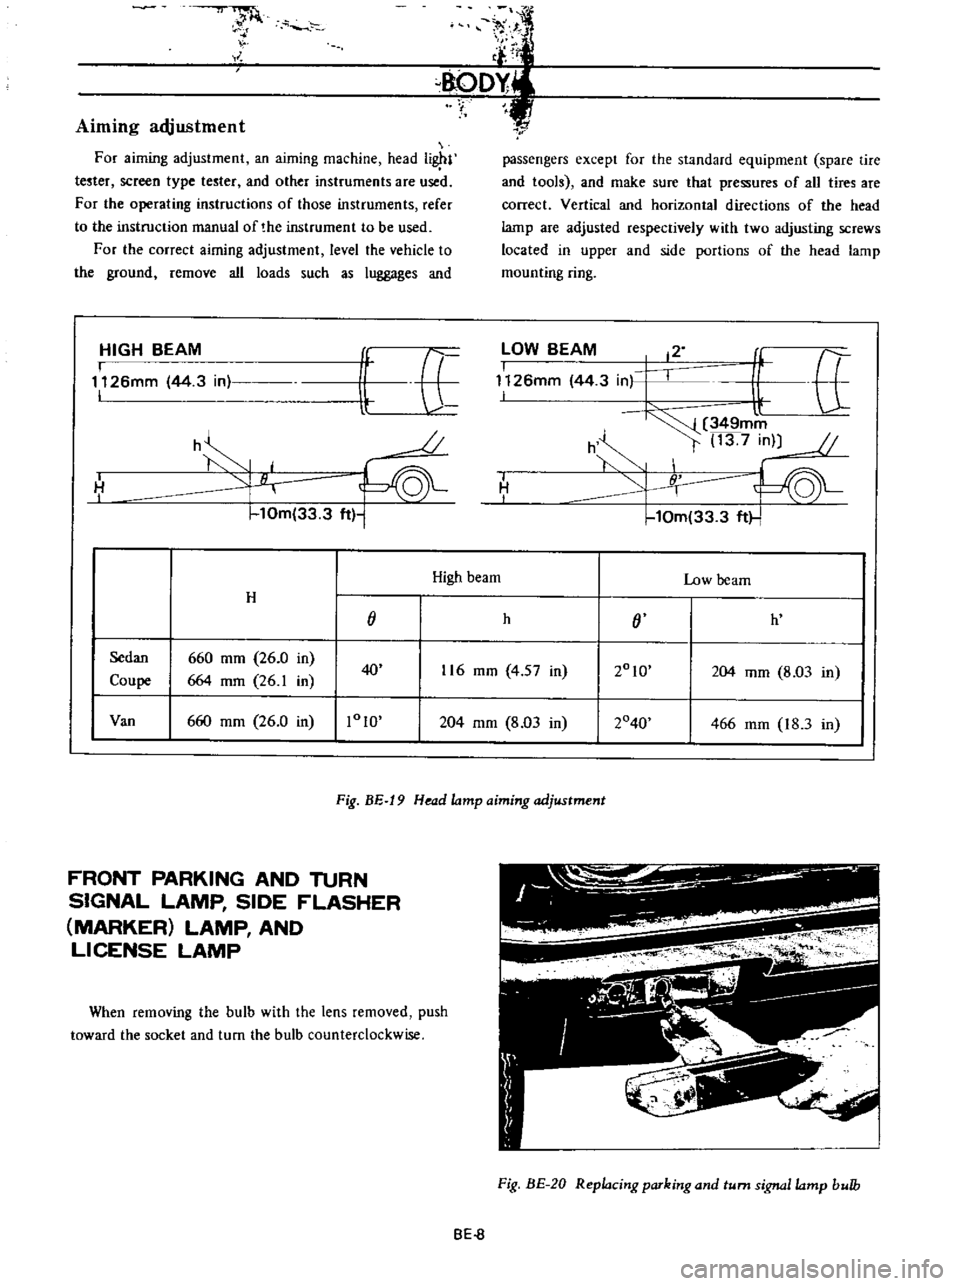
Aiming
adjustment
For
aiming
adjustment
an
aiming
machine
head
i
l
tester
screen
type
tester
and
other
instruments
are
used
For
the
operating
instructions
of
those
instruments
refer
to
the
instruction
manual
of
the
instrument
to
be
used
For
the
correct
airning
adjustment
level
the
vehicle
to
the
ground
remove
all
loads
such
as
luggages
and
HIGH
BEAM
I
1126mm
44
3
in
I
it
E
U
o
h
H
I
10m
33
3
ft
1
r
passengers
except
for
the
standard
equipment
spare
tire
and
tools
and
make
sure
that
pressures
of
all
tires
are
correct
Vertical
and
horizontal
directions
of
the
head
lamp
are
adjusted
respectively
with
two
adjusting
screws
located
in
upper
and
side
portions
of
the
head
lamp
mounting
ring
lOW
BEAM
12
I
f
tt
1126mm
44
3
in
I
l
349mm
h
t
13
7
in
10m
33
3
ft
I
H
I
High
beam
Low
beam
H
j
h
j
h
Sedan
660
mm
26
0
in
2010
Coupe
664
mm
26
1
in
40
116
mm
4
57
in
204
mm
8
03
in
Van
660
mm
26
0
in
1010
204
mm
8
03
in
2040
466
mm
18
3
in
Fig
BE
19
Head
lamp
aiming
adjustment
FRONT
PARKING
AND
TURN
SIGNAL
LAMP
SIDE
FLASHER
MARKER
LAMP
AND
LICENSE
LAMP
When
removing
the
bulb
with
the
lens
removed
push
toward
the
socket
and
turn
the
bulb
counterclockwise
Fig
BE
20
Replacing
parking
and
turn
signa
lamp
bulb
BE
8
Page 309 of 513

ENGINE
Checking
cooling
system
hoses
and
connections
Check
cooling
system
hoses
and
fiHings
for
loose
connections
and
deterioration
Retighten
or
replace
as
necessary
Inspection
of
radiator
cap
Apply
reference
pressure
0
9
kg
cm1
13
psi
to
radiator
cap
by
means
of
a
cap
tester
to
see
if
it
is
in
good
condition
Replace
cap
assembly
if
necessary
ET012
Fig
ET
5
Testing
radiator
cap
Cooling
system
pressure
test
With
radiator
cap
removed
apply
reference
pressure
1
6
kg
cm1
23
psi
to
the
cooling
system
bv
means
of
a
tester
to
check
for
leaks
at
the
system
compo
nents
Water
capacity
with
heater
4
9
l
I
Y
US
gal
l
i
Imp
gal
without
heater
4
2
l
I
i
US
gal
i
Imp
gal
Fig
ET
6
Testing
cooling
system
pressure
Checking
vaccum
fittings
hoses
and
connections
Check
vacuum
system
fittings
and
hoses
for
loose
connections
and
deterioration
Retighten
if
necessary
replace
any
deteriorated
parts
Checking
engine
compression
Compression
pressure
test
Note
To
test
cylinder
compression
remove
all
spark
plugs
and
hold
tester
fitting
tightly
in
spark
plug
hole
of
cylinder
The
tester
is
used
to
determine
whether
cylinder
can
hold
compression
or
whether
there
is
excessive
leakage
past
rings
etc
I
Td10
l
y
Fig
ET
7
Testing
compression
pressure
Test
compression
with
engine
warm
all
spark
plugs
removed
and
throttle
and
choke
valve
opened
No
cylinder
compression
should
be
less
than
80
of
highest
cylinder
s
Excessive
variation
between
cyl
inders
accompanied
by
low
speed
missing
of
the
cylinder
usually
indicates
a
valve
not
properly
seating
or
a
broken
piston
ring
Low
pressures
even
though
uniform
may
indicate
worn
rings
This
may
be
accompanied
by
excessive
oil
consumption
Test
conclusion
If
one
or
more
cylinders
read
low
inject
about
one
tablespoon
of
enigne
oil
on
top
of
the
pistons
in
low
ET
4
Page 312 of 513

EMISSION
CONTROL
AND
TUNE
UP
Fig
ET
11
Checking
spark
plug
gap
Checking
distributor
ignition
wiring
and
ignition
coil
Distributor
Check
centrifugal
advance
unit
for
loose
connection
or
improper
operation
If
it
is
not
operating
properly
the
trouble
may
be
due
to
a
sticky
spring
or
excessively
worn
parts
This
operation
needs
a
distributor
tester
As
to
inspection
procedure
and
reference
data
refer
to
relative
topic
under
Distributor
in
Section
EE
Page
EE
32
If
vacuum
advance
mechanism
fails
to
operate
proJr
erly
check
for
the
following
items
and
correct
the
trouble
as
required
1
Check
vacuum
inlet
for
signs
of
leakage
at
its
connection
If
necessary
retighten
or
replace
with
a
new
one
2
Check
vacuum
diaphragm
for
air
leak
If
leak
is
found
replace
diaphragm
with
a
new
one
3
Inspect
breaker
plate
for
smooth
moving
If
plate
does
not
move
smoothly
this
condition
could
be
due
to
sticky
steel
balls
or
pivot
Apply
grease
to
steel
balls
or
if
necessary
replace
breaker
plate
as
an
assembly
For
vacuum
advance
characteristics
refer
to
Distribu
tor
in
Section
EE
Page
EE
32
Ignition
wiring
Use
an
ohmmeter
to
check
resistance
of
secondary
cables
Disconnect
cables
from
spark
plugs
and
install
the
proper
adapter
between
cable
and
spark
plug
Remove
distributor
cap
from
the
distributor
with
secondary
cables
attached
Do
not
remove
the
cables
from
the
cap
Check
the
resistance
of
one
cable
at
a
time
Connect
the
ohmmeter
between
the
spark
plug
adapter
and
the
corresponding
electrode
inside
the
cap
If
resistance
is
more
than
30
000
ohms
remove
the
cable
from
the
cap
and
check
cable
resistance
only
If
the
resistance
is
still
more
than
30
000
ohms
replace
cable
assembly
T
I
II
Fig
ET
12
Checking
high
tension
cables
Ignition
coil
Check
ignition
coil
for
appearance
oil
leakage
or
performance
For
details
refer
to
Section
EE
Page
EE36
Checking
distributor
cap
and
rotor
Note
This
operation
is
to
be
performed
while
chekcing
distribuotr
points
Inspect
distributor
cap
for
cracks
and
flash
over
External
surfaces
of
all
parts
of
secondary
system
must
be
cleaned
to
reduce
possibility
of
voltage
loss
All
wires
should
be
removed
from
distributor
cap
and
coil
so
that
terminals
can
be
inspected
and
cleaned
Burned
or
corroded
terminals
indicate
that
wires
were
not
fully
seated
which
causes
arcing
between
end
of
wire
and
terminal
When
replacing
wires
in
terminal
be
sure
they
are
fully
seated
before
pushing
rubber
nipple
down
over
tower
Check
distributor
rotor
for
damage
and
distributor
cap
for
cracks
ET
7
Page 318 of 513

EMISSION
CONTROL
AND
TUNE
UP
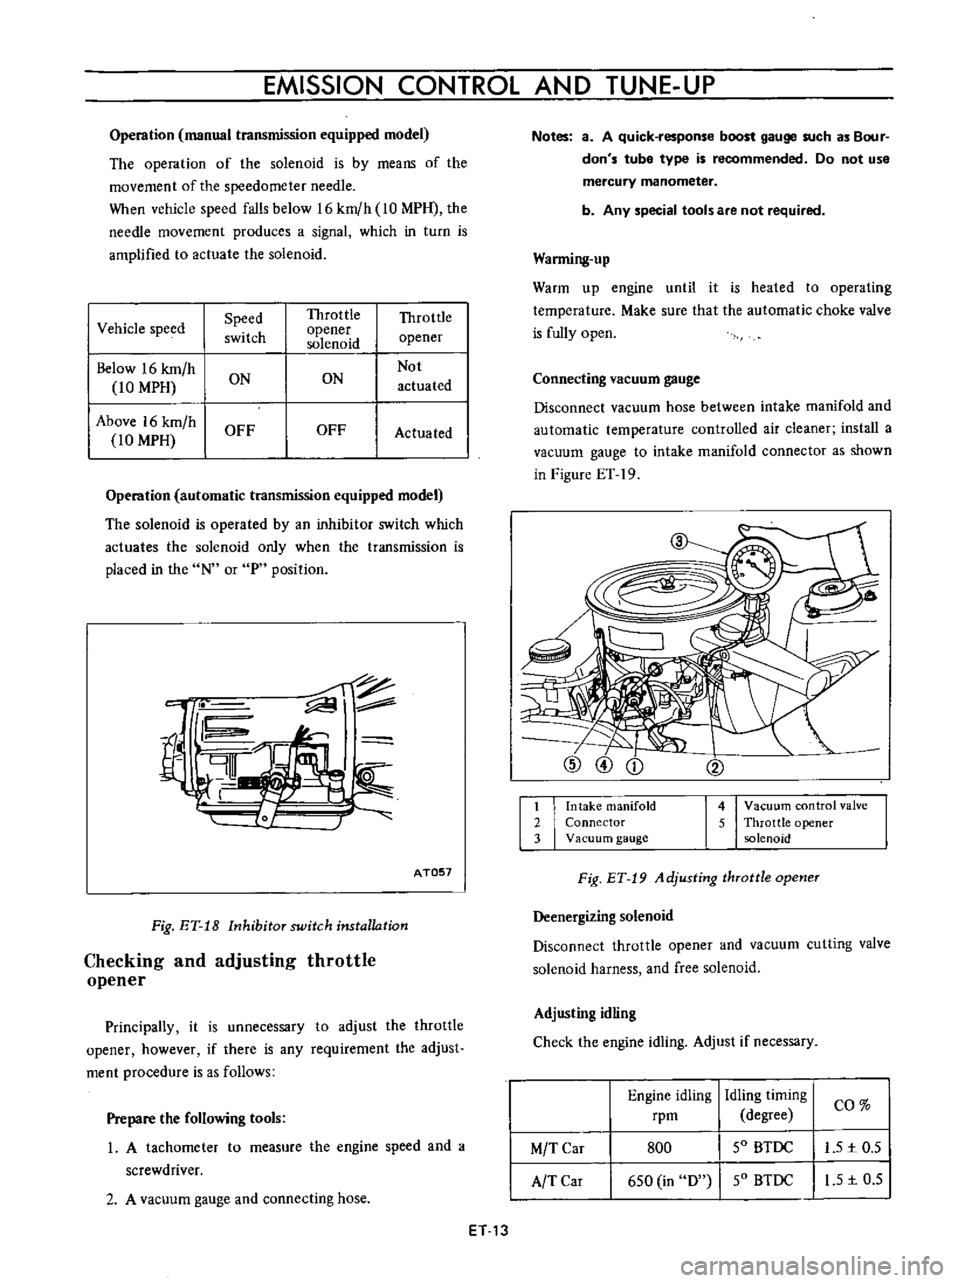
Operation
manual
transmission
equipped
model
The
operation
of
the
solenoid
is
by
means
of
the
movement
of
the
speedometer
needle
When
vehicle
speed
falls
below
16
km
h
10
MPH
the
needle
movement
produces
a
signal
which
in
turn
is
amplified
to
actuate
the
solenoid
I
Vehicle
speed
Speed
Throttle
Throttle
switch
opener
opener
solenoid
Below
16
km
h
Not
10
MPH
ON
ON
actuated
Above
16
km
h
OFF
OFF
Actuated
10
MPH
Operation
automatic
transmission
equipped
model
The
solenoid
is
operated
by
an
inhibitor
switch
which
actuates
the
solenoid
only
when
the
transmission
is
placed
in
the
N
or
P
position
c
fil
rn
AT057
Fig
ET
18
Inhibitor
switch
installation
Checking
and
adjusting
throttle
opener
Principally
it
is
unnecessary
to
adjust
the
throttle
opener
however
if
there
is
any
requirement
the
adjust
ment
procedure
is
as
follows
Prepare
the
following
tools
1
A
tachometer
to
measure
the
engine
speed
and
a
screwdriver
2
A
vacuum
gauge
and
connecting
hose
ET
13
Notes
a
A
quick
response
boost
gauge
such
as
Bour
don
s
tube
type
is
recommended
Do
not
use
mercury
manometer
b
Any
special
tools
are
not
required
Warming
up
Warm
up
engine
until
it
is
heated
to
operating
temperature
Make
sure
that
the
automatic
choke
valve
is
fully
open
Connecting
vacuum
gauge
Disconnect
vacuum
hose
between
intake
manifold
and
automatic
temperature
controlled
air
cleaner
install
a
vacuum
gauge
to
intake
manifold
connector
as
shown
in
Figure
ET
19
1
Intake
manifold
2
Connector
3
Vacuum
gauge
4
Vacuum
control
valve
5
Throttle
opener
solenoid
Fig
ET
19
Adjusting
throttle
opener
Deenergizing
solenoid
Disconnect
throttle
opener
and
vacuum
cutting
valve
solenoid
harness
and
free
solenoid
Adjusting
idling
Check
the
engine
idling
Adjust
if
necessary
Engine
idling
rpm
Idling
timing
I
CO
degree
SO
BTDC
I
L51c0
5
SO
BTDC
I
I
S
1c
0
5
M
T
Car
A
TCar
800
6S0
in
D