2024 FORD F650/750 Port
[x] Cancel search: PortPage 43 of 386
•Height adjuster at the front outboardseating positions.
•Safety belt pretensioner at the frontoutboard seating positions.
•Safety belt warning light and chime.
FASTENING THE SEATBELTS
The front outboard and rear safetyrestraints in the vehicle are combinationlap and shoulder belts.
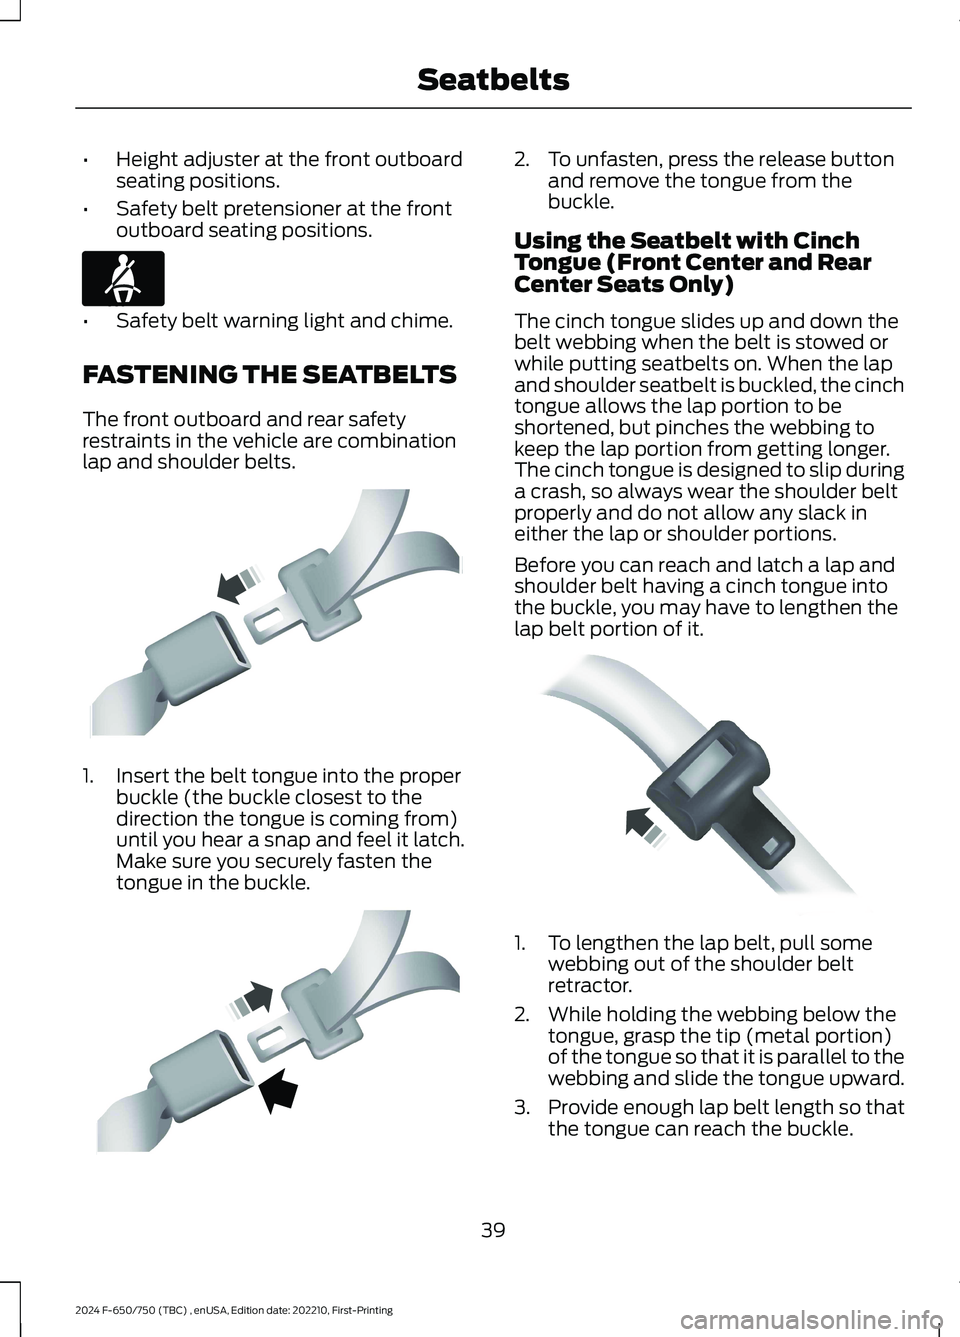
1.Insert the belt tongue into the properbuckle (the buckle closest to thedirection the tongue is coming from)until you hear a snap and feel it latch.Make sure you securely fasten thetongue in the buckle.
2.To unfasten, press the release buttonand remove the tongue from thebuckle.
Using the Seatbelt with CinchTongue (Front Center and RearCenter Seats Only)
The cinch tongue slides up and down thebelt webbing when the belt is stowed orwhile putting seatbelts on. When the lapand shoulder seatbelt is buckled, the cinchtongue allows the lap portion to beshortened, but pinches the webbing tokeep the lap portion from getting longer.The cinch tongue is designed to slip duringa crash, so always wear the shoulder beltproperly and do not allow any slack ineither the lap or shoulder portions.
Before you can reach and latch a lap andshoulder belt having a cinch tongue intothe buckle, you may have to lengthen thelap belt portion of it.
1.To lengthen the lap belt, pull somewebbing out of the shoulder beltretractor.
2.While holding the webbing below thetongue, grasp the tip (metal portion)of the tongue so that it is parallel to thewebbing and slide the tongue upward.
3.Provide enough lap belt length so thatthe tongue can reach the buckle.
39
2024 F-650/750 (TBC) , enUSA, Edition date: 202210, First-PrintingSeatbeltsE71880 E142587 E142588 E162708
Page 44 of 386
Fastening the Cinch Tongue
WARNING: Always drive and ridewith your seatback upright and the lapbelt snug and low across the hips.
1.Pull the lap and shoulder belt from theretractor so that the shoulder beltportion of the seatbelt crosses yourshoulder and chest.
2.Be sure the belt is not twisted. If thebelt is twisted, remove the twist.
3.Insert the belt tongue into the properbuckle for your seating position untilyou hear a snap and feel it latch.
4.Make sure the tongue is securelyfastened to the buckle by pulling onthe tongue.
While you are fastened in the seatbelt, thelap and shoulder belt with a cinch tongueadjusts to your movement. However, if youbrake hard, turn hard, or if your vehiclereceives an impact of 5 mph (8 km/h) ormore, the seatbelt will become locked andhelp reduce your forward movement.
Lap Belts
WARNING: Always drive and ridewith your seatback upright and the lapbelt snug and low across the hips.
The front center lap belt does not adjustautomatically.
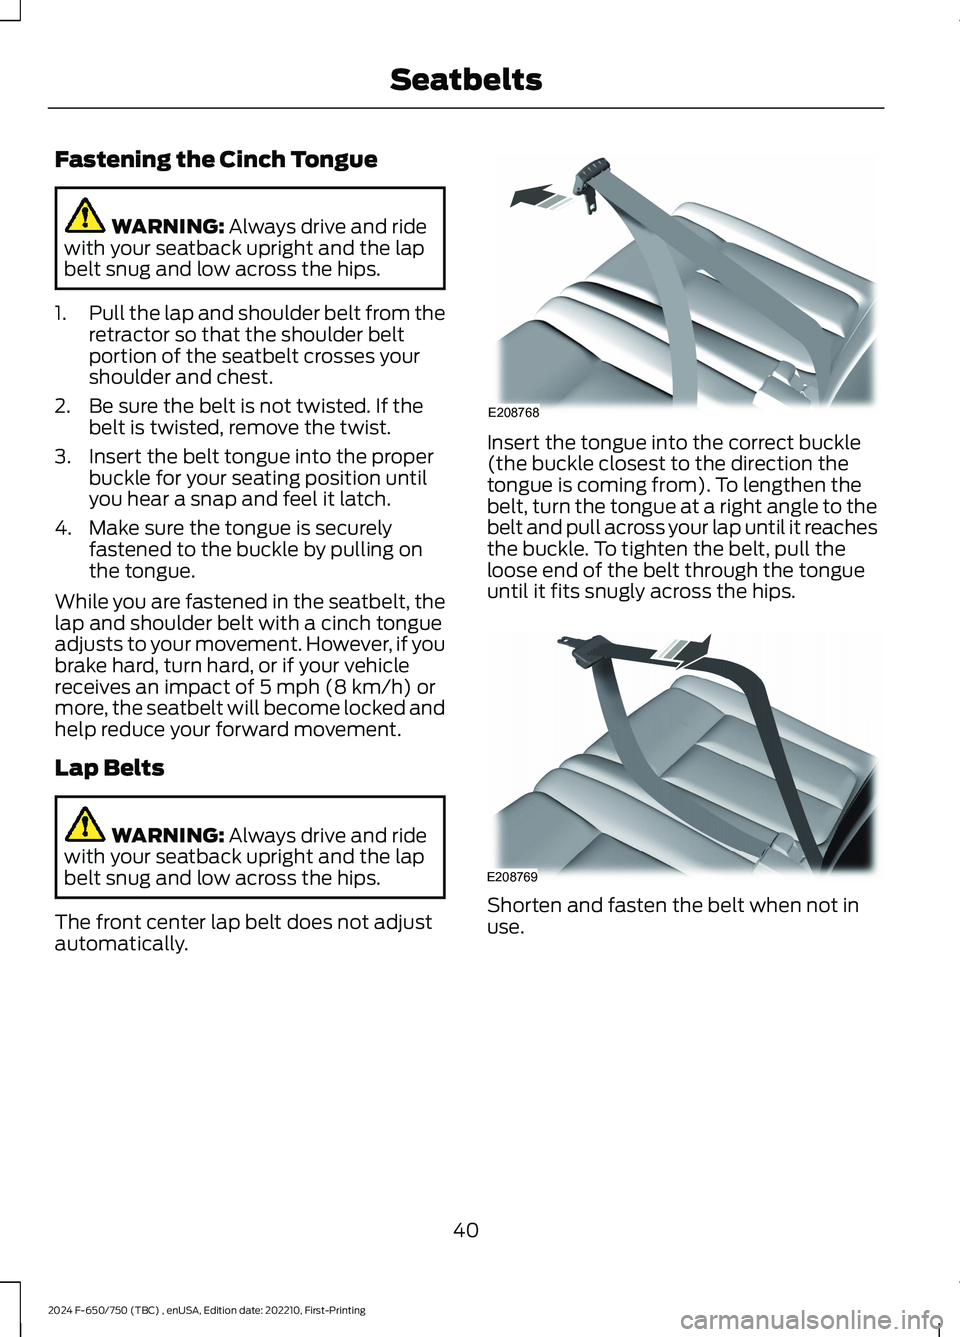
Insert the tongue into the correct buckle(the buckle closest to the direction thetongue is coming from). To lengthen thebelt, turn the tongue at a right angle to thebelt and pull across your lap until it reachesthe buckle. To tighten the belt, pull theloose end of the belt through the tongueuntil it fits snugly across the hips.
Shorten and fasten the belt when not inuse.
40
2024 F-650/750 (TBC) , enUSA, Edition date: 202210, First-PrintingSeatbeltsE208768 E208769
Page 45 of 386
Using Seatbelts During Pregnancy
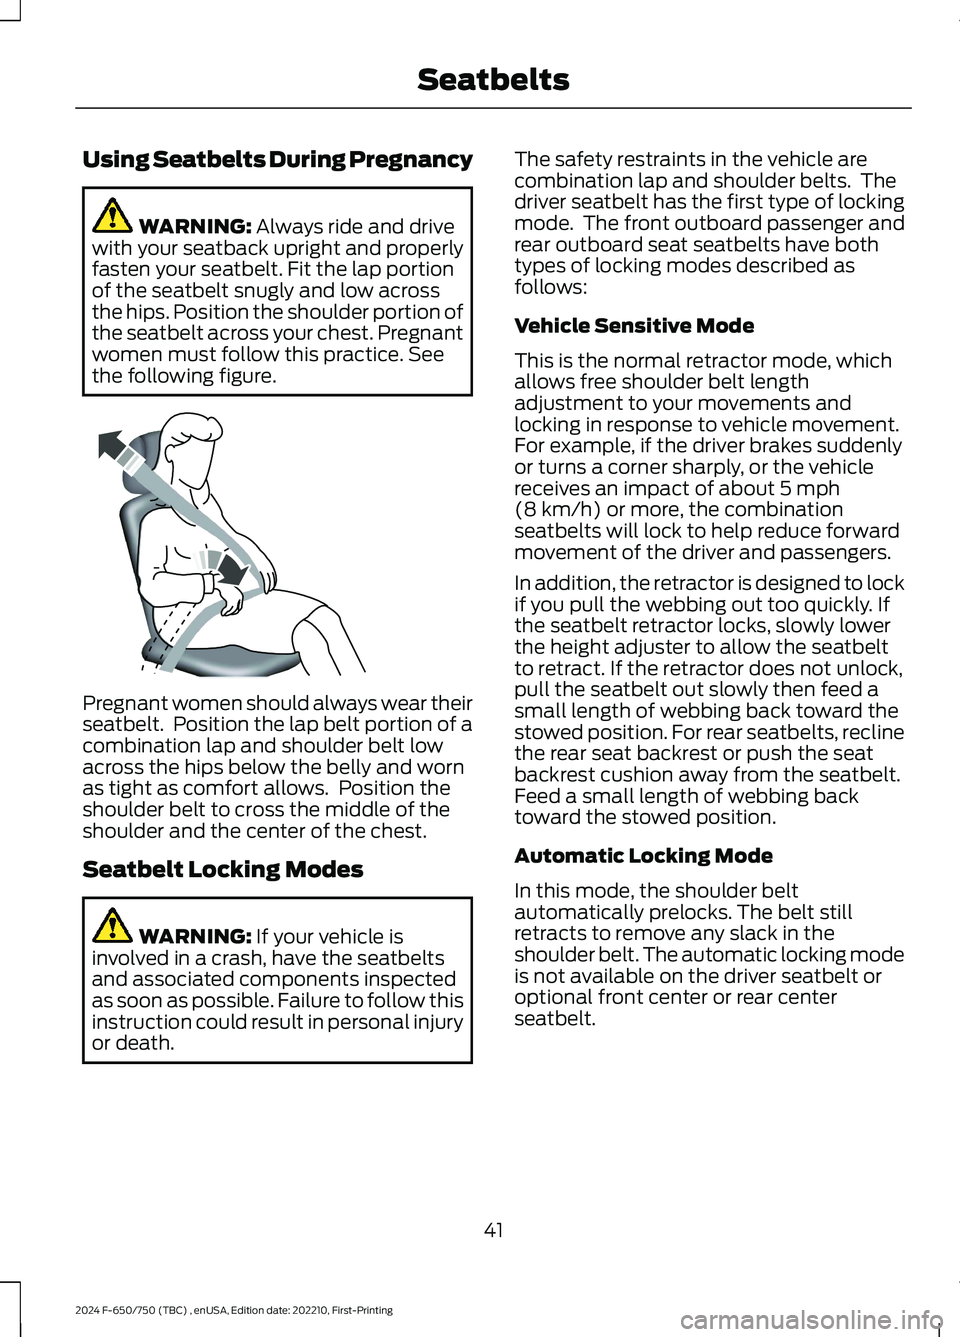
WARNING: Always ride and drivewith your seatback upright and properlyfasten your seatbelt. Fit the lap portionof the seatbelt snugly and low acrossthe hips. Position the shoulder portion ofthe seatbelt across your chest. Pregnantwomen must follow this practice. Seethe following figure.
Pregnant women should always wear theirseatbelt. Position the lap belt portion of acombination lap and shoulder belt lowacross the hips below the belly and wornas tight as comfort allows. Position theshoulder belt to cross the middle of theshoulder and the center of the chest.
Seatbelt Locking Modes
WARNING: If your vehicle isinvolved in a crash, have the seatbeltsand associated components inspectedas soon as possible. Failure to follow thisinstruction could result in personal injuryor death.
The safety restraints in the vehicle arecombination lap and shoulder belts. Thedriver seatbelt has the first type of lockingmode. The front outboard passenger andrear outboard seat seatbelts have bothtypes of locking modes described asfollows:
Vehicle Sensitive Mode
This is the normal retractor mode, whichallows free shoulder belt lengthadjustment to your movements andlocking in response to vehicle movement.For example, if the driver brakes suddenlyor turns a corner sharply, or the vehiclereceives an impact of about 5 mph(8 km/h) or more, the combinationseatbelts will lock to help reduce forwardmovement of the driver and passengers.
In addition, the retractor is designed to lockif you pull the webbing out too quickly. Ifthe seatbelt retractor locks, slowly lowerthe height adjuster to allow the seatbeltto retract. If the retractor does not unlock,pull the seatbelt out slowly then feed asmall length of webbing back toward thestowed position. For rear seatbelts, reclinethe rear seat backrest or push the seatbackrest cushion away from the seatbelt.Feed a small length of webbing backtoward the stowed position.
Automatic Locking Mode
In this mode, the shoulder beltautomatically prelocks. The belt stillretracts to remove any slack in theshoulder belt. The automatic locking modeis not available on the driver seatbelt oroptional front center or rear centerseatbelt.
41
2024 F-650/750 (TBC) , enUSA, Edition date: 202210, First-PrintingSeatbeltsE142590
Page 46 of 386
When to Use the Automatic LockingMode
Use this mode any time a child safety seat,except a booster, is installed in passengerfront or rear seating positions. Properlyrestrain children 12 years old and under ina rear seating position whenever possible.See Child Safety (page 25).
How to Use the Automatic Locking Mode
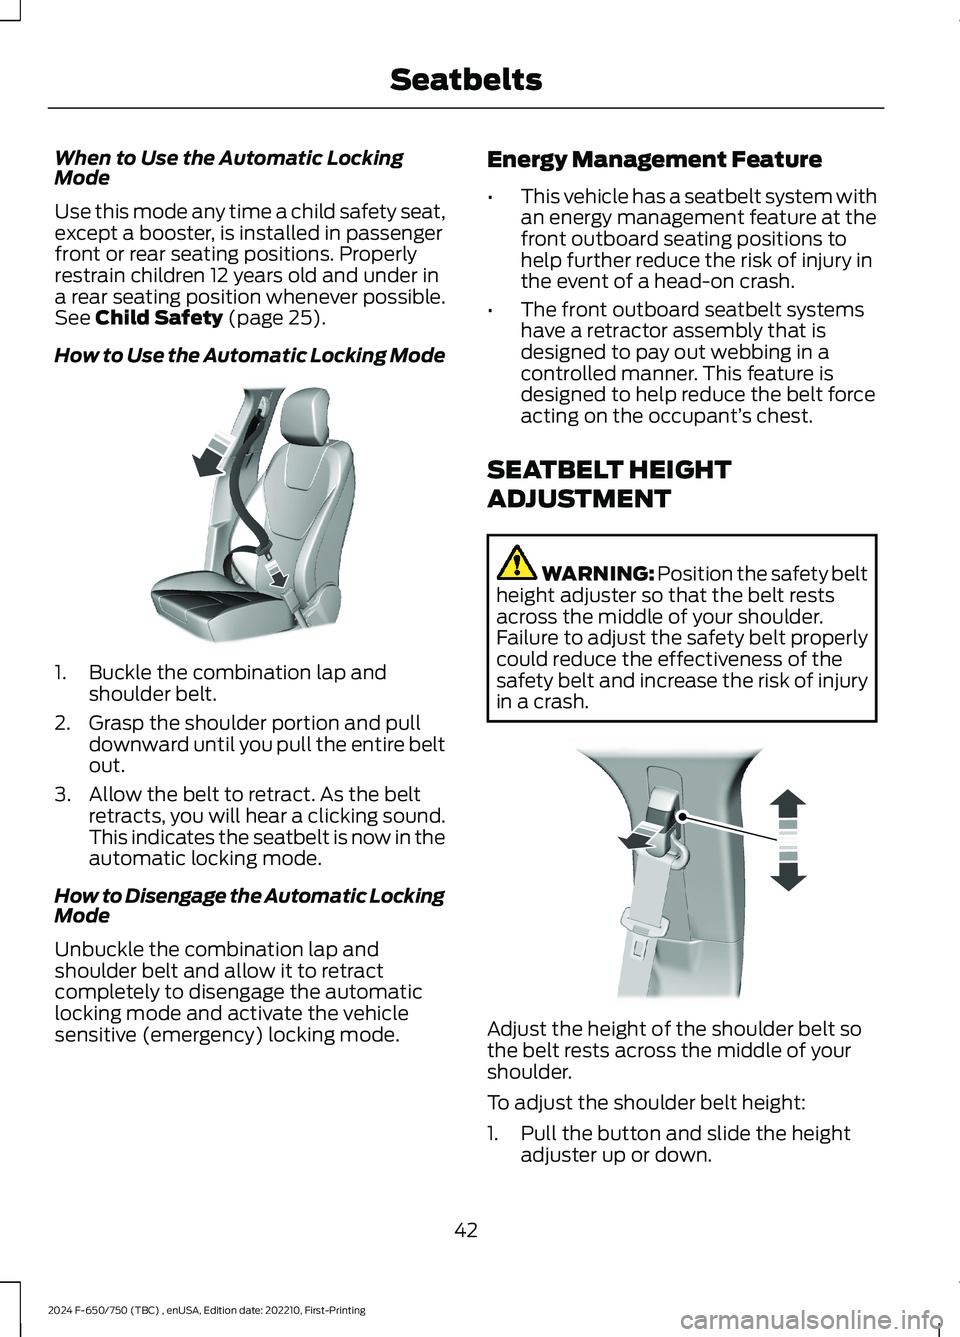
1.Buckle the combination lap andshoulder belt.
2.Grasp the shoulder portion and pulldownward until you pull the entire beltout.
3.Allow the belt to retract. As the beltretracts, you will hear a clicking sound.This indicates the seatbelt is now in theautomatic locking mode.
How to Disengage the Automatic LockingMode
Unbuckle the combination lap andshoulder belt and allow it to retractcompletely to disengage the automaticlocking mode and activate the vehiclesensitive (emergency) locking mode.
Energy Management Feature
•This vehicle has a seatbelt system withan energy management feature at thefront outboard seating positions tohelp further reduce the risk of injury inthe event of a head-on crash.
•The front outboard seatbelt systemshave a retractor assembly that isdesigned to pay out webbing in acontrolled manner. This feature isdesigned to help reduce the belt forceacting on the occupant’s chest.
SEATBELT HEIGHT
ADJUSTMENT
WARNING: Position the safety beltheight adjuster so that the belt restsacross the middle of your shoulder.Failure to adjust the safety belt properlycould reduce the effectiveness of thesafety belt and increase the risk of injuryin a crash.
Adjust the height of the shoulder belt sothe belt rests across the middle of yourshoulder.
To adjust the shoulder belt height:
1.Pull the button and slide the heightadjuster up or down.
42
2024 F-650/750 (TBC) , enUSA, Edition date: 202210, First-PrintingSeatbeltsE142591 E145664
Page 49 of 386
4.While the safety belt warning light ison, buckle and then unbuckle thesafety belt. After Step 4, the safety beltwarning light flashes for confirmation.
•This will switch the feature off for thatseating position if it is currently on.
•This will switch the feature on for thatseating position if it is currently off.
CHILD RESTRAINT AND
SEATBELT MAINTENANCE
Inspect the vehicle seatbelts and childsafety seat systems periodically to makesure they work properly and are notdamaged. Inspect the vehicle and childrestraint seatbelts to make sure there areno nicks, tears or cuts. Replace ifnecessary. All vehicle seatbelt assemblies,including retractors, buckles, front seatbeltbuckle assemblies, buckle supportassemblies (slide bar-if equipped),shoulder belt height adjusters (ifequipped), shoulder belt guide on seatbackrest (if equipped), child safety seatLATCH and tether anchors, and attachinghardware, should be inspected after acrash. Read the child restraintmanufacturer's instructions for additionalinspection and maintenance informationspecific to the child restraint.
We recommend that all seatbeltassemblies in use in vehicles involved in acrash be replaced. However, if the crashwas minor and an authorized dealer findsthat the belts do not show damage andcontinue to operate properly, they do notneed to be replaced. Seatbelt assembliesnot in use during a crash should also beinspected and replaced if either damageor improper operation is noted.
Properly care for seatbelts. See VehicleCare (page 262).
SEATBELT EXTENSIONS
WARNING: Persons who fit intothe vehicle's seatbelt should not use anextension. Unnecessary use could resultin serious personal injury in the event ofa crash.
WARNING: Only use extensionsprovided free of charge by our dealers.The dealer will provide an extensiondesigned specifically for this vehicle,model year and seating position. The useof an extension intended for anothervehicle, model year or seating positionmay not offer you the full protection ofyour vehicle's seatbelt restraint system.
WARNING: Never use seatbeltextensions to install child restraints.
WARNING: Do not use extensionsto change the way the seatbelt fitsacross the torso, over the lap or to makethe seatbelt buckle easier to reach.
If, because of body size or driving position,it is not possible to properly fasten theseatbelt over your lap and shoulder, anextension that is compatible with theseatbelts is available free of charge fromour dealers. Only use our seatbeltextensions made by the original equipmentseatbelt manufacturer with our seatbelts.Ask your authorized dealer if your extensionis compatible with your vehicle restraintsystem.
45
2024 F-650/750 (TBC) , enUSA, Edition date: 202210, First-PrintingSeatbelts
Page 65 of 386
EXTERIOR MIRRORS
Auxiliary Convex Mirrors
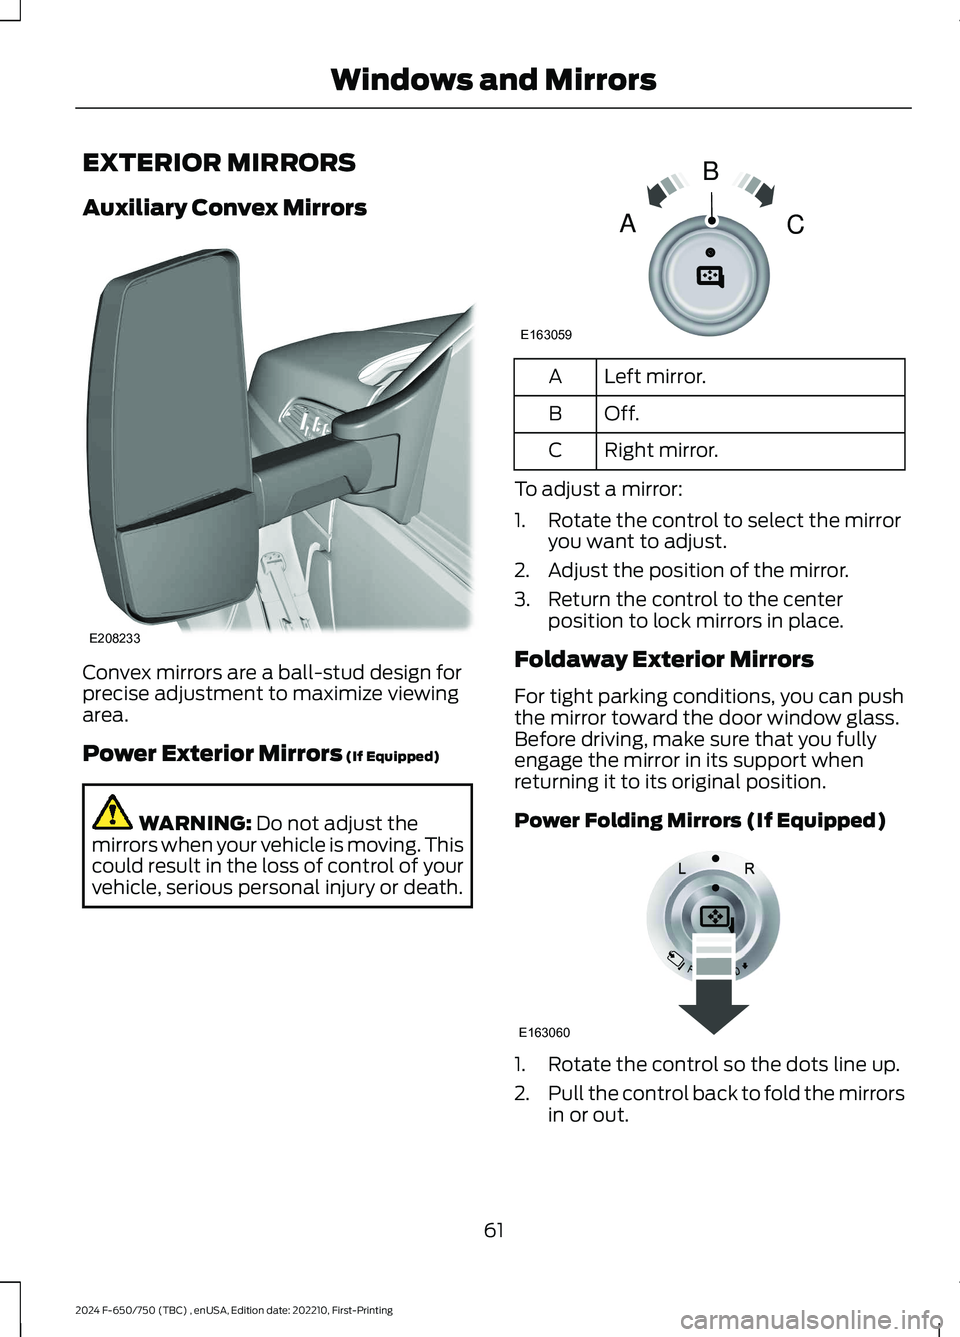
Convex mirrors are a ball-stud design forprecise adjustment to maximize viewingarea.
Power Exterior Mirrors (If Equipped)
WARNING: Do not adjust themirrors when your vehicle is moving. Thiscould result in the loss of control of yourvehicle, serious personal injury or death.
Left mirror.A
Off.B
Right mirror.C
To adjust a mirror:
1.Rotate the control to select the mirroryou want to adjust.
2.Adjust the position of the mirror.
3.Return the control to the centerposition to lock mirrors in place.
Foldaway Exterior Mirrors
For tight parking conditions, you can pushthe mirror toward the door window glass.Before driving, make sure that you fullyengage the mirror in its support whenreturning it to its original position.
Power Folding Mirrors (If Equipped)
1.Rotate the control so the dots line up.
2.Pull the control back to fold the mirrorsin or out.
61
2024 F-650/750 (TBC) , enUSA, Edition date: 202210, First-PrintingWindows and MirrorsE208233 E163059BAC E163060
Page 66 of 386

Note: If you repeatedly fold and unfold themirrors several times within one minute, thesystem may disable to protect the motorsfrom overheating. It resets to normalfunction automatically within three to fiveminutes.
You can also fold a mirror manually bypushing it toward the door window glass.After you manually adjust the mirror, youneed to reset it.
To reset the power folding mirror systemand return it to its normal function:
•Fold the mirror manually by pushing ittoward the door window glass.
•Use the power fold control to fold andunfold the mirror two or three times.The mirror makes a sound as it resets.
Heated Exterior Mirrors (If Equipped)
See Heated Exterior Mirrors (page 88).
Signal Indicator Mirrors (If Equipped)
The outer portion of the appropriate mirrorhousing blinks when you use the directionindicator.
Clearance Lamps (If Equipped)
The lower, outer part of the mirror housingslight when you switch on the headlampsor parking lamps.
Telescoping Mirrors (If Equipped)
This feature lets you extend the mirrorabout 3 in (76 mm). It is useful whentowing a trailer. You can manually pull outor push in the mirrors to the desiredposition.
PowerScope™ Power TelescopingMirrors (If Equipped)
This feature lets you position both mirrorsin or out at the same time. The control ison the door trim panel.
Telescope out.A
Telescope in.B
62
2024 F-650/750 (TBC) , enUSA, Edition date: 202210, First-PrintingWindows and MirrorsE163061 E163062BA
Page 86 of 386
Lane Departure Warning System
ActionMessage
The system has detected a condition thathas caused the system to be temporarilyunavailable. If the message continues todisplay, have the system checked as soonas possible.
Front Camera Temporarily Not Available
The system has detected a condition thatrequires you to clean the windshield in orderfor it to operate properly.
Front Camera Low Visibility Clean Screen
The system requires service, have thesystem checked as soon as possible.Front Camera Malfunction Service Required
The system requests you to keep yourhands on the steering wheel.Keep Hands on Steering Wheel
Maintenance
ActionMessage
Stop your vehicle as soon as safely possibleand turn off the engine. Check the oil level,if the warning stays on or continues to comeon with your engine running, have yourvehicle checked as soon as possible.
Low Engine Oil Pressure
The engine oil life is low and needs to bechanged soon.Change Engine Oil Soon
The engine oil life is low and needs to bechanged immediately.Oil Change Required
The brake fluid level is low, have the systemchecked as soon as possible.Brake Fluid Level Low
The brake system requires service. Stopyour vehicle in a safe place. Have thesystem checked as soon as possible.
Check Brake System
Your vehicle is still in transport or factorymode. This may not allow some featuresto operate properly. Have your vehiclechecked as soon as possible.
Factory Mode Contact Dealer
Transport Mode Contact Dealer
The powertrain requires service.See Manual
82
2024 F-650/750 (TBC) , enUSA, Edition date: 202210, First-PrintingInformation Displays