2024 CHEVROLET SILVERADO EV battery
[x] Cancel search: batteryPage 129 of 429
Chevrolet Silverado EV Owner Manual (GMNA-Localizing-U.S./Canada-
16702912) - 2024 - CRC - 1/13/23
128 Instruments and Controls
delete the schedule, simply touch the Delete
Schedule button, at which point you will be
prompted to confirm your decision.
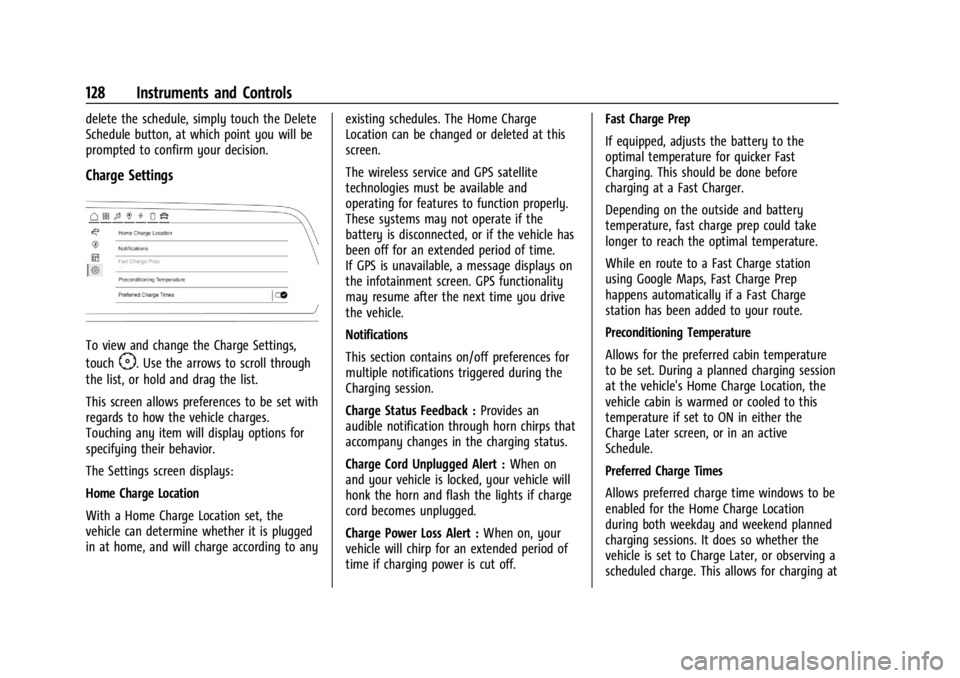
Charge Settings
To view and change the Charge Settings,
touch
F. Use the arrows to scroll through
the list, or hold and drag the list.
This screen allows preferences to be set with
regards to how the vehicle charges.
Touching any item will display options for
specifying their behavior.
The Settings screen displays:
Home Charge Location
With a Home Charge Location set, the
vehicle can determine whether it is plugged
in at home, and will charge according to any existing schedules. The Home Charge
Location can be changed or deleted at this
screen.
The wireless service and GPS satellite
technologies must be available and
operating for features to function properly.
These systems may not operate if the
battery is disconnected, or if the vehicle has
been off for an extended period of time.
If GPS is unavailable, a message displays on
the infotainment screen. GPS functionality
may resume after the next time you drive
the vehicle.
Notifications
This section contains on/off preferences for
multiple notifications triggered during the
Charging session.
Charge Status Feedback :
Provides an
audible notification through horn chirps that
accompany changes in the charging status.
Charge Cord Unplugged Alert : When on
and your vehicle is locked, your vehicle will
honk the horn and flash the lights if charge
cord becomes unplugged.
Charge Power Loss Alert : When on, your
vehicle will chirp for an extended period of
time if charging power is cut off. Fast Charge Prep
If equipped, adjusts the battery to the
optimal temperature for quicker Fast
Charging. This should be done before
charging at a Fast Charger.
Depending on the outside and battery
temperature, fast charge prep could take
longer to reach the optimal temperature.
While en route to a Fast Charge station
using Google Maps, Fast Charge Prep
happens automatically if a Fast Charge
station has been added to your route.
Preconditioning Temperature
Allows for the preferred cabin temperature
to be set. During a planned charging session
at the vehicle's Home Charge Location, the
vehicle cabin is warmed or cooled to this
temperature if set to ON in either the
Charge Later screen, or in an active
Schedule.
Preferred Charge Times
Allows preferred charge time windows to be
enabled for the Home Charge Location
during both weekday and weekend planned
charging sessions. It does so whether the
vehicle is set to Charge Later, or observing a
scheduled charge. This allows for charging at
Page 134 of 429
Chevrolet Silverado EV Owner Manual (GMNA-Localizing-U.S./Canada-
16702912) - 2024 - CRC - 1/13/23
Instruments and Controls 133
overall vehicle energy use are shown. When
selected, distance driven, total energy,
energy usage bar diagram, and selectable
categories are displayed. Select a category
to learn more about how your vehicle uses
energy from the battery.
When selected, Add to Driver Display may
be chosen in the dialog.
Energy Efficiency :Displays a graph showing
the energy efficiency that has been used by
the vehicle over a recently driven distance.
When selected, regenerated range, and
instant efficiency is shown along with
average efficiency in the dialog.
When selected, Add to Driver Display may
be chosen in the dialog.
Trip
Trip Information : Trip 1 or 2 displays the
current distance traveled, in either
kilometers (km) or miles (mi), since the trip
odometer was last reset.
If equipped, Average Efficiency shows the
approximate average kilometers per kilowatt
hour kWh (km/kWh) or miles per kilowatt
hour kWh (mi/kWh). This number is
calculated based on the number of km/kWh
or mi/kWh recorded since the last time this
menu item was reset. This number only reflects the approximate average electrical
energy economy that the vehicle has at that
moment, and changes as driving conditions
change.
To reset these values, touch reset on the
touchscreen display when the Trip
Information dialog is selected.
When selected, the following options may
be chosen in the dialog: Reset Trip 1, Reset
Trip 2, and Add to Driver Display.
Current Trip :
Displays distance driven,
average efficiency, and time elapsed since
vehicle startup. It resets when you turn your
vehicle off.
When selected, Add to Driver Display may
be chosen in the dialog.
Head-Up Display (HUD)
{Warning
If the HUD image is too bright or too
high in your field of view, it may take
you more time to see things you need to
see when it is dark outside. Be sure to
keep the HUD image dim and placed low
in your field of view. If equipped, some vehicle information can be
projected as an image on the windshield via
the HUD lens on top of the instrument
panel.
Caution
If you try to use the HUD image as a
parking aid, you may misjudge the
distance and damage your vehicle. Do not
use the HUD image as a parking aid.
HUD information can be displayed in various
languages. The speedometer reading and
other numerical values can be displayed in
either English or metric units.
The language selection is changed through
the radio, and the units of measurement are
changed through the infotainment display.
See Settings 0166.
Page 137 of 429
Chevrolet Silverado EV Owner Manual (GMNA-Localizing-U.S./Canada-
16702912) - 2024 - CRC - 1/13/23
136 Instruments and Controls
The messages that do not require
immediate action can be acknowledged and
cleared by pressing
V. The messages that
require immediate action cannot be cleared
until that action is performed.
All messages should be taken seriously;
clearing the message does not correct the
problem.
If a SERVICE message appears, see your
dealer.
Follow the instructions given in the
messages. The system displays messages
regarding the following topics:
.Service Messages
.Fluid Levels
.Vehicle Security
.Brakes
.Ride Control Systems
.Advanced Driver Assistance Systems
.Cruise Control
.Lighting and Bulb Replacement
.Wiper/Washer Systems
.Doors and Windows
.Seat Belts
.Airbag Systems
.Propulsion
.Tire Pressure
.Battery
.Steering
Propulsion Power Messages
REDUCED ACCELERATION DRIVE
WITH CARE
This message displays when the vehicle's
propulsion power is reduced. A reduction in
propulsion power can affect the vehicle's
ability to accelerate. If this message is on,
but there is no observed reduction in
performance, proceed to your destination.
Under certain conditions, the performance
may be reduced the next time the vehicle is
driven. The vehicle may be driven while this
message is on, but maximum acceleration
and speed may be reduced. Anytime this
message stays on, or displays repeatedly,
the vehicle should be taken to your dealer
for service as soon as possible.
This message can be displayed when the
high voltage battery charge level is low. This
is normal behavior as the vehicle is limiting
power due to reduced battery capability. Under certain operating conditions
propulsion will be disabled. Try restarting
after the vehicle has been off for
two minutes.
PROPULSION POWER REDUCED DUE TO
TEMPERATURE
This message displays when the vehicle is
on, the battery temperature is low, and
when the vehicle’s performance is limited.
The duration of the limited vehicle
performance depends, in part, on the high
voltage battery charge level. If the high
voltage battery charge level is relatively
high, as the vehicle is driven, the battery
temperature will increase, and the vehicle
will return to normal operation. If the high
voltage battery charge level is relatively low
the vehicle will not return to normal
operation until charged.
Keep the vehicle plugged in, even when fully
charged, to keep the high voltage battery
temperature ready for the next drive. This is
important when outside temperatures are
extremely hot or cold.
Page 138 of 429
Chevrolet Silverado EV Owner Manual (GMNA-Localizing-U.S./Canada-
16702912) - 2024 - CRC - 1/13/23
Instruments and Controls 137
Vehicle Speed Messages
SPEED LIMITED TO XXX KM/H (MPH)
This message shows that the vehicle speed
has been limited to the speed displayed. The
limited speed is a protection for various
propulsion and vehicle systems, such as
lubrication, thermal, brakes, suspension,
Teen Driver if equipped, or tires.
Universal Remote System
SeeRadio Frequency Statement 0404.
Universal Remote System
Programming
If equipped, the Universal Garage Door
(Universal Remote) controls are located on
the infotainment screen.
This system can replace up to eight remote
control transmitters used to activate devices
such as garage door openers, security
systems, and home automation devices.
These instructions refer to a garage door
opener, but can be used for other devices. Do not use the Universal Remote system
with any garage door opener that does not
have the stop and reverse feature. This
includes any garage door opener model
manufactured before April 1, 1982.
Keep the original hand-held transmitter for
use in other vehicles as well as for future
programming. Erase the programming when
vehicle ownership is terminated. See
“Erasing Universal Remotes.”
To program a garage door opener, park
outside directly in line with and facing the
garage door opener receiver. Clear all people
and objects away from the garage door.
Make sure the hand-held transmitter has a
new battery for quick and accurate
transmission of the radio-frequency signal.
Programming the Universal Remote
System
Programming involves time-sensitive actions
and may time out, requiring the procedure
to be repeated. Read these instructions
completely before programming the
Universal Remote system. It may help to
have another person assist with the
programming process. 1. On the infotainment home screen,
navigate to the Universal Remote
controls.
2. Hold the end of the hand-held transmitter about 3 to 8 cm (1 to 3 in)
away from the rear-view mirror. The
hand-held transmitter was supplied by
the manufacturer of the garage door
opener.
3. Select the “Add Remotes” option on the
infotainment screen.
4. Press and hold the hand-held transmitter button. Do not release the hand-held
transmitter button until “Signal Found”
appears on the infotainment screen.
5. Once the signal is found, test the Universal Remote System by pressing the
Test button. If your garage door moves,
then programming was successful. You
may need to press the Test button
several times. Indicate the successful
programming of a remote by pressing
the It Worked button. After successfully
programming a remote, there is no need
to complete Steps 6–10.
Page 141 of 429
Chevrolet Silverado EV Owner Manual (GMNA-Localizing-U.S./Canada-
16702912) - 2024 - CRC - 1/13/23
140 Lighting
Lighting
Exterior Lighting
Exterior Lamp Controls . . . . . . . . . . . . . . . . 140
Exterior Lamps Off Reminder . . . . . . . . . . . 141
Headlamp High/Low-Beam Changer . . . . 141
Flash-to-Pass . . . . . . . . . . . . . . . . . . . . . . . . . . . 141
Daytime Running Lamps (DRL) . . . . . . . . . 141
Automatic Headlamp System . . . . . . . . . . 142
Hazard Warning Flashers . . . . . . . . . . . . . . 142
Turn and Lane-Change Signals . . . . . . . . . 143
Exterior Cargo Lamps . . . . . . . . . . . . . . . . . . 143
Interior Lighting
Instrument Panel IlluminationControl . . . . . . . . . . . . . . . . . . . . . . . . . . . . . . 143
Dome Lamps . . . . . . . . . . . . . . . . . . . . . . . . . . 144
Reading Lamps . . . . . . . . . . . . . . . . . . . . . . . . 144
Lighting Features
Entry Lighting . . . . . . . . . . . . . . . . . . . . . . . . . 144
Exit Lighting . . . . . . . . . . . . . . . . . . . . . . . . . . . 145
Battery Load Management . . . . . . . . . . . . 145
Battery Power Protection . . . . . . . . . . . . . . 145
Exterior Lighting Battery Saver . . . . . . . . 146
Exterior Lighting
Exterior Lamp Controls
The exterior lamp controls, also known as
headlights, are in the Controls App on the
infotainment home screen. Select Controls >
Lights > Headlights.
To operate, select the following options:
Off : Turns off the exterior lamps.
For vehicles first sold in Canada, the
headlamps will automatically reactivate
when the vehicle is shifted out of P (Park).
Auto : Automatically turns on the
headlamps, parking lamps, taillamps,
instrument panel lights, roof marker lamps
(if equipped), license plate lamps or Daytime
Running Lamps (DRL), depending on outside
light conditions.
Parking : Turns on the parking lamps.
On : Turns on the exterior lamps.
IntelliBeam System
If equipped, this system turns the high-beam
headlamps on and off according to
surrounding traffic conditions. The system turns the high-beam headlamps
on when it is dark enough and there is no
other traffic present.
This light
bappears on the instrument
cluster when the IntelliBeam system is
enabled.
Turning the IntelliBeam On and Off
To enable and disable the IntelliBeam
system on the infotainment home screen,
select Control App > Lights >
bAuto
High Beams when the headlights are set in
the Auto position.
Driving with IntelliBeam
The system only activates the high beams
when driving over 40 km/h (25 mph).
The blue high-beam on light appears on the
instrument cluster when the high beams
are on.
There is a sensor near the top center of the
windshield that automatically controls the
system. Keep this area of the windshield
clear of debris to allow for best system
performance.
Page 146 of 429
Chevrolet Silverado EV Owner Manual (GMNA-Localizing-U.S./Canada-
16702912) - 2024 - CRC - 1/13/23
Lighting 145
All lamps will gradually fade out after about
30 seconds.
Entry lighting can be disabled manually by
closing all doors, pressing
Qon the remote
key, or starting the vehicle.
This feature can be changed. On the
infotainment home page, select Settings
T
VehicleTVehicle Locator Lights.
Exit Lighting
Some exterior lamps and interior lamps turn
on when the driver door is opened after the
vehicle is turned off.
The exterior and interior lamps remain on
for a set amount of time, then automatically
turn off.
The interior lights turn on when the vehicle
is turned off.
The exterior lamps turn off immediately by
turning the exterior lamp control off.
This feature can be changed. On the
infotainment home screen, select Settings
T
VehicleTExit Lighting.
Battery Load Management
The vehicle has Electric Power Management
(EPM) that estimates the battery
temperature and state of charge. It then
adjusts the voltage for best performance
and extended life of the 12-volt battery.
When the battery state of charge is low, the
voltage is raised slightly to quickly increase
the charge. When the state of charge is
high, the voltage is lowered slightly to
prevent over charging. As this adjustment
occurs, you may see the voltage move up or
down on the voltmeter gauge or voltage
display on the Driver Information Center
(DIC), if equipped. This is normal. If a
problem occurs, an alert will be displayed.
If the electrical loads are very high, the
battery can be discharged when the vehicle
is stationary. A high electrical load occurs
when several features are on, such as:
headlamps, high beams, rear window
defogger, climate control fan at high speed,
heated seats, motor cooling fans, trailer
loads, and loads plugged into accessory
power outlets.
EPM works to prevent excessive discharge of
the battery by balancing the electrical
system output and the vehicle's electrical needs. In some cases, it can temporarily
reduce the power demands of some
accessories.
These actions occur in steps or levels
without being noticeable. In rare cases at
the highest levels of corrective action, this
action may be noticeable to the driver. If so,
a DIC battery voltage and charging message
displays. It is recommended that the driver
reduce the electrical loads as much as
possible. See
Driver Information Center (DIC)
(Base Level) 0129 or
Driver Information Center (DIC) (Uplevel)
0 130.
Battery Power Protection
This feature helps prevent the battery from
being drained if the interior courtesy lamps
or reading lamps are accidentally left on.
If any of these lamps are left on, they
automatically turn off after 10 minutes when
the vehicle is turned off. The lamps will not
come back on again until one of the
following occurs:
.The vehicle is started.
.The doors are closed and then re-opened.
Page 147 of 429
Chevrolet Silverado EV Owner Manual (GMNA-Localizing-U.S./Canada-
16702912) - 2024 - CRC - 1/13/23
146 Lighting
Exterior Lighting Battery Saver
The exterior lamps turn off about 10 minutes
after the vehicle is turned off, if the parking
lamps or headlamps have been manually
left on. This protects against draining the
battery. To restart the 10-minute timer, turn
the exterior lamp control to the
Oposition
and then back to the
;or2position.
To keep the lamps on for more than
10 minutes, the vehicle must be on.
Page 157 of 429
Chevrolet Silverado EV Owner Manual (GMNA-Localizing-U.S./Canada-
16702912) - 2024 - CRC - 1/13/23
156 Infotainment System
Compass
The Google Maps orientation can be
changed between the direction currently
traveling, pointing north, and route
overview. Touch the compass to switch
between these options.
To recenter the map to the current location,
touch the location icon.
Super Cruise
If equipped, Super Cruise highlights routes in
a specific outline. SeeSuper Cruise0227.
Electric Vehicle (EV) Features with
Google Maps
When vehicle data is shared with Google,
some of the Maps features for EVs are as
follows:
.Estimated battery charge level at arrival
.Estimated minimum charging time in
order to reach destination
If the vehicle needs to be charged to reach a
destination, charging stations may
automatically be added to a route.
Maps
Auto-downloaded Maps
Google Maps downloads maps automatically
for use when not connected to the Internet.
Offline maps make map data available to
vehicle features regardless of connectivity.
These offline maps are only available with
an applicable connected services plan.
To turn on auto-download: 1. Open Google Maps.
2. Touch the settings icon.
3. Touch Privacy center, then select Offline maps.
4. Select Auto-download offline maps.
5. Check the Internet connection and wait for the download to finish.
Downloading Offline Maps 1. Open Google Maps.
2. Touch Settings, then Offline maps.
3. Touch the Select your own map square icon.
4. Adjust the map to cover the desired area to download.
5. Touch Download.
Navigation Symbols
The following are the most common
symbols that may appear in Google Maps.
This indicates the vehicle’s current location
and direction on the map.
The destination pin marks the location of
the final destination. Touch the pin to view
the destination address or to add it or
remove it from the Favorites list. Hide the
information by touching the pin one more
time. It will automatically time out if no
action is taken.