2024 CHEVROLET SILVERADO EV radio
[x] Cancel search: radioPage 6 of 429

Chevrolet Silverado EV Owner Manual (GMNA-Localizing-U.S./Canada-
16702912) - 2024 - CRC - 1/17/23
Introduction 5
1.Air Vents 0177.
2. Windshield Wiper/Washer 098.
Turn and Lane-Change Signals 0143.
3. Instrument Cluster (Base Level) 0107 or
Instrument Cluster (Uplevel) 0109.
4. Shift Switches. See Electric Drive Unit
0 200.
5. Infotainment Controls. See Overview
0 148.
6. Infotainment Display. See AM-FM Radio
0 152.
7. Light Sensor. See Automatic Headlamp
System 0142.
Vehicle Alarm System. See Vehicle
Security 032.
8. Dual Automatic Climate Control System
0174.
9. Power Outlets 099.
10. USB Port 0154.
11. Steering Wheel Controls 0149.
Driver Information Center (DIC) Controls.
See Driver Information Center (DIC) (Base
Level) 0129 or
Driver Information Center (DIC) (Uplevel)
0 130.
12. Horn 098. 13.
Steering Wheel Adjustment 097 (Out
of View).
14. Trailer Brake Control Panel. See “Integrated Trailer Brake Control System”
under Towing Equipment 0301.
15. Adaptive Cruise Control (Advanced) 0217.
Forward Collision Alert (FCA) System
0 261.
16. Data Link Connector (DLC) (Out of View). SeeService Vehicle Soon Light (Propulsion
System Failure) 0115.
17. Manual Hood Release.
18. Fuse Block Cover.
19. Electric Parking Brake 0205
Tow/Haul Mode. See Driver Mode Control
0 209.
Lane Keep Assist (LKA) 0274.
Power Hood Release. See Hood019.
Instrument Panel Illumination Control
0 143.
Page 8 of 429

Chevrolet Silverado EV Owner Manual (GMNA-Localizing-U.S./Canada-
16702912) - 2024 - CRC - 1/17/23
Introduction 7
1.Air Vents 0177.
2. Windshield Wiper/Washer 098.
Turn and Lane-Change Signals 0143.
3. Regenerative Braking 0206.
4. Instrument Cluster (Base Level) 0107 or
Instrument Cluster (Uplevel) 0109.
5. Driver Monitoring System.
6. Shift Switches. See Electric Drive Unit
0 200.
7. Infotainment Controls. See Overview
0 148.
8. Infotainment Display. See AM-FM Radio
0 152.
9. Light Sensor. See Automatic Headlamp
System 0142.
Vehicle Alarm System. See Vehicle
Security 032.
10. Dual Automatic Climate Control System
0174.
11. USB Port 0154.
12. Power Outlets 099.
13. Wireless Charging 0104. 14.
Steering Wheel Controls 0149.
Driver Information Center (DIC) Controls.
See Driver Information Center (DIC) (Base
Level) 0129 or
Driver Information Center (DIC) (Uplevel)
0 130.
15. Horn 098.
16. Steering Wheel Adjustment 097 (Out
of View).
17. Trailer Brake Control Panel. See “Integrated Trailer Brake Control System”
under Towing Equipment 0301.
18. Adaptive Cruise Control (Advanced) 0217.
Forward Collision Alert (FCA) System
0 261.
Heated Steering Wheel 097 (If
Equipped).
19. Data Link Connector (DLC) (Out of View). SeeService Vehicle Soon Light (Propulsion
System Failure) 0115.
20. Manual Hood Release.
21. Fuse Block Cover. 22.
Electric Parking Brake 0205.
Air Suspension 0211.
Lane Keep Assist (LKA) 0274.
Power Hood Release. See Hood019.
Power Tailgate Release. See Tailgate
0 28.
Instrument Panel Illumination Control
0 143.
Page 10 of 429

Chevrolet Silverado EV Owner Manual (GMNA-Localizing-U.S./Canada-
16702912) - 2024 - CRC - 1/23/23
Keys, Doors, and Windows 9
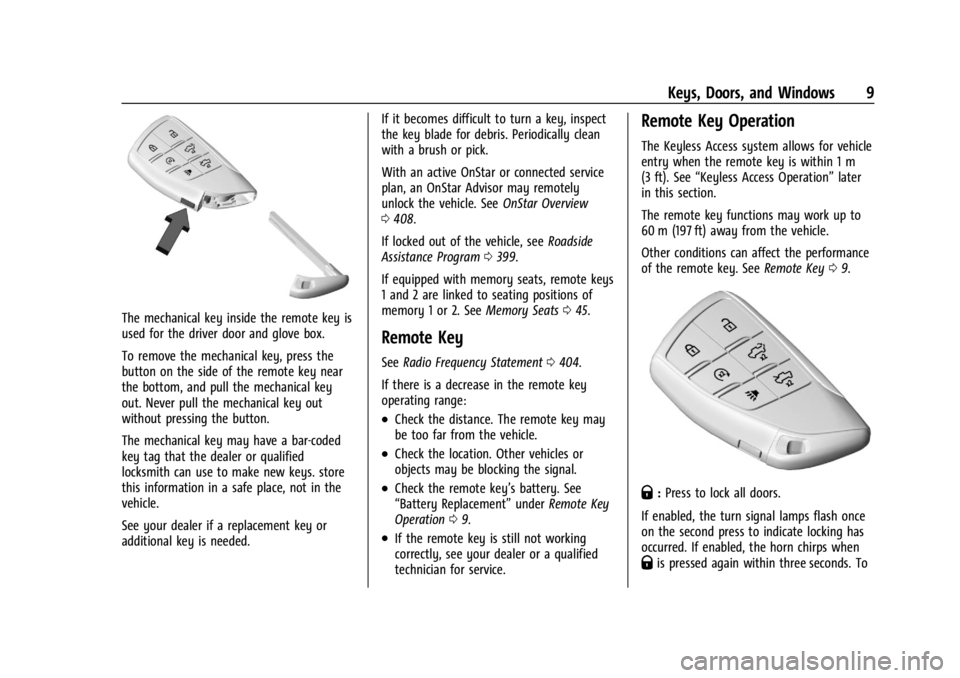
The mechanical key inside the remote key is
used for the driver door and glove box.
To remove the mechanical key, press the
button on the side of the remote key near
the bottom, and pull the mechanical key
out. Never pull the mechanical key out
without pressing the button.
The mechanical key may have a bar-coded
key tag that the dealer or qualified
locksmith can use to make new keys. store
this information in a safe place, not in the
vehicle.
See your dealer if a replacement key or
additional key is needed.If it becomes difficult to turn a key, inspect
the key blade for debris. Periodically clean
with a brush or pick.
With an active OnStar or connected service
plan, an OnStar Advisor may remotely
unlock the vehicle. See
OnStar Overview
0 408.
If locked out of the vehicle, see Roadside
Assistance Program 0399.
If equipped with memory seats, remote keys
1 and 2 are linked to seating positions of
memory 1 or 2. See Memory Seats045.
Remote Key
See Radio Frequency Statement 0404.
If there is a decrease in the remote key
operating range:
.Check the distance. The remote key may
be too far from the vehicle.
.Check the location. Other vehicles or
objects may be blocking the signal.
.Check the remote key’s battery. See
“Battery Replacement” underRemote Key
Operation 09.
.If the remote key is still not working
correctly, see your dealer or a qualified
technician for service.
Remote Key Operation
The Keyless Access system allows for vehicle
entry when the remote key is within 1 m
(3 ft). See “Keyless Access Operation” later
in this section.
The remote key functions may work up to
60 m (197 ft) away from the vehicle.
Other conditions can affect the performance
of the remote key. See Remote Key09.
Q:Press to lock all doors.
If enabled, the turn signal lamps flash once
on the second press to indicate locking has
occurred. If enabled, the horn chirps when
Qis pressed again within three seconds. To
Page 34 of 429

Chevrolet Silverado EV Owner Manual (GMNA-Localizing-U.S./Canada-
16702912) - 2024 - CRC - 1/23/23
Keys, Doors, and Windows 33
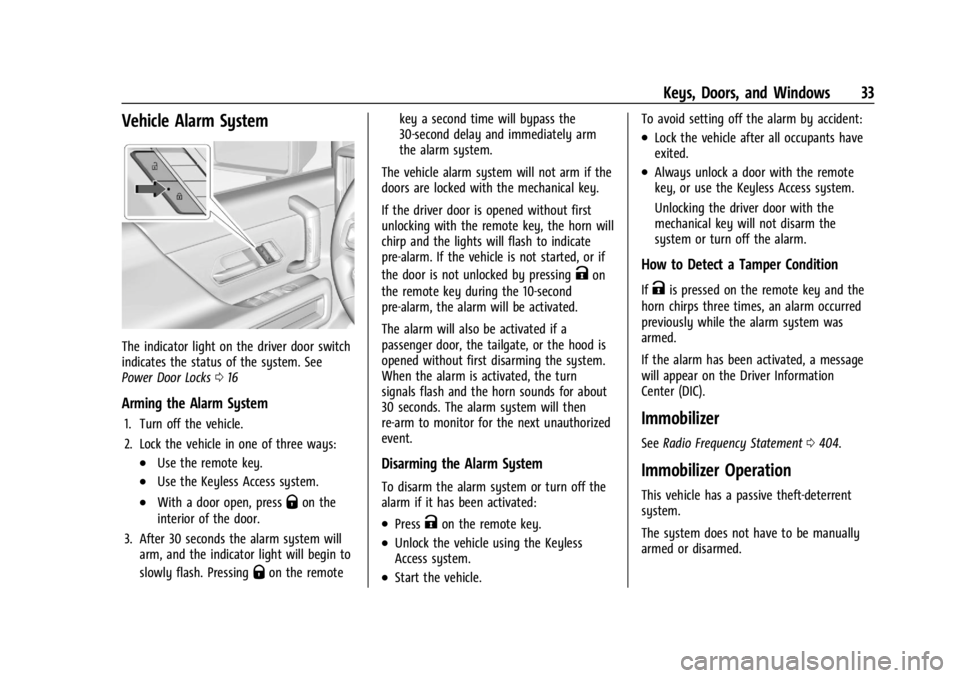
Vehicle Alarm System
The indicator light on the driver door switch
indicates the status of the system. See
Power Door Locks016
Arming the Alarm System
1. Turn off the vehicle.
2. Lock the vehicle in one of three ways:
.Use the remote key.
.Use the Keyless Access system.
.With a door open, pressQon the
interior of the door.
3. After 30 seconds the alarm system will arm, and the indicator light will begin to
slowly flash. Pressing
Qon the remote key a second time will bypass the
30-second delay and immediately arm
the alarm system.
The vehicle alarm system will not arm if the
doors are locked with the mechanical key.
If the driver door is opened without first
unlocking with the remote key, the horn will
chirp and the lights will flash to indicate
pre-alarm. If the vehicle is not started, or if
the door is not unlocked by pressing
Kon
the remote key during the 10-second
pre-alarm, the alarm will be activated.
The alarm will also be activated if a
passenger door, the tailgate, or the hood is
opened without first disarming the system.
When the alarm is activated, the turn
signals flash and the horn sounds for about
30 seconds. The alarm system will then
re-arm to monitor for the next unauthorized
event.
Disarming the Alarm System
To disarm the alarm system or turn off the
alarm if it has been activated:
.PressKon the remote key.
.Unlock the vehicle using the Keyless
Access system.
.Start the vehicle. To avoid setting off the alarm by accident:
.Lock the vehicle after all occupants have
exited.
.Always unlock a door with the remote
key, or use the Keyless Access system.
Unlocking the driver door with the
mechanical key will not disarm the
system or turn off the alarm.
How to Detect a Tamper Condition
IfKis pressed on the remote key and the
horn chirps three times, an alarm occurred
previously while the alarm system was
armed.
If the alarm has been activated, a message
will appear on the Driver Information
Center (DIC).
Immobilizer
See Radio Frequency Statement 0404.
Immobilizer Operation
This vehicle has a passive theft-deterrent
system.
The system does not have to be manually
armed or disarmed.
Page 105 of 429

Chevrolet Silverado EV Owner Manual (GMNA-Localizing-U.S./Canada-
16702912) - 2024 - CRC - 1/13/23
104 Instruments and Controls
Troubleshooting
The power outlets will be momentarily
unavailable at the start and the end of a
350 kW DC Fast Charge. This is normal
operation.
For any error messages that can not be
resolved by resetting fault mode as
discussed earlier in this section, see your
dealer.
{Warning
The power outlets contain high-voltage
electrical equipment. Disassembling the
power outlets may result in electrical
shock causing personal injury or death.
Never attempt to disassemble a power
outlet.
Wireless Charging
If equipped and enabled, the vehicle has
wireless charging in the bin below the
climate control system. The system operates
at 145 kHz and wirelessly charges one Qi
compatible smartphone. The power output
of the system is capable of charging at a
rate up to 3 amp (15 W), as requested by
the compatible smartphone. SeeRadio
Frequency Statement 0404.
{Warning
Wireless charging may affect the
operation of an implanted pacemaker or
other medical devices. If you have one, it
is recommended to consult with your
doctor before using the wireless charging
system.
The vehicle must be on or Retained
Accessory Power (RAP) must be active. The
wireless charging feature may not correctly
indicate charging when the vehicle is in RAP,
during a Bluetooth phone call, or when
phone projection (e.g. Apple CarPlay/Android
Auto) is active. See Power Modes0197.
The operating temperature is −40 °C (−40 °F)
to 85 °C (185 °F) for the charging system and
0 °C (32 °F) to 35 °C (95 °F) for the phone.
A charging stopped alert may be displayed
on the infotainment screen, if the wireless
charger or smartphone are outside of
normal operating temperature. Charging will
automatically resume when a normal
operating temperature is reached.
{Warning
Remove all objects from the charger
before charging your compatible
smartphone. Objects, such as coins, keys,
rings, paper clips, or cards, between the
smartphone and charger may become
very hot.
On the rare occasion that the charging
system does not detect an object, and
the object gets wedged between the
smartphone and charger, remove the
smartphone and allow the object to cool
before removing it from the charger, to
prevent burns.
To charge a compatible smartphone: 1. Confirm the smartphone is capable of wireless charging.
2. The wireless charger is below the climate control system.
Page 115 of 429

Chevrolet Silverado EV Owner Manual (GMNA-Localizing-U.S./Canada-
16702912) - 2024 - CRC - 1/13/23
114 Instruments and Controls
Passenger Airbag Status Indicator
The vehicle has a passenger sensing system.
SeePassenger Sensing System 065 for
important safety information. The overhead
console has a passenger airbag status
indicator.
When the vehicle is started, the passenger
airbag status indicator will light ON and OFF
for several seconds as a system check. Then,
after several more seconds, the status
indicator will light either ON or OFF to let
you know the status of the front outboard
passenger frontal airbag.
If the word ON is lit on the passenger
airbag status indicator, it means that the
front outboard passenger frontal airbag is
allowed to inflate.
If the word OFF is lit on the passenger
airbag status indicator, it means that the
passenger sensing system has turned off the
front outboard passenger frontal airbag. If, after several seconds, both status
indicator lights remain on, or if there are no
lights at all, or if the airbag readiness light
is on, there may be a problem with the
lights or the passenger sensing system. See
your dealer for service right away.
{Warning
If the airbag readiness light ever comes
on and stays on, it means that
something may be wrong with the airbag
system. To help avoid injury to yourself
or others, have the vehicle serviced right
away. See
Airbag Readiness Light 0113
for more information, including important
safety information.
Charging System Light
The charging system light comes on briefly
when the vehicle is started, as a check to
show the light is working. If the light stays on, or comes on while
driving, there could be a problem with the
electrical charging system. Have it checked
by your dealer. Driving while this light is on
could drain the 12-volt battery.
If a short distance must be driven with the
light on, be sure to turn off all accessories,
such as the radio. Find a safe place to stop
the vehicle.
Low State of Charge Light
This light comes on when the vehicle state
of charge is low. Proceed to a charging
station to charge the vehicle.
Charge Cord Connected Light
Page 134 of 429

Chevrolet Silverado EV Owner Manual (GMNA-Localizing-U.S./Canada-
16702912) - 2024 - CRC - 1/13/23
Instruments and Controls 133
overall vehicle energy use are shown. When
selected, distance driven, total energy,
energy usage bar diagram, and selectable
categories are displayed. Select a category
to learn more about how your vehicle uses
energy from the battery.
When selected, Add to Driver Display may
be chosen in the dialog.
Energy Efficiency :Displays a graph showing
the energy efficiency that has been used by
the vehicle over a recently driven distance.
When selected, regenerated range, and
instant efficiency is shown along with
average efficiency in the dialog.
When selected, Add to Driver Display may
be chosen in the dialog.
Trip
Trip Information : Trip 1 or 2 displays the
current distance traveled, in either
kilometers (km) or miles (mi), since the trip
odometer was last reset.
If equipped, Average Efficiency shows the
approximate average kilometers per kilowatt
hour kWh (km/kWh) or miles per kilowatt
hour kWh (mi/kWh). This number is
calculated based on the number of km/kWh
or mi/kWh recorded since the last time this
menu item was reset. This number only reflects the approximate average electrical
energy economy that the vehicle has at that
moment, and changes as driving conditions
change.
To reset these values, touch reset on the
touchscreen display when the Trip
Information dialog is selected.
When selected, the following options may
be chosen in the dialog: Reset Trip 1, Reset
Trip 2, and Add to Driver Display.
Current Trip :
Displays distance driven,
average efficiency, and time elapsed since
vehicle startup. It resets when you turn your
vehicle off.
When selected, Add to Driver Display may
be chosen in the dialog.
Head-Up Display (HUD)
{Warning
If the HUD image is too bright or too
high in your field of view, it may take
you more time to see things you need to
see when it is dark outside. Be sure to
keep the HUD image dim and placed low
in your field of view. If equipped, some vehicle information can be
projected as an image on the windshield via
the HUD lens on top of the instrument
panel.
Caution
If you try to use the HUD image as a
parking aid, you may misjudge the
distance and damage your vehicle. Do not
use the HUD image as a parking aid.
HUD information can be displayed in various
languages. The speedometer reading and
other numerical values can be displayed in
either English or metric units.
The language selection is changed through
the radio, and the units of measurement are
changed through the infotainment display.
See Settings 0166.
Page 138 of 429

Chevrolet Silverado EV Owner Manual (GMNA-Localizing-U.S./Canada-
16702912) - 2024 - CRC - 1/13/23
Instruments and Controls 137
Vehicle Speed Messages
SPEED LIMITED TO XXX KM/H (MPH)
This message shows that the vehicle speed
has been limited to the speed displayed. The
limited speed is a protection for various
propulsion and vehicle systems, such as
lubrication, thermal, brakes, suspension,
Teen Driver if equipped, or tires.
Universal Remote System
SeeRadio Frequency Statement 0404.
Universal Remote System
Programming
If equipped, the Universal Garage Door
(Universal Remote) controls are located on
the infotainment screen.
This system can replace up to eight remote
control transmitters used to activate devices
such as garage door openers, security
systems, and home automation devices.
These instructions refer to a garage door
opener, but can be used for other devices. Do not use the Universal Remote system
with any garage door opener that does not
have the stop and reverse feature. This
includes any garage door opener model
manufactured before April 1, 1982.
Keep the original hand-held transmitter for
use in other vehicles as well as for future
programming. Erase the programming when
vehicle ownership is terminated. See
“Erasing Universal Remotes.”
To program a garage door opener, park
outside directly in line with and facing the
garage door opener receiver. Clear all people
and objects away from the garage door.
Make sure the hand-held transmitter has a
new battery for quick and accurate
transmission of the radio-frequency signal.
Programming the Universal Remote
System
Programming involves time-sensitive actions
and may time out, requiring the procedure
to be repeated. Read these instructions
completely before programming the
Universal Remote system. It may help to
have another person assist with the
programming process. 1. On the infotainment home screen,
navigate to the Universal Remote
controls.
2. Hold the end of the hand-held transmitter about 3 to 8 cm (1 to 3 in)
away from the rear-view mirror. The
hand-held transmitter was supplied by
the manufacturer of the garage door
opener.
3. Select the “Add Remotes” option on the
infotainment screen.
4. Press and hold the hand-held transmitter button. Do not release the hand-held
transmitter button until “Signal Found”
appears on the infotainment screen.
5. Once the signal is found, test the Universal Remote System by pressing the
Test button. If your garage door moves,
then programming was successful. You
may need to press the Test button
several times. Indicate the successful
programming of a remote by pressing
the It Worked button. After successfully
programming a remote, there is no need
to complete Steps 6–10.