2024 CHEVROLET SILVERADO EV buttons
[x] Cancel search: buttonsPage 25 of 429
Chevrolet Silverado EV Owner Manual (GMNA-Localizing-U.S./Canada-
16702912) - 2024 - CRC - 1/23/23
24 Keys, Doors, and Windows
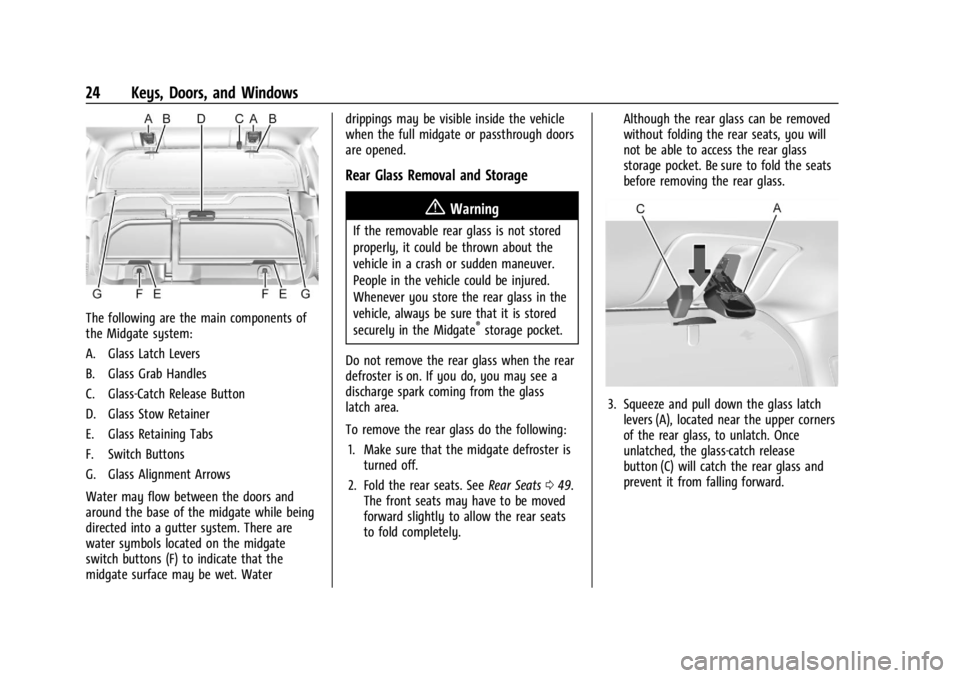
The following are the main components of
the Midgate system:
A. Glass Latch Levers
B. Glass Grab Handles
C. Glass-Catch Release Button
D. Glass Stow Retainer
E. Glass Retaining Tabs
F. Switch Buttons
G. Glass Alignment Arrows
Water may flow between the doors and
around the base of the midgate while being
directed into a gutter system. There are
water symbols located on the midgate
switch buttons (F) to indicate that the
midgate surface may be wet. Waterdrippings may be visible inside the vehicle
when the full midgate or passthrough doors
are opened.
Rear Glass Removal and Storage
{Warning
If the removable rear glass is not stored
properly, it could be thrown about the
vehicle in a crash or sudden maneuver.
People in the vehicle could be injured.
Whenever you store the rear glass in the
vehicle, always be sure that it is stored
securely in the Midgate
®storage pocket.
Do not remove the rear glass when the rear
defroster is on. If you do, you may see a
discharge spark coming from the glass
latch area.
To remove the rear glass do the following: 1. Make sure that the midgate defroster is turned off.
2. Fold the rear seats. See Rear Seats049.
The front seats may have to be moved
forward slightly to allow the rear seats
to fold completely. Although the rear glass can be removed
without folding the rear seats, you will
not be able to access the rear glass
storage pocket. Be sure to fold the seats
before removing the rear glass.
3. Squeeze and pull down the glass latch
levers (A), located near the upper corners
of the rear glass, to unlatch. Once
unlatched, the glass-catch release
button (C) will catch the rear glass and
prevent it from falling forward.
Page 47 of 429
Chevrolet Silverado EV Owner Manual (GMNA-Localizing-U.S./Canada-
16702912) - 2024 - CRC - 1/13/23
46 Seats and Restraints
3. Start the vehicle with the initial key orremote key. The DIC welcome message
should display the driver number of the
initial remote key.
Saving Seating Positions
Read these instructions completely before
saving memory positions.
To save preferred driving positions to
1 and 2: 1. Turn the vehicle on. A DIC welcome message may indicate the driver number
of the current remote key. See
“Identifying Driver Number” previously in
this section.
2. Adjust all available memory features to the desired driving position.
3. Press and release SET; a beep will sound.
4. Immediately upon releasing SET, press and hold memory button 1 or 2 matching
the current remote key number until two
beeps sound. If too much time passes
between releasing SET and pressing 1 or
2, the two beeps will not sound
indicating memory position were not
saved. Repeat Steps 3 and 4 to try again.
5. Repeat Steps 1–4 for the other remote key 1 or 2 using the other 1 or 2 memory
button. It is recommended to save the preferred
driving positions to both 1 and 2 if you are
the only driver.
To save the common exit seating position to
Bthat is used by all drivers for Manually
Recalling Seating Positions and Auto Seat
Exit Memory Recall features, repeat
Steps 1–4 using
B, the exit button.
Manually Recalling Seating Positions
Press and hold 1, 2, or
Bbutton until the
recall is complete, to recall the positions
previously saved to that button.
Manual Memory recall movement for 1, 2 or
Bbuttons may be initiated and will
complete to the saved memory position if
the vehicle is in or out of P (Park).
Enabling Automatic Recalls
.Seat Entry Memory moves the driver seat
to the selected 1 or 2 position when the
vehicle is started. Select Settings >
Vehicle > Seating Position > Seat Entry
Memory > ON or OFF. See “Auto Seat
Entry Memory Recall” later in this section.
.Seat Exit Memory moves the driver seat
to the preferred exit position of the
B
button when the vehicle is turned off and the door is opened. Select Settings >
Vehicle > Seating Position > Seat Exit
Memory > Select ON or OFF. See
“Auto
Seat Exit Memory Recall” later in this
section.
Auto Seat Entry Memory Recall
Seat Entry Memory will automatically begin
movement to the seating positions of the 1
or 2 button corresponding to remote key
number 1 or 2 detected by the vehicle when:
.The vehicle is turned ON.
.Seating positions have been previously
saved to the same 1 or 2 button. See
“Saving Seating Positions” previously in
this section.
.Seat Entry Memory is enabled. See
“Enabling Automatic Recalls” previously in
this section.
.The vehicle is in P (Park).
Seat Entry Memory Recall will continue if
the vehicle is shifted out of P (Park) prior to
reaching the saved memory position.
If the saved memory seat position does not
automatically recall, verify the recall is
enabled. See “Enabling Automatic Recalls”
previously in this section.
Page 48 of 429
Chevrolet Silverado EV Owner Manual (GMNA-Localizing-U.S./Canada-
16702912) - 2024 - CRC - 1/13/23
Seats and Restraints 47
If the memory seat recalls to the wrong
position, remote key number 1 or 2 may not
match the memory button number positions
they were saved to. Try the other remote
key or try saving the positions to the other
1 or 2 memory button. See“Saving Seating
Positions” previously in this section.
Automatic Seat Entry Memory recalls are
only available for remote key numbers 1 and
2. Remote keys 3–8 will not provide Seat
Entry Memory recalls.
Auto Seat Exit Memory Recall
Seat Exit Memory will begin movement to
the seating position of the
B
button when:
.The vehicle is turned off and the driver
door is open or opened within a
short time.
.A seating position has been previously
been saved to the
Bmemory button.
See “Saving Seating Positions” previously
in this section.
.Seat Exit Memory is enabled. See
“Enabling Automatic Recalls” previously in
this section.
.The vehicle is in P (Park). Seat Exit Memory recall will continue if the
vehicle is shifted out of P (Park) prior to
reaching the saved memory position.
Seat Exit Memory is not linked to a remote
key. The seating position saved to
Bis
used for all drivers.
Cancel Memory Seating Recalls
.During any memory recall:
Press a power seat control
Press SET memory button
.During Manual memory recall:
Release 1, 2, or
Bmemory button
.During Auto Seat Entry Memory Recall:
Turn vehicle off
Press SET, 1, 2, or
Bmemory buttons
.During Auto Seat Exit Memory Recall:
Press SET, 1, 2, or
Bmemory buttons
Obstructions
If something has blocked the seat while
recalling a memory position, the recall may
stop. Remove the obstruction and try the
recall again. If the memory position still
does not recall, see your dealer.
Heated and Ventilated Front
Seats
{Warning
If temperature change or pain to the skin
cannot be felt, the seat heater may cause
burns. To reduce the risk of burns, use
care when using the seat heater,
especially for long periods of time. Do
not place anything on the seat that
insulates against heat, such as a blanket,
cushion, cover, or similar item. This may
cause the seat heater to overheat. An
overheated seat heater may cause a burn
or may damage the seat.
Page 49 of 429
Chevrolet Silverado EV Owner Manual (GMNA-Localizing-U.S./Canada-
16702912) - 2024 - CRC - 1/13/23
48 Seats and Restraints
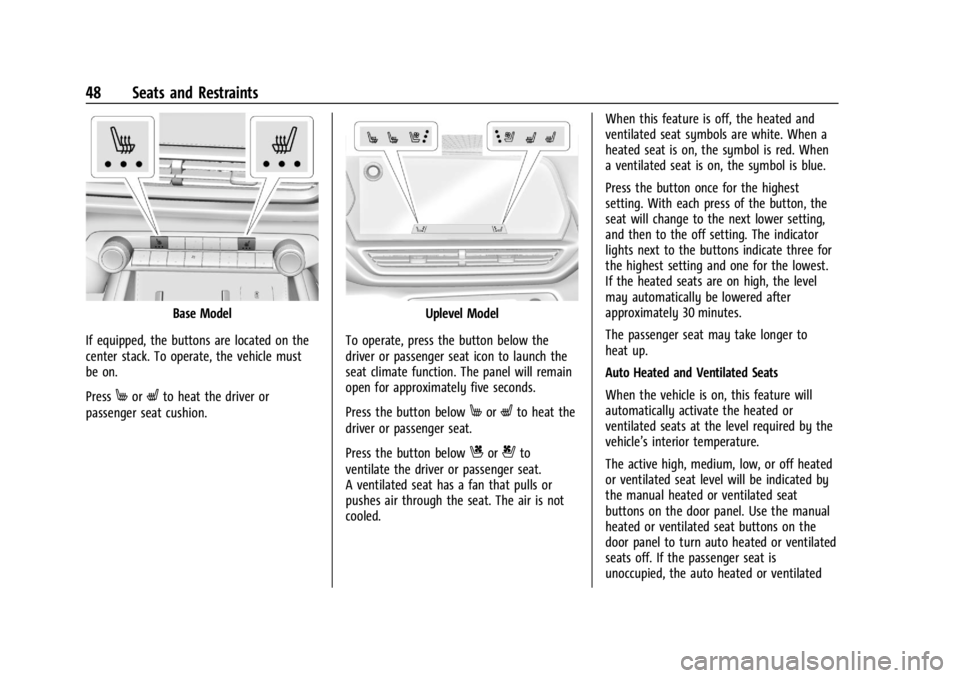
Base Model
If equipped, the buttons are located on the
center stack. To operate, the vehicle must
be on.
Press
MorLto heat the driver or
passenger seat cushion.
Uplevel Model
To operate, press the button below the
driver or passenger seat icon to launch the
seat climate function. The panel will remain
open for approximately five seconds.
Press the button below
MorLto heat the
driver or passenger seat.
Press the button below
Cor{to
ventilate the driver or passenger seat.
A ventilated seat has a fan that pulls or
pushes air through the seat. The air is not
cooled. When this feature is off, the heated and
ventilated seat symbols are white. When a
heated seat is on, the symbol is red. When
a ventilated seat is on, the symbol is blue.
Press the button once for the highest
setting. With each press of the button, the
seat will change to the next lower setting,
and then to the off setting. The indicator
lights next to the buttons indicate three for
the highest setting and one for the lowest.
If the heated seats are on high, the level
may automatically be lowered after
approximately 30 minutes.
The passenger seat may take longer to
heat up.
Auto Heated and Ventilated Seats
When the vehicle is on, this feature will
automatically activate the heated or
ventilated seats at the level required by the
vehicle’s interior temperature.
The active high, medium, low, or off heated
or ventilated seat level will be indicated by
the manual heated or ventilated seat
buttons on the door panel. Use the manual
heated or ventilated seat buttons on the
door panel to turn auto heated or ventilated
seats off. If the passenger seat is
unoccupied, the auto heated or ventilated
Page 53 of 429
Chevrolet Silverado EV Owner Manual (GMNA-Localizing-U.S./Canada-
16702912) - 2024 - CRC - 1/13/23
52 Seats and Restraints
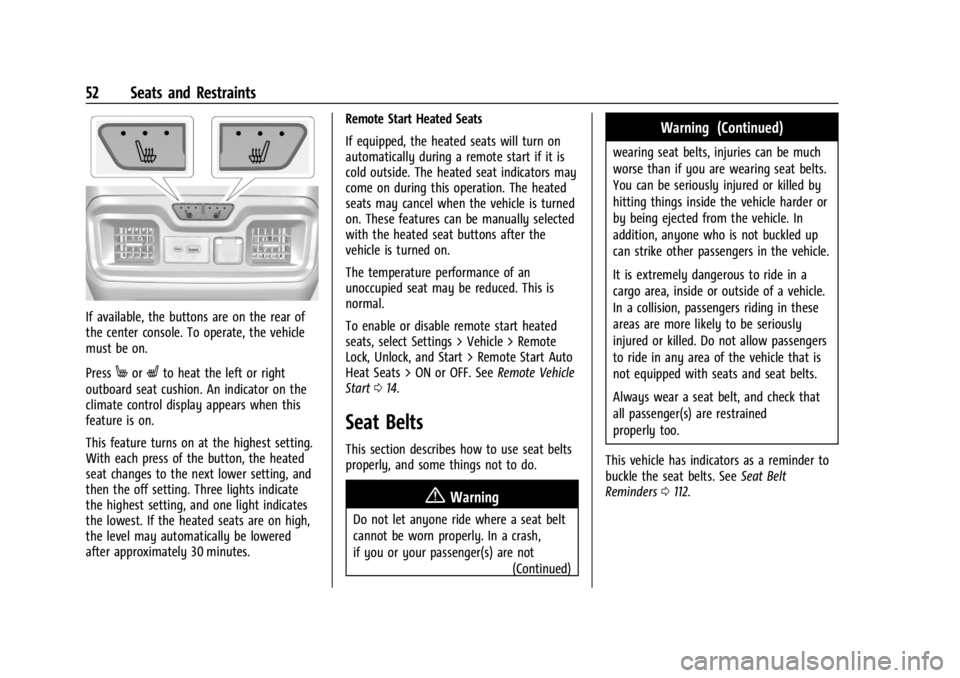
If available, the buttons are on the rear of
the center console. To operate, the vehicle
must be on.
Press
MorLto heat the left or right
outboard seat cushion. An indicator on the
climate control display appears when this
feature is on.
This feature turns on at the highest setting.
With each press of the button, the heated
seat changes to the next lower setting, and
then the off setting. Three lights indicate
the highest setting, and one light indicates
the lowest. If the heated seats are on high,
the level may automatically be lowered
after approximately 30 minutes. Remote Start Heated Seats
If equipped, the heated seats will turn on
automatically during a remote start if it is
cold outside. The heated seat indicators may
come on during this operation. The heated
seats may cancel when the vehicle is turned
on. These features can be manually selected
with the heated seat buttons after the
vehicle is turned on.
The temperature performance of an
unoccupied seat may be reduced. This is
normal.
To enable or disable remote start heated
seats, select Settings > Vehicle > Remote
Lock, Unlock, and Start > Remote Start Auto
Heat Seats > ON or OFF. See
Remote Vehicle
Start 014.
Seat Belts
This section describes how to use seat belts
properly, and some things not to do.
{Warning
Do not let anyone ride where a seat belt
cannot be worn properly. In a crash,
if you or your passenger(s) are not
(Continued)
Warning (Continued)
wearing seat belts, injuries can be much
worse than if you are wearing seat belts.
You can be seriously injured or killed by
hitting things inside the vehicle harder or
by being ejected from the vehicle. In
addition, anyone who is not buckled up
can strike other passengers in the vehicle.
It is extremely dangerous to ride in a
cargo area, inside or outside of a vehicle.
In a collision, passengers riding in these
areas are more likely to be seriously
injured or killed. Do not allow passengers
to ride in any area of the vehicle that is
not equipped with seats and seat belts.
Always wear a seat belt, and check that
all passenger(s) are restrained
properly too.
This vehicle has indicators as a reminder to
buckle the seat belts. See Seat Belt
Reminders 0112.
Page 86 of 429
Chevrolet Silverado EV Owner Manual (GMNA-Localizing-U.S./Canada-
16702912) - 2024 - CRC - 1/13/23
Seats and Restraints 85
Head Restraint or Headrest Removal and
Reinstallation
For base models, the second row outboard
head restraints or center headrest can be
removed if they interfere with the proper
installation of the child restraint.
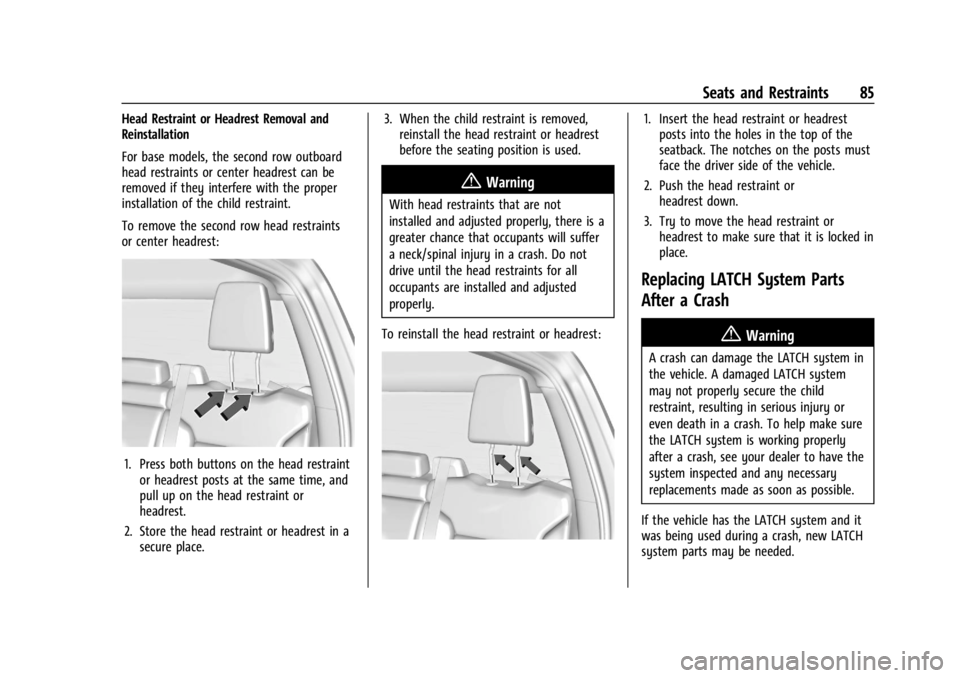
To remove the second row head restraints
or center headrest:
1. Press both buttons on the head restraintor headrest posts at the same time, and
pull up on the head restraint or
headrest.
2. Store the head restraint or headrest in a secure place. 3. When the child restraint is removed,
reinstall the head restraint or headrest
before the seating position is used.
{Warning
With head restraints that are not
installed and adjusted properly, there is a
greater chance that occupants will suffer
a neck/spinal injury in a crash. Do not
drive until the head restraints for all
occupants are installed and adjusted
properly.
To reinstall the head restraint or headrest:
1. Insert the head restraint or headrest posts into the holes in the top of the
seatback. The notches on the posts must
face the driver side of the vehicle.
2. Push the head restraint or headrest down.
3. Try to move the head restraint or headrest to make sure that it is locked in
place.
Replacing LATCH System Parts
After a Crash
{Warning
A crash can damage the LATCH system in
the vehicle. A damaged LATCH system
may not properly secure the child
restraint, resulting in serious injury or
even death in a crash. To help make sure
the LATCH system is working properly
after a crash, see your dealer to have the
system inspected and any necessary
replacements made as soon as possible.
If the vehicle has the LATCH system and it
was being used during a crash, new LATCH
system parts may be needed.
Page 140 of 429
Chevrolet Silverado EV Owner Manual (GMNA-Localizing-U.S./Canada-
16702912) - 2024 - CRC - 1/13/23
Instruments and Controls 139
Reprogramming a Single Universal
Remote System Button
To reprogram any of the system buttons:1. Select the universal remote to be reprogrammed.
2. Select “Delete”.
3. Select “Add Remote”. Follow the
instructions in Universal Remote System
Programming 0137.
Page 153 of 429
Chevrolet Silverado EV Owner Manual (GMNA-Localizing-U.S./Canada-
16702912) - 2024 - CRC - 1/13/23
152 Infotainment System
Software Updates
Over-the-Air Software Updates
If equipped, see“Updates”underSettings
0 166 for details on software updates.
Radio
AM-FM Radio
Playing the Radio
From the Home Page, touch the Audio icon
to display the now playing screen for the
active audio source. Touch the source button
such as FM or AM in the left corner to
change your source.
Finding a Station
Seeking a Station
From the AM or FM screen, touch the back
or forward buttons to search for the
previous or next strong station.
Tune
Touch
Yon the infotainment display to
enter the Tune screen. Enter a frequency
using the keypad. Touch the
Hto save the station as a
favorite.
Entering a valid AM or FM frequency will
automatically tune to the new station but
not close the Tune screen.
Touch the Go button or frequency in the list
to begin playing the station. The tune page
will close and return to the now playing
screen.
Storing Radio Station Favorites
Saved favorite stations will show at the
bottom of the now playing screen.
AM or FM favorites can be stored by
pressing and holding a favorite slot.
Audio Settings
Audio settings vary by region.
From the now playing screen, touch
kand
the following may display.
Sound
.Equalizer
.Fade/Balance
.Sound Mode (if equipped) Bose AudioPilot
If equipped, adjusts the volume based on
the noise inside the vehicle and vehicle
speed.
Manage Radio Favorites
Displays a list of audio favorites that can be
moved or deleted.
Radio Text (RDS)
When on, radio station call letters and
messages from radio stations will be shown.
Radio Text Category
When on, category information about
current radio content will be shown.
Radio Data System (RDS)
RDS relies on receiving specific RDS
information from radio stations and only
works when the information is available.
It is possible that a radio station could
broadcast information that causes the radio
to work improperly.
In addition, RDS features are region and
country of sale specific. This means specific
RDS content may not be available in your
listening area or in the country you operate
the vehicle.