2024 CHEVROLET SILVERADO EV charging
[x] Cancel search: chargingPage 8 of 429

Chevrolet Silverado EV Owner Manual (GMNA-Localizing-U.S./Canada-
16702912) - 2024 - CRC - 1/17/23
Introduction 7
1.Air Vents 0177.
2. Windshield Wiper/Washer 098.
Turn and Lane-Change Signals 0143.
3. Regenerative Braking 0206.
4. Instrument Cluster (Base Level) 0107 or
Instrument Cluster (Uplevel) 0109.
5. Driver Monitoring System.
6. Shift Switches. See Electric Drive Unit
0 200.
7. Infotainment Controls. See Overview
0 148.
8. Infotainment Display. See AM-FM Radio
0 152.
9. Light Sensor. See Automatic Headlamp
System 0142.
Vehicle Alarm System. See Vehicle
Security 032.
10. Dual Automatic Climate Control System
0174.
11. USB Port 0154.
12. Power Outlets 099.
13. Wireless Charging 0104. 14.
Steering Wheel Controls 0149.
Driver Information Center (DIC) Controls.
See Driver Information Center (DIC) (Base
Level) 0129 or
Driver Information Center (DIC) (Uplevel)
0 130.
15. Horn 098.
16. Steering Wheel Adjustment 097 (Out
of View).
17. Trailer Brake Control Panel. See “Integrated Trailer Brake Control System”
under Towing Equipment 0301.
18. Adaptive Cruise Control (Advanced) 0217.
Forward Collision Alert (FCA) System
0 261.
Heated Steering Wheel 097 (If
Equipped).
19. Data Link Connector (DLC) (Out of View). SeeService Vehicle Soon Light (Propulsion
System Failure) 0115.
20. Manual Hood Release.
21. Fuse Block Cover. 22.
Electric Parking Brake 0205.
Air Suspension 0211.
Lane Keep Assist (LKA) 0274.
Power Hood Release. See Hood019.
Power Tailgate Release. See Tailgate
0 28.
Instrument Panel Illumination Control
0 143.
Page 97 of 429
Chevrolet Silverado EV Owner Manual (GMNA-Localizing-U.S./Canada-
16702912) - 2024 - CRC - 1/13/23
96 Instruments and Controls
Instruments and Controls
Controls
Steering Wheel Adjustment . . . . . . . . . . . . 97
Heated Steering Wheel . . . . . . . . . . . . . . . . . 97
Horn . . . . . . . . . . . . . . . . . . . . . . . . . . . . . . . . . . . 98
Pedestrian Safety Signal . . . . . . . . . . . . . . . . 98
Windshield Wiper/Washer . . . . . . . . . . . . . 98
Clock . . . . . . . . . . . . . . . . . . . . . . . . . . . . . . . . . . . 99
Power Outlets . . . . . . . . . . . . . . . . . . . . . . . . . . 99
Onboard Generator . . . . . . . . . . . . . . . . . . . . 101
Wireless Charging . . . . . . . . . . . . . . . . . . . . . 104
On-Screen Controls . . . . . . . . . . . . . . . . . . . . 107
Warning Lights, Gauges, and Indicators
Warning Lights, Gauges, andIndicators . . . . . . . . . . . . . . . . . . . . . . . . . . . . 107
Instrument Cluster (Base Level) . . . . . . . . 107
Instrument Cluster (Uplevel) . . . . . . . . . . . 109
Speedometer . . . . . . . . . . . . . . . . . . . . . . . . . . 110
Odometer . . . . . . . . . . . . . . . . . . . . . . . . . . . . . . 110
Trip Odometer . . . . . . . . . . . . . . . . . . . . . . . . . 110
Battery Gauge (High Voltage) . . . . . . . . . 110
Power Indicator Gauge . . . . . . . . . . . . . . . . . 111
Speed Limiter Indicator . . . . . . . . . . . . . . . . . 112
Seat Belt Reminders . . . . . . . . . . . . . . . . . . . . 112
Airbag Readiness Light . . . . . . . . . . . . . . . . . 113
Passenger Airbag Status Indicator . . . . . . 114
Charging System Light . . . . . . . . . . . . . . . . . 114
Low State of Charge Light . . . . . . . . . . . . . 114 Charge Cord Connected Light . . . . . . . . . . 114
Battery Fault Light . . . . . . . . . . . . . . . . . . . . . 115
Propulsion Power is Limited Light . . . . . . 115
Service Vehicle Soon Light (Propulsion
System Failure) . . . . . . . . . . . . . . . . . . . . . . . 115
Brake System Warning Light . . . . . . . . . . . 115
Electric Parking Brake Light . . . . . . . . . . . . 116
Service Electric Parking Brake Light . . . . 116
Antilock Brake System (ABS) Warning Light . . . . . . . . . . . . . . . . . . . . . . . . . . . . . . . . . 116
Four-Wheel-Drive Light . . . . . . . . . . . . . . . . . 117
Lane Keep Assist (LKA) Light . . . . . . . . . . . 117
Automatic Emergency Braking (AEB) Disabled Light . . . . . . . . . . . . . . . . . . . . . . . . 117
Vehicle Ahead Indicator . . . . . . . . . . . . . . . . 117
Pedestrian Ahead Indicator . . . . . . . . . . . . . 118
Traction Off Light . . . . . . . . . . . . . . . . . . . . . . 118
Traction Control System (TCS)/Electronic Stability Control Light . . . . . . . . . . . . . . . . 118
Electronic Stability Control (ESC) Off Light . . . . . . . . . . . . . . . . . . . . . . . . . . . . . . . . . 119
Driver Mode Control Light . . . . . . . . . . . . . 119
Four-Wheel Steering Light . . . . . . . . . . . . . 119
Air Suspension Light . . . . . . . . . . . . . . . . . . . 119
Tire Pressure Light . . . . . . . . . . . . . . . . . . . . . 120
Security Light . . . . . . . . . . . . . . . . . . . . . . . . . . 121
Vehicle Ready Light . . . . . . . . . . . . . . . . . . . . 121
One-Pedal Driving Light . . . . . . . . . . . . . . . . 121
High-Beam On Light . . . . . . . . . . . . . . . . . . . . 121
Lamps On Reminder . . . . . . . . . . . . . . . . . . . . 121 Cruise Control Light . . . . . . . . . . . . . . . . . . . . 122
Driver Attention Assist Light . . . . . . . . . . . 122
Door Ajar Light . . . . . . . . . . . . . . . . . . . . . . . . 122
Information Displays
Charging . . . . . . . . . . . . . . . . . . . . . . . . . . . . . . . 123
Driver Information Center (DIC) (Base
Level) . . . . . . . . . . . . . . . . . . . . . . . . . . . . . . . . 129
Driver Information Center (DIC) (Uplevel) . . . . . . . . . . . . . . . . . . . . . . . . . . . . . 130
Vehicle Status . . . . . . . . . . . . . . . . . . . . . . . . . 132
Head-Up Display (HUD) . . . . . . . . . . . . . . . . 133
Vehicle Messages
Vehicle Messages . . . . . . . . . . . . . . . . . . . . . . 135
Propulsion Power Messages . . . . . . . . . . . 136
Vehicle Speed Messages . . . . . . . . . . . . . . . 137
Universal Remote System
Universal Remote System . . . . . . . . . . . . . . 137
Universal Remote System Programming . . . . . . . . . . . . . . . . . . . . . . . . 137
Universal Remote System Operation . . . 138
Page 104 of 429
Chevrolet Silverado EV Owner Manual (GMNA-Localizing-U.S./Canada-
16702912) - 2024 - CRC - 1/13/23
Instruments and Controls 103
{Warning
Using a damaged power outlet could
result in electrical shock causing personal
injury or death. Inspect the power outlet
for damage before use and do not use
the outlet if it is damaged.
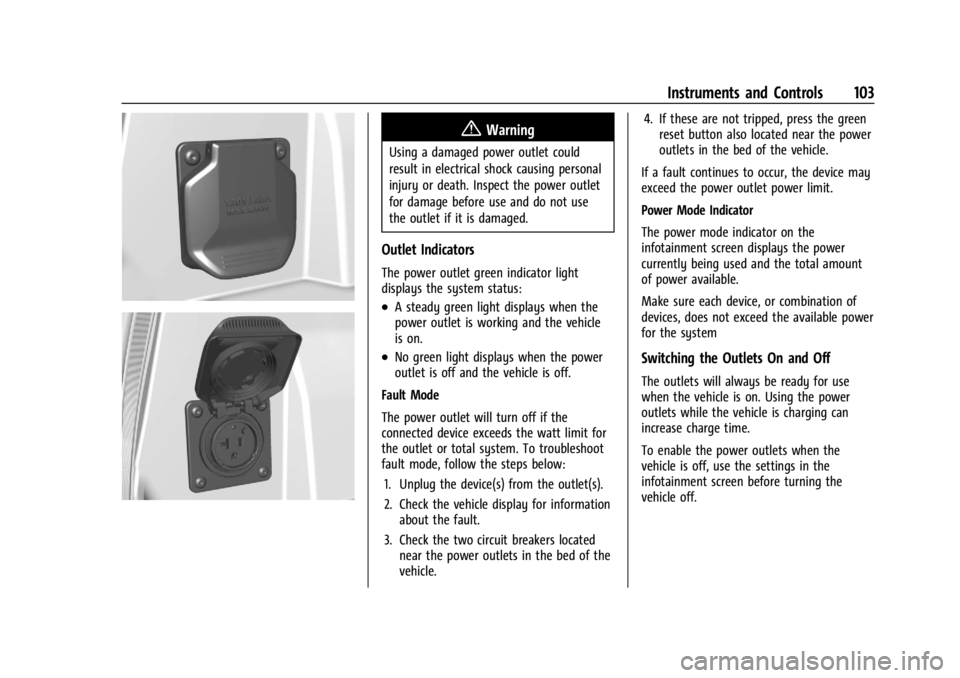
Outlet Indicators
The power outlet green indicator light
displays the system status:
.A steady green light displays when the
power outlet is working and the vehicle
is on.
.No green light displays when the power
outlet is off and the vehicle is off.
Fault Mode
The power outlet will turn off if the
connected device exceeds the watt limit for
the outlet or total system. To troubleshoot
fault mode, follow the steps below: 1. Unplug the device(s) from the outlet(s).
2. Check the vehicle display for information about the fault.
3. Check the two circuit breakers located near the power outlets in the bed of the
vehicle. 4. If these are not tripped, press the green
reset button also located near the power
outlets in the bed of the vehicle.
If a fault continues to occur, the device may
exceed the power outlet power limit.
Power Mode Indicator
The power mode indicator on the
infotainment screen displays the power
currently being used and the total amount
of power available.
Make sure each device, or combination of
devices, does not exceed the available power
for the systemSwitching the Outlets On and Off
The outlets will always be ready for use
when the vehicle is on. Using the power
outlets while the vehicle is charging can
increase charge time.
To enable the power outlets when the
vehicle is off, use the settings in the
infotainment screen before turning the
vehicle off.
Page 105 of 429

Chevrolet Silverado EV Owner Manual (GMNA-Localizing-U.S./Canada-
16702912) - 2024 - CRC - 1/13/23
104 Instruments and Controls
Troubleshooting
The power outlets will be momentarily
unavailable at the start and the end of a
350 kW DC Fast Charge. This is normal
operation.
For any error messages that can not be
resolved by resetting fault mode as
discussed earlier in this section, see your
dealer.
{Warning
The power outlets contain high-voltage
electrical equipment. Disassembling the
power outlets may result in electrical
shock causing personal injury or death.
Never attempt to disassemble a power
outlet.
Wireless Charging
If equipped and enabled, the vehicle has
wireless charging in the bin below the
climate control system. The system operates
at 145 kHz and wirelessly charges one Qi
compatible smartphone. The power output
of the system is capable of charging at a
rate up to 3 amp (15 W), as requested by
the compatible smartphone. SeeRadio
Frequency Statement 0404.
{Warning
Wireless charging may affect the
operation of an implanted pacemaker or
other medical devices. If you have one, it
is recommended to consult with your
doctor before using the wireless charging
system.
The vehicle must be on or Retained
Accessory Power (RAP) must be active. The
wireless charging feature may not correctly
indicate charging when the vehicle is in RAP,
during a Bluetooth phone call, or when
phone projection (e.g. Apple CarPlay/Android
Auto) is active. See Power Modes0197.
The operating temperature is −40 °C (−40 °F)
to 85 °C (185 °F) for the charging system and
0 °C (32 °F) to 35 °C (95 °F) for the phone.
A charging stopped alert may be displayed
on the infotainment screen, if the wireless
charger or smartphone are outside of
normal operating temperature. Charging will
automatically resume when a normal
operating temperature is reached.
{Warning
Remove all objects from the charger
before charging your compatible
smartphone. Objects, such as coins, keys,
rings, paper clips, or cards, between the
smartphone and charger may become
very hot.
On the rare occasion that the charging
system does not detect an object, and
the object gets wedged between the
smartphone and charger, remove the
smartphone and allow the object to cool
before removing it from the charger, to
prevent burns.
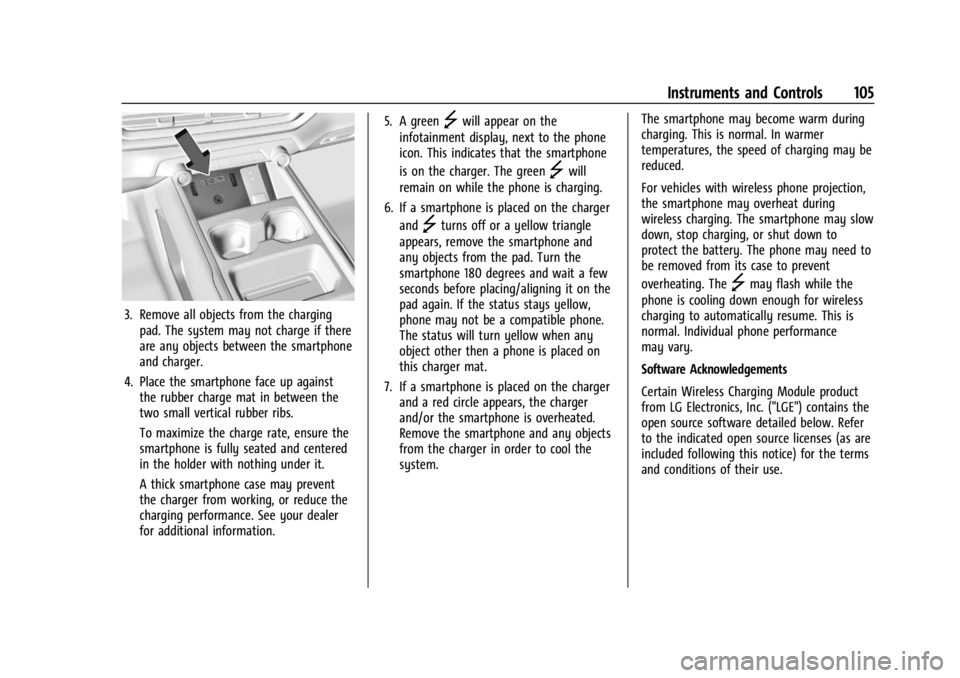
To charge a compatible smartphone: 1. Confirm the smartphone is capable of wireless charging.
2. The wireless charger is below the climate control system.
Page 106 of 429
Chevrolet Silverado EV Owner Manual (GMNA-Localizing-U.S./Canada-
16702912) - 2024 - CRC - 1/13/23
Instruments and Controls 105
3. Remove all objects from the chargingpad. The system may not charge if there
are any objects between the smartphone
and charger.
4. Place the smartphone face up against the rubber charge mat in between the
two small vertical rubber ribs.
To maximize the charge rate, ensure the
smartphone is fully seated and centered
in the holder with nothing under it.
A thick smartphone case may prevent
the charger from working, or reduce the
charging performance. See your dealer
for additional information. 5. A green
]will appear on the
infotainment display, next to the phone
icon. This indicates that the smartphone
is on the charger. The green
]will
remain on while the phone is charging.
6. If a smartphone is placed on the charger and
]turns off or a yellow triangle
appears, remove the smartphone and
any objects from the pad. Turn the
smartphone 180 degrees and wait a few
seconds before placing/aligning it on the
pad again. If the status stays yellow,
phone may not be a compatible phone.
The status will turn yellow when any
object other then a phone is placed on
this charger mat.
7. If a smartphone is placed on the charger and a red circle appears, the charger
and/or the smartphone is overheated.
Remove the smartphone and any objects
from the charger in order to cool the
system. The smartphone may become warm during
charging. This is normal. In warmer
temperatures, the speed of charging may be
reduced.
For vehicles with wireless phone projection,
the smartphone may overheat during
wireless charging. The smartphone may slow
down, stop charging, or shut down to
protect the battery. The phone may need to
be removed from its case to prevent
overheating. The
]may flash while the
phone is cooling down enough for wireless
charging to automatically resume. This is
normal. Individual phone performance
may vary.
Software Acknowledgements
Certain Wireless Charging Module product
from LG Electronics, Inc. ("LGE") contains the
open source software detailed below. Refer
to the indicated open source licenses (as are
included following this notice) for the terms
and conditions of their use.
Page 115 of 429

Chevrolet Silverado EV Owner Manual (GMNA-Localizing-U.S./Canada-
16702912) - 2024 - CRC - 1/13/23
114 Instruments and Controls
Passenger Airbag Status Indicator
The vehicle has a passenger sensing system.
SeePassenger Sensing System 065 for
important safety information. The overhead
console has a passenger airbag status
indicator.
When the vehicle is started, the passenger
airbag status indicator will light ON and OFF
for several seconds as a system check. Then,
after several more seconds, the status
indicator will light either ON or OFF to let
you know the status of the front outboard
passenger frontal airbag.
If the word ON is lit on the passenger
airbag status indicator, it means that the
front outboard passenger frontal airbag is
allowed to inflate.
If the word OFF is lit on the passenger
airbag status indicator, it means that the
passenger sensing system has turned off the
front outboard passenger frontal airbag. If, after several seconds, both status
indicator lights remain on, or if there are no
lights at all, or if the airbag readiness light
is on, there may be a problem with the
lights or the passenger sensing system. See
your dealer for service right away.
{Warning
If the airbag readiness light ever comes
on and stays on, it means that
something may be wrong with the airbag
system. To help avoid injury to yourself
or others, have the vehicle serviced right
away. See
Airbag Readiness Light 0113
for more information, including important
safety information.
Charging System Light
The charging system light comes on briefly
when the vehicle is started, as a check to
show the light is working. If the light stays on, or comes on while
driving, there could be a problem with the
electrical charging system. Have it checked
by your dealer. Driving while this light is on
could drain the 12-volt battery.
If a short distance must be driven with the
light on, be sure to turn off all accessories,
such as the radio. Find a safe place to stop
the vehicle.
Low State of Charge Light
This light comes on when the vehicle state
of charge is low. Proceed to a charging
station to charge the vehicle.
Charge Cord Connected Light
Page 124 of 429
Chevrolet Silverado EV Owner Manual (GMNA-Localizing-U.S./Canada-
16702912) - 2024 - CRC - 1/13/23
Instruments and Controls 123
Information Displays
Charging
Important Information about Electric Vehicle
Charging
.Charging an electric vehicle can stress a
building’s electrical system more than a
typical household appliance.
.Charge cord limits can vary from vehicle
to vehicle, and increased charging rates
can stress a building’s electrical system.
.Before plugging into any electrical outlet,
have a qualified electrician inspect and
verify the electrical system (electrical
outlet, wiring, junctions, and protection
devices) for heavy-duty service at a
12 amp continuous load.
.Electrical outlets may wear out with
normal usage or may be damaged over
time, making them unsuitable for electric
vehicle charging.
.Check the electrical outlet/plug while
charging and discontinue use if the
electrical outlet/plug is hot, then have the
electrical outlet serviced by a qualified
electrician.
.When outdoors, plug into an electrical
outlet that is weatherproof while in use.
.Mount the charging cord to reduce strain
on the electrical outlet/plug.
.Do not place the charge cord in a position
where it is expected to be submerged in
water.
{Danger
Improper use of portable electric vehicle
charge cords may cause a fire, electrical
shock, or burns, and may result in
damage to property, serious injury,
or death.
.Do not use extension cords,
multi-outlet power strips, splitters,
grounding adapters, surge protectors,
or similar devices.
.Do not use an electrical outlet that is
worn or damaged, or will not hold the
plug firmly in place.
.Do not use an electrical outlet that is
not properly grounded.
.Do not use an electrical outlet that is
on a circuit with other electrical loads.
Charging App
The Charging app gives you access to
features that will help you better
understand and control how the vehicle
manages charging, providing a central
location to determine and review your
charging preferences.
To launch the Charging app from the
infotainment home screen, touch the
Charging icon. There are four selections to
choose from: Next Charge, Charge Assist,
Schedule, and Settings. When you launch
Charging for the first time, the Next Charge
screen will display.
Next Charge
To view the current charging status in the
infotainment display, touch
C.
On the Next Charge screen, there is a range
of information associated with the next
Charging session, as well as the ability to
specify when you would like to charge the
vehicle. The choices available to charge are
Charge Now or Charge Later.
Page 125 of 429
Chevrolet Silverado EV Owner Manual (GMNA-Localizing-U.S./Canada-
16702912) - 2024 - CRC - 1/13/23
124 Instruments and Controls
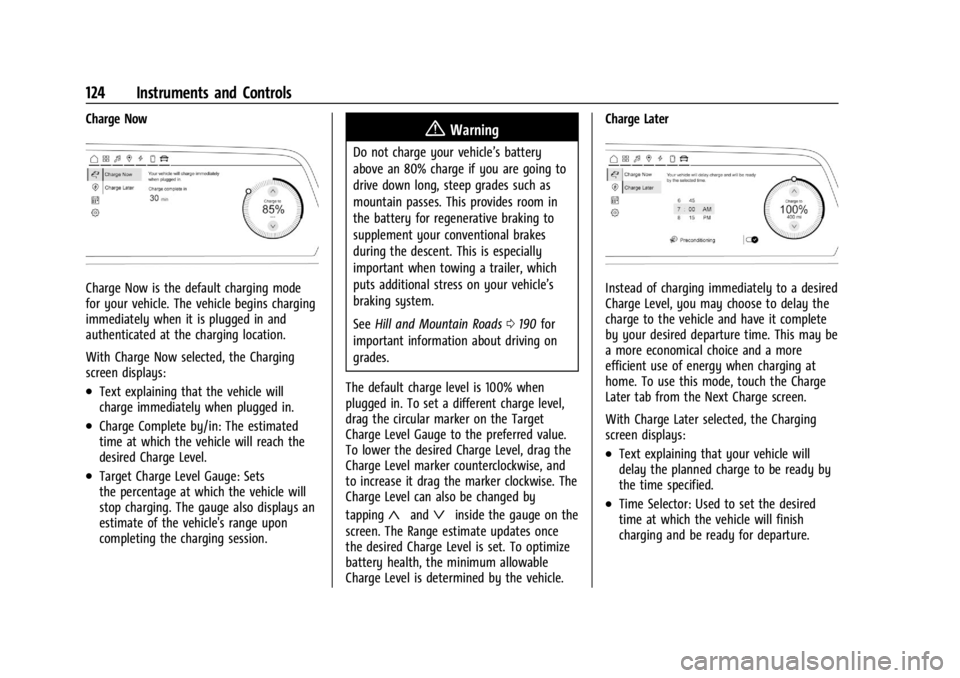
Charge Now
Charge Now is the default charging mode
for your vehicle. The vehicle begins charging
immediately when it is plugged in and
authenticated at the charging location.
With Charge Now selected, the Charging
screen displays:
.Text explaining that the vehicle will
charge immediately when plugged in.
.Charge Complete by/in: The estimated
time at which the vehicle will reach the
desired Charge Level.
.Target Charge Level Gauge: Sets
the percentage at which the vehicle will
stop charging. The gauge also displays an
estimate of the vehicle's range upon
completing the charging session.
{Warning
Do not charge your vehicle’s battery
above an 80% charge if you are going to
drive down long, steep grades such as
mountain passes. This provides room in
the battery for regenerative braking to
supplement your conventional brakes
during the descent. This is especially
important when towing a trailer, which
puts additional stress on your vehicle’s
braking system.
SeeHill and Mountain Roads 0190 for
important information about driving on
grades.
The default charge level is 100% when
plugged in. To set a different charge level,
drag the circular marker on the Target
Charge Level Gauge to the preferred value.
To lower the desired Charge Level, drag the
Charge Level marker counterclockwise, and
to increase it drag the marker clockwise. The
Charge Level can also be changed by
tapping
«andªinside the gauge on the
screen. The Range estimate updates once
the desired Charge Level is set. To optimize
battery health, the minimum allowable
Charge Level is determined by the vehicle. Charge Later
Instead of charging immediately to a desired
Charge Level, you may choose to delay the
charge to the vehicle and have it complete
by your desired departure time. This may be
a more economical choice and a more
efficient use of energy when charging at
home. To use this mode, touch the Charge
Later tab from the Next Charge screen.
With Charge Later selected, the Charging
screen displays:
.Text explaining that your vehicle will
delay the planned charge to be ready by
the time specified.
.Time Selector: Used to set the desired
time at which the vehicle will finish
charging and be ready for departure.