2023 TOYOTA RAV4 HYBRID ECU
[x] Cancel search: ECUPage 447 of 586
4456-3. Do-it-yourself maintenance
6
Maintenance and care
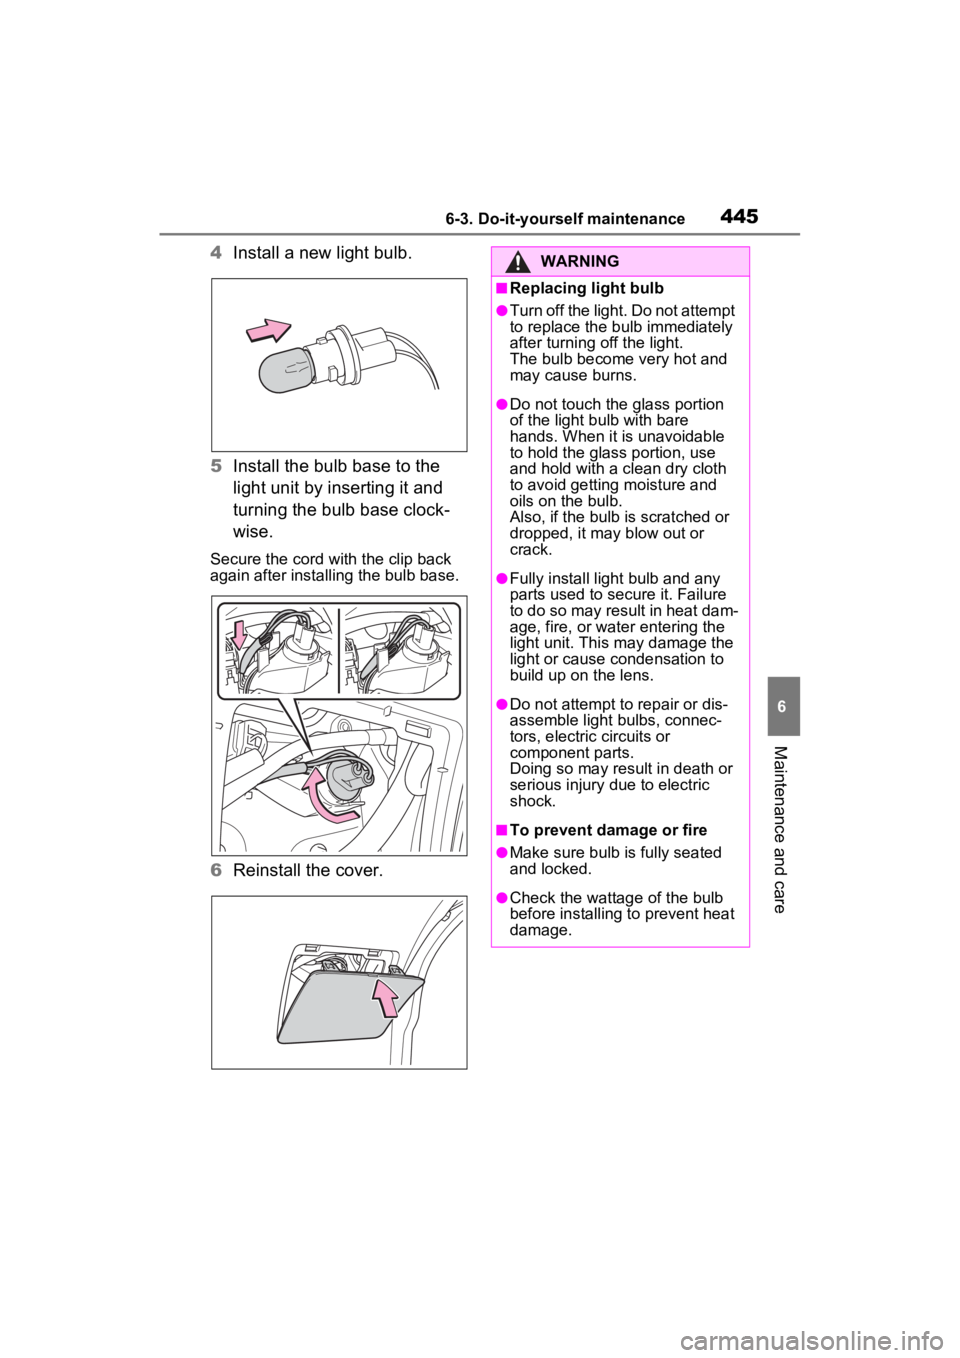
4Install a new light bulb.
5 Install the bulb base to the
light unit by inserting it and
turning the bulb base clock-
wise.
Secure the cord wit h the clip back
again after installing the bulb base.
6 Reinstall the cover.
WARNING
■Replacing light bulb
●Turn off the light. Do not attempt
to replace the bu lb immediately
after turning off the light.
The bulb become very hot and
may cause burns.
●Do not touch the glass portion
of the light bulb with bare
hands. When it is unavoidable
to hold the glass portion, use
and hold with a clean dry cloth
to avoid getting moisture and
oils on the bulb.
Also, if the bulb is scratched or
dropped, it may blow out or
crack.
●Fully install light bulb and any
parts used to secure it. Failure
to do so may result in heat dam-
age, fire, or water entering the
light unit. This may damage the
light or cause condensation to
build up on the lens.
●Do not attempt to repair or dis-
assemble light bulbs, connec-
tors, electric circuits or
component parts.
Doing so may result in death or
serious injury due to electric
shock.
■To prevent damage or fire
●Make sure bulb is fully seated
and locked.
●Check the wattage of the bulb
before installing to prevent heat
damage.
Page 451 of 586
4497-1. Essential information
7
When trouble arises
1Steadily step on the brake
pedal with both feet and
firmly depress it.
Do not pump the brake pedal
repeatedly as this will increase the
effort required to slow the vehicle.
2Shift the shift lever to N.
If the shift lever is shifted to N
3 After slowing down, stop the
vehicle in a safe place by the
road.
4 Stop the hybrid system.
If the shift lever cannot be
shifted to N
3 Keep depressing the brake
pedal with both feet to reduce
vehicle speed as much as
possible.
4 Perform the following proce-
dure to stop the hybrid sys-
tem:
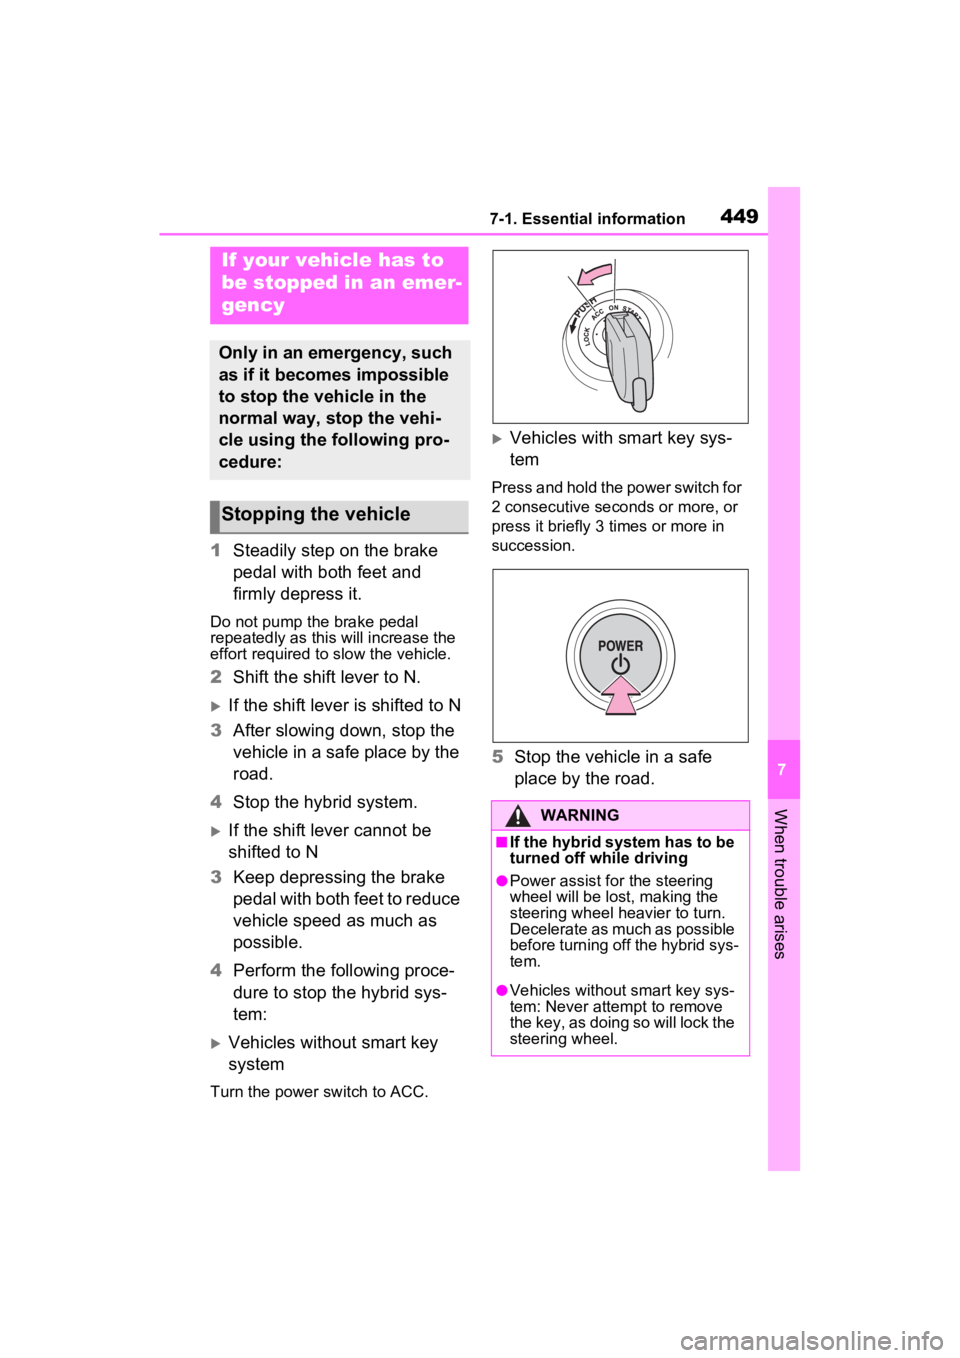
Vehicles without smart key
system
Turn the power s witch to ACC.
Vehicles with smart key sys-
tem
Press and hold the power switch for
2 consecutive seconds or more, or
press it briefly 3 times or more in
succession.
5Stop the vehicle in a safe
place by the road.
If your vehicle has to
be stopped in an emer-
gency
Only in an emergency, such
as if it becomes impossible
to stop the vehicle in the
normal way, stop the vehi-
cle using the following pro-
cedure:
Stopping the vehicle
WARNING
■If the hybrid system has to be
turned off while driving
●Power assist for the steering
wheel will be lost, making the
steering wheel heavier to turn.
Decelerate as much as possible
before turning off the hybrid sys-
tem.
●Vehicles without smart key sys-
tem: Never atte mpt to remove
the key, as doing so will lock the
steering wheel.
Page 454 of 586
4527-2. Steps to take in an emergency
When using a flat-bed truck to
transport the vehicle, use tire
strapping belts. Refer to the
owner’s manual of the flat-bed
truck for the tire strapping
method.
In order to suppress vehicle
movement during transporta-
tion, set the parking brake and
turn the power switch off.
If a tow truck is not available in
an emergency, your vehicle may
be temporarily towed using
cables or chains secured to the
emergency towing eyelets. This
should only be attempted on
hard surfaced roads for short
WARNING
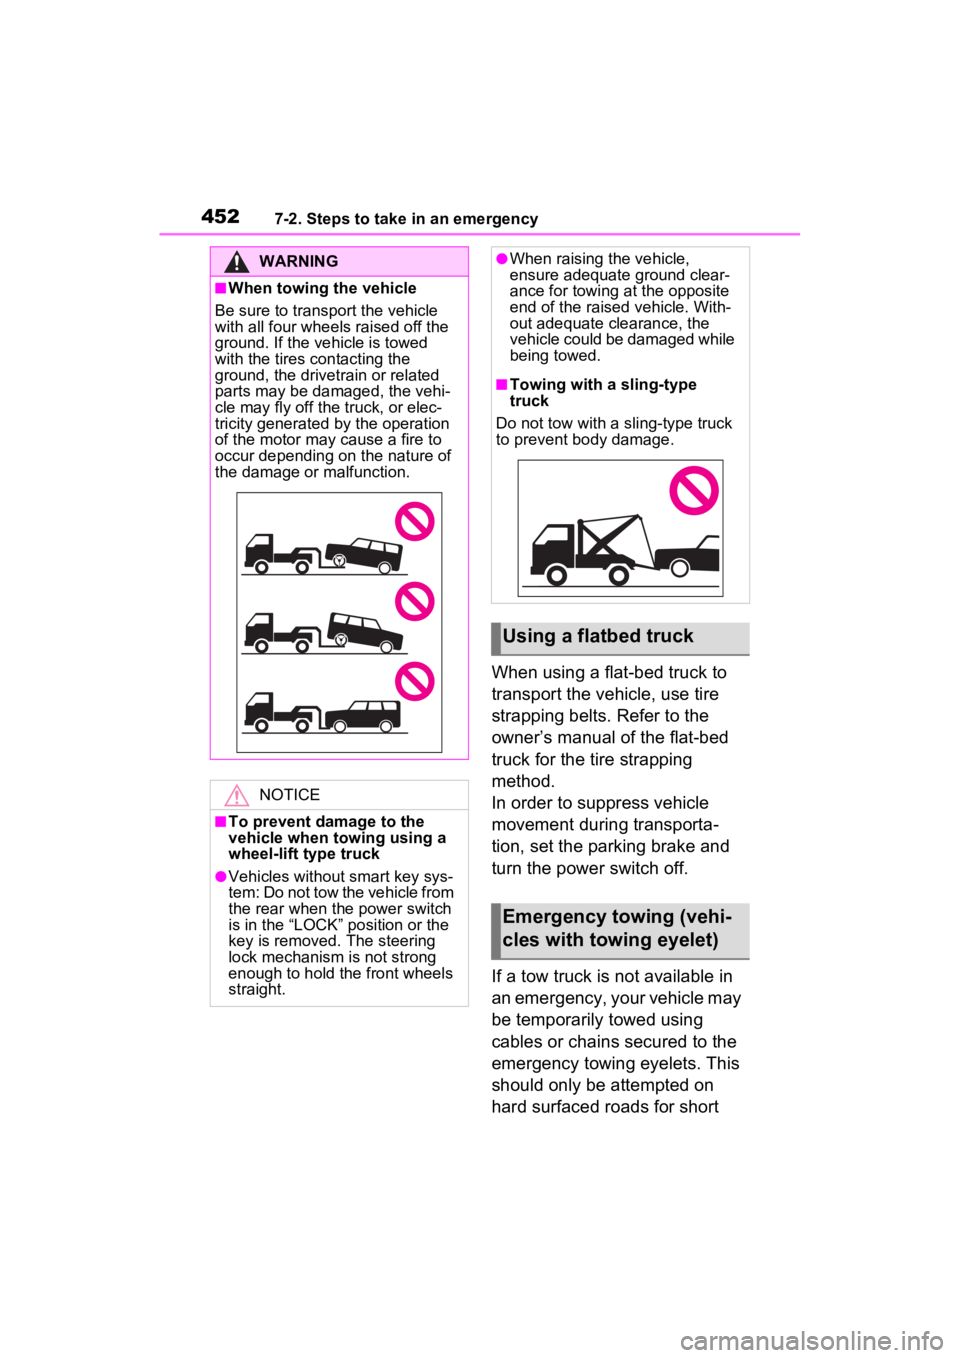
■When towing the vehicle
Be sure to transport the vehicle
with all four wheels raised off the
ground. If the vehicle is towed
with the tires contacting the
ground, the drivetrain or related
parts may be damaged, the vehi-
cle may fly off the truck, or elec-
tricity generated by the operation
of the motor may cause a fire to
occur depending on the nature of
the damage or malfunction.
NOTICE
■To prevent damage to the
vehicle when towing using a
wheel-lift type truck
●Vehicles without smart key sys-
tem: Do not tow the vehicle from
the rear when th e power switch
is in the “LOCK” position or the
key is removed. The steering
lock mechanism is not strong
enough to hold the front wheels
straight.
●When raising the vehicle,
ensure adequate ground clear-
ance for towing at the opposite
end of the raised vehicle. With-
out adequate clearance, the
vehicle could be damaged while
being towed.
■Towing with a sling-type
truck
Do not tow with a sling-type truck
to prevent body damage.
Using a flatbed truck
Emergency towing (vehi-
cles with towing eyelet)
Page 455 of 586
4537-2. Steps to take in an emergency
7
When trouble arises
distances at under 18 mph (30
km/h).
A driver must be in the vehicle to
steer and operate the brakes.
The vehicle’s wheels, drive
train, axles, steering and brakes
must be in good condition.
To have your vehicle towed by
another vehicle, the towing eye-
let must be installed to your
vehicle. Install the towing eyelet
using the following procedure.
1Take out the wheel nut
wrench and towing eyelet.
( P.472)
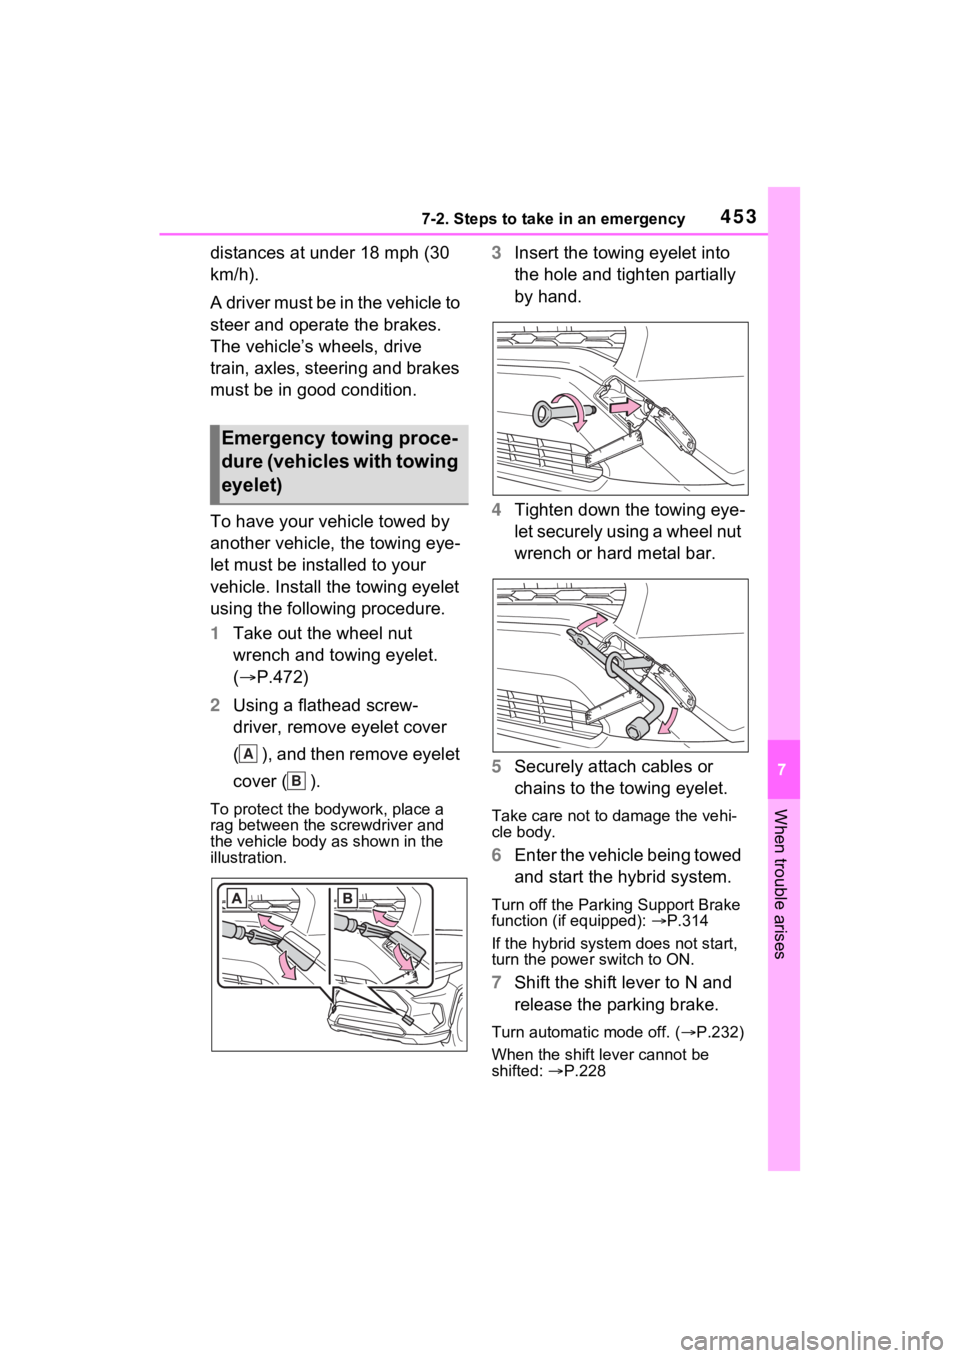
2 Using a flathead screw-
driver, remove eyelet cover
( ), and then remove eyelet
cover ( ).
To protect the bodywork, place a
rag between the screwdriver and
the vehicle body as shown in the
illustration.
3Insert the towing eyelet into
the hole and tighten partially
by hand.
4 Tighten down the towing eye-
let securely using a wheel nut
wrench or hard metal bar.
5 Securely attach cables or
chains to the towing eyelet.
Take care not to damage the vehi-
cle body.
6Enter the vehicle being towed
and start the hybrid system.
Turn off the Parking Support Brake
function (if equipped): P.314
If the hybrid system does not start,
turn the power switch to ON.
7 Shift the shift lever to N and
release the parking brake.
Turn automatic mode off. ( P.232)
When the shift lever cannot be
shifted: P.228
Emergency towing proce-
dure (vehicles with towing
eyelet)
A
B
Page 456 of 586
4547-2. Steps to take in an emergency
■While towing
If the hybrid system is off, the power
assist for the brakes and steering
will not function, making steering
and braking more difficult.
■Wheel nut wrench (if equipped)
Wheel nut wrench is installed in the
tool bag in luggage compartment.
( P.472)
WARNING
Observe the following precau-
tions. Failure to do so may result
in death or serious injury.
■While towing (vehicles with
towing eyelet)
●When towing using cables or
chains, avoid sudden starts, etc.
which place excessive stress on
the towing eyelets, cables or
chains. The towing eyelets,
cables or chains may become
damaged, broken debris may hit
people, and cause serious dam-
age.
●Vehicles without smart key sys-
tem: Do not turn the power
switch to the “LOCK” position.
There is a possibility that the
steering wheel is locked and
cannot be operated.
■Installing towi ng eyelets to
the vehicle (vehicles with
towing eyelets)
Make sure that towing eyelets are
installed securely. If not securely
installed, towing eyelets may
come loose during towing.
NOTICE
■To prevent damage to the
vehicle during emergency
towing (vehicles with towing
eyelet)
Do not secure cables or chains to
the suspension components.
Page 465 of 586

4637-2. Steps to take in an emergency
7
When trouble arises
passenger that his or her seat belt is not fastened. If the sea t belt is
unfastened, the buzzer sounds int ermittently for a certain period of time
after the vehicle reaches a certain speed.
■Rear passengers’ seat belt reminder lights*1 (warning
buzzer*2)
*1: These lights illumina te on the multi-information display.
*2: Rear passengers’ seat belt warning buzzer:
The rear passengers’ seat belt w arning buzzer sounds to alert the rear
passengers that his o r her seat belt is not fastened. If the se at belt is
unfastened, the buzzer sounds intermittently for a certain peri od of time,
after the seat belt is fastened and unfastened and the vehicle reaches a
certain speed.
■Warning buzzer
In some cases, the buzzer may not
be heard because of noisy place or
an audio sound.
■Front passenger detection sen-
sor, seat belt reminder and
warning buzzer
●If luggage is placed on the front
passenger seat, the front passen-
ger detection sensor may cause
the warning light to flash and the
warning buzzer to sound even if a
passenger is not sitting in the
seat.
●If a cushion is placed on the seat,
the sensor may n ot detect a pas-
senger, and the warning light may
not operate properly.
■SRS warning light
This warning light system monitors
the airbag sensor assembly, front
impact sensors, side impact sensors
(front door), side impact sensors
(front), driver’s seat position sen- sor, driver’s seat belt buckle switch,
front passenger occupant classifica-
tion system (ECU and sensors),
“AIR BAG ON” indicator light, “AIR
BAG OFF” indicator light, front pas-
senger’s seat belt buckle switch,
driver’s seat belt pr
etensioner, front
passenger’s seat b elt pretensioner
and force limiter, airbags, intercon-
necting wiring and power sources.
( P.34)
■If the malfunction indicator
lamp comes on while driving
First check the following:
●Is the fuel tank empty?
If it is, fill the fuel tank immediately.
●Is the fuel ta nk cap loose?
If it is, tighten it securely.
The light will go off after several
driving trips.
If the light does not go off even after
several trips, con tact your Toyota
dealer as soon as possible.
Warning lightDetails/Actions
(If equipped)
Warns the rear passengers to fasten their seat
belts
Fasten the seat belt.
Page 476 of 586
4747-2. Steps to take in an emergency
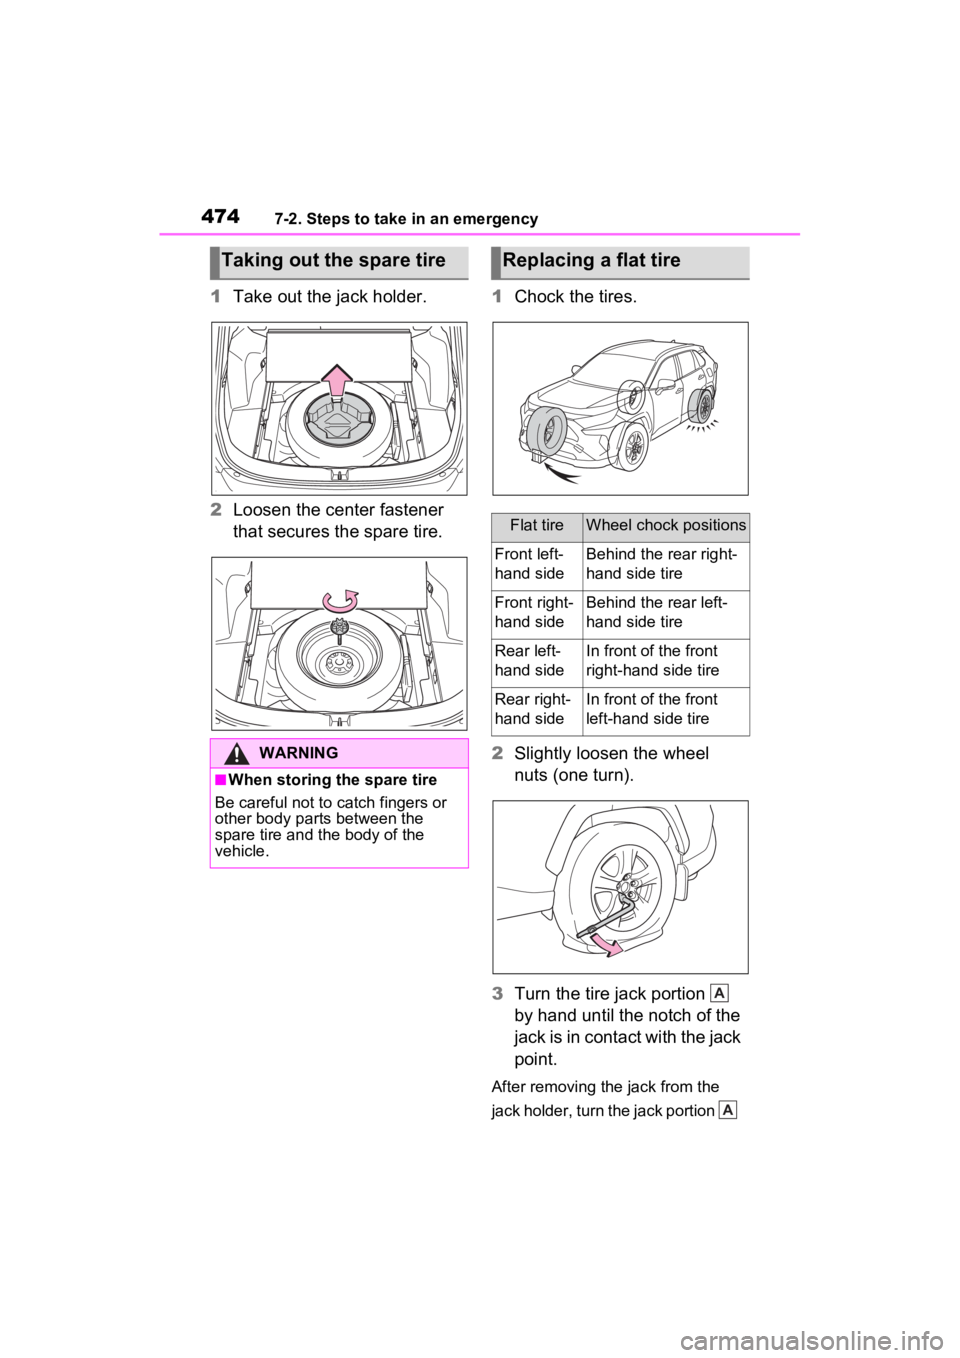
1Take out the jack holder.
2 Loosen the center fastener
that secures the spare tire. 1
Chock the tires.
2 Slightly loosen the wheel
nuts (one turn).
3 Turn the tire jack portion
by hand until the notch of the
jack is in contact with the jack
point.
After removing the jack from the
jack holder, turn the jack portion
Taking out the spare tire
WARNING
■When storing the spare tire
Be careful not to catch fingers or
other body parts between the
spare tire and the body of the
vehicle.
Replacing a flat tire
Flat tireWheel chock positions
Front left-
hand sideBehind the rear right-
hand side tire
Front right-
hand sideBehind the rear left-
hand side tire
Rear left-
hand sideIn front of the front
right-hand side tire
Rear right-
hand sideIn front of the front
left-hand side tire
A
A
Page 481 of 586
4797-2. Steps to take in an emergency
7
When trouble arises
WARNING
■Speed limit when using the
compact spare tire
Do not drive at speeds in excess
of 50 mph (80 km/h) when a com-
pact spare tire is installed on the
vehicle.
The compact spare tire is not
designed for driving at high
speeds. Failure to observe this
precaution may lead to an acci-
dent causing death or serious
injury.
■After using the tools and jack
Before driving, make sure all the
tools and jack are securely in
place in their storage location to
reduce the possibility of personal
injury during a co llision or sudden
braking.
NOTICE
■Be careful when driving over
bumps with the compact
spare tire installed on the
vehicle
The vehicle height may become
lower when driving with the com-
pact spare tire compared to when
driving with standard tires. Be
careful when driving over uneven
road surfaces.
■Driving with tire chains and
the compact spare tire
Do not fit tire chains to the com-
pact spare tire.
Tire chains may damage the vehi-
cle body and adversely affect driv-
ing performance.
■When replacing the tires
(vehicles with tire pressure
warning system)
When removing or fitting the
wheels, tires or th e tire pressure
warning valve and transmitter,
contact your Toyota dealer as the
tire pressure warning valve and
transmitter may be damaged if not
handled correctly.