Page 210 of 586

2084-1. Before driving
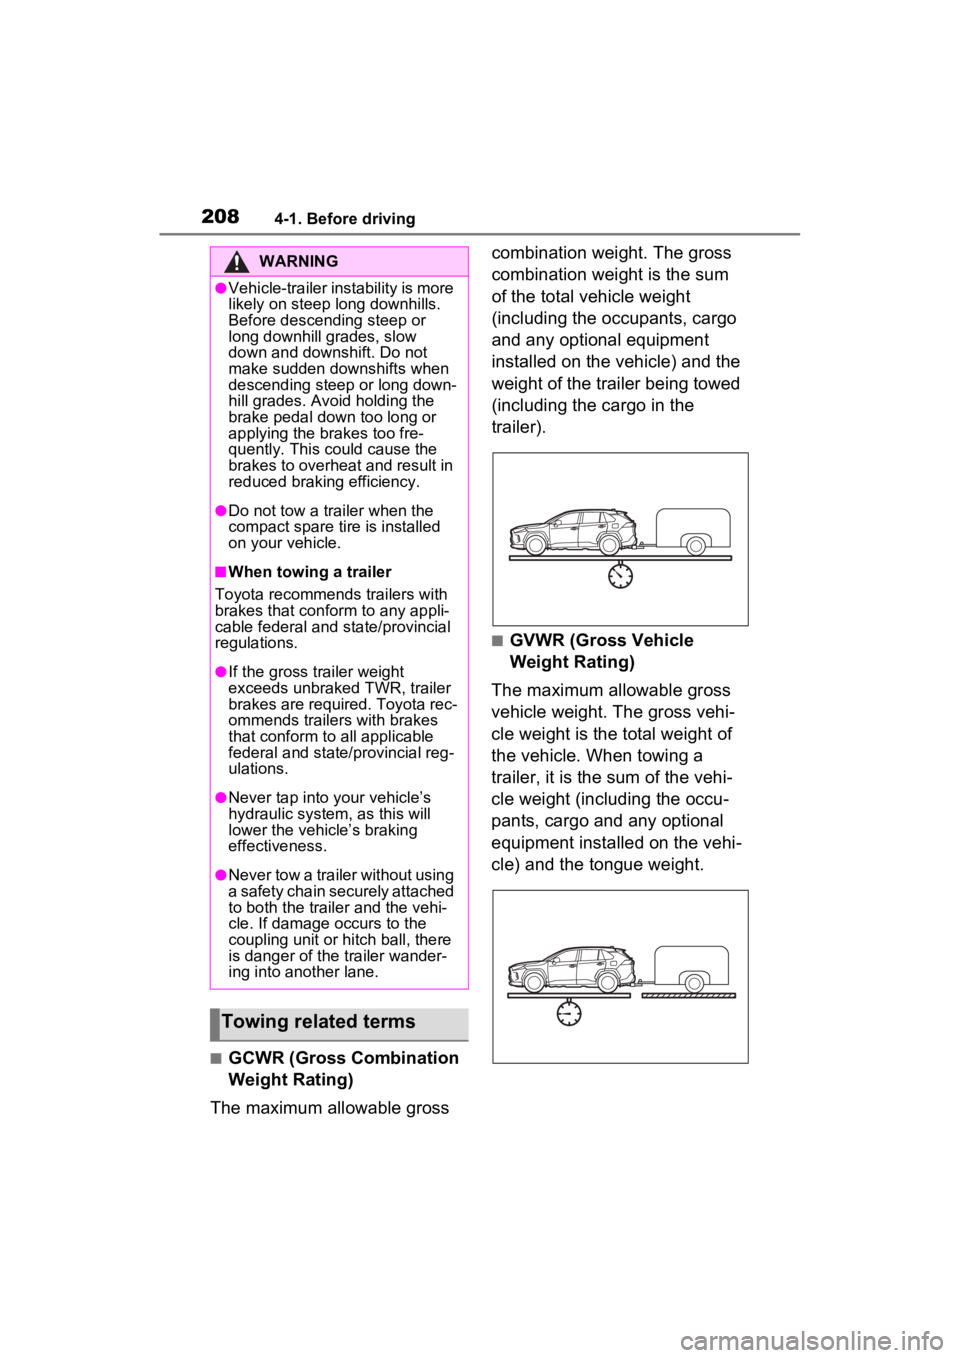
■GCWR (Gross Combination
Weight Rating)
The maximum allowable gross combination weight. The gross
combination weight is the sum
of the total vehicle weight
(including the occupants, cargo
and any optional equipment
installed on the vehicle) and the
weight of the trailer being towed
(including the cargo in the
trailer).
■GVWR (Gross Vehicle
Weight Rating)
The maximum allowable gross
vehicle weight. The gross vehi-
cle weight is the total weight of
the vehicle. When towing a
trailer, it is the sum of the vehi-
cle weight (including the occu-
pants, cargo and any optional
equipment installed on the vehi-
cle) and the tongue weight.
WARNING
●Vehicle-trailer instability is more
likely on steep long downhills.
Before descending steep or
long downhill grades, slow
down and downshift. Do not
make sudden downshifts when
descending steep or long down-
hill grades. Avoid holding the
brake pedal down too long or
applying the brakes too fre-
quently. This could cause the
brakes to overheat and result in
reduced braking efficiency.
●Do not tow a trailer when the
compact spare tire is installed
on your vehicle.
■When towing a trailer
Toyota recommends trailers with
brakes that confor m to any appli-
cable federal and state/provincial
regulations.
●If the gross trailer weight
exceeds unbraked TWR, trailer
brakes are required. Toyota rec-
ommends trailers with brakes
that conform to all applicable
federal and state/provincial reg-
ulations.
●Never tap into y our vehicle’s
hydraulic system, as this will
lower the vehicle’s braking
effectiveness.
●Never tow a trailer without using
a safety chain securely attached
to both the traile r and the vehi-
cle. If damage occurs to the
coupling unit or hitch ball, there
is danger of the trailer wander-
ing into another lane.
Towing related terms
Page 252 of 586

2504-4. Refueling
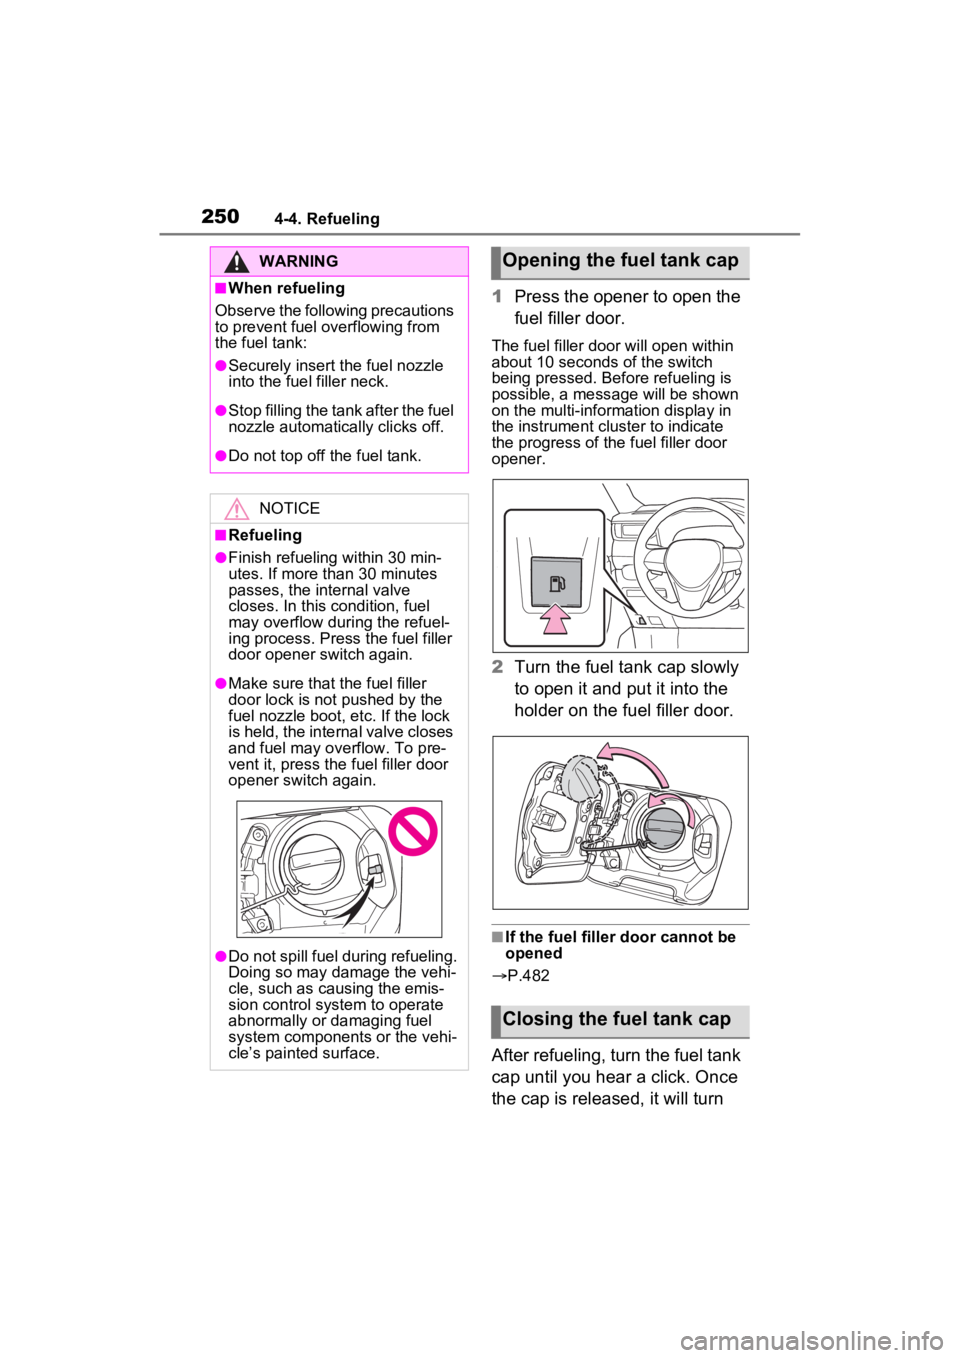
1Press the opener to open the
fuel filler door.
The fuel filler door will open within
about 10 seconds of the switch
being pressed. Before refueling is
possible, a message will be shown
on the multi-information display in
the instrument cluster to indicate
the progress of the fuel filler door
opener.
2Turn the fuel tank cap slowly
to open it and put it into the
holder on the fuel filler door.
■If the fuel filler door cannot be
opened
P.482
After refueling, turn the fuel tank
cap until you hear a click. Once
the cap is released, it will turn
WARNING
■When refueling
Observe the following precautions
to prevent fuel overflowing from
the fuel tank:
●Securely insert the fuel nozzle
into the fuel filler neck.
●Stop filling the tank after the fuel
nozzle automatically clicks off.
●Do not top off the fuel tank.
NOTICE
■Refueling
●Finish refueling within 30 min-
utes. If more than 30 minutes
passes, the internal valve
closes. In this condition, fuel
may overflow during the refuel-
ing process. Press the fuel filler
door opener switch again.
●Make sure that the fuel filler
door lock is not pushed by the
fuel nozzle boot, etc. If the lock
is held, the internal valve closes
and fuel may overflow. To pre-
vent it, press the fuel filler door
opener switch again.
●Do not spill fuel during refueling.
Doing so may damage the vehi-
cle, such as causing the emis-
sion control system to operate
abnormally or damaging fuel
system components or the vehi-
cle’s painted surface.
Opening the fuel tank cap
Closing the fuel tank cap
Page 253 of 586
2514-4. Refueling
4
Driving
slightly in the opposite direction.
■When “Check Fuel Cap” is dis-
played on the multi-information
display
The fuel tank cap may be unfas-
tened or loose. Turn the power
switch to OFF, check the cap and
tighten it securely. If the message
remains, wait a few seconds and
then turn the power switch to OFF
once again.
WARNING
■When replacing the fuel tank
cap
Do not use anything but a genu-
ine Toyota fuel tank cap designed
for your vehicle. Doing so may
cause a fire or other incident
which may result in death or seri-
ous injury.
Page 300 of 586

2984-5. Using the driving support systems
a vehicle remains in the detection
area
• When driving up and down con-
secutive steep inclines, such as
hills, dips in the road, etc.
• When driving on roads with sharp
bends, consecutive curves, or
uneven surfaces
• When vehicle lanes are wide, or
when driving on the edge of a
lane, and the vehicle in an adja-
cent lane is far away from your
vehicle
• When an accessory (such as a bicycle carrier) is installed to the
rear of the vehicle
• When there is a significant differ- ence in height between your vehi-
cle and the vehicle that enters the
detection area
• Immediately after the Blind Spot
Monitor is turned on
• When towing with the vehicle
●Instances of unnecessary detec-
tion may increase in situations
such as the follo wing (while driv-
ing):
• When the sensor is misaligned
due to a strong impact to the sen-
sor or its surrounding area
• When the distanc e between your
vehicle and a guar drail, wall, etc.
that enters the detection area is
short
• When driving up and down con-
secutive steep inclines, such as
hills, dips in the road, etc.
• When vehicle lanes are narrow, or
when driving on the edge of a
lane, and a vehicle traveling in a
lane other than the adjacent lanes
enters the detection area
• When driving on roads with sharp bends, consecutive curves, or
uneven surfaces
• When the tires are slipping or spinning
• When the distanc e between your
vehicle and a following vehicle is
short
• When an accessory (such as a
bicycle carrier) is installed to the
rear of the vehicle
• When towing with the vehicle
*: If equipped
■Location and types of sen-
sors
Front corner sensors
Front center sensors
Rear corner sensors
Rear center sensors
■Display (Multi-information
display)
When the sensors detect an
object, such as a wall, a graphic
is shown on the multi-informa-
Intuitive parking
assist*
The distance from your
vehicle to objects, such as a
wall, when parallel parking
or maneuvering into a
garage is measured by the
sensors and communicated
via the multi-information
display or Multimedia Dis-
play and a buzzer. Always
check the surrounding area
when using this system.
System components
A
B
C
D
Page 361 of 586
3595-3. Using the storage features
5
Interior features
Raise the hook to use.
The cargo hooks are provided for
securing loose items.
■Flipping the deck board
upside down
The deck board can be flipped
upside down (resin side up)
depending on the situation. Original position
Underside (resin side)
■Changing the deck board
positions
Height of the deck board can be
changed by setting the deck
board under the floor.
Upper
Lower
Luggage compart-
ment features
Cargo hooks
WARNING
■When cargo hooks are not in
use
To avoid injury, always return the
hooks to their stowed positions
when not in use.
Deck board
A
B
A
B
Page 364 of 586

3625-3. Using the storage features
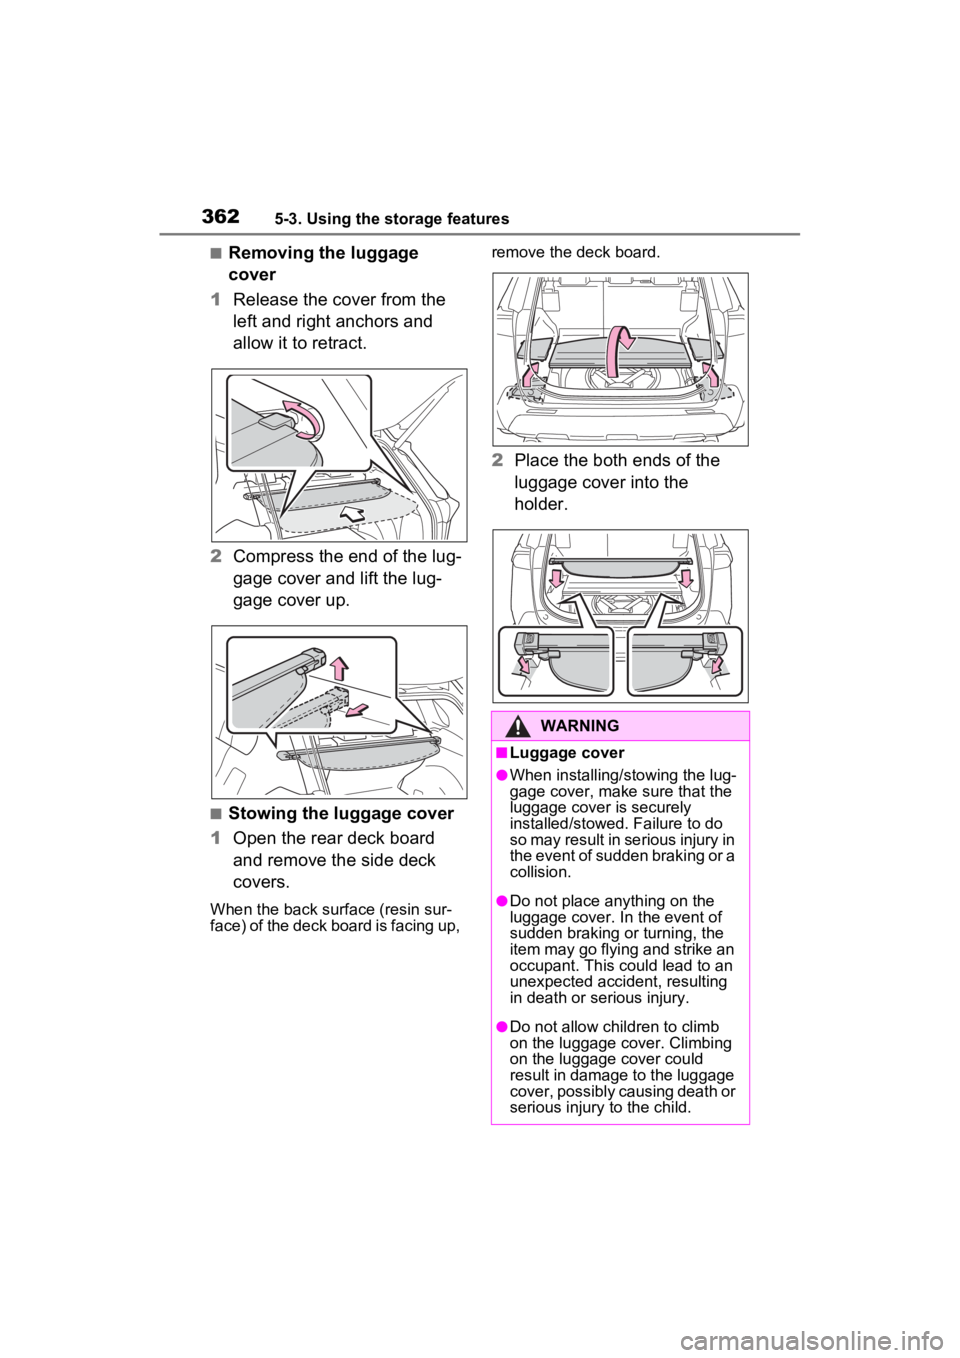
■Removing the luggage
cover
1 Release the cover from the
left and right anchors and
allow it to retract.
2 Compress the end of the lug-
gage cover and lift the lug-
gage cover up.
■Stowing the luggage cover
1 Open the rear deck board
and remove the side deck
covers.
When the back surface (resin sur-
face) of the deck board is facing up, remove the deck board.
2
Place the both ends of the
luggage cover into the
holder.
WARNING
■Luggage cover
●When installing/stowing the lug-
gage cover, make sure that the
luggage cover is securely
installed/stowed. Failure to do
so may result in serious injury in
the event of sudden braking or a
collision.
●Do not place anything on the
luggage cover. In the event of
sudden braking or turning, the
item may go flying and strike an
occupant. This could lead to an
unexpected accident, resulting
in death or serious injury.
●Do not allow children to climb
on the luggage cover. Climbing
on the luggage cover could
result in damage to the luggage
cover, possibly causing death or
serious injury to the child.
Page 377 of 586

3755-4. Using the other interior features
5
Interior features
*: If equipped
■HomeLink® programming pro-
cedure
The programming procedures can
also be found at the following URL.
Website: www.hom elink.com/toyota
For support, contact customer sup-
port at the following.
Help Line: 1-800-355-3515
The HomeLink® wireless control
system in your vehicle has 3
buttons which can be pro-
grammed to operate 3 different
devices. Refer to the program-
ming methods on the following
pages to determine the method
which is appropriate for the device.
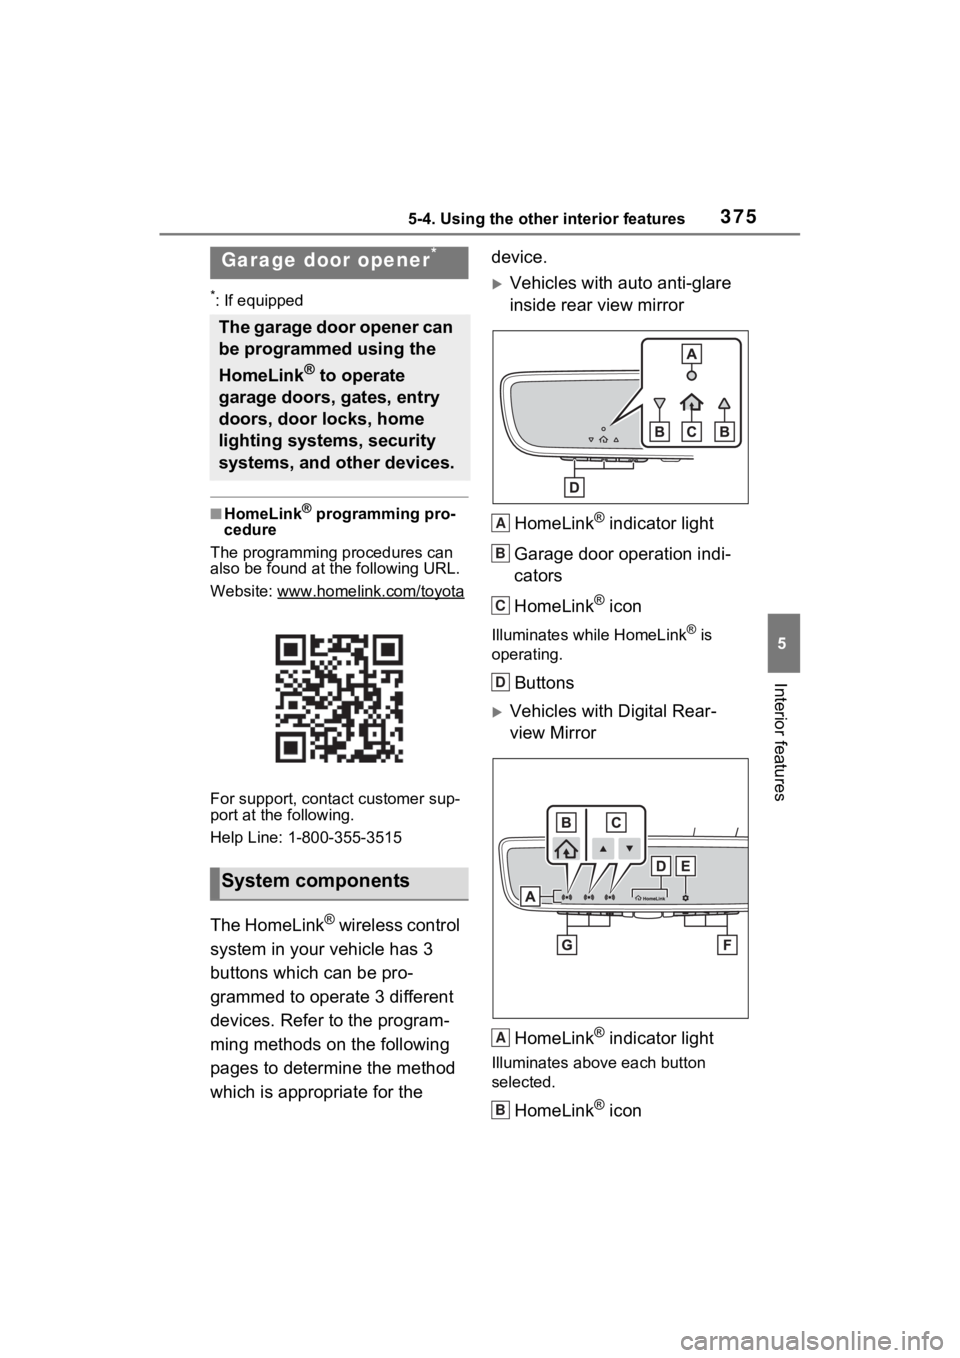
Vehicles with auto anti-glare
inside rear view mirror
HomeLink
® indicator light
Garage door operation indi-
cators
HomeLink
® icon
Illuminates while HomeLink® is
operating.
Buttons
Vehicles with Digital Rear-
view Mirror
HomeLink
® indicator light
Illuminates above each button
selected.
HomeLink® icon
Garage door opener*
The garage door opener can
be programmed using the
HomeLink
® to operate
garage doors, gates, entry
doors, door locks, home
lighting systems, security
systems, and other devices.
System components
A
B
C
D
A
B
Page 394 of 586

3926-2. Maintenance
General maintenance
Listed below are the general
maintenance items that
should be performed at the
intervals specified in the
“Owner’s Warranty Informa-
tion Booklet” or “Owner’s
Manual Supplement/Sched-
uled Maintenance Guide”. It
is recommended that any
problem you notice should
be brought to the attention
of your Toyota dealer or
qualified service shop for
advice.
WARNING
■If the hybrid system is run-
ning
Turn the hybrid system off and
ensure that there is adequate
ventilation before performing
maintenance checks.
Engine compartment
ItemsCheck points
Brake fluid
Is the brake fluid at
the correct level?
( P.405)
Engine/power
control unit
coolant
Is the
engine/power con-
trol unit coolant at
the correct level?
( P.403)
Engine oil
Is the engine oil at
the correct level?
( P.401)
Exhaust sys-
temThere should not
be any fumes or
strange sounds.
Radiator/con-
denser
The radiator and
condenser should
be free from for-
eign objects.
( P.404)
Washer fluid
Is there sufficient
washer fluid?
( P.406)
Luggage compartment
ItemsCheck points
12-volt batteryCheck the connec-
tions. ( P.407)
Vehicle interior
ItemsCheck points
Accelerator
pedal
• The accelerator
pedal should
move smoothly
(without uneven
pedal effort or
catching).
Hybrid trans-
mission “Park”
mechanism
• When parked on a slope and the
shift position is in
P, is the vehicle
securely
stopped?
ItemsCheck points