Page 93 of 586
932-1. Instrument cluster
2
Vehicle status information and indicators
The display of the speedometer can be selected from two types,
analog or digital. (P.110)
Analog speedometer
The units used on the meter and display may differ depending on the target
region.
Hybrid System Indicator
Displays the Hybrid System Indicator ( P.96)
Speedometer
Displays the vehicle speed
Clock
Automatically adjusts the time by using the GPS time informatio n (GPS
clock).
For details, refer to “MULTIMEDIA OWNER’S MANUAL”.
Fuel gauge
Displays the quantity of fu el remaining in the tank.
In the following sit uations, the actual quantity of fuel remain ing in the tank
may not be displayed correctly. Refer to P.96 if the actual quantity of fuel
remaining in the tank is not displayed correctly.
Gauges and meters (with 7-inch multi-information
display)
The meters display various drive information.
Meter display
A
B
C
D
Page 95 of 586

952-1. Instrument cluster
2
Vehicle status information and indicators
Displays the vehicle speed
Clock
Automatically adjusts the time by using the GPS time information (GPS
clock).
For details, refer to “MULTIMEDIA OWNER’S MANUAL”.
Fuel gauge
Displays the quantity of fu el remaining in the tank.
In the following sit uations, the actual quantity of fuel remain ing in the tank
may not be displayed correctly. Refer to P.96 if the actual quantity of fuel
remaining in the tank is not displayed correctly.
• A small amount of fuel is added.
• Fuel is added with the fuel gauge near or at “F”.
• The vehicle is stopp ed on an uneven surface, such as a slope.
• The vehicle is driven on a slope or around a curve.
Engine coolant temperature gauge
Displays the engine coolant temperature
Odometer and trip meter
Odometer:
Displays the total distance th at the vehicle has been driven
Trip meter:
Displays the distance the vehicle has been driven since the meter was last
reset. Trip meters “A” and “B” c an be used to record and display different
distances independently.
Outside temperature ( P.96)
Multi-information display
Presents the driver with a variety of driving-related data ( P.105)
Displays warning messages if a malfunction occurs (P.466)
Shift position and shift range indicator
Displays the selected shift posit ion or selected shift range (P.226)
■The meters and display illumi-
nate when
The power swit ch is in ON.
■When changing driving mode
Speedometer color is changed fol-
lowing the selected driving mode or
when Trail Mode is turned on.
( P.323, 324)
C
D
E
F
G
H
I
Page 100 of 586

1002-1. Instrument cluster
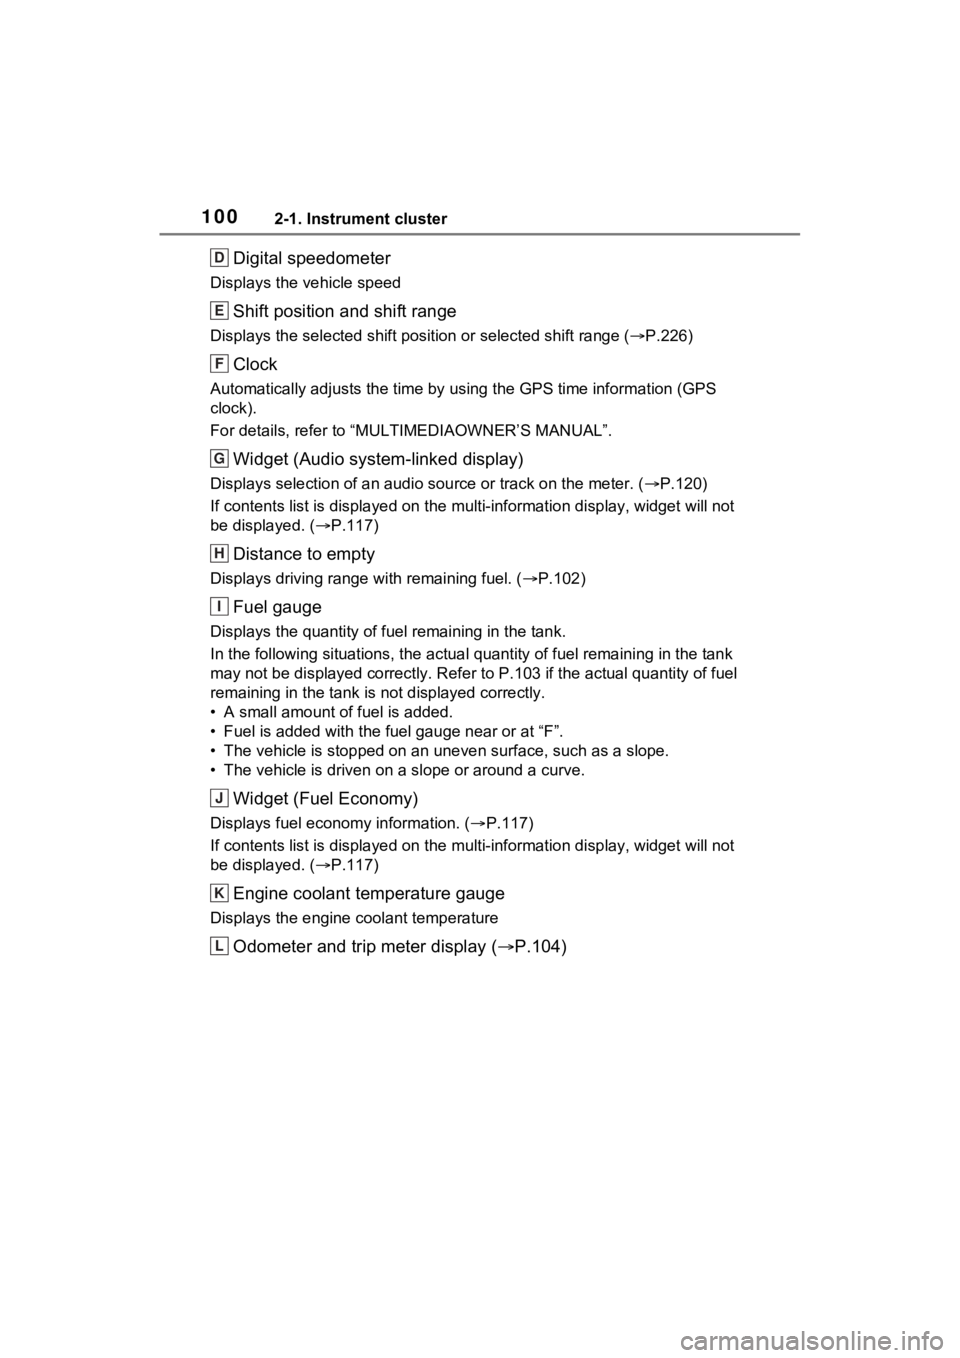
Digital speedometer
Displays the vehicle speed
Shift position and shift range
Displays the selected shift position or selected shift range (P.226)
Clock
Automatically adjusts the time by using the GPS time informatio n (GPS
clock).
For details, refer to “MU LTIMEDIAOWNER’S MANUAL”.
Widget (Audio system-linked display)
Displays selection of an audio source or track on the meter. ( P.120)
If contents list is displayed on t he multi-information display, widget will not
be displayed. ( P.117)
Distance to empty
Displays driving range with remaining fuel. ( P.102)
Fuel gauge
Displays the quantity of fu el remaining in the tank.
In the following sit uations, the actual quantity of fuel remain ing in the tank
may not be displayed correctly. R efer to P.103 if the actual quantity of fuel
remaining in the tank is not displayed correctly.
• A small amount of fuel is added.
• Fuel is added with the fuel gauge near or at “F”.
• The vehicle is stopp ed on an uneven surface, such as a slope.
• The vehicle is driven on a slope or around a curve.
Widget (Fuel Economy)
Displays fuel economy information. ( P.117)
If contents list is displayed on t he multi-information display, widget will not
be displayed. ( P.117)
Engine coolant temperature gauge
Displays the engine c oolant temperature
Odometer and trip meter display ( P.104)
D
E
F
G
H
I
J
K
L
Page 101 of 586

1012-1. Instrument cluster
2
Vehicle status information and indicators
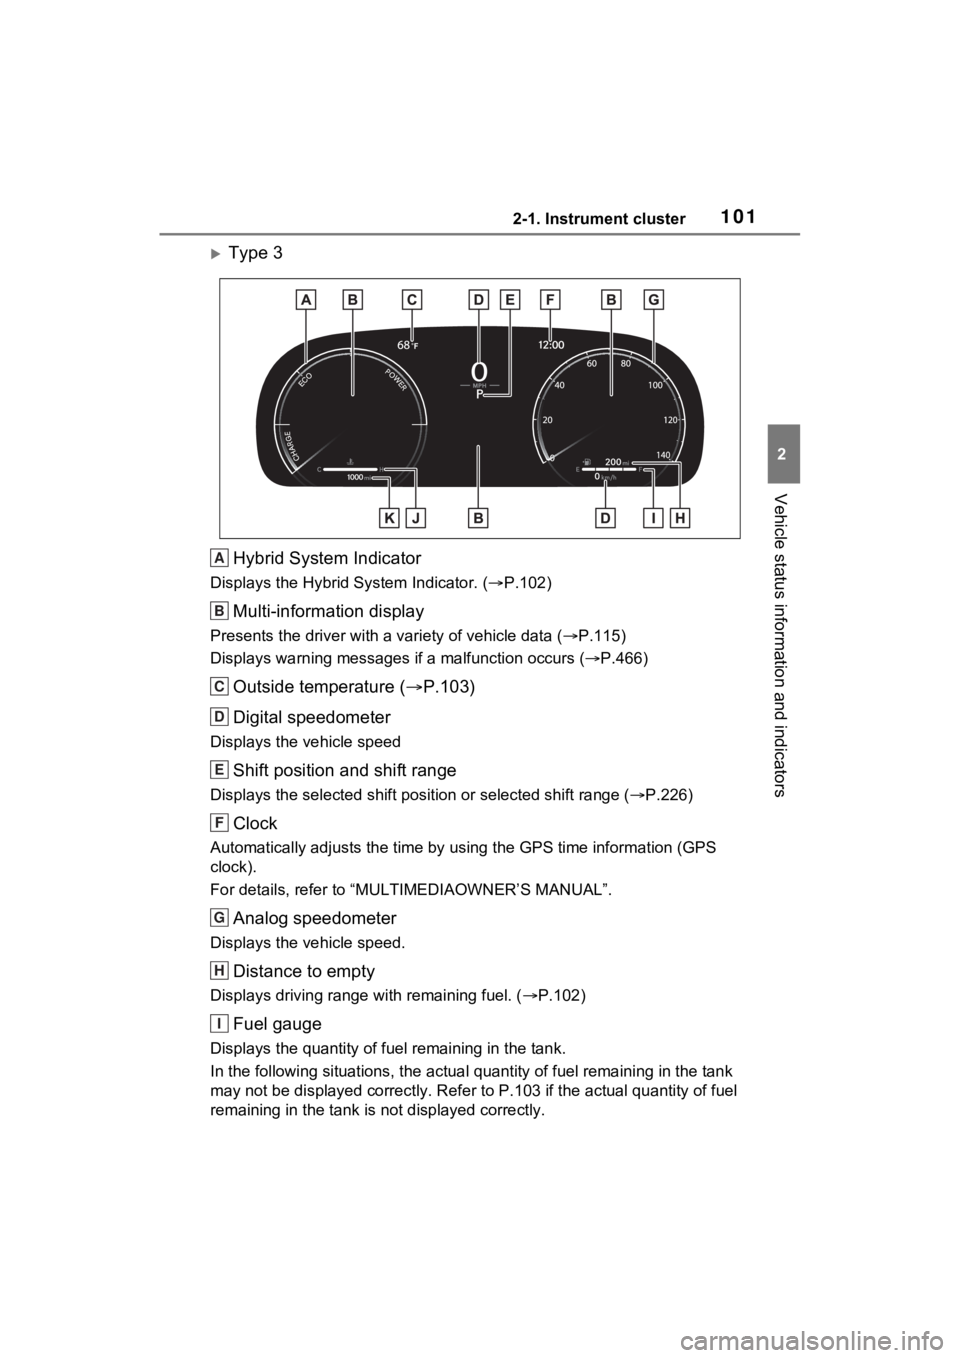
Type 3Hybrid System Indicator
Displays the Hybrid S ystem Indicator. (P.102)
Multi-information display
Presents the driver with a variety of vehicle data (P.115)
Displays warning messages if a malfunction occurs (P.466)
Outside temperature ( P.103)
Digital speedometer
Displays the vehicle speed
Shift position and shift range
Displays the selected shift posit ion or selected shift range (P.226)
Clock
Automatically adjusts the time by using the GPS time informatio n (GPS
clock).
For details, refer to “MU LTIMEDIAOWNER’S MANUAL”.
Analog speedometer
Displays the vehicle speed.
Distance to empty
Displays driving range with remaining fuel. ( P.102)
Fuel gauge
Displays the quantity of fu el remaining in the tank.
In the following sit uations, the actual quantity of fuel remain ing in the tank
may not be displayed correctly. R efer to P.103 if the actual quantity of fuel
remaining in the tank is not displayed correctly.
A
B
C
D
E
F
G
H
I
Page 344 of 586
3425-1. Using the air conditioning system and defogger
5-1.Using the air conditioning system and defogger
Automatic mode switch
Left-hand side temperature control knob
Right-hand side temperature control knob
“SYNC” switch
“OFF” switch
Windshield defogger switch
Rear window and outside rear view mirror defoggers switch
Eco air conditioning mode switch
Fan speed decrease switch
Fan speed increase switch
Airflow mode control switch
Outside/recirculated air mode switch
Front seat concentrated airflow mode (S-FLOW) switch
“A/C” switch
■Adjusting the temperature
setting
Turn driver’s side temperature
control dial clockwise to increases the temperature and
turn the dial counterclockwise to
decreases the temperature.
The air conditioning system
Automatic air co
nditioning system
Air outlets and fan speed are automatically adjusted accord-
ing to the temperature setting.
Air conditioning controls
A
B
C
D
E
F
G
H
I
J
K
L
M
N
Page 404 of 586

4026-3. Do-it-yourself maintenance
check the oil level on the dip-
stick.
■Checking the engine oil
1 Park the vehicle on level
ground. After warming up the
engine and turning off the
hybrid system, wait more
than 5 minutes for the oil to
drain back into the bottom of
the engine.
2 Holding a rag under the end,
pull the dipstick out.
3 Wipe the dipstick clean.
4 Reinsert the dipstick fully.
5 Holding a rag under the end,
pull the dipstick out and
check the oil level.
Low
Normal
Excessive
The shape of the dipstick may differ
depending on the type of vehicle or
engine.
6Wipe the dipstick and reinsert
it fully.
■Checking the oil type and
preparing the items needed
Make sure to check the oil type
and prepare the items needed
before adding oil.
Engine oil selection
P.498
Oil quantity (Low Full)
1.6 qt. (1.5 L, 1.3 Imp. qt.)
Item
Clean funnel
■Adding engine oil
If the oil level is below or near
the low level mark, add engine
oil of the same type as that
already in the engine.
1 Remove the oil filler cap by
turning it counterclockwise.
2 Add engine oil slowly, check-
ing the dipstick.
3 Install the oil filler cap by
turning it clockwise.
A
B
C
Page 443 of 586
4416-3. Do-it-yourself maintenance
6
Maintenance and care
■Front turn signal/parking
lights (type A)
1 Turn the bulb base counter-
clockwise.
2 Remove the light bulb.
3 Install a new light bulb then
install the bulb base to the
light unit by inserting it and
turning the bulb base clock-
wise.
■Front turn signal lights
(type B)
1 Turn the bulb base counter-
clockwise.
2 Remove the light bulb.
3 Install a new light bulb then
install the bulb base to the
light unit by inserting it and
turning the bulb base clock-
wise.Replacing light bulb
Page 444 of 586
4426-3. Do-it-yourself maintenance
■Front side marker lights
(type A)
1 Turn the bulb base counter-
clockwise.
2 Remove the light bulb.
3 Install a new light bulb then
install the bulb base to the
light unit by inserting it and
turning the bulb base clock-
wise.■Front side marker lights
(type B)
1 Turn the bulb base counter-
clockwise.
2 Remove the light bulb.
3 Install a new light bulb then
install the bulb base to the
light unit by inserting it and
turning the bulb base clock-
wise.