Page 57 of 72
 with Door Monitor")
55†LEGAL DISCL AIMERS ON BACK INSIDE COVER | *IF EQUIPPEDALWAYS CHECK THE OWNER ’S MANUAL FOR COMPLETE OPER ATING INFORMATION AND SAFET Y WARNINGS
Rear Occupant Alert (ROA) with Door Monitoring
The Rear Occupant Alert (ROA) with Door Monitoring can help alert the driver when a rear passenger may be left in the vehicle The alert will be a message on the Instrument Cluster stating to “Check rear seats” C and a chime will sound
The factory default is set to OFF To turn the system ON or OFF, go to User Settings in the Instrument cluster or Vehicle Settings*, on the infotainment system select Convenience, then Rear Occupant Alert and check/uncheck the box
REMINDER: Always be sure to check the passenger areas before leaving the vehicle
Rear Occupant Aler t is not a substitute for one’s at tention and may not detect all movement within the vehicle Always check the vehicle interior when exiting the vehicle
See section 5 in the Owner ’s Manual for more information
Image is for illustrative purposes only and may not reflect actual feature or operation
Refer to the inside front cover for more information on QR codes www youtube com/KiaFeatureVideos
Rear Occupant Alert (ROA) with Door Monitoring Video
SEATING
S E AT I N G
QR CODES
(Message on Cluster Display)
Check rear seat
for passengers
and belongings
C
Page 58 of 72

56†LEGAL DISCL AIMERS ON BACK INSIDE COVER | *IF EQUIPPEDNIRO HYBRID / PLUG-IN HYBRID FEATURES & FUNCTIONS GUIDE
SeatbackLumbarSeatSeat Cushion
6-Way Manual Adjustable
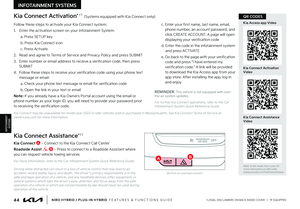
Driver’s Seat*†1 1
Pull lever D to slide Seat forward/backward
Pull/press lever E up/down one or more times to adjust Seat height*
Pull lever F to adjust Seatback recline
Power Adjustable Driver’s Seat*†1 1
Move/Press controls to adjust Seat forward/backward, Seat Cushion tilt up/down, Seatback forward/backward or Lumbar forward/backward
REMINDER: Do not at tempt to adjust the seat while the vehicle is moving This could result in loss of control of the vehicle
Do not at tempt to adjust the seat while the vehicle is moving This could result in loss of control of the vehicle
Refer to section 4 in the Owner ’s Manual for more information
Refer to the inside front cover for more information on QR codes www youtube com/KiaFeatureVideos
Manual Adjustable Driver’s Seat Video
Power Adjustable Driver’s Seat with Memory Settings Video
A
A A C
F
D
E
QR CODES
SEATING
S E AT I N G
When adjusting seat for ward or backward, ensure seat clicks or locks into place before driving vehicle
QUICK TIPB
B
C
Page 59 of 72

57*IF EQUIPPEDALWAYS CHECK THE OWNER ’S MANUAL FOR COMPLETE OPER ATING INFORMATION AND SAFET Y WARNINGS
•It may be necessar y to adjust the front seatbacks to fully lower rear seats
•Ensure the seat is locked by pressing down on Seatback and ensuring red line is NOT visible on bot tom of Folder Lever
QUICK TIPS
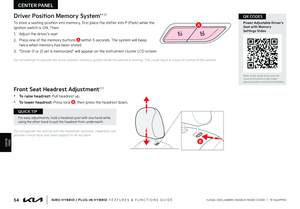
Folding Rear Seats
To Fold:
1 Ensure the belt strap is out of way of the Seatback folding A Insert the metal seat belt tab into the holder B
2 Adjust the Front Seatback to the upright position and lower the rear headrest to the lowest position
3 Pull on the Rear Seatback lock release lever C, then fold the seat toward the front
To Unfold:
1 Pull the lock release lever C and pull and lift the Seatback backward until it clicks firmly in place
2 Return the rear seat belt to the proper position
REMINDERS:
•
Before unfolding Seatback, ensure the metal seat belt tab is placed into the holder
•
Always make sure the seatback is locked in place when unfolded
For illustration purposes only Actual vehicle might be slightly different
Refer to section 4 in the Owner ’s Manual for more information
C
HOLD
HOLD
HOLDHOLD
Remote Keyless Entry (Folding Key)*
Remote but ton configuration may var y depending on vehicle options To turn OFF Alarm, press any but ton
Refer to section 5 in the Owner ’s Manual for more information
D Press the release button to unfold the key
E Press to lock All doors; Press twice within two seconds to sound the horn
F Press to unlock Driver ’s Door; Press twice in 4 seconds to unlock All Doors and Liftgate
G Press and hold for more than 1 second to unlock Liftgate Then lift by the handle to manually open Liftgate
H Press and hold more than a half second for Panic Alarm To turn off Alarm, press any buttonRefer to the inside front cover for more information on QR codes www youtube com/KiaFeatureVideos
Kia Smart & Folding Key Fobs Video
QR CODE
SEATING
S E AT I N G
OTHER KEY FEATURES
OTHER KEY F E AT U R E S
B
A
E
F
G
H
D
Page 60 of 72

58*IF EQUIPPEDNIRO HYBRID / PLUG-IN HYBRID FEATURES & FUNCTIONS GUIDE
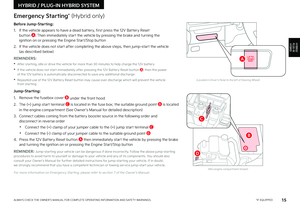
Digital Key 2 Touch*
Refer to the inside front cover for more information on QR codes www youtube com/KiaFeatureVideos
Digital Key 2 Touch Video
QR CODE
Digital Key 2 Touch, through your smartphone, can be used to lock and unlock your vehicle and allow you to start or power off your vehicle, without needing to have a key fob
Digital Key 2 Touch Setup:
1 First, ensure your Smart Key is inside the vehicle and turn the vehicle on
2 Download the Kia Access App and activate Kia Connect in your vehicle’s Infotainment System (see page 44)
3 Register your smartphone by going to the Vehicle Settings* on the Infotainment System:
– Press SETUP, VEHICLE, DIGITAL KEY C, SMARTPHONE KEY and then MY SMARTPHONE KEY
4 On your smartphone, press CONTINUE, then CONTINUE again, which will open the Wallet or Pass app Follow the prompts to complete the registration/pairing of your smartphone
5 Place your smartphone in the authentication pad (wireless charging pad) to complete registration Click Save on the Infotainment System screen and a message will appear showing the process is in place
6 When the Infotainment System is done pairing, remove the smar tphone and continue the steps to open the Digital Key in your iPhone® Wallet or Samsung™ Pass
7 When in the Wallet or Pass app, click on the Digital Key A and select the menu icon to adjust other settings or use other features
Using your Digital Key 2 Touch:
1 To lock or unlock your vehicle with Digital Key, touch phone on door handle (sensor) for more than two seconds If two-press unlock is set up, when unlocking, touch phone on door handle (sensor) briefly, then pull away and then touch door handle again within four seconds
2 To start your vehicle with Digital Key 2 Touch, place registered smart phone on the authentication pad B (wireless charging pad; see next page)
Sharing your Digital Key 2 Touch:
1 Open the Wallet or Pass app, click on the Kia Digital Key and select the menu icon to enter settings
2 Under People, click on Invite and follow the prompts to share your Digital Key with one of your contacts – the shared device must be the same smartphone operating system - Apple iPhone/iWatch or Samsung phone/smartwatch
Revoking shared Digital Key access:
1 Go to the Vehicle Settings* on the Infotainment System Press SETUP, VEHICLE, DIGITAL KEY, SMARTPHONE KEY and MY SMARTPHONE KEY Then delete the Digital Key
2 You can also delete a key using the Kia Access App on your smartphone Open the Wallet or Pass app, click on the Kia Digital Key and select the menu icon to enter settings Under People, click on the contact to revoke Then click on Revoke Access
OTHER KEY FEATURES
OTHER KEY F E AT U R E S
A
Page 61 of 72

•You can set the Access for the Shared Digital Key befor")
59*IF EQUIPPEDALWAYS CHECK THE OWNER ’S MANUAL FOR COMPLETE OPER ATING INFORMATION AND SAFET Y WARNINGS
Digital Key 2 Touch* (continued)
•You can set the Access for the Shared Digital Key before inviting the contact, or click on the contact when in the set tings page to change access
•When sharing the Digital Key, the receiver of the share invitation must have the same t ype of smar tphone device – Apple iPhone or Samsung
•If the smar t phone digital key does not operate, move the smar t phone more than 4 inches (10 cm) from the door handle authentication pad and tr y it again
QUICK TIPS
REMINDERS:
•
Digital Key 2 Touch is currently only compatible with Apple iPhone & iWatch and Samsung phone and smar t watch Future expansion to other Google phones •
Your iPhone Wallet or Samsung Pass app content may var y as the apps are updated The actual steps for Digital Key 2 Touch setup, usage and sharing may change •
During the Digital Key saving process, the process will cancel when: -The smar t phone is removed from the in-vehicle authentication pad -Changing the infotainment system screen -The vehicle is powered off or the gear is shifted -There is no smar t key (saving process will not begin)
•Currently compatible devices: -For Apple iPhone (Ensure the device has the latest version of iOS):
-
iPhone XS or later
-
iPhone 11 Pro or later (for passive entr y or remote features on compatible cars)
- F o r Apple Watch (Ensure the device has the latest version of watchOS):
-
Apple Watch Series 5 or later
-
Apple Watch Series 6 or later (for passive entr y or remote features on compatible cars)
- F o r Samsung Phones: Ensure the device has the latest version of Android OS and latest application version of Samsung Pass)
-
Galaxy S20 or later
-
Galaxy Note2 5G or later
-
Galaxy Z Flip 5G (not yet released) or later
-Galaxy Fold 2 or later
12V 180WUSB
11:00 AM Wed. Jun . 29
Vehicle Settings
Seat
Lights
Door
Digital Key
Convenience Smartphone Key
Card Key
Digital Key Information >
>
>
Refer to section 5 in the Owner ’s Manual for more information
OTHER KEY FEATURES
OTHER KEY F E AT U R E S
BC
Door handle authentication pad
NFC antenna (backside of smar tphone)Antenna position differs depending on models
Page 62 of 72

60†LEGAL DISCL AIMERS ON BACK INSIDE COVER | *IF EQUIPPEDNIRO HYBRID / PLUG-IN HYBRID FEATURES & FUNCTIONS GUIDE
F
HOLD
HOLD
HOLDHOLD
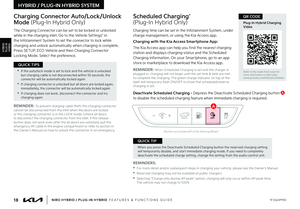
Smart Key / Remote Start*†6
Smart Key Fob:
A Press to lock All Doors; Press twice within 2 seconds to sound the horn
B Press to unlock Driver ’s Door Press twice in 4 seconds to unlock All Doors
C Press and hold for more than 1 second to unlock Liftgate Then lift by the handle to manually open Liftgate
REMINDER: The Liftgate unlocks when the Smar t Key fob is within close proximit y of the vehicle’s Liftgate
D Press and hold more than 1 second for Panic Alarm To turn off Alarm, press any button
E Press to release Mechanical Key
Driver’s Door Lock/Unlock button F:
•
Press button once to unlock Driver ’s Door
•Press again within 4 seconds to unlock All Doors
•Press again to lock All Doors
Mechanical Key G: Use to unlock/lock Driver ’s Door:
•Pull out door handle
•Remove door handle keyhole cover with Mechanical Key by pressing up into slot as shown I
•Insert Mechanical Key J and turn right to Unlock Driver ’s Door
•Turn twice within 4 seconds to Unlock All Doors
•Insert Mechanical Key and turn left to Lock All Doors
•Return keyhole cover to its original position
Remote Start* H: Lock the doors by pressing the door lock button A within 32 feet distance from the vehicle Within four (4) seconds of pressing the door lock button A, press and hold the Remote Start button H for more than two (2) seconds to start the vehicle To stop the Remote Start operation, press the button again If driver does not enter vehicle within ten minutes of starting the vehicle, the engine will automatically turn off
REMINDERS: • Remote but ton configuration may var y depending on vehicle options •
When reinser ting the mechanical key, make sure it is pushed all the way in until there is a click sound
Refer to section 5 in the Owner ’s Manual for more information
Refer to the inside front cover for more information on QR codes www youtube com/KiaFeatureVideos
Smart Key with Remote Start Video
•If the Smar t Key bat ter y is weak or not working properly, hold the Smar t Key fob up to the Engine Star t/Stop but ton (Lock but ton side closest) and press to star t engine
•The Smar t Key ’s signal can be blocked by the normal operation of a cell phone or smar tphone To help prevent this, store each device separately
QUICK TIPS
QR CODES
OTHER KEY FEATURES
OTHER KEY F E AT U R E S
H
G
B
A
C
D
E
I
J
Page 63 of 72

61*IF EQUIPPEDALWAYS CHECK THE OWNER ’S MANUAL FOR COMPLETE OPER ATING INFORMATION AND SAFET Y WARNINGS
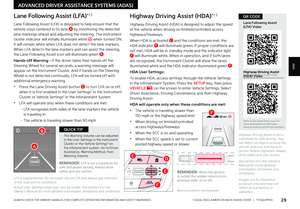
The sunroof glass and sunshade operation is controlled by a multidirectional switch E, and the ignition needs to be in the ON position to operate the sunroof glass and sunshade
To slide the sunroof glass and sunshade:
•
Auto Open: Slide switch E backward to the farthest position and release
•
Auto Close (Sunroof only): Slide the switch E forward to the farthest position and release
Tilt the Sunroof:
•Tilt open: Press switch E upward
•Tilt close: Press switch E forward
Map/Room Lamps
Automatic turn off function*
The interior lights automatically turn off approximately 30 seconds after the Engine Start/Stop button is OFF
Map Lamp/Room Lamp Operation
•Press lens A to turn the Driver ’s/ Passenger ’s Map Lamps ON/OFF This light produces a spot beam for convenient use as a map lamp or as a personal lamp for the driver or the front passenger
•Press button B to turn all the Map/ Room Lamps ON/OFF
•
Press button C to turn the Map/Room Lamp ON, for 30 seconds, when a door is opened, unlocked from Smart Key or the ignition is turned OFF When pressed and a door is opened, or doors are unlocked from the Smart Key, the Map and Room Lamps turn ON for approximately 30 seconds
•Press button D to turn the Room Lamp ON/OFF
Sunroof Operation*
REMINDERS:
•
Sunshade needs to remain OPEN while Sunroof is open
•When closing, be mindful of any objects or persons
•
If the sunroof is not fully closed, a warning will sound and display on the instrument cluster when the following occur:
-The vehicle is powered off
-The Smar t Key is removed from the vehicle
-The driver ’s door is opened
(Type B)
•When doors are unlocked by the Smar t Key*, the lamp turns ON for approximately 30 seconds
•If your vehicle is equipped with the theft alarm system, the interior lights automatically turn off approximately 3 seconds after the system is in armed stage
•Using interior lights for an extended period of time may cause bat ter y discharge
QUICK TIPS
•To stop the Sunroof at any position, push or pull the Sunroof control lever in any direction
•While driving with the rear windows down or with the sunroof* in an open or par tially open position, a wind buffeting or pulsation noise may be heard This noise is a normal occurrence and can be reduced or eliminated by the following:
-If the noise occurs with one or both of the rear windows down, par tially lower both front windows approximately 1 inch
-If the noise occurs with the sunroof open, slightly reduce the size of the sunroof opening
QUICK TIPS
Do not adjust the Sunroof or Sunshade while driving This could result in loss of control of the vehicle
OTHER KEY FEATURES
OTHER KEY F E AT U R E S
Refer to section 4 in the Owner ’s Manual for more information
Refer to the inside front cover for more information on QR codes www youtube com/KiaFeatureVideos
Sunroof Video
QR CODE
D
AA
BC
E
Page 64 of 72

Opening the Hood:
1 Pull the Hood Release Lever A to unlatch the Hood
2 In the front of the vehicle, lift the Hood slightly, pull the secondary Latch B inside of the Hood’s center and lift the Hood
Closing the Hood: Lower the Hood about halfway and then press down to securely lock in place
62NIRO HYBRID / PLUG-IN HYBRID FEATURES & FUNCTIONS GUIDE†LEGAL DISCL AIMERS ON BACK INSIDE COVER | *IF EQUIPPED
OTHER KEY FEATURES
OTHER KEY F E AT U R E S
Refer to the inside front cover for more information on QR codes www youtube com/KiaFeatureVideos
Kia Fuel Cap Video
Fuel Filler Lid Video
QR CODES
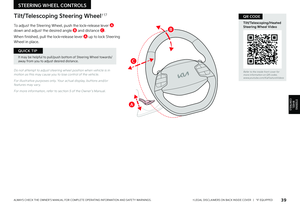
OFFHOLDOFF
�'�V�F�M���'�J�M�M�F�S���-�J�E
(But tons located on Driver's Panel to the left of the Steering Wheel)
Hood Release Lever and Latch
(Located on Driver side kick panel)
(Latch located inside hood)
Fuel Cap / Malfunction
Indicator (Check Engine Light)
Tighten for ONE CLICK to prevent Malfunction
Indicator from illuminating
REMINDERS:
•
The Fuel Filler Door Release but ton is located on the left side of the Steering Wheel on the lower but ton panel
•
It is normal to hear one click when tightening and for the Fuel Cap to click back when released
CLICK!
Refer to section 5 in the Owner ’s Manual for more information
REMINDERS:
•
Sunvisor may not shield all direct light
•
Do not operate the vehicle if Sunvisor is impairing your visibilit y
•
Be aware of your seating position when adjusting or swinging Sunvisor around from the front or side windows
Sunvisor†1 6
Refer to section 5 in the Owner ’s Manual for more information Refer to section 8 in the Owner ’s Manual for more information
Refer to section 8 in the Owner ’s Manual for more information
There may be a delay in Fuel Filler Lid opening for about 20 seconds due to depressurization
QUICK TIP
Use the Sunvisor to shield direct light through the front or side windows Move the Sunvisor out and adjust as needed
1 Stop the engine
2
Press the Fuel Filler Lid button C to open the Fuel Filler Lid The LCD may display this message: Wait until fuel door opens (Plug-In Hybrid Only) Once
the Fuel Filler Lid is open, the LCD may display this message: Fuel door open
3 Pull open the Fuel Filler Lid
4
Remove cap by turning
counterclockwise
C
AB