Page 17 of 72

15*IF EQUIPPEDALWAYS CHECK THE OWNER ’S MANUAL FOR COMPLETE OPER ATING INFORMATION AND SAFET Y WARNINGS
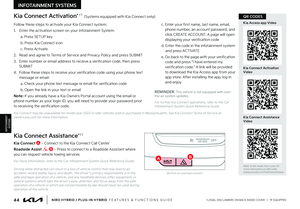
Before Jump-Starting:
1
If the vehicle appears to have a dead battery, first press the 12V Battery Reset button A Then immediately start the vehicle by pressing the brake and turning the ignition on or pressing the Engine Start/Stop button
2
If the vehicle does not start after completing the above steps, then jump-start the vehicle (as described below)
REMINDERS:
•After star ting, idle or drive the vehicle for more than 30 minutes to help charge the 12V bat ter y
•
If the vehicle does not star t immediately after pressing the 12V Bat ter y Reset but ton A, then the power of the 12V bat ter y is automatically disconnected to save any additional discharge
•
Repeated use of the 12V Bat ter y Reset but ton may cause over discharge which will prevent the vehicle from star ting
Jump-Starting:
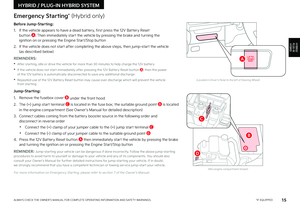
1 Remove the fusebox cover B under the front hood
2 The {+} jump start terminal C is located in the fuse box; the suitable ground point D is located
in the engine compartment (See Owner ’s Manual for detailed description)
3
Connect cables coming from the battery booster source in the following order and disconnect in reverse order
•Connect the {+} clamp of your jumper cable to the {+} jump start terminal C
•Connect the {-} clamp of your jumper cable to the suitable ground point D
4
Press the 12V Battery Reset button A then immediately start the vehicle by pressing the brake and turning the ignition on or pressing the Engine Start/Stop button
REMINDER: Jump-star ting your vehicle can be dangerous if done incorrectly Follow the above jump-star ting procedures to avoid harm to yourself or damage to your vehicle and any of its components You should also consult your Owner's Manual for fur ther detailed instructions for jump-star ting your vehicle If in doubt, we strongly recommend that you have a competent technician or towing ser vice jump-star t your vehicle
For more information on Emergency Star ting, please refer to section 7 of the Owner ’s Manual
(Located in Driver's Panel to the left of Steering Wheel)
(Niro engine compar tment shown)
Emergency Starting* (Hybrid only)
HYBRID / PLUG-IN HYBRID SYSTEM
HYBRID/PLUG-IN
HYBRID
B
A
C
D
Page 18 of 72

16*IF EQUIPPEDNIRO HYBRID / PLUG-IN HYBRID FEATURES & FUNCTIONS GUIDE
A Level 2 or “normal” 240-volt charger is recommended for regular charging of the vehicle
QUICK TIP
Refer to the inside front cover for more information on QR codes www youtube com/KiaFeatureVideos
Plug-In Hybrid Charging Video
QR CODECharging the Plug-In Hybrid Vehicle (Plug-In Hybrid Only)
AC Charger Level 1 Charging – “Trickle” Charge
An AC Charger Level 1 or “trickle” charger is the most common type of charging system for a Plug-In Hybrid This type of charger uses 110 volts of household electricity and takes up to 9 hours for a full charge
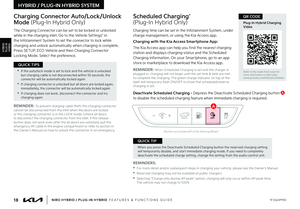
Indicators:
A ICCB plug
B
Power – When the charger and AC plug is plugged in and functioning normally, the indicator will turn green Indicator is red if plug temperature sensor warning is present
C Charge – Indicates that the vehicle is charging
D Fault – Indicates charge failure
E Charge Level – Indicates the level of charge: 6A , 8A , 10A , 12 A
F ICCB – In-Cable Control Box
REMINDER: Do not use an extension cord Plug trickle charger directly into wall socket Do not charge to a receptacle that is old, damaged, corroded or cracked When using outdoors, be careful not to expose it to external environments such as rain, snow, and high temperatures
AC Charger Level 2 Charging – “Normal” Charge
An AC Charger Level 2 or “normal” 240-volt charger is the recommended charging system for the Plug-In Hybrid This type of charger uses 240 volts of electricity and takes approximately 2 5-3 hours for a full charge (Based on Kia Corporation testing with SAE J1772 charger per formed at 3 3kW) This charger may be able to be installed at your home by a qualified electrician or found at a public charging station
REMINDERS:
•
Shape of charger and how to use the charger may be different for each manufacturer Please see Owner ’s Manual for more information
•For more detail and/or subsequent steps in charging your vehicle, please see the Owner's Manual
•
Distance to empt y may depend on many factors such as the charge amount of the high voltage bat ter y, weather, temperature, durabilit y of the bat ter y, geographical features, and driving st yle
•Operating the air conditioner or heater excessively may reduce the distance to empt y
HYBRID / PLUG-IN HYBRID SYSTEM
HYBRID/PLUG-IN
HYBRID
FA U LT
POWERCHARGE
!
C
DE
F
B
A
Page 19 of 72

17*IF EQUIPPEDALWAYS CHECK THE OWNER ’S MANUAL FOR COMPLETE OPER ATING INFORMATION AND SAFET Y WARNINGS
Refer to the inside front cover for more information on QR codes www youtube com/KiaFeatureVideos
Plug-In Hybrid Charging Video
QR CODE
REMINDER: For more detail and/or subsequent steps in charging your vehicle, please see section 1 in the Owner ’s Manual
Charging the Plug-In Hybrid Vehicle (Continued)
To charge the Plug-In Hybrid vehicle using a normal/trickle charger:
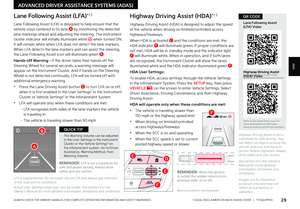
1 Connect the ICCB A plug to an electrical outlet
2 Check if the power light (green) B on the ICCB turns on
3 Press the brake pedal and engage the parking brake
4 Turn off all switches, put the shift lever in P (Park), and turn off the vehicle
5 Open the charging door E by pressing the charging door (Ensure doors are unlocked)
6 Remove any dust or water on the charging connector and
charging inlet F
7 Hold the charging connector handle G and connect it to the vehicle’s charging inlet F by pushing the connector until you hear a clicking sound
8 Charging begins automatically (Ensure the charge indicator light is illuminated on your instrument cluster, indicating the vehicle is charging)
Checking the Charging Status
The charging status can be checked by viewing the charging status indicator on the dash panel The lights will progressively become lit as the vehicle approaches a full charge
After charging has started, the light turns green and the estimated charging time is displayed on the Instrument Cluster LCD H for about 1 minute It is also displayed when the driver ’s door is opened with charging in progress When fully charged, the light turns off
HYBRID / PLUG-IN HYBRID SYSTEM
HYBRID/PLUG-IN
HYBRID
(Message on Cluster Display)
Remaining Time
2 h 35 m
kW
10%
G
H
E
F
B
A
Page 20 of 72

Scheduled Charging*
(Plug-In Hybrid Only)
Charging Connector Auto/Lock/Unlock")
18*IF EQUIPPEDNIRO HYBRID / PLUG-IN HYBRID FEATURES & FUNCTIONS GUIDE
(But tons are located left of the Steering Wheel)
Scheduled Charging*
(Plug-In Hybrid Only)
Charging Connector Auto/Lock/Unlock
Mode (Plug-In Hybrid Only)
Charging time can be set in the Infotainment System, under charge management, or using the Kia Access app
Charging with the Kia Access Smartphone App:
The Kia Access app can help you find the nearest charging station and displays charging-status and the Scheduled Charging information On your Smartphone, go to an app store or marketplace to download the Kia Access app
REMINDER: When Scheduled Charging is set and the charger is plugged in, charging will not begin until the set time & date are met to complete the charging The green charge indicator on top of the dash will temporar y flash ON/OFF to show that scheduled/reser ve charging is set
Deactivate Scheduled Charging - Depress the Deactivate Scheduled Charging button A to disable the scheduled charging feature when immediate charging is required
The Charging Connector can be set to be locked or unlocked while in the charging inlet Go to the Vehicle Settings* in the Infotainment System to set the connector to lock while charging and unlock automatically when charging is complete Press SETUP, ECO Vehicle and then Charging Connector Locking Mode Select the preference
REMINDERS:
• For more detail and/or subsequent steps in charging your vehicle, please see the Owner ’s Manual
•Reser ved charging may not be available at public chargers
•
Selecting “Charge only during off-peak ” option, charging will only occur within off-peak time The vehicle may not charge to 100%
REMINDER: To prevent charging cable theft, the charging connector cannot be disconnected from the inlet when the doors are locked or the charging connector is in the LOCK mode Unlock all doors to disconnect the charging connector from the inlet If the release but ton does not work even after the all doors are unlocked, pull the emergency lift cable in the engine compar tment or refer to section in the Owner ’s Manual on how to unlock the connector in an emergency
Refer to the inside front cover for more information on QR codes www youtube com/KiaFeatureVideos
Plug-In Hybrid Charging Video
QR CODE
When you press the Deactivate Scheduled Charging but ton the reser ved charging set ting will temporarily disable, and star t immediate charging mode If you need to completely deactivate the scheduled charge set ting, change the set ting from the audio control unit
QUICK TIP
•If the auto/lock mode is set to lock and the vehicle is unlocked but charging cable is not disconnected within 10 seconds, the connector will be automatically locked again
•If charging connector is unlocked but all doors are locked again, immediately, the connector will be automatically locked again
•If charging does not work, disconnect the connector and tr y charging again
QUICK TIPS
HYBRID / PLUG-IN HYBRID SYSTEM
HYBRID/PLUG-IN
HYBRID
OFFOFFHOLD
A
Page 21 of 72

19*IF EQUIPPEDALWAYS CHECK THE OWNER ’S MANUAL FOR COMPLETE OPER ATING INFORMATION AND SAFET Y WARNINGS
HYBRID / PLUG-IN HYBRID SYSTEM
HYBRID/PLUG-IN
HYBRID
Refer to the inside front cover for more information on QR codes www youtube com/KiaFeatureVideos
Plug-In Hybrid Paddle Switches / Paddle Shifters Video
QR CODE
Each of the different Drive Modes allows the regenerative braking level to be set at the driver ’s preference
QUICK TIP
Regenerative Braking with Paddle Switches*
The regenerative braking system charges the battery when coasting or when you use the brakes to stop the vehicle When the Drive Mode is in ECO mode, use the paddle switches to adjust the regenerative braking level from 1 to 3, MA X and AUTO The level will be displayed on the instrument cluster A
•Pull the left paddle switch B to increase regenerative braking and deceleration Pull and hold to reach the MA X level
•Pull the right paddle switch C to decrease regenerative braking and deceleration Pull and hold to reach Smart Regeneration System (AUTO)
The paddle shifters do not operate when:
•Both paddle switches are pulled at the same time
•The vehicle is decelerating by depressing the brake pedal
•Smart Cruise Control (SCC) is active
•When the SOC gauge shows a high level
•If there is a restriction by the vehicle system
•When the drive mode is switched from sport to ECO
Smart Regeneration System*
Smart Regeneration automatically adjusts the regenerative braking level based on a vehicle being detected in front, and road conditions
To activate Smart Regeneration, pull and hold the right paddle switch or go to Vehicle Settings* on the Infotainment System Press the SETUP button or SETUP on the screen, VEHICLE and ECO VEHICLE Then SMART REGENER ATION
AUTO D will be displayed on the instrument cluster above the Regenerative Braking indicator
96%Lv 1READY
DRIVE
MODE
�'�P�S���N�P�S�F���J�O�G�P�S�N�B�U�J�P�O���P�O���S�F�H�F�O�F�S�B�U�J�W�F���C�S�B�L�J�O�H���P�S���U�I�F���4�N�B�S �U���3�F�H�F�O�F�S�B�U�J�P�O���4�Z�T�U�F�N�
���Q�M�F�B�T�F���S�F�G�F�S���U�P���T�F�D�U�J�P�O�������J�O���U�I�F���0�X�O�F�S �s�T���.�B�O�V�B�M ��
�4�N�B�S �U���3�F�H�F�O�F�S�B�U�J�P�O���J�T���B���T�V�Q�Q�M�F�N�F�O�U�B�M���T�Z�T�U�F�N���G�P�S���U�I�F���E�S�J�W�F�S �s�T���D�P�O�W�F�O�J�F�O�D�F �����%�P���O�P�U���T�P�M�F�M�Z���S�F�M�Z���P�O���U�I�J�T���T�Z�T�U�F�N���U�P���T�U�P�Q���U�I�F���W�F�I�J�D�M�F���P�S���B�W�P�J�E���D�P�M�M�J�T�J�P�O�T�����"�M�X�B�Z�T���D�B�V�U�J�P�V�T�M�Z���M�P�P�L���B�I�F�B�E���U�P���Q�S�F�W�F�O�U���V�O�F�Y�Q�F�D�U�F�E���P�S���T�V�E�E�F�O���T�J�U�V�B�U�J�P�O�T ��
�4�U�F�F�S�J�O�H���X�I�F�F�M���J�M�M�V�T�U�S�B�U�J�P�O���J�T���G�P�S���J�M�M�V�T�U�S�B�U�J�W�F���Q�V�S�Q�P�T�F�T���P�O�M�Z�����:�P�V�S���B�D�U�V�B�M���T�U�F�F�S�J�O�H���X�I�F�F�M���C�V�U �U�P�O�T���B�O�E���P�S���G�F�B�U�V�S�F�T���N�B�Z���E�J�G�G�F�S ��
�"�M�X�B�Z�T���V�T�F���Q�F�E�B�M���C�S�B�L�J�O�H���X�I�F�O���O�F�D�F�T�T�B�S �Z�����1�B�Z���B�U �U�F�O�U�J�P�O���U�P���U�I�F���S�P�B�E���D�P�O�E�J�U�J�P�O���B�I�F�B�E���B�O�E���B�Q�Q�M�Z���U�I�F���C�S�B�L�F���J�G���O�F�D�F�T�T�B�S �Z ��
96%Lv 1READY
DRIVE
MODE
96%L v 1READY
DRIVE
MODE
BC
L v 2
CHARGE
ECO
POWER
LH
AUTO
CHARGE
ECO
POWER
L H
Lv 2
CHARGE
ECO
POWER
L H
AUTO
CHARGE
ECO
POWER
LH
DA
Page 22 of 72

20†LEGAL DISCL AIMERS ON BACK INSIDE COVER | *IF EQUIPPEDNIRO HYBRID / PLUG-IN HYBRID FEATURES & FUNCTIONS GUIDE
The Warning Volume can be adjusted in the User Set tings in the Instrument Cluster or the Vehicle Set tings* on the infotainment system Go to Driver Assistance, Warning Method, then Warning Volume
QUICK TIP
EMERGENCY BRAKING
COLLISION WARNINGFCA is designed to detect and monitor a vehicle ahead or detect a pedestrian in the roadway through front view camera recognition and front radar signals to warn the driver that a collision is imminent and, if necessary, temporarily apply emergency braking Initially, FCA provides Collision Warning when it detects a potential collision with a vehicle, pedestrian, or cyclist, emitting an audible warning and visual alert on the instrument cluster
If FCA detects that the collision risk has increased, Forward Collision-Avoidance Assist (FCA) automatically applies the brakes to reduce your speed, potentially helping to reduce the effects of a possible collision
With the turn signal on, if it detects a potential collision, Junction Tu r n i n g A may help to avoid the collision with an oncoming vehicle in an adjacent lane when turning left by applying emergency braking
FCA Settings:
•FCA is on by default in most Kia models FCA can be turned on/off by going to the User Settings* in the Instrument Cluster or the Vehicle Settings* in the Infotainment System
•Only adjust settings when the vehicle is at a standstill, gear shift is in Park and the ignition is on or the Engine Start/Stop button* in the on position
•To access User settings* in the Instrument Cluster - Press the Mode button B on the Steering Wheel to toggle to User Settings Press the OK button C up/down to toggle to Driver Assistance and Forward Safety
•To access Vehicle settings* in the Infotainment System – Press the SETUP key or the onscreen SETUP button Press VEHICLE to enter Vehicle Settings Select Driver Assistance, Driving Safety and Forward Safety
•To adjust the FCA initial warning activation time, go to User Settings , Driver Assistance, Warning Timing, then select Standard or Late, depending on your Kia model:
–
Standard: This setting allows for a nominal amount of distance between the vehicles before the initial warning occurs
– Late: Reduces the amount of distance between the vehicles before the initial warning occurs
FCA/FCW will become active when the:
•Ignition is on or the Engine Start/Stop button* is ON
•Vehicle is traveling faster than 5 mph
•Electronic Stability Control (ESC) is ON
Forward Collision-Avoidance Assist (FCA)†3
For ward Collision-Avoidance Assist (FCA) is not a substitute for safe driving and may not detect all objects in front of the vehicle Always drive safely and use caution
Actual User Set tings steps may var y by model Refer to section 6 in the Owner ’s Manual for more information
REMINDERS:
•
FCA will be activated by default when the ignition is cycled ON, even when previous set ting was OFF
•
If FCA is operating and ESC (Electronic Stabilit y Control) is turned off, FCA is automatically turned off
•
When FCA is off, the FCA warning indicator is on in the Instrument Cluster
Refer to the inside front cover for more information on QR codes www youtube com/KiaFeatureVideos
Forward Collision- Avoidance Assist (FCA)Video
QR CODE
ADVANCED DRIVER ASSISTANCE SYSTEMS (ADAS)
ADAS
(But tons located on Steering Wheel – Type B)
B
A
(Junction Turning)
C
Page 23 of 72

EF
324mi
MPH
CHARGE
ECO
POWER
L H
D
E F
324mi
MPH
CHARGE
ECO
POWER
L H
D
E F
324mi
MPH
CHARGE
ECO
POWER
L H
D
E F
324mi
MPH
CHARGE
ECO
POWER
L H
D
When LK A detects the lane markers, both lanes are displayed white
When LK A does not detect the lane markers, the lanes are displayed gray
When LK A detects the vehicle moving outside of the lane being traveled in, a yellow lane marker will illuminate either on the left or right lane (shown in both images above)
(But tons are located left of the Steering Wheel)
21†LEGAL DISCL AIMERS ON BACK INSIDE COVER | *IF EQUIPPEDALWAYS CHECK THE OWNER ’S MANUAL FOR COMPLETE OPER ATING INFORMATION AND SAFET Y WARNINGS
ADAS
ADVANCED DRIVER ASSISTANCE SYSTEMS (ADAS)
Lane Keeping Assist is not a substitute for safe driving and may not always aler t the driver if the vehicle is driven outside of its lane Always drive safely and use caution
Actual User Set tings steps may var y by model Refer to section 6 in the Owner ’s Manual for more information
For illustrative purposes only Your actual display, but tons and/or features may var y
Lane Keeping Assist (LKA)*†3
Lane Keeping Assist (LK A) is designed to detect the lane markers on the road with a front view camera on the windshield, and may assist the driver ’s steering to potentially help keep the vehicle in the lane When turned on, the instrument cluster indicator will initially illuminate white It will remain white when the vehicle is traveling slower than 40 mph or when LK A does not detect the lane markers When LK A detects the lane markers and can assist the steering, the LK A icon will illuminate green
If the LK A detects that you are moving outside of your lane, without using the turn signal, LK A may give an audible warning and display Lane Departure Warning on the instrument cluster or LK A may provide steering inputs, trying to prevent the vehicle from moving outside its lane
Hands-off Warning - If the driver takes their hands off the Steering Wheel for several seconds, a warning message will appear on the Instrument Cluster And if hands on the Steering Wheel is not detected continually, LFA will be turned off with additional emergency warning
LKA Settings:
•Press and hold the Lane Driving Assist button A to turn LK A on or off, when it is first enabled in the User Settings* in the Instrument Cluster or Vehicle Settings* in the Infotainment System
•Only adjust settings when the vehicle is at a standstill, gear shift is in Park and the ignition is on or the Engine Start/Stop button* in the on position
•To access User settings* in the Instrument Cluster - Press the Mode button B on the Steering Wheel to toggle to User Settings Press the OK button C up/down to toggle to Driver Assistance and then Lane Safety
•To access Vehicle settings* in the Infotainment System – Press the SETUP key or the onscreen SETUP button Press VEHICLE to enter Vehicle Settings Select Driver Assistance, Driving Safety and then Lane Safety
LK A will operate under the following conditions:
•The vehicle speed exceeds approximately 40 mph
•
LK A recognizes both sides of the lane markers the vehicle is traveling in
•
The vehicle is between the lane markers
Refer to the inside front cover for more information on QR codes www youtube com/KiaFeatureVideos
Lane Keeping Assist (LK A) Video
QR CODE
The Warning Volume can be adjusted in the User Set tings in the Instrument Cluster or the Vehicle Set tings* on the infotainment system Go to Driver Assistance, Warning Method, then Warning Volume
QUICK TIP
REMINDERS:
•
LK A will not issue a warning if the turn signals or hazard lights are activated
•
When the ignition is cycled, LK A will return to the previously set state
A
B
C
Page 24 of 72

ADAS
Blind-spot Collision Warning (BCW")
22†LEGAL DISCL AIMERS ON BACK INSIDE COVER | *IF EQUIPPEDNIRO HYBRID / PLUG-IN HYBRID FEATURES & FUNCTIONS GUIDE
ADVANCED DRIVER ASSISTANCE SYSTEMS (ADAS)
ADAS
Blind-spot Collision Warning (BCW)*†3
BCW uses rear corner radar sensors in the rear bumper to monitor and warn the driver in certain situations if it detects an approaching vehicle in the driver ’s blind spot area, before changing lanes and before exiting a parallel parking space BCW provides Collision Warning when it detects a potential collision with a vehicle, emitting an audible warning and visual alert on the outside rearview mirrors On select Kia models, when exiting a parallel parking space and BCW detects that the collision risk has increased, BCW can help avoid a collision by applying the brakes
Vehicle detection: When another vehicle is detected within BCW warning boundary A, an indicator will illuminate on the outside rearview mirrors B
Collision warning: When vehicle detection warning is on and the driver activates a turn signal, a flashing indicator will illuminate on the outside rearview mirrors and the system will sound a warning
Collision-Avoidance Assist*: On select Kia models, when collision warning has already occurred, and the collision risk has increased, BCW can help avoid a collision by applying the brakes Your vehicle needs to be traveling less than 2 mph, and the approaching vehicle is traveling less than 3 mph
BCW Settings:
•BCW can be turned on/off by going to the User Settings* in the Instrument Cluster or the Vehicle Settings* in the Infotainment System
•Only adjust settings when the vehicle is at a standstill, gear shift is in Park and the ignition is on or the Engine Start/Stop button* in the on position
•To access User settings* in the Instrument Cluster - Press the Mode button C on the Steering Wheel to toggle to User Settings Press the OK D up/down to toggle to Driver Assistance, Driving Safety, then Blind-Spot Safety
•To access Vehicle settings* in the Infotainment System – Press the SETUP key or the onscreen SETUP button Press VEHICLE to enter Vehicle Settings Select Driver Assistance, Driving Safety, then Blind-spot Safety
REMINDERS:
•
When BCA is ON and the ignition is cycled, BCW returns to its previous state
•
If the turn signal is turned on to make a left turn at an intersection, BCW may warn the driver regardless of driver ’s intentions Maintain a proper distance from oncoming vehicles
Refer to the inside front cover for more information on QR codes www youtube com/KiaFeatureVideos
Blind-Spot Collision Warning Video
QR CODE
•The Warning Volume can be adjusted in the User Set tings in the Instrument Cluster or the Vehicle Set tings* on the Infotainment System Go to Driver Assistance, Warning Method, then Warning Volume
•BCW will activate when: -BCW is turned on -
Other vehicles are detected on the rear sides of the vehicle -Collsion Warning: Vehicle speed is above approximately 12 mph and the speed of the vehicle in the blind spot is above 7 mph
QUICK TIPS
A
B
When engaged, BCW is a supplemental system Do not solely rely on this system and always pay at tention to the road and its conditions
The images on this page are for illustrative purposes only and may not reflect actual feature or operation
Refer to section 6 in the Owner ’s Manual for more information (But tons are located left of the Steering Wheel)
C
D