2022 TOYOTA YARIS CROSS warning light
[x] Cancel search: warning lightPage 415 of 618

413
7
CV Owner's Manual_Europe_M52N20_en
7-2. Steps to take in an emergency
When trouble arises
■Warning messages
The warning messages explained below
may differ from the actual messages according to operation conditions and vehicle specifications.
■Warning buzzer
A buzzer may sound when a message is displayed.The buzzer may not be audible if the
vehicle is in a noisy location or if the audio system volume is high.
■If “Engine Oil Level Low Add or Replace” is displayed
The engine oil level is low. Check the
level of the engine oil, and add if neces-
sary.
This message may appear if the vehicle is stopped on a slope. Move the vehicle
to a level surface and check to see if the message disappears.
■If “Engine Stopped Steering Power Low” is displayed
This message is displayed if the engine is stopped while driving.
When steering wheel operations are
heavier than usual, grip the steering wheel firmly and operate it using more force than usual.
■If “Auto Power OFF to Conserve
Battery” is displayed
Power was cut off due to the automatic power off function. Next time when start-
ing the engine, increase the engine speed slightly and maintain that level for approximately 5 minutes to recharge the
battery.
■If “Headlight System Malfunction Visit Your Dealer” is displayed
The following systems may be malfunc-
tioning. Have the vehicle inspected by any authorized Toyota retailer or Toyota authorized repairer, or any reliable
repairer immediately.
●The LED headlight system (if
equipped)
●AHS (Adaptive High-beam System) (if
equipped)
●Automatic High Beam (if equipped)
■If a message that indicates the mal-
function of front camera is dis- played
The following systems may be sus-
pended until the problem shown in the message is resolved. ( P.215, 403)
●PCS (Pre-Collision System) (if equipped)
●LTA (Lane Tracing Assist) (if equipped)
●AHS (Adaptive High-beam System) (if equipped)
If a warning message is
displayed
The multi-information display
shows warnings for system
malfunctions and incorrectly
performed operations, and
messages that indicate a need
for maintenance. When a mes-
sage is displayed, perform the
appropriate corrective action
for the message.
If a warning message is dis-
played again after the appro-
priate actions have been
performed, contact any autho-
rized Toyota retailer or Toyota
authorized repairer, or any reli-
able repairer.
Additionally, if a warning light
comes on or flashes at the
same time that a warning mes-
sage is displayed, take the
appropriate corrective action
for the warning light. ( P.403)
Page 426 of 618

424
CV Owner's Manual_Europe_M52N20_en
7-2. Steps to take in an emergency
replaced, make sure to tell any autho-
rized Toyota retailer or Toyota autho- rized repairer, or any reliable repairer that the sealant is injected.
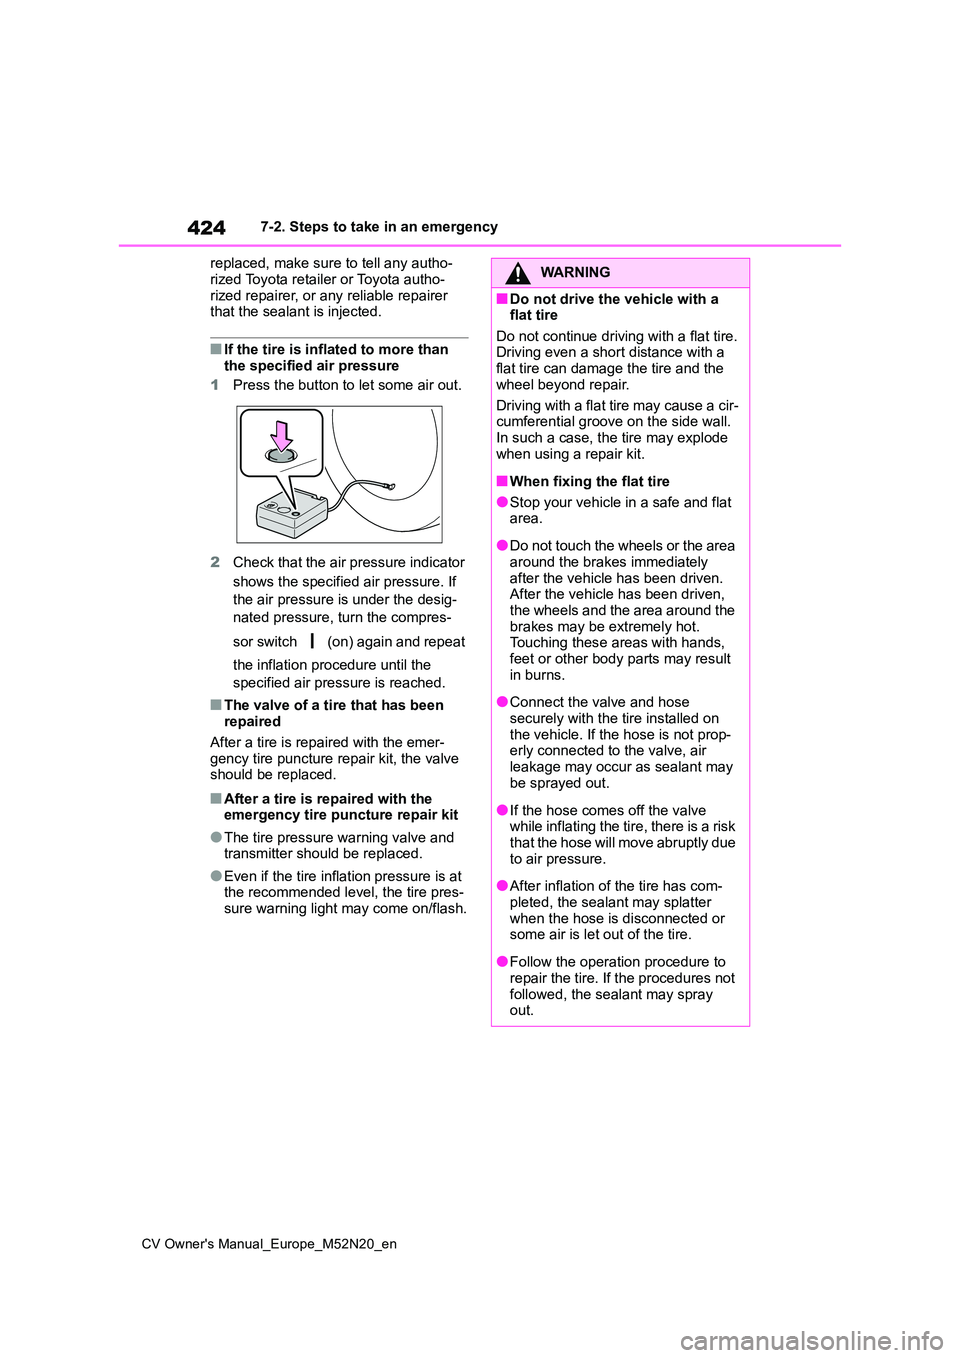
■If the tire is inflated to more than the specified air pressure
1 Press the button to let some air out.
2 Check that the air pressure indicator
shows the specified air pressure. If
the air pressure is under the desig-
nated pressure, turn the compres-
sor switch (on) again and repeat
the inflation procedure until the
specified air pressure is reached.
■The valve of a tire that has been repaired
After a tire is repaired with the emer-
gency tire puncture repair kit, the valve should be replaced.
■After a tire is repaired with the emergency tire puncture repair kit
●The tire pressure warning valve and transmitter should be replaced.
●Even if the tire inflation pressure is at the recommended level, the tire pres-
sure warning light may come on/flash.
WARNING
■Do not drive the vehicle with a flat tire
Do not continue driving with a flat tire. Driving even a short distance with a flat tire can damage the tire and the
wheel beyond repair.
Driving with a flat tire may cause a cir- cumferential groove on the side wall.
In such a case, the tire may explode when using a repair kit.
■When fixing the flat tire
●Stop your vehicle in a safe and flat area.
●Do not touch the wheels or the area around the brakes immediately
after the vehicle has been driven. After the vehicle has been driven, the wheels and the area around the
brakes may be extremely hot. Touching these areas with hands, feet or other body parts may result
in burns.
●Connect the valve and hose
securely with the tire installed on the vehicle. If the hose is not prop-erly connected to the valve, air
leakage may occur as sealant may be sprayed out.
●If the hose comes off the valve while inflating the tire, there is a risk that the hose will move abruptly due
to air pressure.
●After inflation of the tire has com-
pleted, the sealant may splatter when the hose is disconnected or some air is let out of the tire.
●Follow the operation procedure to repair the tire. If the procedures not
followed, the sealant may spray out.
Page 431 of 618

429
7
CV Owner's Manual_Europe_M52N20_en
7-2. Steps to take in an emergency
When trouble arises
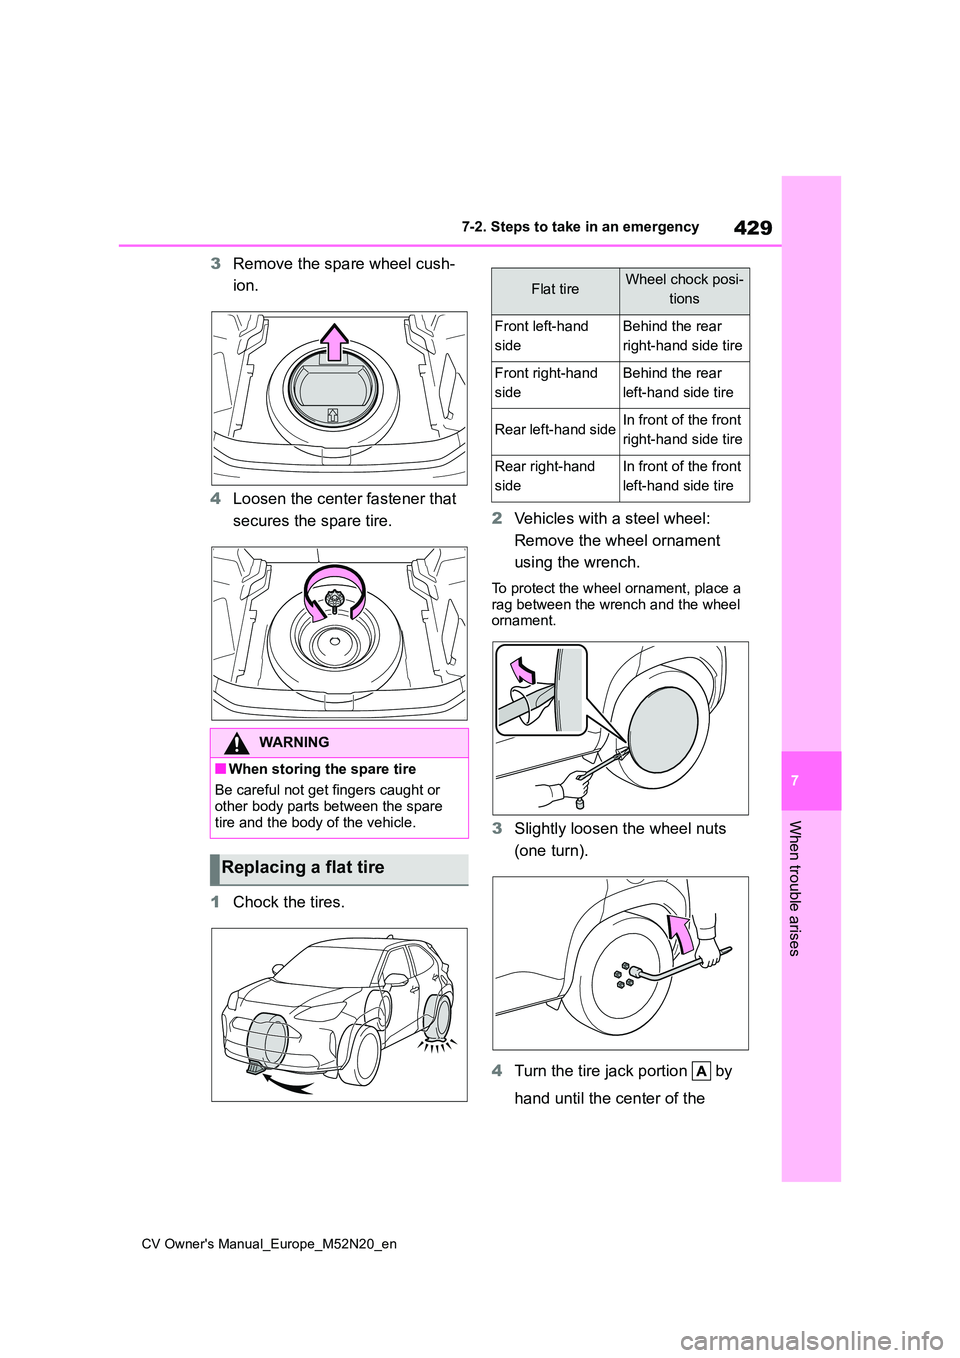
3Remove the spare wheel cush-
ion.
4 Loosen the center fastener that
secures the spare tire.
1 Chock the tires.
2 Vehicles with a steel wheel:
Remove the wheel ornament
using the wrench.
To protect the wheel ornament, place a
rag between the wrench and the wheel ornament.
3 Slightly loosen the wheel nuts
(one turn).
4 Turn the tire jack portion by
hand until the center of the
WARNING
■When storing the spare tire
Be careful not get fingers caught or other body parts between the spare
tire and the body of the vehicle.
Replacing a flat tire
Flat tireWheel chock posi-
tions
Front left-hand
side
Behind the rear
right-hand side tire
Front right-hand
side
Behind the rear
left-hand side tire
Rear left-hand sideIn front of the front
right-hand side tire
Rear right-hand
side
In front of the front
left-hand side tire
Page 432 of 618

430
CV Owner's Manual_Europe_M52N20_en
7-2. Steps to take in an emergency
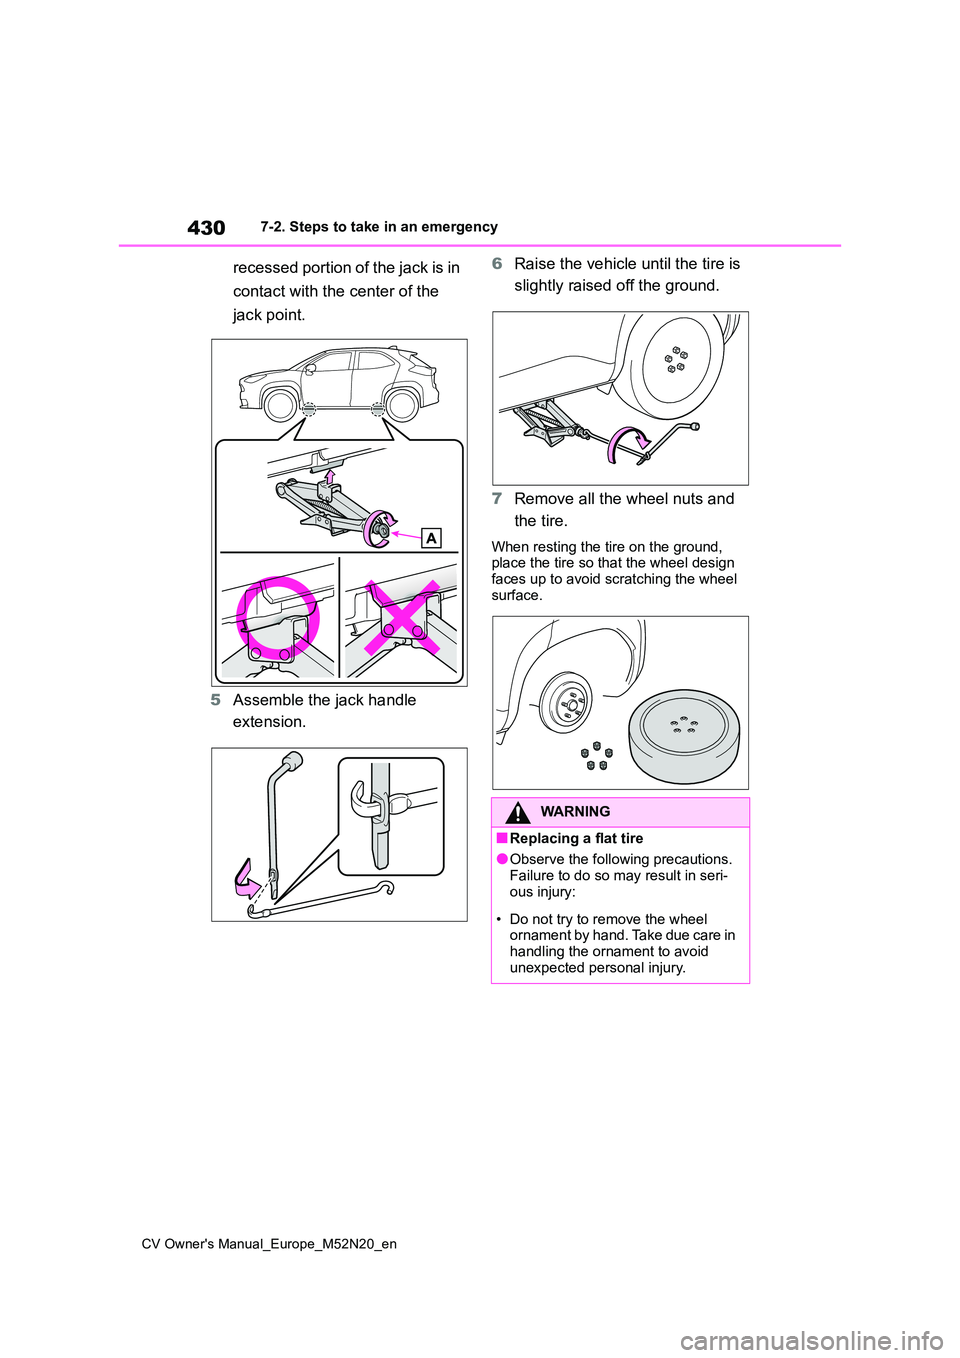
recessed portion of the jack is in
contact with the center of the
jack point.
5 Assemble the jack handle
extension.
6 Raise the vehicle until the tire is
slightly raised off the ground.
7 Remove all the wheel nuts and
the tire.
When resting the tire on the ground, place the tire so that the wheel design faces up to avoid scratching the wheel
surface.
WARNING
■Replacing a flat tire
●Observe the following precautions.
Failure to do so may result in seri- ous injury:
• Do not try to remove the wheel ornament by hand. Take due care in handling the ornament to avoid
unexpected personal injury.
Page 435 of 618

433
7
CV Owner's Manual_Europe_M52N20_en
7-2. Steps to take in an emergency
When trouble arises
system. Also, if you replace the compact
spare tire after the tire pressure warning light comes on, the light remains on.
■If you have a flat rear tire (vehicles
with a compact spare tire in some
countries*)
Do not install the compact spare tire to rear axles.
Install the compact spare tire on one of the front wheels of the vehicle.
1 Replace a front tire with the compact spare tire.
2 Replace the flat rear tire with the tire
removed from the front of the vehi- cle.*: Guadelope, Martinique, F. Guiana,
Ceuta & Melilla, Ukraine, Turkey, New
Caledonia, Tahiti, Egypt
■If you have a flat front tire on a road covered with snow or ice (vehicles
with a compact spare tire)
Install the compact spare tire on one of the rear wheels of the vehicle. Perform
the following steps and fit tire chains to the front tires:
1 Replace a rear tire with the compact spare tire.
2 Replace the flat front tire with the tire
removed from the rear of the vehicle.
3 Fit tire chains to the front tires.
■When reinstalling the wheel orna- ment (steel wheels except compact spare tire)
Align the cutout of the wheel ornament with the valve stem as shown in the illustration.
WARNING
■When using the full-size spare tire (if equipped)
●Replace the full-size spare tire with a standard tire as soon as possible.
●Avoid sudden acceleration, abrupt steering, sudden braking and shift-ing operations that cause sudden
engine braking.
■When using the compact spare
tire (if equipped)
●Remember that the compact spare tire provided is specifically
designed for use with your vehicle. Do not use your compact spare tire on another vehicle.
●Do not use more than one compact spare tires simultaneously.
●Replace the compact spare tire with a standard tire as soon as possible.
●Avoid sudden acceleration, abrupt steering, sudden braking and shift-
ing operations that cause sudden engine braking.
■When the compact spare tire (if equipped) is attached
The vehicle speed may not be cor-
rectly detected, and the following sys- tems may not operate correctly:
• ABS & Brake assist
• VSC
•TRC
• Automatic High Beam (if equipped)
• Dynamic radar cruise control with
full-speed range (if equipped)
• Dynamic radar cruise control (if
equipped)
• EPS
• Trailer Sway Control (if equipped)
Page 443 of 618

441
7
CV Owner's Manual_Europe_M52N20_en
7-2. Steps to take in an emergency
When trouble arises
entry & start system when the battery
is discharged. Use the wireless remote control or the mechanical key to lock or unlock the doors.
●The engine may not start on the first attempt after the battery has
recharged but will start normally after the second attempt. This is not a mal-function.
●The engine switch mode is memo-rized by the vehicle. When the battery
is reconnected, the system will return to the mode it was in before the bat-tery was discharged. Before discon-
necting the battery, turn the engine switch off.If you are unsure what mode the
engine switch was in before the bat- tery discharged, be especially careful when reconnecting the battery.
●The Stop & Start system may not automatically stop the engine for up to
an hour.
■When replacing the battery
●Use a battery that conforms to Euro-
pean regulations.
●Use a battery that the case size is
same as the previous one, 20 hour rate capacity (20HR) is equivalent or greater, and performance rating
(CCA) is equivalent or greater. Check the label on top of the battery for the battery size and specifications (ex.
LN2, 60Ah, 345A). • If the sizes differ, the battery cannot be properly secured.
• If the 20 hour rate capacity is low, even if the time period where the vehi-cle is not used is a short time, the bat-
tery may discharge and the engine may not be able to start.
●For details, consult any authorized Toyota retailer or Toyota authorized repairer, or any reliable repairer.
WARNING
■When removing the battery ter-minals
Always remove the negative (-) termi- nal first. If the positive (+) terminal contacts any metal in the surrounding
area when the positive (+) terminal is removed, a spark may occur, leading to a fire in addition to electrical shocks
and death or serious injury.
■Avoiding battery fires or explo-
sions
Observe the following precautions to prevent accidentally igniting the flam-
mable gas that may be emitted from the battery:
●Make sure each jumper cable is connected to the correct terminal and that it is not unintentionally in
contact with any other than the intended terminal.
●Do not allow the other end of the jumper cable connected to the “+” terminal to come into contact with
any other parts or metal surfaces in the area, such as brackets or unpainted metal.
●Do not allow the + and - clamps of the jumper cables to come into con-
tact with each other.
●Do not smoke, use matches, ciga-
rette lighters or allow open flame near the battery.
■Battery precautions
The battery contains poisonous and corrosive acidic electrolyte, while
related parts contain lead and lead compounds. Observe the following precautions when handling the bat-
tery:
Page 456 of 618

454
CV Owner's Manual_Europe_M52N20_en
8-1. Specifications
*1: Minimum pedal clearance when depressed with a force of 300 N (31.0 kgf, 67.4
lbf) while the engine is running.
*2: Make sure to confirm that the brake warning light (yellow) doe s not illuminate. (If
the brake warning light illuminates, refer to P.81, 410)
16-inch tires
17-inch tires
Parking brake indicator*2
When pulling the parking brake switch for 1 to 2
seconds: comes on
When pushing the parking brake switch for 1 to
2 seconds: turns off
Fluid typeSAE J1704 or FMVSS No.116 DOT 4
Steering
Free playLess than 30 mm (1.2 in.)
Tires and wheels
Tire size205/65R16 95H
Tire inflation pressure
(Recommended cold tire
inflation pressure)
Front tire
230 kPa (2.3 kgf/cm2 or bar, 33 psi)
Rear tire
220 kPa (2.2 kgf/cm2 or bar, 32 psi)
Wheel size16 6 1/2J
Wheel nut torque103 N•m (10.5 kgf•m, 76 ft•lbf)
Tire size215/55R17 94V
Tire inflation pressure
(Recommended cold tire
inflation pressure)
Front tire
220 kPa (2.2 kgf/cm2 or bar, 32 psi)
Rear tire
200 kPa (2.0 kgf/cm2 or bar, 29 psi)
Wheel size17 7J
Wheel nut torque103 N•m (10.5 kgf•m, 76 ft•lbf)
Page 468 of 618

466
CV Owner's Manual_Europe_M52N20_en
8-2. Customization
*: If equipped
■Vehicle customization
When the smart entry & start system is off, Smart door unlocking cannot be cus-tomized.
■In the following situations, custom-
ize mode in which the settings can be changed through the multi-infor-mation display will automatically
be turned off
●A warning message appears after the
customize mode screen is displayed
●The engine switch is turned off.
●The vehicle begins to move while the customize mode screen is displayed.
Operation after the engine
switch is turned offOnOff——O
Operation when the doors
are unlockedOnOff——O
Operation when you
approach the vehicle with
the electronic key on your
person*
OnOff——O
Footwell lights*, front con-
sole light and door trim
lights*
OnOff——O
FunctionDefault settingCustomized setting