2022 TOYOTA YARIS CROSS warning light
[x] Cancel search: warning lightPage 338 of 618
336
CV Owner's Manual_Europe_M52N20_en
5-4. Other interior features
patible is attached. Depending on the
type of cover and/or accessory attached, it may not be possible to charge the portable device. If the porta-
ble device is placed on the charging area and does not charge, remove the cover and/or accessories.
■If interference is heard in AM radio
broadcasts while charging
Turn off the wireless charger and check if the noise is reduced. If noise is
reduced, press and hold the power sup- ply switch of the wireless charger for 2 seconds. The frequency of the wireless
charger is changed and noise may be reduced. When the frequency is changed, the operation indicator light
will blink (orange) 2 times.
■Charging precautions
●If the electronic key cannot be
detected in the cabin, charging cannot be performed. When a door is opened and closed, charging may be tempo-
rarily suspended.
●While charging, the wireless charger
and the portable device will become warm.This is not a malfunction.If a portable
device becomes warm while charging and charging stops due to the protec-tion function of the portable device,
wait until the portable device cools down and charge it again.
■Sound generated during operation
When the power supply switch is turned
on or while a portable device is being identified, operation sounds may be heard. This is not a malfunction.
■Cleaning the wireless charger
P. 3 4 5
WARNING
■Caution while driving
When charging a portable device
while driving, for safety reasons, the driver should not operate the portable device.
■Caution regarding interference with electronic devices
People with implantable cardiac pace-
makers, cardiac resynchronization therapy pacemakers or implantable cardioverter defibrillators, as well as
any other electrical medical device, should consult their physician about the usage of the wireless charger.
Operations of the wireless charger may have an affect on medical devices.
■To prevent damage or burns
Observe the following precautions.
Failure to do so may result in the pos- sibility of fire, equipment failure or damage, or burns due to heat.
●Do not put any metallic objects between the charging area and the
portable device while charging.
●Do not attach metallic objects, such
as aluminum stickers, to the charging area.
●Do not cover the wireless charger with a cloth or other object while charging.
●Do not attempt to charge portable devices which are not compatible
with the Qi wireless charging stan- dard.
●Do not disassemble, modify or remove the wireless charger.
●Do not apply force or impact to the wireless charger.
NOTICE
■Conditions in which the wireless
charger may not operate cor- rectly
In the following situations, the wire-
less charger may not operate cor- rectly:
Page 352 of 618

350
CV Owner's Manual_Europe_M52N20_en
6-3. Do-it-yourself maintenance
6-3.Do-it-y ours elf main ten ance
Do-it-yourself ser vice
precautions
If you perform maintenance by
yourself, be sure to follow the
correct procedure as given in
these sections.
Maintenance
ItemsParts and tools
Battery con-
dition
( P.358)
•Warm water
• Baking soda
• Grease
• Conventional wrench
(for terminal clamp
bolts)
Engine cool-
ant level
( P.356)
• “Toyota Super Long
Life Coolant” or a simi-
lar high quality eth-
ylene glycol-based
non-silicate, non-
amine, non-nitrite and
non-borate coolant
with long-life hybrid
organic acid technol-
ogy.
“Toyota Super Long
Life Coolant” is pre-
mixed with 50% cool-
ant and 50% deionized
water.
• Funnel (used only for
adding coolant)
Engine oil
level
( P.354)
• “Toyota Genuine Motor
Oil” or equivalent
• Rag or paper towel
• Funnel (used only for
adding engine oil)
Fuses
( P.381)
• Fuse with same
amperage rating as
original
Light bulbs
( P.386)
• Bulb with same num-
ber and wattage rating
as original
• Flathead screwdriver
•Wrench
Radiator,
condenser
( P.357)
Tire inflation
pressure
( P.373)
• Tire pressure gauge
• Compressed air
source
Washer fluid
( P.362)
• Water or washer fluid
containing antifreeze
(for winter use)
• Funnel (used only for
adding water or
washer fluid)
WARNING
The engine compartment contains many mechanisms and fluids that
may move suddenly, become hot, or become electrically energized. To avoid death or serious injury, observe
the following precautions.
■When working on the engine
compartment
●Keep hands, clothing and tools away from the moving fan and
engine drive belt.
●Be careful not to touch the engine,
radiator, exhaust manifold, etc. right after driving as they may be hot. Oil and other fluids may also be hot.
●Do not leave anything that may burn easily, such as paper and
rags, in the engine compartment.
ItemsParts and tools
Page 353 of 618
351
6
CV Owner's Manual_Europe_M52N20_en
6-3. Do-it-yourself maintenance
Maintenance and care
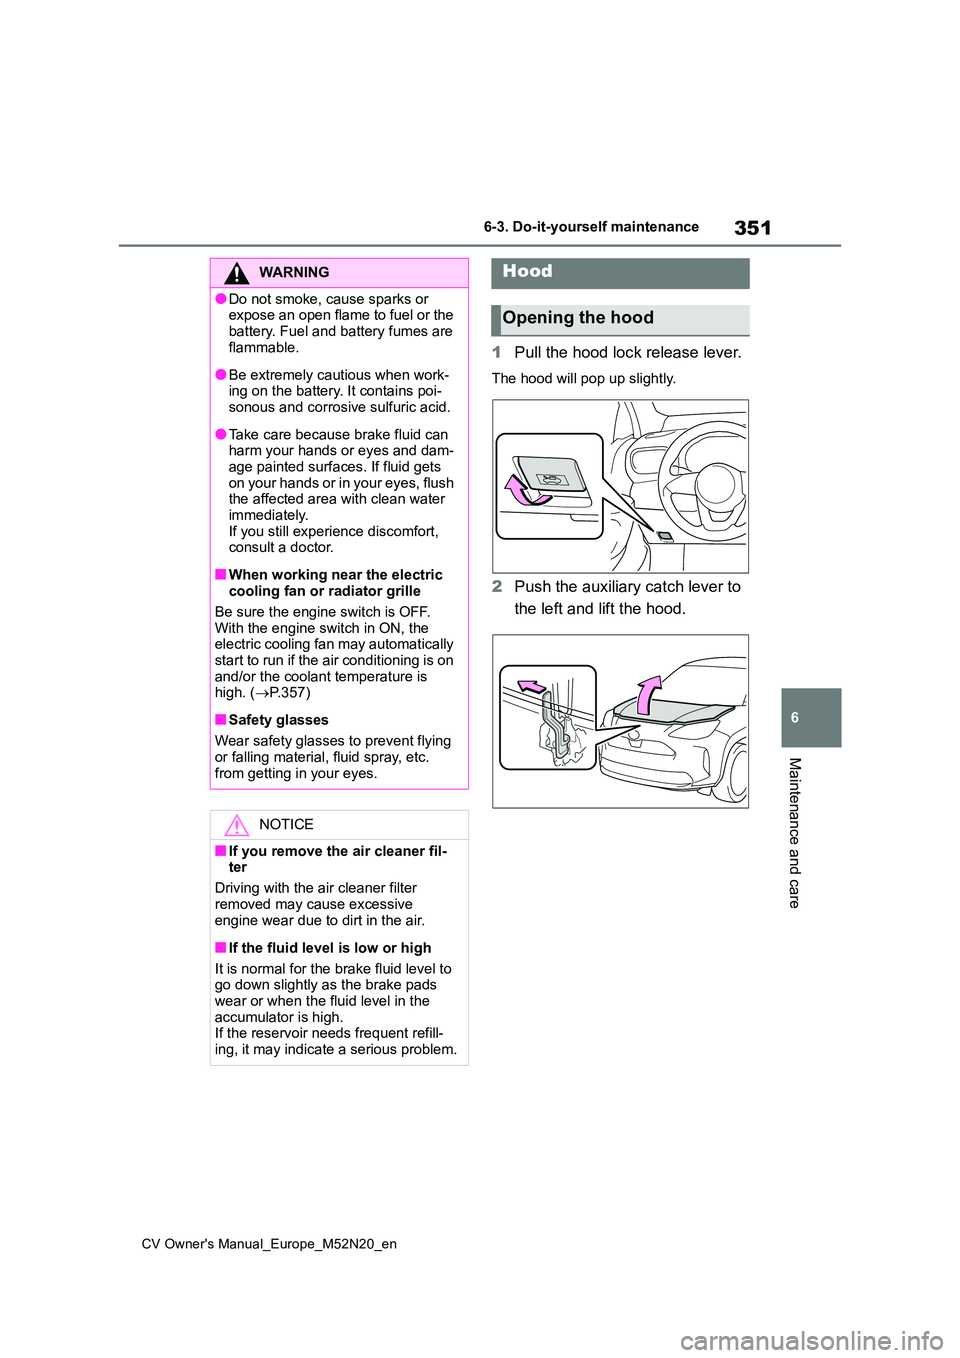
1Pull the hood lock release lever.
The hood will pop up slightly.
2Push the auxiliary catch lever to
the left and lift the hood.
WARNING
●Do not smoke, cause sparks or expose an open flame to fuel or the
battery. Fuel and battery fumes are flammable.
●Be extremely cautious when work-ing on the battery. It contains poi-sonous and corrosive sulfuric acid.
●Take care because brake fluid can harm your hands or eyes and dam-
age painted surfaces. If fluid gets on your hands or in your eyes, flush the affected area with clean water
immediately. If you still experience discomfort, consult a doctor.
■When working near the electric cooling fan or radiator grille
Be sure the engine switch is OFF. With the engine switch in ON, the electric cooling fan may automatically
start to run if the air conditioning is on and/or the coolant temperature is high. ( P.357)
■Safety glasses
Wear safety glasses to prevent flying
or falling material, fluid spray, etc. from getting in your eyes.
NOTICE
■If you remove the air cleaner fil-ter
Driving with the air cleaner filter
removed may cause excessive engine wear due to dirt in the air.
■If the fluid level is low or high
It is normal for the brake fluid level to go down slightly as the brake pads
wear or when the fluid level in the accumulator is high.If the reservoir needs frequent refill-
ing, it may indicate a serious problem.
Hood
Opening the hood
Page 363 of 618
361
6
CV Owner's Manual_Europe_M52N20_en
6-3. Do-it-yourself maintenance
Maintenance and care
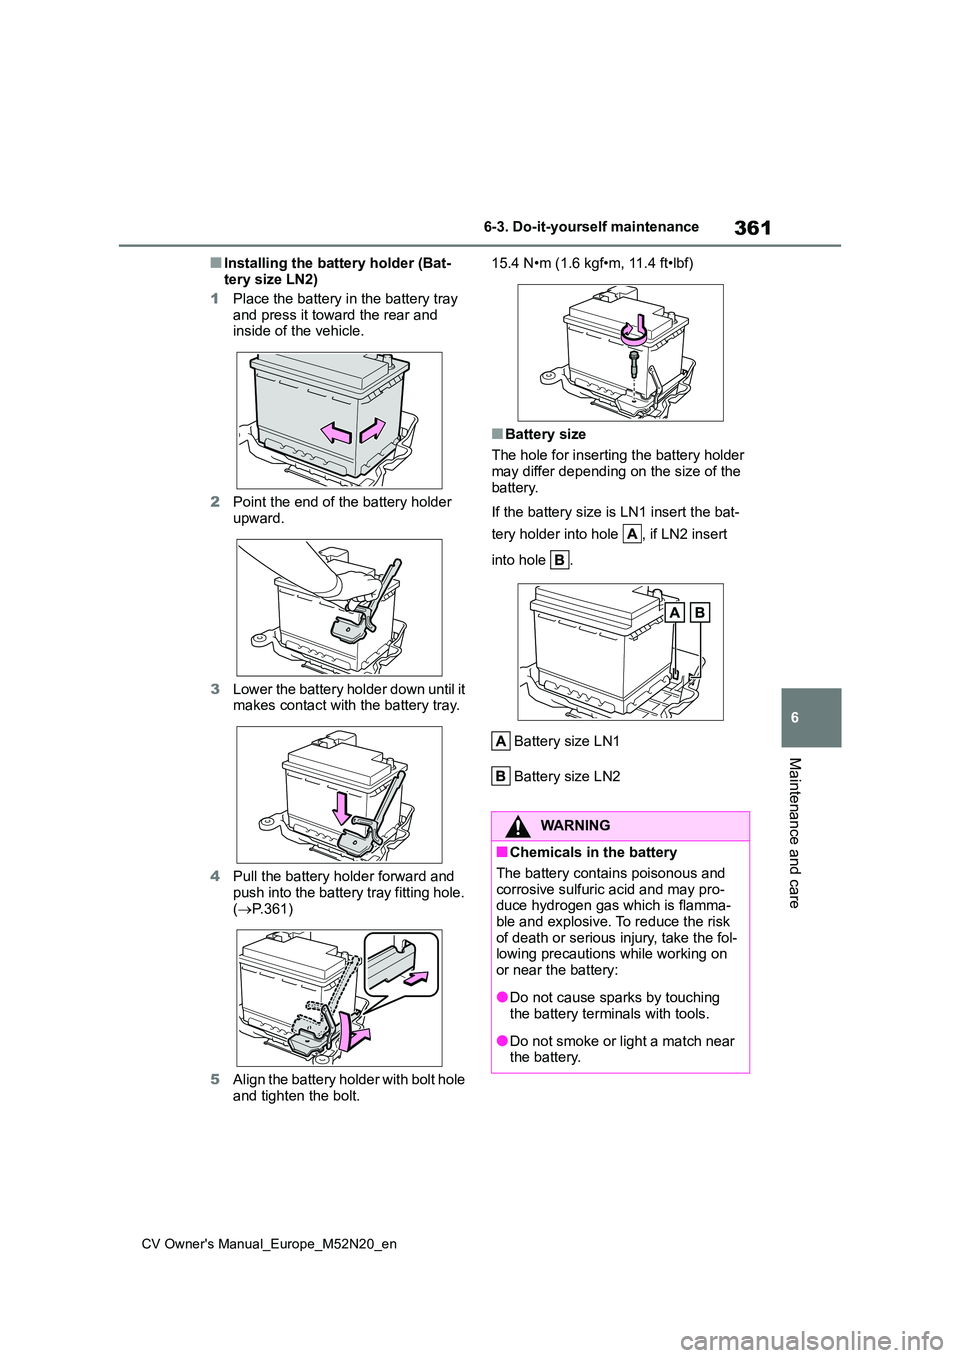
■Installing the battery holder (Bat-
tery size LN2)
1 Place the battery in the battery tray and press it toward the rear and inside of the vehicle.
2 Point the end of the battery holder upward.
3 Lower the battery holder down until it makes contact with the battery tray.
4 Pull the battery holder forward and push into the battery tray fitting hole.
( P.361)
5 Align the battery holder with bolt hole
and tighten the bolt.
15.4 N•m (1.6 kgf•m, 11.4 ft•lbf)
■Battery size
The hole for inserting the battery holder
may differ depending on the size of the battery.
If the battery size is LN1 insert the bat-
tery holder into hole , if LN2 insert
into hole .
Battery size LN1
Battery size LN2
WARNING
■Chemicals in the battery
The battery contains poisonous and corrosive sulfuric acid and may pro-duce hydrogen gas which is flamma-
ble and explosive. To reduce the risk of death or serious injury, take the fol-lowing precautions while working on
or near the battery:
●Do not cause sparks by touching the battery terminals with tools.
●Do not smoke or light a match near the battery.
Page 366 of 618
364
CV Owner's Manual_Europe_M52N20_en
6-3. Do-it-yourself maintenance
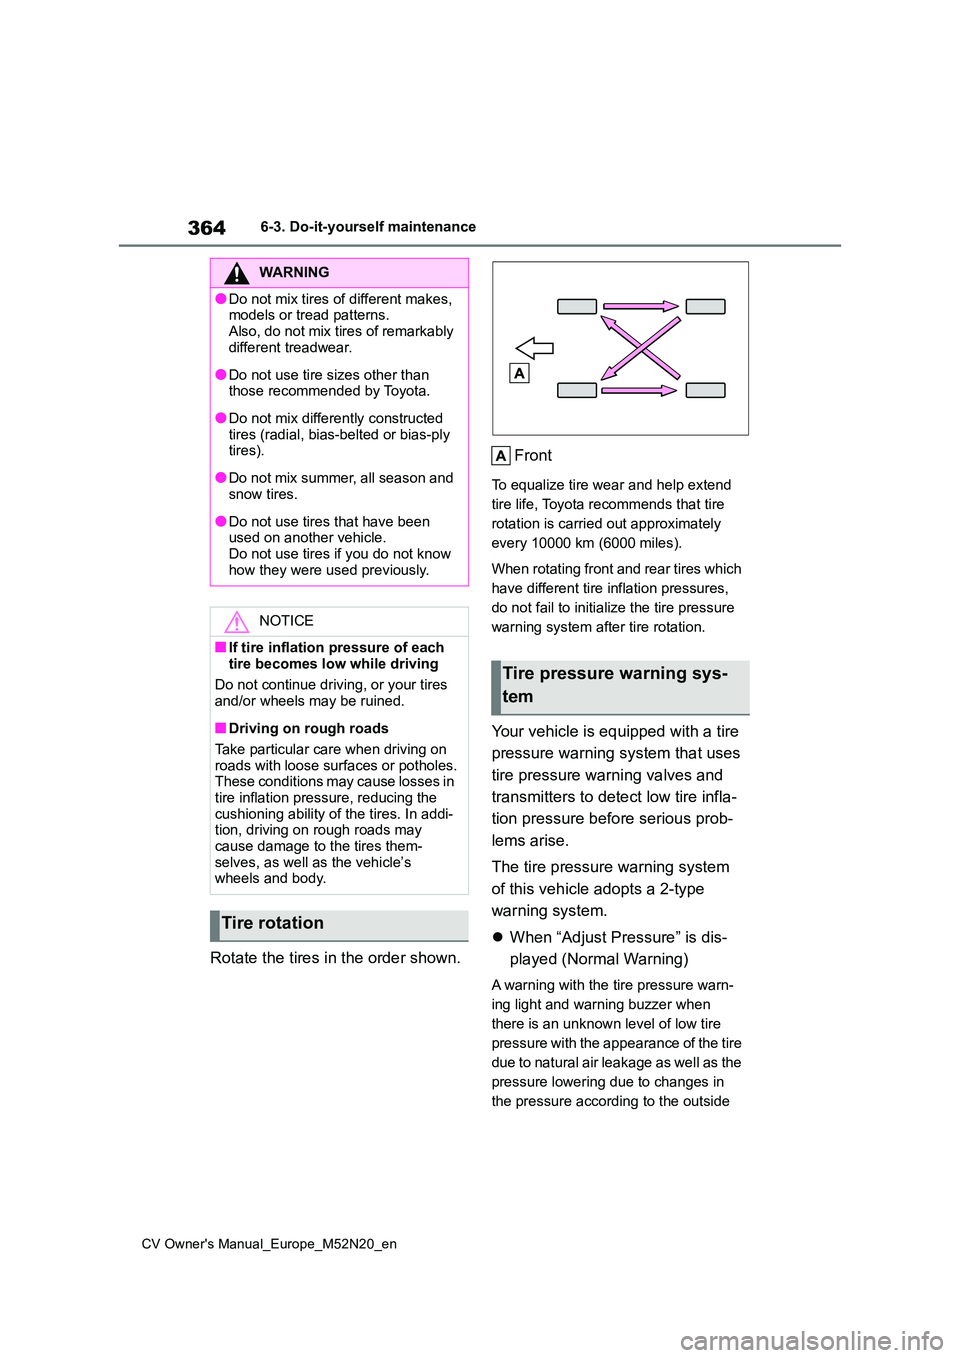
Rotate the tires in the order shown.
Front
To equalize tire wear and help extend
tire life, Toyota recommends that tire
rotation is carried out approximately
every 10000 km (6000 miles).
When rotating front and rear tires which
have different tire inflation pressures,
do not fail to initialize the tire pressure
warning system after tire rotation.
Your vehicle is equipped with a tire
pressure warning system that uses
tire pressure warning valves and
transmitters to detect low tire infla-
tion pressure before serious prob-
lems arise.
The tire pressure warning system
of this vehicle adopts a 2-type
warning system.
When “Adjust Pressure” is dis-
played (Normal Warning)
A warning with the tire pressure warn-
ing light and warning buzzer when
there is an unknown level of low tire
pressure with the appearance of the tire
due to natural air leakage as well as the
pressure lowering due to changes in
the pressure according to the outside
WARNING
●Do not mix tires of different makes, models or tread patterns.
Also, do not mix tires of remarkably different treadwear.
●Do not use tire sizes other than those recommended by Toyota.
●Do not mix differently constructed tires (radial, bias-belted or bias-ply tires).
●Do not mix summer, all season and snow tires.
●Do not use tires that have been used on another vehicle.
Do not use tires if you do not know how they were used previously.
NOTICE
■If tire inflation pressure of each
tire becomes low while driving
Do not continue driving, or your tires and/or wheels may be ruined.
■Driving on rough roads
Take particular care when driving on roads with loose surfaces or potholes.These conditions may cause losses in
tire inflation pressure, reducing the cushioning ability of the tires. In addi-tion, driving on rough roads may
cause damage to the tires them- selves, as well as the vehicle’s wheels and body.
Tire rotation
Tire pressure warning sys-
tem
Page 367 of 618

365
6
CV Owner's Manual_Europe_M52N20_en
6-3. Do-it-yourself maintenance
Maintenance and care
temperature. (Ways of coping: P.411,
454)
When “Immediately Check tire
when Safe” is displayed (Emer-
gency Warning)
A warning with the tire pressure warn-
ing light and warning buzzer when
there is a known level of low tire pres-
sure with the appearance of the tire due
to pressure suddenly lowering. (Ways
of coping: P.415, 426)
However, the system may not be able
to detect sudden tire ruptures (bursting,
etc.).
The tire pressure detected by the
tire pressure warning system can
be displayed on the 9-inch display
multimedia system or multi-infor-
mation display.
9-inch display multimedia system
1 Press the “HOME” button
2 Select “Vehicle” on the “Home”
screen
3 If a screen other than “Tyre
pressure” is displayed, select
“Tyre pressure”
Multi-information display
The unit can be changed.
■How to change the unit
1 Park the vehicle in a safe place
and turn the engine switch off.
Changing the unit cannot be performed
while the vehicle is moving.
2 Turn the engine switch to ON.
3 Press / (7-inch display)
or / (4.2-inch display) of
the meter control switch to
select .
4 Press / (7-inch display)
or / (4.2-inch display) to
select “Vehicle Settings” and
then press and hold .
5 Press / to select “TPWS
setting” and then press .
6 Press / to select “Setting
Unit”.
7 Press / to select the
desired unit and then press .
Page 369 of 618
367
6
CV Owner's Manual_Europe_M52N20_en
6-3. Do-it-yourself maintenance
Maintenance and care
any reliable repairer. (P.369)
■Replacing tires and wheels
If the ID code of the tire pressure warn- ing valve and transmitter is not regis-tered, the tire pressure warning system
will not work properly. After driving for about 10 minutes, the tire pressure warning light blinks for 1 minute and
stays on to indicate a system malfunc- tion.
■The tire pressure warning sys-
tem must be init ialized in the
following circumstances:
When rotating front and rear tires
which have different tire inflation
pressures.
When changing the tire size.
When the tire inflation pressure
is changed such as when chang-
ing traveling speed or load
weight.
When changing between two
registered wheel sets.
When the tire pressure warning
system is initialized, the current tire
inflation pressure is set as the
benchmark pressure.
■How to initialize the tire pres-
sure warning system
1 Park the vehicle in a safe place
and turn the engine switch off,
wait for approximately 15 min-
NOTICE
■Repairing or replacing tires,
wheels, tire pressure warning valves, transmitters and tire valve caps
●When removing or fitting the wheels, tires or the tire pressure warning valves and transmitters,
contact any authorized Toyota retailer or Toyota authorized repairer, or any reliable repairer as
the tire pressure warning valves and transmitters may be damaged if not handled correctly.
●Make sure to install the tire valve caps. If the tire valve caps are not
installed, water could enter the tire pressure warning valves, corrode the valve, and cause sticking and
air leaks.
●When replacing tire valve caps, do
not use tire valve caps other than those specified. The cap may become stuck.
■To avoid damage to the tire pres-sure warning valves and trans-mitters
When a tire is repaired with liquid sealants, the tire pressure warning valve and transmitter may not operate
properly. If a liquid sealant is used, contact any authorized Toyota retailer or Toyota authorized repairer, or any
reliable repairer as soon as possible. Make sure to replace the tire pressure warning valve and transmitter when
replacing the tire. ( P.366)
Initializing the tire pressure
warning system
Page 370 of 618

368
CV Owner's Manual_Europe_M52N20_en
6-3. Do-it-yourself maintenance
utes or more, and then perform
the procedure.
2 Adjust the tire inflation pressure
to the specified cold tire inflation
pressure level. ( P.454)
Make sure to adjust the tire pressure to the specified cold tire inflation pressure
level. The tire pressure warning system will operate based on this pressure level.
3 Turn the engine switch to ON.
Initialization cannot be performed while the vehicle is moving.
4 Press / (7-inch display)
or / (4.2-inch display) of
the meter control switch to
select .
5 Press / (7-inch display)
or / (4.2-inch display) to
select “Vehicle Settings” and
then press and hold .
6 Press / to select “TPWS
setting” and then press .
7 Press / to select “Setting
Pressure”. Then press and hold
until the tire pressure warn-
ing light blinks 3 times.
Then a message will be displayed on the multi-information display. “--” will be
displayed on the multi-information dis- play for the inflation pressure of each tire while initialization is being per-
formed.
8 Drive straight (with occasional
left and right turns) at approxi-
mately 40 km/h (25 mph) or
more for approximately 10 to 30
minutes.
Even if the vehicle is not driven at
approximately 40 km/h (25 mph) or more, initialization can be completed by driving for a long time. However, if ini-
tialization does not complete after driv- ing for 1 hour or more, park the vehicle in a safe place for more than 15 min-
utes and please drive a vehicle once again with the engine switch ON. ( P.371)
■Initialization procedure
●Make sure to carry out initialization after adjusting the tire inflation pres-
sure. Also, make sure the tires are cold before carrying out initialization or tire
inflation pressure adjustment.
●If you have accidentally turned the
engine switch off during initialization, it is not necessary to press the reset switch again as initialization will
restart automatically when the engine switch is turned to ON the next time.
●If you accidentally press the reset switch when initialization is not neces-sary, adjust the tire inflation pressure
to the specified level when the tires are cold, and conduct initialization again.
●While the position of each tire is being