2022 HYUNDAI KONA EV display
[x] Cancel search: displayPage 224 of 548
Convenient features
5-40
4.
Push the control lever forward for about 10 seconds.
- When the sunroof is in the closed position :
- The glass will tilt and slightly move up and down.
- When the sunroof is in the tilt position:
The glass will slightly move up and
down.
Do not release the lever until the
operation is completed.
If you release the lever during operation,
try again from step 2.
5. Within 3 seconds, push the control lever forward until the sunroof
operates as follows:
Tilt down → Slide Open → Slide Close.
Do not release the lever until the
operation is completed.
If you release the lever during operation,
try again from step 2.
6. Release the sunroof control lever after all operation has completed (The
sunroof system has been reset).
Information
• If the sunroof does not reset when
the vehicle battery is disconnected or
discharged, or related fuse is blown, the
sunroof may not operate normally.
• For more detailed information, we
recommend that you contact an
authorized HYUNDAI dealer.
Sunroof open warning (if equipped)
• If the driver turns off the vehicle
when the sunroof is not fully closed,
the warning chime will sound for
approximately 3 seconds and the
open sunroof warning appear on the
LCD display.
• If the driver turns off the vehicle and
opens the door when the sunroof is
not fully closed, the open sunroof
warning will appear on the LCD
display until the door is closed or the
sunroof is fully closed.
Close the sunroof securely when leaving
your vehicle.
Page 226 of 548
Convenient features
5-42
Closing the hood
1. Before closing the hood, check the
following:
• All filler caps in motor room must be
correctly installed.
• Gloves, rags or any other
combustible material must
be removed from the motor
compartment.
2. Return the support rod to its clip to prevent it from rattling.
3. Lower the hood halfway (lifted approximately 30 cm from the closed
position) and push down to securely
lock in place. Then double check to be
sure the hood is secure.
If the hood can be raised slightly, it is
not securely locked. Open it again and
close it with more force.
WARNING
• Before closing the hood, ensure
all obstructions are removed from
around the hood opening.
• Always double check to be sure that
the hood is firmly latched before
driving away. Check there is no
hood open warning light or message
displayed on the instrument cluster.
If the hood is not latched while the
vehicle is moving, the chime will
sound to warn the driver the hood
is not fully latched. Driving with the
hood opened may cause a total loss
of visibility, which might result in an
accident.
• Do not move the vehicle with the
hood in the raised position, as vision
is obstructed, which might result in
an accident, and the hood could fall or be damaged.
Page 230 of 548
Convenient features
5-46
OOSEV050125L
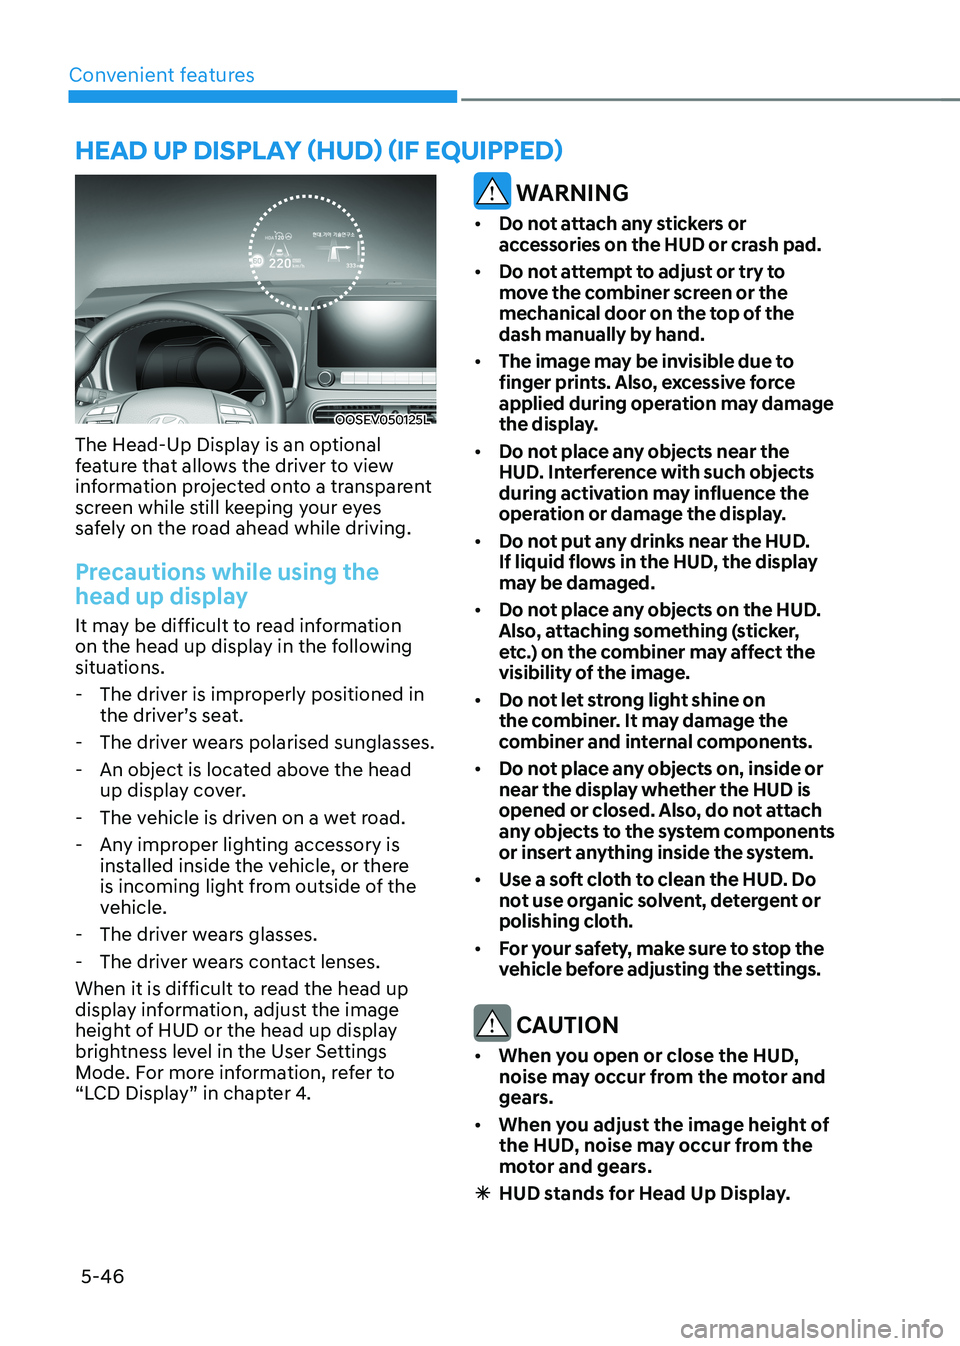
The Head-Up Display is an optional
feature that allows the driver to view
information projected onto a transparent
screen while still keeping your eyes
safely on the road ahead while driving.
Precautions while using the
head up display
It may be difficult to read information
on the head up display in the following
situations. - The driver is improperly positioned in the driver’s seat.
- The driver wears polarised sunglasses.
- An object is located above the head up display cover.
- The vehicle is driven on a wet road.
- Any improper lighting accessory is installed inside the vehicle, or there
is incoming light from outside of the
vehicle.
- The driver wears glasses.
- The driver wears contact lenses.
When it is difficult to read the head up
display information, adjust the image
height of HUD or the head up display
brightness level in the User Settings
Mode. For more information, refer to
“LCD Display” in chapter 4.
WARNING
• Do not attach any stickers or
accessories on the HUD or crash pad.
• Do not attempt to adjust or try to
move the combiner screen or the
mechanical door on the top of the
dash manually by hand.
• The image may be invisible due to
finger prints. Also, excessive force
applied during operation may damage
the display.
• Do not place any objects near the
HUD. Interference with such objects
during activation may influence the
operation or damage the display.
• Do not put any drinks near the HUD.
If liquid flows in the HUD, the display
may be damaged.
• Do not place any objects on the HUD.
Also, attaching something (sticker,
etc.) on the combiner may affect the
visibility of the image.
• Do not let strong light shine on
the combiner. It may damage the
combiner and internal components.
• Do not place any objects on, inside or
near the display whether the HUD is
opened or closed. Also, do not attach
any objects to the system components
or insert anything inside the system.
• Use a soft cloth to clean the HUD. Do
not use organic solvent, detergent or
polishing cloth.
• For your safety, make sure to stop the
vehicle before adjusting the settings.
CAUTION
• When you open or close the HUD,
noise may occur from the motor and
gears.
• When you adjust the image height of
the HUD, noise may occur from the
motor and gears.
à HUD stands for Head Up Display.
head up display (hud) (if equipped)
Page 231 of 548
05
5-47
Head Up Display ON/OFF
OOSEV040061L
Use the head-up display ON/OFF button
to activate or deactivate the head-up
display when the START/STOP button is
in the ON position or when the vehicle is
in the ready (
) mode.
The head-up display will retract
automatically when the vehicle is turned
OFF and the doors are locked with the
Smart Key or when pressing the button on the outside door handle.
Note that if the vehicle is turned OFF and
the doors are not locked, the head-up
display will automatically retract after
approximately five minutes.
Head Up Display Information
OOS050019L
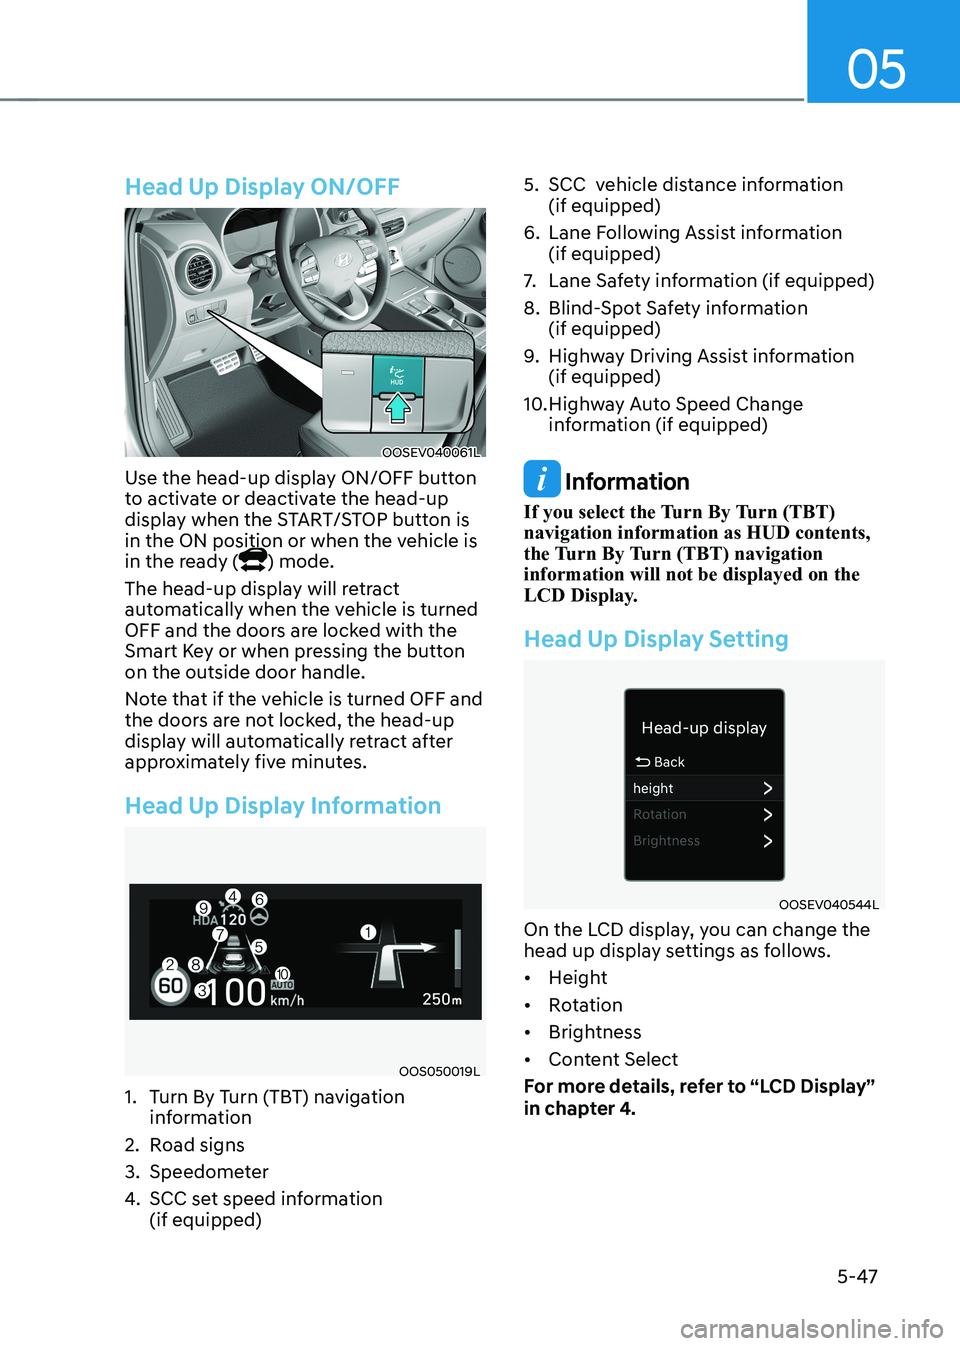
1. Turn By Turn (TBT) navigation information
2. Road signs
3. Speedometer
4. SCC set speed information (if equipped) 5. SCC vehicle distance information
(if equipped)
6. Lane Following Assist information (if equipped)
7. Lane Safety information (if equipped)
8. Blind-Spot Safety information (if equipped)
9. Highway Driving Assist information (if equipped)
10. Highway Auto Speed Change information (if equipped)
Information
If you select the Turn By Turn (TBT) navigation information as HUD contents,
the Turn By Turn (TBT) navigation information will not be displayed on the
LCD Display.
Head Up Display Setting
OOSEV040544L
On the LCD display, you can change the
head up display settings as follows. • Height
• Rotation
• Brightness
• Content Select
For more details, refer to “LCD Display”
in chapter 4.
Page 234 of 548
Convenient features
5-50
Turn signals and lane change signals
OOS047410N
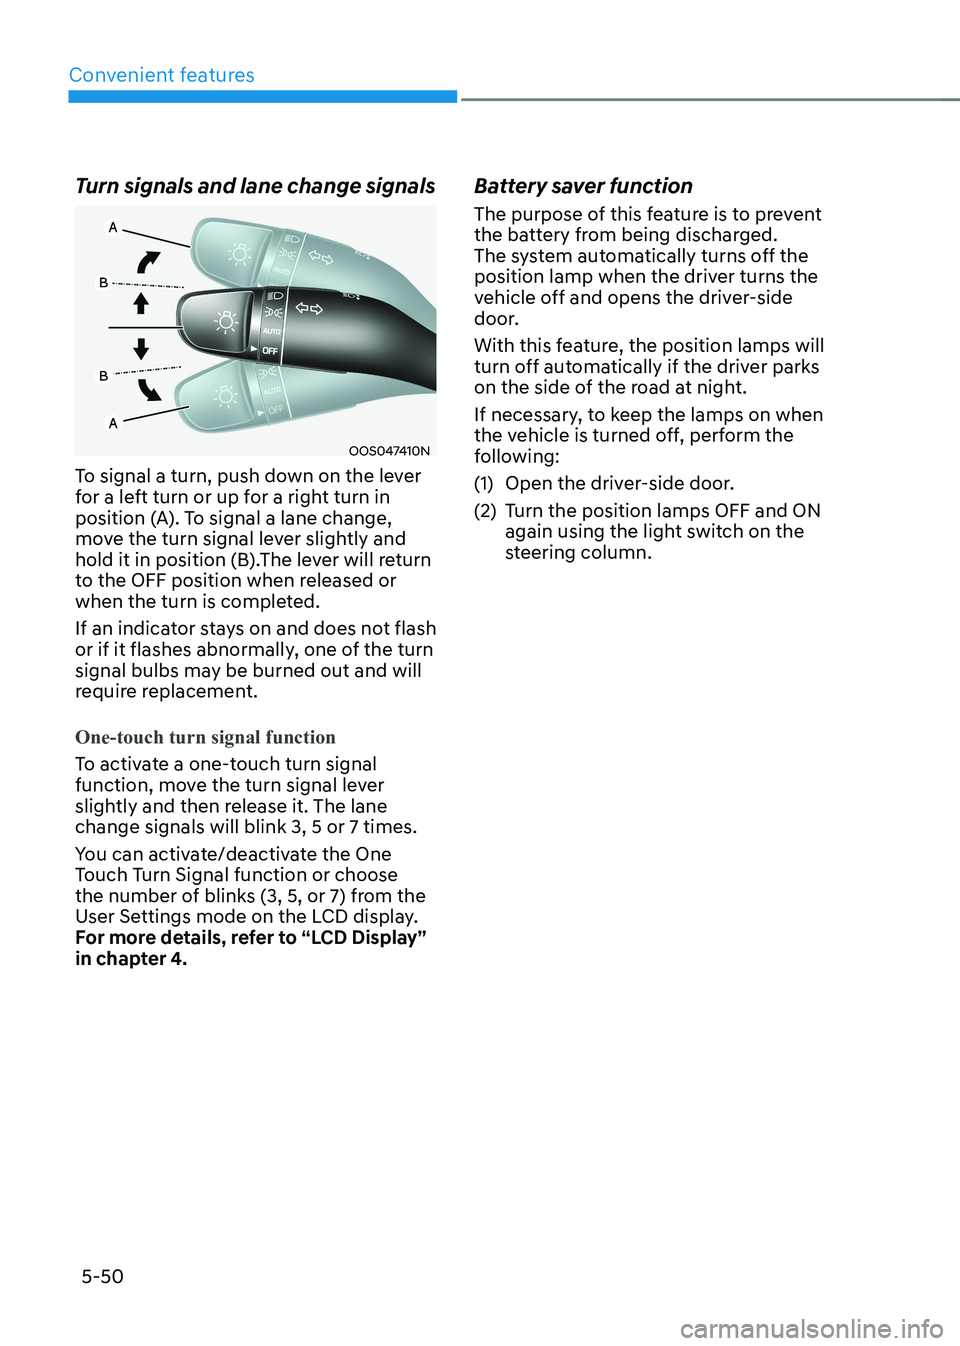
To signal a turn, push down on the lever
for a left turn or up for a right turn in
position (A). To signal a lane change,
move the turn signal lever slightly and
hold it in position (B).The lever will return
to the OFF position when released or
when the turn is completed.
If an indicator stays on and does not flash
or if it flashes abnormally, one of the turn
signal bulbs may be burned out and will
require replacement.
One-touch turn signal function
To activate a one-touch turn signal
function, move the turn signal lever
slightly and then release it. The lane change signals will blink 3, 5 or 7 times.
You can activate/deactivate the One
Touch Turn Signal function or choose
the number of blinks (3, 5, or 7) from the
User Settings mode on the LCD display.
For more details, refer to “LCD Display”
in chapter 4. Battery saver function
The purpose of this feature is to prevent
the battery from being discharged.
The system automatically turns off the
position lamp when the driver turns the
vehicle off and opens the driver-side
door.
With this feature, the position lamps will
turn off automatically if the driver parks
on the side of the road at night.
If necessary, to keep the lamps on when
the vehicle is turned off, perform the
following:
(1) Open the driver-side door.
(2) Turn the position lamps OFF and ON
again using the light switch on the
steering column.
Page 235 of 548
05
5-51
Headlamp delay function (if equipped)
If you place the START/STOP button
to the ACC or OFF position with the
headlamps ON, the headlamps (and/or
position lamps) remain on for about 5
minutes. However, with the vehicle off if
the driver’s door is opened and closed,
the headlamps (and/or position lamps)
are turned off after 15 seconds.
The headlamps (and/or position lamps)
can be turned off by pressing the lock
button on the smart key twice or turning
the light switch to the OFF or AUTO
position. However, if you turn the light
switch to the AUTO position when it is
dark outside, the headlamps will not be
turned off.
You can activate or deactivate the
Headlamp Delay function from the User
Settings mode on the LCD display. For
more details, refer to “LCD Display” in
chapter 4.
NOTICE
If the driver gets out of the vehicle
through other doors (except driver’s
door), the battery saver function
does not operate and the headlamp
delay function does not turn off
automatically. Therefore, It causes the
battery to be discharged. In this case,
make sure to turn off the headlamps
before getting out of the vehicle.
Welcome system (if equipped)
Headlamp and position lamp
When the headlamp (lamp switch in the
headlamp or AUTO position) is on and
all doors (and tailgate) are locked and closed, the position lamp and headlamp
will come on for 15 seconds when the
door unlock button is pressed on the
smart key.
At this time, if you press the door lock
or unlock button, the position lamp and
headlamp will turn off immediately
Interior lamp
When the interior lamp switch is in
the DOOR position and all doors (and
tailgate) are closed and locked, the room
lamp will come on for 30 seconds if any
of the below is performed. • When the door unlock button is
pressed on the smart key.
• When the button of the outside door
handle is pressed with the smart key in possession.
At this time, if you press the door lock or
unlock button, the room lamp will turn
off immediately.
Page 245 of 548
05
5-61
Rear window wiper and washer
switch (if equipped)
OTLE045167
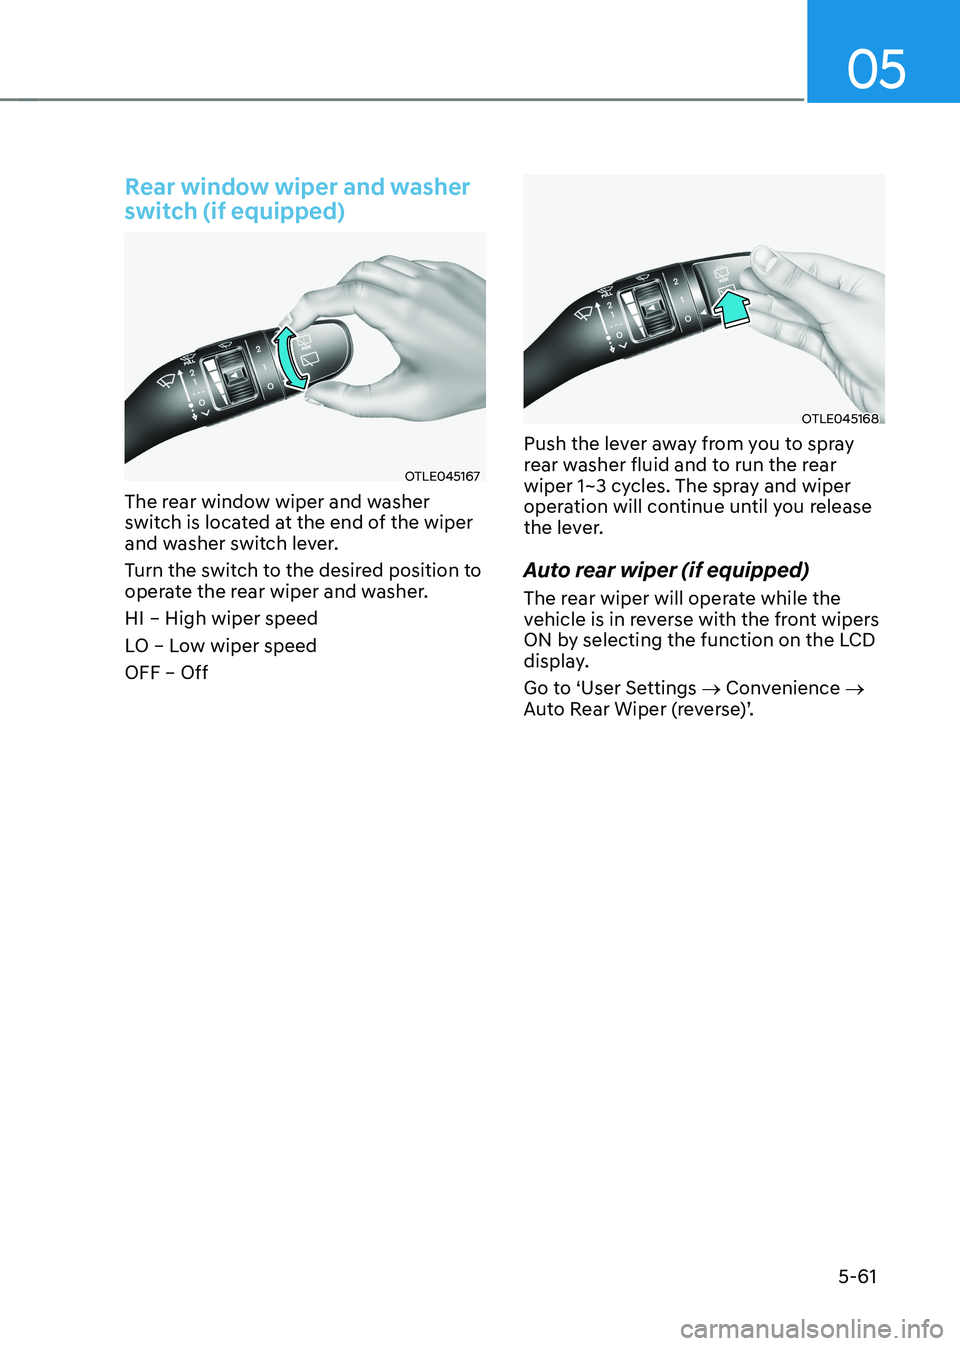
The rear window wiper and washer
switch is located at the end of the wiper
and washer switch lever.
Turn the switch to the desired position to
operate the rear wiper and washer. HI – High wiper speed
LO – Low wiper speed OFF – Off
OTLE045168
Push the lever away from you to spray
rear washer fluid and to run the rear
wiper 1~3 cycles. The spray and wiper
operation will continue until you release
the lever.
Auto rear wiper (if equipped)
The rear wiper will operate while the
vehicle is in reverse with the front wipers
ON by selecting the function on the LCD
display.
Go to ‘User Settings → Convenience →
Auto Rear Wiper (reverse)’.
Page 247 of 548
05
5-63
Automatic heating and air
conditioning
The Automatic Climate Control System
is controlled by setting the desired
temperature.
OOSEV048301
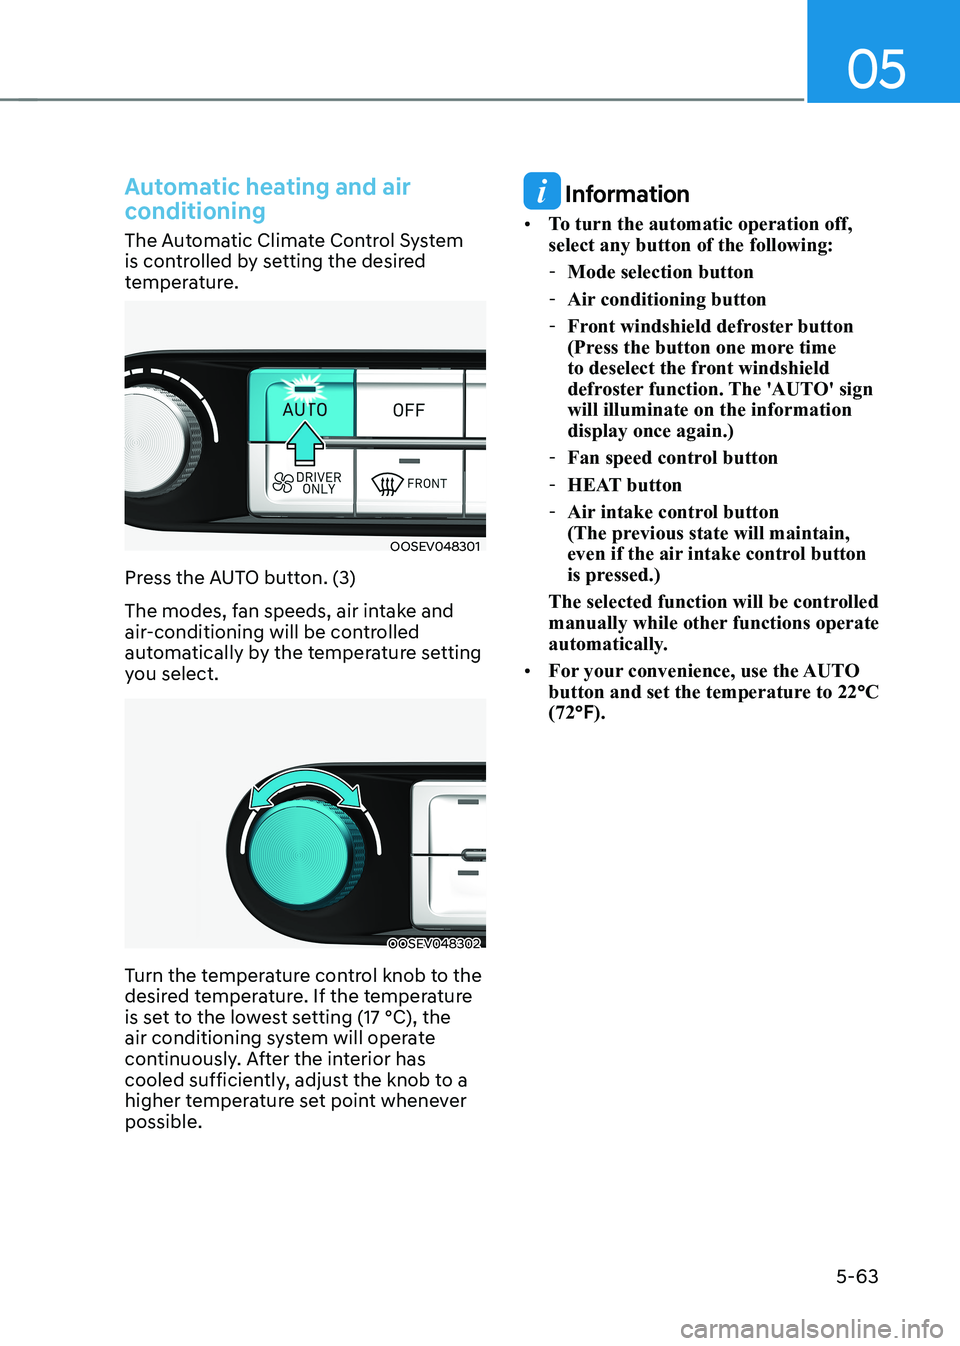
Press the AUTO button. (3)
The modes, fan speeds, air intake and
air-conditioning will be controlled
automatically by the temperature setting
you select.
OOSEV048302
Turn the temperature control knob to the
desired temperature. If the temperature
is set to the lowest setting (17 °C), the
air conditioning system will operate
continuously. After the interior has
cooled sufficiently, adjust the knob to a
higher temperature set point whenever possible.
Information
• To turn the automatic operation off, select any button of the following:
- Mode selection button
- Air conditioning button
- Front windshield defroster button
(Press the button one more time
to deselect the front windshield
defroster function. The 'AUTO' sign will illuminate on the information display once again.)
- Fan speed control button
- HEAT button
- Air intake control button
(The previous state will maintain,
even if the air intake control button
is pressed.)
The selected function will be controlled
manually while other functions operate
automatically.
• For your convenience, use the AUTO
button and set the temperature to 22 °C
(72 °F).