Page 185 of 211

Fig. 144 Manually locking the vehicle with the vehicle key
First read and observe the introductoryinformation and safety warnings⇒
Introduction
The front passenger door and the rear doors can be locked manually.
•Open the door.
•If necessary, remove the rubber seal from the end face of the door. The seal is marked with a
lock symbol ⇒ Fig. 143.
•Fold the key bit out of the vehicle key if necessary ⇒ Vehicle key set.
•Insert the key bit into the slit in the opening and turn it clockwise as far as it will go ⇒ Fig. 144.
•If necessary, put the rubber seal back in place and close the door fully.
•Ensure that the door is locked.
•If required, repeat the process for the other doors.
•The vehicle should be checked by a qualified workshop as soon as possible.
The doors can be unlocked and opened from the inside by pulling the door release handle.
You may have to pull the door release lever twice ⇒ Central locking system.
Unlocking the tailgate manually
Fig. 145 Inside the luggage compartment: unlocking the tailgate manually
First read and observe the introductoryinformation and safety warnings⇒
Introduction
•If necessary, fold the backrest of the rear bench seat forwards ⇒ Seat functions.
•Remove items of luggage so that you can reach the tailgate from the inside.
•Fold the key bit out of the vehicle key ⇒ Vehicle key set.
•Insert the key bit into the opening in the tailgate ⇒ Fig. 145 and push the release lever in the
direction of the arrow to unlock the tailgate.
Vehicle toolkit
Introduction
This chapter contains information on the followingsubjects:
⇒ Stowage
⇒ Contents
Observe any country-specific legislation when securing your vehicle in the event of a breakdown.
Vehicle tools in the vehicle
In vehicles factory-fitted with a spare wheel, emergency spare wheel or winter wheels, additional
vehicle tools may be located in the luggage compartment ⇒ Stowage.
Additional information and warnings:
•Preparation for working in the engine compartment ⇒ Preparation for working in the engine
compartment
•In an emergency ⇒ In an emergency
•Changing a wheel ⇒ Changing a wheel
•Breakdown set ⇒ Breakdown set
Page 186 of 211

Stowage
Fig. 146 In the luggage compartment: floor covering held in upright position
First read and observe the introductoryinformation and safety warnings⇒
Introduction
The vehicle tools, spare wheel, emergency spare wheel or breakdown set are located in the
luggage compartment under the floor covering ⇒ Fig. 146.
•If necessary, remove the variable luggage compartment floor ⇒ Luggage compartment.
•Lift the floor covering at the recess (arrow) ⇒ Fig. 146.
After using the vehicle jack, crank it back to its original position so that it can be stored
safely.
Contents
Fig. 147 Contents of the vehicle toolkit
First read and observe the introductoryinformation and safety warnings⇒
Introduction
The content of the vehicle toolkit depends on the vehicle equipment level. The following describes
the maximum scope.
The vehicle toolkit contains the following⇒ Fig. 147
Screwdriver with hexagon socket in the handle for slackened wheel bolts. The screwdriver
blade is reversible. The screwdriver may be located under the box spanner.
Adapter for the anti-theft wheel bolts. Volkswagen recommends that you carry the wheel
bolt adapter in the vehicle toolkit at all times. The code number of the anti-theft wheel bolt is
engraved on the front of the adapter. You will need this number to replace the adapter if lost.
Make a note of the code number for the anti-theft wheel bolt and keep it in a safe place – but
not inside the vehicle.
Removable towing eye.
Wire hook for pulling off the centre cover, wheel covers and the wheel bolt caps.
In the event of a sudden driving or braking manoeuvre or accident, a loose vehicle toolkit,
breakdown set and spare wheel could be flung though the vehicle and cause severe injuries.
•Always ensure that the vehicle toolkit, breakdown set and spare wheel or temporary spare
wheel are secured in the luggage compartment.
WARNING
Unsuitable or damaged tools in the vehicle toolkit can lead to accidents and injuries.
•Never work with unsuitable or damaged tools from the vehicle toolkit.
WARNING
Page 187 of 211

Vehicle jack. Before you return the vehicle jack to the toolbox, fully wind in the claw. To
stow the vehicle jack securely the crank lever must be braced against the side of the jack.
Box spanner for wheel bolts.
Vehicles with a natural gas engine
In vehicles with natural gas engines delivered with a second wheel set, the toolkit is kept in a
seperate bag. Volkswagen recommends not keeping the bag in the vehicle all the time but only
when it is necessary for changing to winter or summer tyres.
Hubcaps
Introduction
This chapter contains information on the followingsubjects:
⇒ Centre cover
⇒ Wheel cover
⇒ Wheel bolt caps
Additional information and warnings:
•Cleaning and caring for the vehicle exterior ⇒ Caring for and cleaning the vehicle exterior
•Vehicle toolkit ⇒ Vehicle toolkit
•Changing a wheel ⇒ Changing a wheel
•Breakdown set ⇒ Breakdown set
Centre cover
Fig. 148 Pulling off the centre cover on an alloy wheel
Fig. 149 Pulling off the centre cover on a steel wheel
First read and observe the introductoryinformation and safety warnings⇒
Introduction
Using unsuitable hubcaps, or fitting them incorrectly, can cause accidents and serious
injuries.
•Incorrectly fitted hubcaps can become loose while the vehicle is in motion and endanger
other road users.
•Do not use damaged hubcaps.
•Always ensure that the airflow to cool the brakes is not restricted or reduced. This also
applies if hubcaps are retrofitted. If the airflow is not sufficient, the braking distance could
increase significantly.
WARNING
Remove the hubcaps carefully and fit them again properly so as to avoid damage to the
vehicle.
NOTICE
Page 188 of 211

The centre cover has to be pulled off to gain access to the wheel bolts.
Removing and installing the centre cover
•To remove: take the wire hook from the toolkit and insert it in a hole (alloy wheel) or into an
edge on the cover (steel wheel) ⇒ Fig. 148 or ⇒ Fig. 149.
•Remove the cover in the direction of the arrow.
•To replace: press the centre cover against the rim until you feel it engage.
The centre cover protects the wheel bolts and must be replaced after changing the tyre.
Wheel cover
Fig. 150 Removing the wheel covers
First read and observe the introductoryinformation and safety warnings⇒
Introduction
Removing the wheel covers
•Take the box spanner and wire hook from the vehicle toolkit ⇒ Vehicle toolkit.
•Insert the wire hook into one of the holes in the wheel cover.
•Push the box spanner through the wire hook ⇒ Fig. 150 and remove the wheel cover in the
direction of the arrow.
Fitting the wheel covers
The wheel covers must be pushed on to the rims with the hole for the valve aligned with the valve.
When fitting the wheel cover, ensure that it engages securely on the entire circumference. If using
an anti-theft wheel bolt, insert the bolt in the position opposite the valve.
Wheel bolt caps
Fig. 151 Removing the wheel bolt caps
First read and observe the introductoryinformation and safety warnings⇒
Introduction
•Take the wire hook from the vehicle toolkit ⇒ Vehicle toolkit.
•Insert the hook through the opening in the cap ⇒ Fig. 151 and pull off in the direction of the
arrow.
The caps protect the wheel bolts and must be replaced after changing the tyre.
The anti-theft wheel bolt has a separate cap. It only fits onto the anti-theft wheel bolts and not onto
conventional wheel bolts.
Changing a wheel
Introduction
This chapter contains information on the followingsubjects:
⇒ Preparation for changing a wheel
⇒ Wheel bolts
Page 189 of 211

In the event of a flat tyre, park your vehicle on a firm and level surface at a safe distance
from the flow of traffic.
Apply the handbrake firmly Braking, stopping and parking.
With an automated manual gearbox, move the selector lever to D or R with the ignition on
Changing gear.
Stop the engine and remove the vehicle key from the ignition Starting and stopping the
engine.
Manual gearbox: select a gear Changing gear.
Ensure that all vehicle occupants exit the vehicle and proceed to a safe position, e.g.
behind the safety barrier.
Chock the wheel opposite the wheel being worked on with a stone or a similar object.
Remove any items of luggage in the luggage compartment.
Remove the spare wheel or temporary spare wheel and vehicle toolkit from the luggage
compartment.
Remove the hubcaps Hubcaps.
⇒ Lifting the vehicle with the jack
⇒ Changing a wheel
⇒ After changing a wheel
Some models are delivered without a factory-fitted jack or box spanner. If this is the case, the wheel
should be changed by a qualified workshop.
The vehicle jack supplied with the vehicle is only designed for changing a wheel when one vehicle
tyre is damaged and has to be replaced. Seek expert assistance if both tyres on one side of the
vehicle, both tyres on one axle, or all tyres are damaged.
Only change the wheel yourself when the car is parked in a safe place, you are familiar with the
necessary steps and safety procedures and you have access to all the correct tools. Seek expert
assistance if this is not the case.
Additional information and warnings:
•Exterior views ⇒ Exterior views
•Vehicle key set ⇒ Vehicle key set
•Wheels and tyres ⇒ Wheels and tyres
•In an emergency ⇒ In an emergency
•Vehicle toolkit ⇒ Vehicle toolkit
•Hubcaps ⇒ Hubcaps
Preparation for changing a wheel
First read and observe the introductoryinformation and safety warnings⇒
Introduction
Checklist
The following actions must always be carried out in the given order in preparation for changing
the wheel ⇒:
Changing a wheel can be dangerous, especially when carried out at the side of a road. Please
note the following steps in order to reduce the risk of serious injuries:
•Stop the vehicle as soon as possible and when safe to do so. Park the vehicle at a safe
distance from moving traffic in order to carry out the wheel change.
•All passengers and children in particular must be at a safe distance and away from your
area of work during the wheel change.
•Switch on the hazard warning lights to warn other road users.
•The ground should be firm and level. If necessary use a large, strong board or similar
support for the vehicle jack.
•Only change the wheel yourself if you feel confident carrying out the procedure. If not,
seek expert assistance.
•Always use suitable and undamaged tools to change the wheel.
•Always switch off the engine, firmly apply the handbrake and move the selector lever to D
or R with the ignition switched on, or select a gear on a manual gearbox in order to reduce
the risk of unintended vehicle movement.
•The wheel bolt tightening torque should be checked with a torque wrench immediately
after changing a wheel.
WARNING
Page 190 of 211

Wheel bolts
Fig. 152 Changing a wheel: loosening the wheel bolts
Fig. 153 Changing wheel: tyre valve ① and location of the anti-theft wheel bolt ②
First read and observe the introductoryinformation and safety warnings⇒
Introduction
Only the spanner delivered with the vehicle should be used to loosen the wheel bolts.
Only loosen the wheel bolts by approximately one turn before raising the vehicle with the vehicle
jack.
If the wheel bolt is very tight, you may be able to loosen it by pushing down the end of the spanner
carefully with your foot. Hold on to the car for support and take care not to slip.
Loosening the wheel bolts
•Fit the box spanner over the wheel bolt as far as it will go ⇒ Fig. 152.
•Hold the end of the box spanner and turn the wheel bolt one turn anticlockwise ⇒.
Loosening the anti-theft wheel bolt
The anti-theft wheel bolt must be bolted into position ⇒ Fig. 153② on wheels with a wheel cover.
Otherwise, it will not be possible to fit the wheel cover.
•Take the adapter for anti-theft wheel bolts out of the vehicle toolkit.
•Insert the adapter into the anti-theft wheel bolt ⇒ Fig. 153. Push it in as far as it will go.
•Insert the box spanner into the adapter as far as it will go.
•Hold the end of the box spanner and turn the wheel bolt one turn anticlockwise ⇒.
Important information about the wheel bolts
The design of the wheel rims and wheel bolts is matched to the factory-fitted wheels. If different
rims are fitted, the correct wheel bolts with the right length and correctly shaped bolt heads must be
used. This ensures that wheels are fitted securely and that the brake system works properly.
In certain circumstances, wheel bolts from a vehicle of the same model series may not be used.
Tightening torque for the wheel bolts
The tightening torque for wheel bolts for steel and alloy wheels is 110 Nm. The tightening torque
should be checked with a torque wrench immediately after changing a wheel.
If the wheel bolts are corroded and difficult to turn, they must be replaced and the wheel hub
threads cleaned before the tightening torque is checked.
Never grease or lubricate the wheel bolts or the threads of the wheel hub. This could cause them to
loosen while the vehicle is in motion, even if the required torque setting is used.
Ignoring any of the items on this important safety checklist can lead to accidents and severe
injuries.
•Always follow the instructions in the checklist and observe the general safety procedures.
WARNING
Page 191 of 211

Find a firm and level surface suitable for lifting the vehicle.
Stop the engine, select a gear on a manual gearbox or with an automated manual
gearbox, move the selector lever to D or R with the ignition switched onChanging gear
then apply the handbrake firmly Braking, stopping and parking.
Chock the wheel diagonally opposite using the collapsible chocks or other suitable objects.
Loosen the wheel bolts on the wheel that is being changed Wheel bolts.
Find the jacking point under the vehicle which is closest to the wheel that is being
changed.
Raise the vehicle jack until it just fits under the jacking point of the vehicle.
Ensure that the foot of the jack is resting securely on the ground with its whole surface and
that the foot of the jack is positioned precisely, i.e. vertically beneath the point of
application .
Position the vehicle jack. At the same time, continue to crank the claw up until it is in
position around the vertical rib underneath the vehicle .
Lifting the vehicle with the jack
Fig. 154 Jacking points for the vehicle jack (mirrored on the right-hand side of the vehicle)
Fig. 155 Vehicle jack at the rear left-hand side of the vehicle
First read and observe the introductoryinformation and safety warnings⇒
Introduction
The jack may be applied only at the jacking points shown (markings on the body) ⇒ Fig. 154.
Always use the jacking point closest to the wheel you are working on ⇒.
Raise the vehicle using only the designated jacking points.
Checklist
To ensure your own safety and that of your passengers, observe the following actions in the
specified order ⇒:
Incorrectly tightened wheel bolts can loosen while the vehicle is in motion and cause
accidents, serious injury, and loss of control of the vehicle.
•Only use wheel bolts that belong to the wheel.
•Never use different wheel bolts.
•The wheel bolts and threads of the wheel hubs must be clean, free from oil and grease,
and turn easily.
•Always use the box spanner placed in the vehicle at the factory to loosen and tighten the
wheel bolts.
•Only loosen the wheel bolts by approximately one turn before raising the vehicle with the
vehicle jack.
•Never grease or lubricate the wheel bolts or the threads of the wheel hub. This could
cause them to loosen while the vehicle is in motion, even if the required torque setting is
used.
•Never remove the bolts on rims with bolted-on rings.
•If the tightening torque of the wheel bolts is too low, the wheel bolts and rims can loosen
while the vehicle is in motion. The wheel bolts and threads can be damaged if the
tightening torque is too high.
WARNING
Page 192 of 211

Crank the vehicle jack further until the wheel is just clear of the ground.
Changing a wheel
Fig. 156 Changing a wheel: removing the wheel bolts with the screwdriver handle
First read and observe the introductoryinformation and safety warnings⇒
Introduction
Removing the wheel
•Read the checklist ⇒ Preparation for changing a wheel.
•Loosen the wheel bolts ⇒ Wheel bolts.
•Jack up the vehicle ⇒ Lifting the vehicle with the jack.
•Using the hexagonal socket in the screwdriver handle ⇒ Fig. 156, unscrew the loosened wheel
bolts, remove and place on a clean surface.
•Remove the wheel.
Fitting the spare wheel or temporary spare wheel
Note any specific tyre running direction ⇒ Wheels and tyres.
•Position the spare wheel / temporary spare wheel.
•Screw in the wheel bolts in a clockwise direction and use the hexagonal socket in the
screwdriver handle to tighten them gently.
•Use the adapter for anti-theft wheel bolts where appropriate.
•Lower the vehicle with the jack.
•Use the box spanner to tighten all the wheel bolts securely in a clockwise direction ⇒. Do not
tighten the bolts in clockwise or anticlockwise sequence. Tighten them in diagonal sequence.
•Fit the cover caps, centre covers or wheel covers ⇒ Hubcaps.
Incorrect use of the vehicle jack can cause the vehicle to slip off the jack, which can lead to
severe injuries. Please note the following to help reduce the risk of injuries:
•Only use vehicle jacks that have been approved by Volkswagen for your vehicle type.
Other vehicle jacks could slip out of position – this includes vehicle jacks supplied with
other Volkswagen models.
•The ground must be firm and level. Soft ground or surfaces at an incline under the vehicle
jack may cause the vehicle to slip off the jack. If necessary use a large, strong board or
similar support for the vehicle jack.
•On a hard, slippery surface (such as tiles) use a rubber mat or similar to prevent the
vehicle jack from slipping.
•Fit the vehicle jack only at the points described. The vehicle jack claw must grip the
vertical rib under the door sill securely ⇒ Fig. 155.
•Never place any part of your body (e.g. an arm or leg) underneath the vehicle if the latter
is only supported by the vehicle jack.
•If you have to work underneath the vehicle, use suitable stands to provide extra support
for the vehicle.
•Never lift the vehicle when the engine is running, or if the vehicle is tilted to the side or on
a gradient.
•Never start the engine when the vehicle is raised on a vehicle jack. Engine vibrations can
cause the vehicle to fall off the vehicle jack.
WARNING
Ignoring any of the items on this important safety checklist can lead to accidents and severe
injuries.
•Always follow the instructions in the checklist and observe the general safety procedures.
WARNING
 1
1 2
2 3
3 4
4 5
5 6
6 7
7 8
8 9
9 10
10 11
11 12
12 13
13 14
14 15
15 16
16 17
17 18
18 19
19 20
20 21
21 22
22 23
23 24
24 25
25 26
26 27
27 28
28 29
29 30
30 31
31 32
32 33
33 34
34 35
35 36
36 37
37 38
38 39
39 40
40 41
41 42
42 43
43 44
44 45
45 46
46 47
47 48
48 49
49 50
50 51
51 52
52 53
53 54
54 55
55 56
56 57
57 58
58 59
59 60
60 61
61 62
62 63
63 64
64 65
65 66
66 67
67 68
68 69
69 70
70 71
71 72
72 73
73 74
74 75
75 76
76 77
77 78
78 79
79 80
80 81
81 82
82 83
83 84
84 85
85 86
86 87
87 88
88 89
89 90
90 91
91 92
92 93
93 94
94 95
95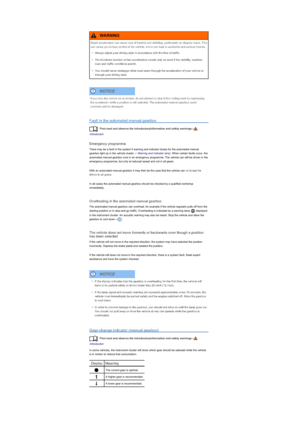 96
96 97
97 98
98 99
99 100
100 101
101 102
102 103
103 104
104 105
105 106
106 107
107 108
108 109
109 110
110 111
111 112
112 113
113 114
114 115
115 116
116 117
117 118
118 119
119 120
120 121
121 122
122 123
123 124
124 125
125 126
126 127
127 128
128 129
129 130
130 131
131 132
132 133
133 134
134 135
135 136
136 137
137 138
138 139
139 140
140 141
141 142
142 143
143 144
144 145
145 146
146 147
147 148
148 149
149 150
150 151
151 152
152 153
153 154
154 155
155 156
156 157
157 158
158 159
159 160
160 161
161 162
162 163
163 164
164 165
165 166
166 167
167 168
168 169
169 170
170 171
171 172
172 173
173 174
174 175
175 176
176 177
177 178
178 179
179 180
180 181
181 182
182 183
183 184
184 185
185 186
186 187
187 188
188 189
189 190
190 191
191 192
192 193
193 194
194 195
195 196
196 197
197 198
198 199
199 200
200 201
201 202
202 203
203 204
204 205
205 206
206 207
207 208
208 209
209 210
210