2021 RAM PROMASTER CITY light
[x] Cancel search: lightPage 83 of 280
STARTING AND OPERATING81
Towing Requirements — Trailer Brakes
Do not interconnect the hydraulic brake
system or vacuum system of your vehicle
with that of the trailer. This could cause inad -
equate braking and possible personal injury.
An electronically actuated trailer brake
controller is required when towing a trailer
with electronically actuated brakes. When
towing a trailer equipped with a hydraulic
surge actuated brake system, an electronic
brake controller is not required.
Trailer brakes are recommended for trailers
over 1,000 lbs (453 kg) and required for
trailers in excess of 2,000 lbs (907 kg).
Towing Requirements — Trailer Lights And
Wiring
Whenever you pull a trailer, regardless of the
trailer size, stoplights and turn signals on the
trailer are required for motoring safety.
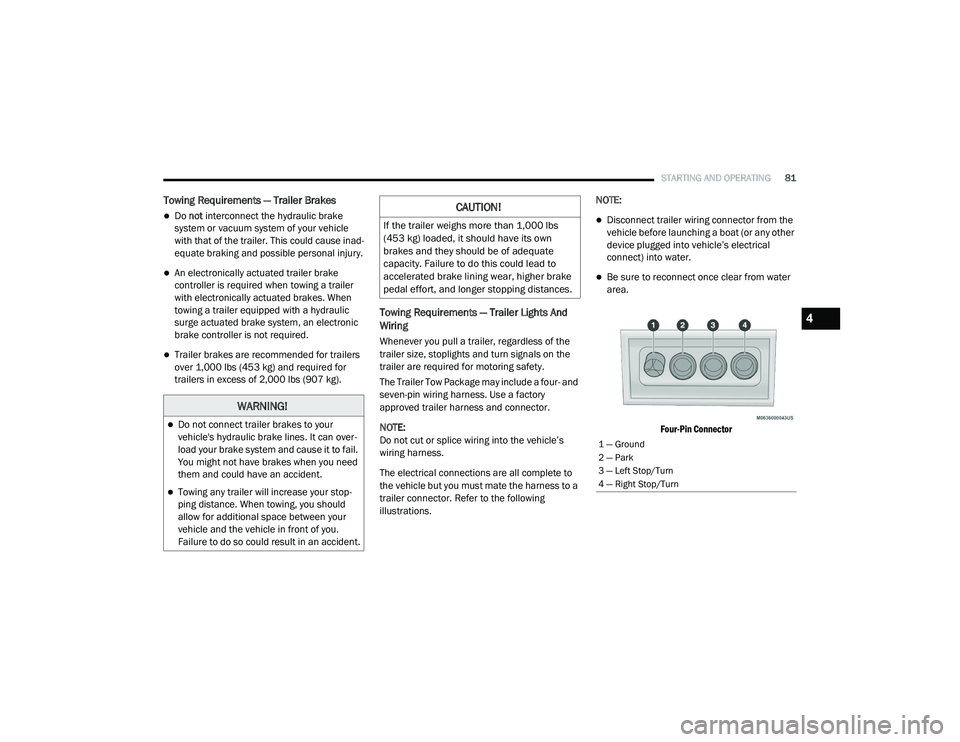
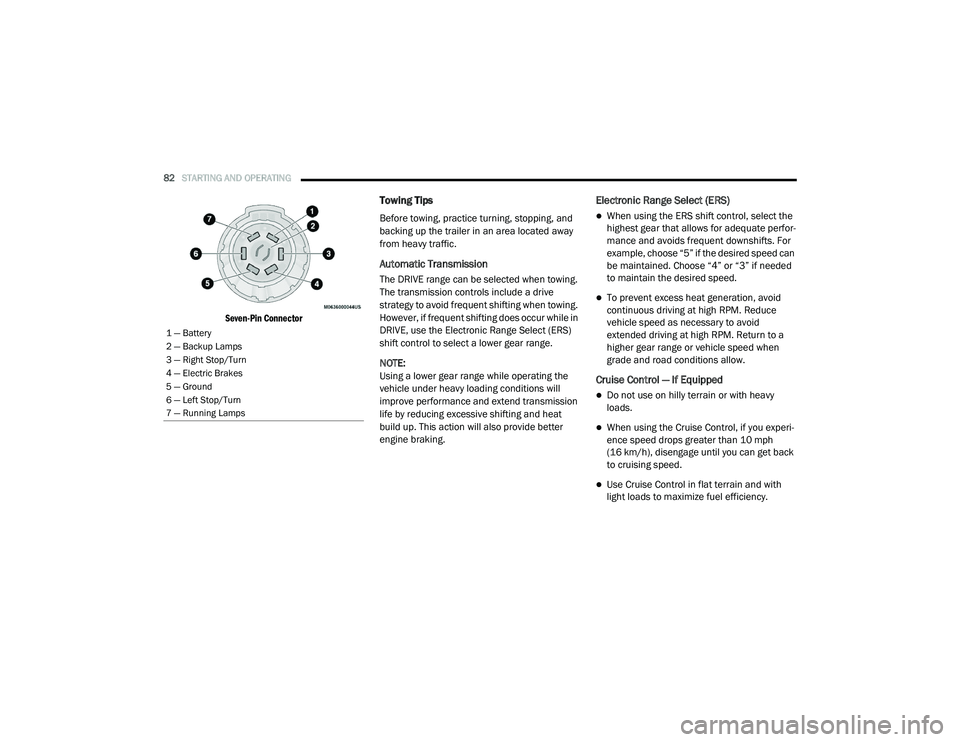
The Trailer Tow Package may include a four- and
seven-pin wiring harness. Use a factory
approved trailer harness and connector.
NOTE:
Do not cut or splice wiring into the vehicle’s
wiring harness.
The electrical connections are all complete to
the vehicle but you must mate the harness to a
trailer connector. Refer to the following
illustrations. NOTE:
Disconnect trailer wiring connector from the
vehicle before launching a boat (or any other
device plugged into vehicle’s electrical
connect) into water.
Be sure to reconnect once clear from water
area.
Four-Pin Connector
WARNING!
Do not connect trailer brakes to your
vehicle's hydraulic brake lines. It can over -
load your brake system and cause it to fail.
You might not have brakes when you need
them and could have an accident.
Towing any trailer will increase your stop -
ping distance. When towing, you should
allow for additional space between your
vehicle and the vehicle in front of you.
Failure to do so could result in an accident.
CAUTION!
If the trailer weighs more than 1,000 lbs
(453 kg) loaded, it should have its own
brakes and they should be of adequate
capacity. Failure to do this could lead to
accelerated brake lining wear, higher brake
pedal effort, and longer stopping distances.
1 — Ground
2 — Park
3 — Left Stop/Turn
4 — Right Stop/Turn
4
21_VM_OM_EN_USC_t.book Page 81
Page 84 of 280
82STARTING AND OPERATING
Seven-Pin Connector
Towing Tips
Before towing, practice turning, stopping, and
backing up the trailer in an area located away
from heavy traffic.
Automatic Transmission
The DRIVE range can be selected when towing.
The transmission controls include a drive
strategy to avoid frequent shifting when towing.
However, if frequent shifting does occur while in
DRIVE, use the Electronic Range Select (ERS)
shift control to select a lower gear range.
NOTE:
Using a lower gear range while operating the
vehicle under heavy loading conditions will
improve performance and extend transmission
life by reducing excessive shifting and heat
build up. This action will also provide better
engine braking.
Electronic Range Select (ERS)
When using the ERS shift control, select the
highest gear that allows for adequate perfor -
mance and avoids frequent downshifts. For
example, choose “5” if the desired speed can
be maintained. Choose “4” or “3” if needed
to maintain the desired speed.
To prevent excess heat generation, avoid
continuous driving at high RPM. Reduce
vehicle speed as necessary to avoid
extended driving at high RPM. Return to a
higher gear range or vehicle speed when
grade and road conditions allow.
Cruise Control — If Equipped
Do not use on hilly terrain or with heavy
loads.
When using the Cruise Control, if you experi -
ence speed drops greater than 10 mph
(16 km/h), disengage until you can get back
to cruising speed.
Use Cruise Control in flat terrain and with
light loads to maximize fuel efficiency.
1 — Battery
2 — Backup Lamps
3 — Right Stop/Turn
4 — Electric Brakes
5 — Ground
6 — Left Stop/Turn
7 — Running Lamps
21_VM_OM_EN_USC_t.book Page 82
Page 87 of 280

STARTING AND OPERATING85
(Continued)
Shallow Standing Water
Although your vehicle is capable of driving
through shallow standing water, consider the
following Cautions and Warnings before doing
so.
WARNING!
Driving through standing water limits your
vehicle’s traction capabilities. Do not
exceed 5 mph (8 km/h) when driving
through standing water.
Driving through standing water limits your
vehicle’s braking capabilities, which
increases stopping distances. Therefore,
after driving through standing water, drive
slowly and lightly press on the brake pedal
several times to dry the brakes.
Failure to follow these warnings may result
in injuries that are serious or fatal to you,
your passengers, and others around you.
CAUTION!
Always check the depth of the standing
water before driving through it. Never drive
through standing water that is deeper than
the bottom of the tire rims mounted on the
vehicle.
Determine the condition of the road or the
path that is under water and if there are any
obstacles in the way before driving through
the standing water.
Do not exceed 5 mph (8 km/h) when
driving through standing water. This will
minimize wave effects.
Driving through standing water may cause
damage to your vehicle’s drivetrain compo -
nents. Always inspect your vehicle’s fluids
(i.e., engine oil, transmission, axle, etc.) for
signs of contamination (i.e., fluid that is
milky or foamy in appearance) after driving
through standing water. Do not continue to
operate the vehicle if any fluid appears
contaminated, as this may result in further
damage. Such damage is not covered by
the New Vehicle Limited Warranty.
Getting water inside your vehicle’s engine
can cause it to lock up and stall out, and
cause serious internal damage to the
engine. Such damage is not covered by the
New Vehicle Limited Warranty.
CAUTION! (Continued)
4
21_VM_OM_EN_USC_t.book Page 85
Page 91 of 280
MULTIMEDIA89
Display
When the Display button is pressed on the touchscreen, the system will display the options related to the theme (if equipped), brightness, and color of
the touchscreen. The available settings are:
Setting Name Description
Language This setting will change the languages of the Uconnect system. The
available language are English, Français, and Español.
Display Mode This setting will allow you to set the brightness manually or have the
system set it automatically. The “Auto” setting has the system
automatically adjust the display brightness. The “Manual” setting will
allow the user to adjust the brightness of the display.
Brightness This setting will allow you to set the brightness when the headlights are
on. To access this setting, Display Mode must be set to Manual. The
“With Headlights On” setting will increase or decrease the brightness
with the headlight on; the “With Headlights Off” will increase or decrease
the brightness with the headlights off.
Touchscreen Beep This setting will allow you to turn the touchscreen beep on or off.
Display Trip B This setting will turn on or off the Trip B display on the Instrument Cluster
Display.
5
21_VM_OM_EN_USC_t.book Page 89
Page 94 of 280
92MULTIMEDIA
Safety/Assistance
When the Safety/Assistance button is pressed, the system displays the options related to the vehicle’s safety settings. These options will differ
depending on the features equipped on the vehicle. The settings may display in list form or within sub-folders on the screen. To access a sub-folder,
select the desired folder; the available options related to that feature will then display on the screen.
Lights
After pressing the Lights button on the touchscreen, the following settings will be available:
NOTE:
When the “Daytime Running Lights” feature is selected, the daytime running lights can be turned on or off. This feature is only allowed by law in the
country of the vehicle purchased.
Setting Name Description
ParkView Backup Camera Delay This setting will add a delay to the backup camera when shifting out of
reverse.
Setting Name
Description
Daytime Running Lights This setting will allow you to turn the Daytime Running Lights on or off.
21_VM_OM_EN_USC_t.book Page 92
Page 100 of 280
98MULTIMEDIA
Feature Description
Settings Press the Settings button to access the Uconnect Settings.
Back Press the Back button to return to a previous page.
Enter/Browse & Tune/Scroll Knob Push the Enter/Browse button to accept a highlighted selection on the
screen. Rotate the Tune/Scroll rotary knob to scroll through a list or tune
a radio station.
More Push the More button to access additional options such as: Trip, Clock,
and Camera.
Phone Press the Phone button to enter Phone Mode and access the hands-free
phone system.
NAV/Camera Press the Camera button (if equipped) to access the vehicle’s rear
backup camera. Press the NAV button (if equipped) to access Navigation
Mode, the system’s build-in navigation feature.
Media Press the Media button to enter Media Mode and access controls for
external audio sources.
Radio Press the Radio button to enter Radio Mode and access the system’s
radio functions.
Volume & On/Off Rotate the rotary knob to adjust the volume. Push the Volume & On/Off
button to turn the system on and off.
Mute Push the Mute button to turn the audio of the radio system off. Press it
again to turn the audio on.
Screen Off Push the Screen Off button to turn the screen on or off.
21_VM_OM_EN_USC_t.book Page 98
Page 104 of 280
102MULTIMEDIA
This functionality is only available for radios
equipped with a Satellite receiver. In order to
receive satellite radio, the vehicle needs to be
outside with a clear view to the sky.
If the screen shows Acquiring Signal, you might
have to change the vehicle’s position in order to
receive a signal. In most cases, the satellite
radio does not receive a signal in underground
parking garages or tunnels.
No Subscription
Radios equipped with a Satellite receiver
require a subscription to the SiriusXM® Service.
When the Radio does not have the necessary
subscription, the Radio is able to receive the
Preview channel only.
Acquiring SiriusXM® Subscription
To activate the SiriusXM® Satellite Radio
subscription, US visit www.UconnectPhone.com
or call:
1-800-643-2112
Canada visit www.UconnectPhone.com or call:
1-800-465-2001 (English)1-800-387-9983
(French) NOTE:
You will need to provide the SiriusXM® ID (RID)
located at the bottom of the Channel 0 screen.
The Satellite Mode is activated by a press of the
SXM button on the touchscreen.
When in Satellite mode:
The SXM button on the touchscreen is high
-
lighted.
The SiriusXM® Presets are displayed at the
top of the screen.
The SiriusXM® Channel Number is displayed
in the center.
The Program Information is displayed at the
bottom of the Channel Number.
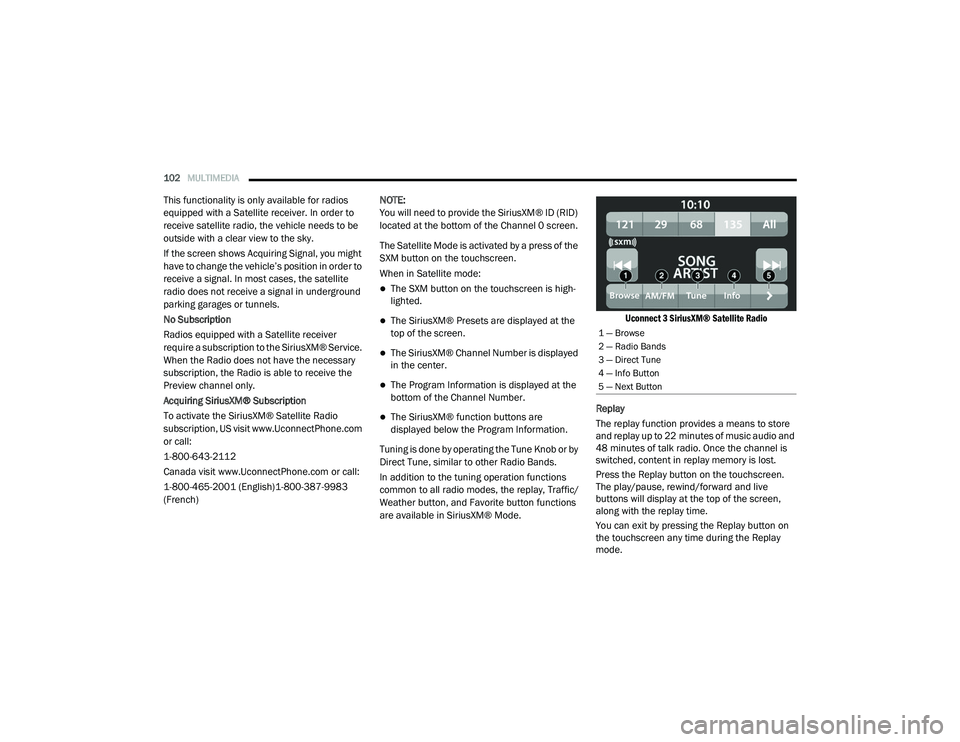
The SiriusXM® function buttons are
displayed below the Program Information.
Tuning is done by operating the Tune Knob or by
Direct Tune, similar to other Radio Bands.
In addition to the tuning operation functions
common to all radio modes, the replay, Traffic/
Weather button, and Favorite button functions
are available in SiriusXM® Mode.
Uconnect 3 SiriusXM® Satellite Radio
Replay
The replay function provides a means to store
and replay up to 22 minutes of music audio and
48 minutes of talk radio. Once the channel is
switched, content in replay memory is lost.
Press the Replay button on the touchscreen.
The play/pause, rewind/forward and live
buttons will display at the top of the screen,
along with the replay time.
You can exit by pressing the Replay button on
the touchscreen any time during the Replay
mode.
1 — Browse
2 — Radio Bands
3 — Direct Tune
4 — Info Button
5 — Next Button
21_VM_OM_EN_USC_t.book Page 102
Page 111 of 280
MULTIMEDIA109
Once the Bluetooth® device is paired to the
Uconnect system, push the Media button
located on the faceplate. Once in Media Mode,
press the Source button on the touchscreen
and select Bluetooth®.
NOTE:
For mobile phone compatibility and pairing
instructions, please visit UconnectPhone.com.
Voice Commands Media
Uconnect offers connections via USB ports and
Bluetooth®. Voice operation is only available for
connected USB devices.
Push the VR button . After the beep, say one
of the following commands and follow the
prompts to switch your media source or choose
an artist.
“Change source to Bluetooth®”
“Change source to USB”
“Play artist Beethoven”; “ Play album
Greatest Hits”; “ Play song Moonlight
Sonata”; “ Play genre Classical” Did You Know:
Press the Browse button on the
touchscreen to see all of the music on your USB
device. Your Voice Command must match
exactly how the artist, album, song, and genre
information is displayed.
Phone Mode
Overview
Uconnect Phone is a voice-activated,
hands-free, in-vehicle communications system.
Uconnect Phone allows you to dial a phone
number with your mobile phone.
Uconnect Phone supports the following
features:
Voice Activated Features
Hands-Free dialing via Voice (“Call John
Smith Mobile” or “Dial 248-555-1212”).
Hands-Free text-to-speech listening of your
incoming SMS messages.
Hands-Free Text Message Reply: Forward
one of 18 predefined SMS messages to
incoming calls/text messages.
Redialing last dialed numbers (“Redial”).
Calling back the last incoming call number
(“Call Back”).
Viewing call logs on screen (“Show Incoming
Calls,” “Show Outgoing Calls,” “Show Missed
Calls,” or “Show Recent Calls”).
Searching Contacts phone number (“Search
for John Smith Mobile”).
Screen Activated Features
Dialing via Keypad using touchscreen.
Viewing and Calling contacts from Phone -
books displayed on the touchscreen.
Setting Favorite Contact phone numbers so
they are easily accessible on the Main Phone
screen.
Viewing and Calling contacts from recent call
logs.
Reviewing your recent Incoming SMS
Messages.
Pairing up to 10 phones/audio devices for
easy access to connect to them quickly.
5
21_VM_OM_EN_USC_t.book Page 109