Page 113 of 308

4KE012721BF
High-voltage system
— Monitor the Audi charging system if it is be-
ing used near children.
— Installation and setup of the household con-
nection for Audi charging systems may only
be performed by a qualified electrician. The
qualified electrician is thereby responsible
for adhering to applicable standards and
regulations.
— Make sure that the household socket is
grounded and shielded from water.
— If Audi charging systems do not function ac-
cording to the specifications in the operat-
ing manual, they must not be used. Contact
an authorized Audi dealer or authorized
Audi Service Facility.
— Audi charging systems are intended for use
in private and semi-private areas (for exam-
ple, private property and company parking
lots). Depending on the country where the
vehicle is operated, charging with a mode 2
charging cable (meaning charging with the
Audi charging system) may be prohibited in
public areas. Contact an authorized Audi
dealer or authorized Audi Service Facility for
more information.
— Operate the Audi charging systems in power
networks that are properly grounded. It can-
not be used with non-grounded power net-
works (such as IT networks).
— When charging the high-voltage battery us-
ing household/industrial sockets, the elec-
trical installation can be used at full capaci-
ty. Audi recommends having a qualified elec-
trician regularly inspect the electrical instal-
lations that are used for charging.
— If possible, disconnect Audi charging sys-
tems from the power network during a
thunderstorm.
— Never submerge the Audi charging systems
or the connectors in water.
— Audi charging systems must only be cleaned
when the control unit is completely discon-
nected from the power supply and from the
vehicle. Use a dry towel to clean.
— Audi charging systems are only intended for
use on Audi vehicles and vehicles within the
Volkswagen Group. Using the devices on
vehicles made by another manufacturer is
not authorized.
() Note
— If the vehicle is not being used for long peri-
ods of time, the high-voltage battery must
be charged after four months at the latest
or the vehicle must be continuously con-
nected to a power source (for 50% charging
target > page 115). Otherwise, the high-
voltage battery could become damaged.
— Make sure that you always use the correct
charging equipment for the country in
which it is being used. Contact an author-
ized Audi dealer or authorized Audi Service
Facility for more information.
— On vehicles with only one charging port,
there is a cover on the opposite side of the
vehicle with no charging components instal-
led underneath it. Do not try to open this
cover.
G@) Tips
— Your vehicle can only be charged at charging
stations that meet the requirements in the
respective country and meet the following
standards, at a minimum:
— GB/T 18487.1 and GB/T 20234 (China)
— IEC 61851 and IEC 62196 (Europe)
— SAE J1772 (North America, Japan)
— You can use your Audi charging system if
there is a household or industrial connec-
tion available at the charging station.
(i) Tips
Applies to: Audi charging systems
— For an uninterrupted charging process, Audi
recommends only charging using sockets
that are connected to a separately protected
circuit.
— Audi recommends using Audi charging sys-
tems in the wall mount clip* during opera-
tion. If this is not possible, always position
Audi charging systems on a secure surface
during the charging process > A.
—To reduce the risk of overheating during op-
eration, do not place Audi charging systems
111
>
Page 114 of 308

High-voltage system
in direct sunlight for long periods of time. If
the control unit is overheated, the charging
process is automatically paused until the
temperature has lowered back within the
normal range.
Fig. 83 Left front side of the vehicle: opening the high-
voltage charging port door
Fig. 84 Charging unit: charging port and LED
Connecting the charging cable
If you charge your vehicle at a charging station,
the following sequence of steps may vary. Follow
the manufacturer guidelines and operating in-
structions for the charging station.
Requirement: the “P” gear must be selected, the
parking brake must be set, and drive ready mode
must have ended.
—If necessary, remove the charging cable from
the vehicle > page 119, Transport.
— Remove the cap from the charging cable if nec-
essary.
— First connect the charging cable to the power
supply, or remove it from the charging station.
— Unwind the charging cable completely.
— Unlock the charging port door by unlocking the
vehicle. In vehicles with a convenience key*, the
112
charging port door will be automatically un-
locked when the convenience key is near the
charger.
— Press the center of the button @ to open the
charging port door on the driver's side or front
passenger's side*.
— If you would like to use quick charging at public
direct current (DC) charging stations, open the
charging port cover (4).
— Plug the charging connector into the vehicle
charging port.
— Check if the charging option shown @) (immedi-
ate charging/timer charging) is the one you
would like to use for charging.
Starting to charge automatically (immediate
charging)
If charging is not delayed with a timer, the charg-
ing process will begin immediately. If necessary,
the charging station may need to be activated.
Follow the manufacturer guidelines and operat-
ing instructions for the charging station.
You can also adjust the charging process to your
preferences > page 115, Setting the charging
target, > page 116, Setting the timer,
= page 116, Advanced charging settings.
Timer charging
With timer charging, the charging process starts
and ends based on a timer that is set beforehand.
—To charge by timer, switch on the timer and
timer charging before exiting the vehicle
=> page 116.
If the charging connector is disconnected and re-
connected while timer charging is switched on,
immediate charging will activate automatically.
To continue charging by timer, timer charging
must be switched on again.
While charging
The charging display on the charging unit @) will
pulse green while charging. It will pulse is in
the instrument cluster. A label on the charging
unit @) informs you about the various displays
=> page 114.
The charging connector is locked while charging
and cannot be removed.
Page 115 of 308

4KE012721BF
High-voltage system
Depending on the selected view > page 12, the
following information about the charging process
is displayed in the instrument cluster:
— Gv: range
—&: remaining charging time until the charging
process is complete
— 2): current battery charge level
—Q: date and time of when the charging process
was completed
—&: charging speed (additional range per hour)
—4: charging power (depends on the selected
power source)
To access the charging process information at a
later time, select in the instrument cluster: Vehi-
cle functions tab > EE] button > Charging.
Ending the charging process
You can interrupt the charging process at any
time.
— Unlock the vehicle. In vehicles with a conven-
ience key*, the convenience key only needs to
be near the charging port door.
— Press the center of the button @.
— Remove the charging connector. If the charging
connector is not removed within 30 seconds, it
will automatically relock and the charging proc-
ess may continue.
— After removing the charging connector, the
charging port door will close automatically;
otherwise, press on the center of the button @
to close the charging port door.
— Disconnect the charging cable from the power
supply if necessary or return it securely to the
charging station.
— Install the protective caps on the charging ca-
ble again.
—If you are transporting the charging cable in
the vehicle, store it securely > page 119.
If the charging connector cannot be disconnected
from the vehicle, perform the following steps in
the order listed and try again to disconnect the
charging connector:
— Switch the ignition on/off.
— Lock/unlock the vehicle.
— Make sure the auxiliary air conditioning is not
activated > page 87.
If the charging connector still cannot be discon-
nected, you must unlock it manually > page 116.
If you cannot disconnect the charging connector
from the charging station, authenticate yourself
again at the charging station and then try again
to disconnect the charging connector. If you still
cannot disconnect the charging connector from
the charging station, contact the charging sta-
tion operator.
Z\ WARNING
—When closing the charging port door, make
sure the area where the door is closing is
clear to reduce the risk of injury.
— Do not disconnect the charging cable from
the socket or the vehicle charging port while
the vehicle is charging. End the charging
process before removing the charging cable
from the socket in order to reduce the risk of
damaging the connector contacts from
sparks.
— Never drive with the charging port door
open. An open charging port door could hit
other road users, which increases the risk of
injury.
— Ifa charging unit is damaged, the vehicle
must not be charged at the damaged charg-
ing port or at the charging port on the other
side* to reduce the risk of injury.
— If the charging unit is damaged or the
charging port door cannot close or is miss-
ing, drive immediately to an authorized Audi
dealer or authorized Audi Service Facility
and have the malfunction corrected to re-
duce the risk of injury.
@) Note
— If you drive with the charging unit open,
both the charging port door and the elec-
tronics installed behind it could be dam-
aged. Check each time after charging if the
port door is locked before you start driving
the vehicle.
— Applies to: vehicles with charging ports on
the driver and front passenger’s side: Never
attempt to charge the vehicle using both
113
>
Page 116 of 308

High-voltage system
charging ports at the same time, because — Remove ice and snow in the charging unit
this could damage the charging equipment. using a hand brush and solvent-free deicing
Gy Tips
spray.
— The vehicle radio and TV systems may have
— If the parking brake is set, it could create limited reception when charging the vehicle.
noises when the charging connector is con-
nected.
Charging display
The charging display is an LED light on the charg- informs you about the various displays. The fol-
ing unit @) that indicates the charging status. A lowing table explains the displays.
label on the charging unit @) > page 112, fig. 84
LED on the charging unit Meaning
Off
Vehicle charging system is in sleep mode. A timer may be active,
but charging has not started yet.
Charging process is interrupted.
White Pulsing
Connection between the power source and the vehicle is being
established.
Pulsing The high-voltage battery is charging.
Green Flashing A timer is active, but charging has not started yet.
On High-voltage battery charging process is completed.
On
Yellow
When using the Audi charging system, make sure the power
plug is inserted in the power socket > page 119. No power sup-
ply was recognized even though the charging cable is plugged
in. Have the power supply or power supply system inspected.
When using the Audi charging system, check the status displays
on the unit > table on page 120. See an authorized Audi dealer
or authorized Audi Service Facility for assistance if necessary.
Flashing
The vehicle is not secured from rolling away. Check if “P” is se-
lected and the parking brake is set. If the LED continues to
flash, see an authorized Audi dealer or authorized Audi Service
Facility for assistance.
114
Page 117 of 308

4KE012721BF
High-voltage system
LED on the charging unit Meaning
Red On The charging connector may not be able to lock correctly in the
vehicle charging port. Check if the charging connector is insert-
ed correctly. Disconnect the charging connector, reconnect it to
the charging socket, and press it upward lightly for five seconds,
or use a different charging station. If the LED stays turned on,
there is a malfunction either in the vehicle charging system or at
the power source. See an authorized Audi dealer or authorized
Audi Service Facility for assistance if necessary.
Both charging port doors are open. Try to close one of the charg-
ing port doors by hand. If the LED stays turned on, the high-
voltage battery may not be charging. See an authorized Audi
dealer or authorized Audi Service Facility for assistance.
The outside temperature is too low or too high.
@ Tips
The charging display modes are also displayed
in the instrument cluster Bag.
Setting the charging connector to unlock
automatically
To prevent a charging station from being blocked
for long periods of time and to make it possible
for others to charge, you can set the charging
connector to unlock automatically once the
charging process has ended.
> Before charging, always check if the selected
settings are suitable for the current charging
session.
> Applies to: MMI: Select on the home screen:
VEHICLE > Charging & Efficiency > Charging >
@.
@) Note
The function should only be activated if the
charging cable is part of the charging station.
Otherwise, your charging cable could be sto-
len.
Setting the charging target
You can set the charging target, meaning you can
set the maximum charge level to which the high-
voltage battery should be charged. The charging
target can be set between 50% and 100%. For
daily usage, Audi recommends setting the charg-
ing target at 80%. This can extend the service life
of the high-voltage battery. For long trips, Audi
recommends setting the charging target to
100% to achieve the highest possible range.
> Applies to: MMI: Select on the home screen:
VEHICLE > Charging & Efficiency > Charging.
> When the timer is displayed, swipe your finger
on the display toward the right.
> Press on the right section of the battery charge
level display.
> Set the desired charging target.
The charging target that is set will be stored and
used in all locations where you have not defined
specific charging settings. If you are charging at
an address where you have defined specific
charging settings > page 116, Advanced charg-
ing settings, the charging target that is set will
be stored in the advanced charging settings and
used.
G) Tips
If you set the charging target lower than the
current battery charge level while charging,
then the charging process will be canceled. If
you set the charging target above the current
battery
charge level again, then the charging
process will resume. This does not apply if you
are charging at a charging station, where you
have authenticated yourself manually. If this
is the case, authenticate yourself again at the
charging station.
115
Page 118 of 308

High-voltage system
Setting the timer
Introduction
By setting a timer, you determine when your vehi-
cle should reach the desired charging target.
When the timer is activated, it will be run regu-
larly at the set time. In addition to the charging
target, you can also specify if your vehicle should
be heated or cooled to the temperature set in the
climate control system. You can turn on multiple
timers at the same time. The active timer is indi-
cated by the respective number in © in the upper
section of the display.
» Applies to: MMI: Select on the home screen:
VEHICLE > Charging & Efficiency > Charging.
> When the charging target is displayed, swipe
your finger on the display toward the left.
Configuring the timer
> To set a timer, select > in the line for the de-
sired timer.
> Select one ore more days of the week and select
Next.
» Set the desired departure time and select OK.
> To also activate the climate control with a tim-
er, select F.
Switching on the timer and timer charging
The charging process will only follow the timer
settings if you have switched on the timer and
timer charging.
> To turn ona timer, select CD.
> To switch on timer charging, select ©. A col-
ored bar will turn on in the button.
If the set departure time for the timer is too
soon, the desired charging target may not be
reached.
G) Tips
It is not possible to charge using the timer at
some charging stations.
Advanced charging settings
With the advanced charging settings, you can de-
fine
addresses (locations) at which certain charg-
ing settings should apply (for example, charging
116
target, minimum charge). If your vehicle is in the
vicinity of a defined address, the advanced charg-
ing settings will be automatically applied. The
charging target that is set will be used both for
immediate charging and timer charging.
Managing the advanced charging settings
> Applies to: MMI: Select on the home screen:
VEHICLE > Charging & Efficiency > Charging >
<2} > Advanced charging settings.
> To define new settings for a certain address, se-
lect +. Follow the instructions in the display.
> To edit existing settings for a certain address,
press the respective button.
> To delete existing settings for a certain ad-
dress, select Z.
Charging with a preferred charging time
A preferred charging time is only used when tim-
er charging is switched on > page 116, Switching
on the timer and timer charging.
Incase of malfunction, you can manually release
the charging port door or the charging connec-
tor.
Fig. 85 Motor compartment: emergency release
Manually releasing the charging port door
> Open the hood = page 234.
> Open the cover in the motor compartment on
the side of the applicable charging port.
> Loosen the red loop @) > fig. 85 from the re-
tainer and then pull on the loop carefully >@.
> If necessary, open the charging port door by
hand.
> After releasing manually, secure the loop on
the retainer and close the cover.
Page 119 of 308

4KE012721BF
High-voltage system
> Drive to an authorized Audi dealer or author-
ized Audi Service Facility immediately to have
the malfunction corrected.
Manually releasing the charging connector
If you are not able to pull the charging connector
out of the vehicle charging port, there may bea
malfunction. You must use the emergency re-
lease to release the vehicle charging connector.
Requirement: the “P” gear must be selected and
the vehicle must be unlocked.
> End the charging process > page 113.
> Open the hood = page 234.
> Open the cover in the motor compartment on
the side of the applicable charging port.
> Loosen the yellow loop @) fig. 85 from the re-
tainer and then pull on the loop carefully >@.
» Remove the charging connector.
> After releasing manually, secure the loop on
the retainer and close the cover.
> Drive to an authorized Audi dealer or author-
ized Audi Service Facility immediately to have
the malfunction corrected.
If the charging connector still cannot be removed
after using the emergency release, see an author-
ized Audi dealer or authorized Audi Service Facili-
ty for assistance.
@) Note
Only pull on the loop until you feel resistance.
You
will not hear it release. If you continue to
pull, you could damage the emergency re-
lease mechanism.
Messages
If the or BY indicator light turns on, then the
range is low or very low. Charge the high-voltage
battery.
Vehicle charging connection: malfunction!
See owner's manual
This message appears if the charging port door is
open while driving. Stop the vehicle as soon as
possible and try to close the charging port door
using the button @) & page 112, fig. 83 or by
hand. If the charging port door cannot close
and/or the message continues to appear, drive to
an authorized Audi dealer or authorized Audi
Service Facility immediately and have the mal-
function corrected > A\ in Charging on page 113;
=>@© in Charging on page 113.
EB Ac charging system: malfunction! Please
contact Service
B DC charging system: malfunction! Please
contact Service
This message appears if there is a malfunction in
the charging system. Drive to an authorized Audi
dealer or authorized Audi Service Facility immedi-
ately.
Incompatible charging system. Please check
charging system
This message appears when the charging system
is incompatible. Only charge using the Audi
charging system that is designed for your vehicle.
fa Charging system: malfunction
This message appears if there is a malfunction in
the vehicle charging infrastructure or the charg-
ing station. Use a different charging station. If
this message does not turn off, contact an au-
thorized Audi dealer or authorized Audi Service
Facility.
Charging equipment
Introduction
Depending on the vehicle equipment, the Audi e-
tron compact charging system may be available.
Using the charging equipment
Pay attention to the following information for
safe handling of the charging equipment:
— Secure the charging equipment against any
strain, such as being run over, falling, pulling,
bending, and crushing.
— Do not submerge the charging equipment in
water and do not cover it with snow or ice.
— When you remove the charging cable from the
vehicle and from the power supply, only pull at
the connectors and not at the cable.
— Put the cap on after using the charging cable.
117
>
Page 120 of 308

High-voltage system
— Only operate the Audi charging system ina
power supply system with a frequency of
50 Hz/60 Hz.
— Only operate or store the Audi charging system
at a humidity level between 5% and 95% (no
condensation).
— The Audi charging system is protected against
dust and splashing water (IP55 (USA: Enclosure
3).
Depending on the country, different warnings
may be on the charging equipment.
Symbol Meaning
Symbol Meaning
Incorrect use increases the risk of
electric shock.
Pay attention to the applicable own
er's manual, particularly the safety
precautions.
Pay attention to all applicable dis-
posal regulations when disposing.
Operate or store the Audi charging
system at a temperature range of
-22 °F (-30 °C) to +122 °F (+50 °C).
a
Do not use any extensions cords or
cable reels.
Operate or store the Audi charging
system at a temperature range of
-22 °F (-30 °C) to +122 °F (+50 °C).
Do not use any travel adapters.
Do not use any power strips.
Operate or store the Audi charging
system at a maximum elevation of
13,000 feet (4,000 m) above sea
level.
Le =4000m
Do not use any charging cables with
damage to the electronics or the
connecting wires.
Xo,
Operate or store the Audi charging
system at a maximum elevation of
16,400 feet (5,000 m) above sea
level.
Liv ~=5000m
Operate the Audi charging system
in single-phase power supplies. ©
The Audi charging system is not
equipped with a connected ground
conductor.
©
The Audi charging system is equip-
ped with a connected ground con-
ductor.
©
Do not operate the Audi charging
system in power networks that are
not grounded (such as IT networks).
Only operate the Audi charging sys-
tem in grounded power networks.
&
Surfaces can become very hot when
in direct sunlight.
>
eb
118
Grounding instructions
Audi charging systems must be grounded. If it
should malfunction or break down, grounding
provides a path of least resistance for electric
current to reduce the risk of electric shock. Audi
charging systems are equipped with a cord hav-
ing an equipment grounding conductor and a
grounding plug. The plug must be plugged into
an appropriate outlet that is properly installed
and grounded in accordance with all local codes
and ordinances.
ZA WARNING
Improper connection of the equipment-
grounding conductor is able to result in a risk
of electric shock. Check with a qualified elec-
trician or serviceman if you are in doubt as to
whether the product is properly grounded. Do
not modify the plug provided with the product
— if it will not fit the outlet, have a proper out-
let installed by a qualified electrician.
 1
1 2
2 3
3 4
4 5
5 6
6 7
7 8
8 9
9 10
10 11
11 12
12 13
13 14
14 15
15 16
16 17
17 18
18 19
19 20
20 21
21 22
22 23
23 24
24 25
25 26
26 27
27 28
28 29
29 30
30 31
31 32
32 33
33 34
34 35
35 36
36 37
37 38
38 39
39 40
40 41
41 42
42 43
43 44
44 45
45 46
46 47
47 48
48 49
49 50
50 51
51 52
52 53
53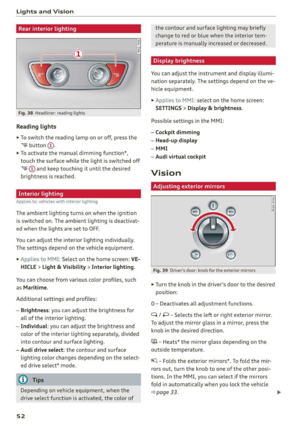 54
54 55
55 56
56 57
57 58
58 59
59 60
60 61
61 62
62 63
63 64
64 65
65 66
66 67
67 68
68 69
69 70
70 71
71 72
72 73
73 74
74 75
75 76
76 77
77 78
78 79
79 80
80 81
81 82
82 83
83 84
84 85
85 86
86 87
87 88
88 89
89 90
90 91
91 92
92 93
93 94
94 95
95 96
96 97
97 98
98 99
99 100
100 101
101 102
102 103
103 104
104 105
105 106
106 107
107 108
108 109
109 110
110 111
111 112
112 113
113 114
114 115
115 116
116 117
117 118
118 119
119 120
120 121
121 122
122 123
123 124
124 125
125 126
126 127
127 128
128 129
129 130
130 131
131 132
132 133
133 134
134 135
135 136
136 137
137 138
138 139
139 140
140 141
141 142
142 143
143 144
144 145
145 146
146 147
147 148
148 149
149 150
150 151
151 152
152 153
153 154
154 155
155 156
156 157
157 158
158 159
159 160
160 161
161 162
162 163
163 164
164 165
165 166
166 167
167 168
168 169
169 170
170 171
171 172
172 173
173 174
174 175
175 176
176 177
177 178
178 179
179 180
180 181
181 182
182 183
183 184
184 185
185 186
186 187
187 188
188 189
189 190
190 191
191 192
192 193
193 194
194 195
195 196
196 197
197 198
198 199
199 200
200 201
201 202
202 203
203 204
204 205
205 206
206 207
207 208
208 209
209 210
210 211
211 212
212 213
213 214
214 215
215 216
216 217
217 218
218 219
219 220
220 221
221 222
222 223
223 224
224 225
225 226
226 227
227 228
228 229
229 230
230 231
231 232
232 233
233 234
234 235
235 236
236 237
237 238
238 239
239 240
240 241
241 242
242 243
243 244
244 245
245 246
246 247
247 248
248 249
249 250
250 251
251 252
252 253
253 254
254 255
255 256
256 257
257 258
258 259
259 260
260 261
261 262
262 263
263 264
264 265
265 266
266 267
267 268
268 269
269 270
270 271
271 272
272 273
273 274
274 275
275 276
276 277
277 278
278 279
279 280
280 281
281 282
282 283
283 284
284 285
285 286
286 287
287 288
288 289
289 290
290 291
291 292
292 293
293 294
294 295
295 296
296 297
297 298
298 299
299 300
300 301
301 302
302 303
303 304
304 305
305 306
306 307
307