Page 41 of 308

4KE012721BF
Opening and closing
— Keep new or used batteries away from chil-
dren.
— If the battery compartment on a vehicle key
does not close securely, stop using the key
and keep it away from children.
— Seek medical attention immediately if you
suspect that a battery was swallowed or has
entered the body in any other way.
@ For the sake of the environment
Discharged batteries must be disposed of us-
ing
methods that will not harm the environ-
ment. Do not dispose of them in household
trash.
@ Tips
Replacement batteries for the vehicle key
must meet the same specifications as the
original battery.
Luggage compartment
lid
General information
— After closing the luggage compartment lid,
make sure that it is latched. The luggage
compartment lid could open suddenly while
driving, which would increase the risk of an
accident.
— Never drive with the luggage compartment
lid ajar or open, because poisonous gases
from the surrounding area can enter the ve-
hicle interior and increase the risk of asphyx-
iation.
— If there is a luggage rack (such as a bicycle
rack) on the luggage compartment lid, the
luggage compartment lid may not open
completely under certain circumstances or it
could close by itself if open due to the extra
weight. Therefore, the open luggage com-
partment lid must be given additional sup-
port or the cargo must first be removed
from the luggage rack.
— Applies to vehicles with power-operated or
sensor-controlled luggage compartment lid:
Pay careful attention when closing the lug-
gage compartment lid. Otherwise, you could
cause serious injury to yourself or others de-
spite the pinch protection.
ZA WARNING
— Applies to vehicles with anti-theft alarm sys-
tem: When the vehicle is locked from the
outside, no one - especially children - should
remain in the vehicle, because the windows
can no longer open from the inside
= page 35. Locked doors make it more diffi-
cult for emergency workers to enter the ve-
hicle, which puts lives at risk.
— Always close and lock the luggage compart-
ment lid and the doors when the vehicle is
not in use. Otherwise someone such as a
child could enter the vehicle through the
luggage compartment and become locked
inside it. To reduce the risk of injury, do not
allow children to play in or around the vehi-
cle.
— To reduce the risk of injuries by pinching,
make sure that no one is in the operating
area of the luggage compartment lid, in-
cluding the hinge areas and the upper and
lower edge of the luggage compartment lid.
@) Note
The luggage compartment lid can bump into
objects such as the garage ceiling when open-
ing and become damaged.
G) Tips
— The button on the vehicle key for the lug-
gage compartment lid may differ << or AS.
— When the vehicle is locked, the luggage
compartment lid can be unlocked separately
by pressing the
ment lid locks automatically when it is
closed again.
— The ability to open the luggage compart-
ment lid using the handle can be deactivat-
ed or activated in the MMI > page 33.
39
Page 42 of 308

Opening and closing
Opening and closing the luggage
compartment lid
Automatic luggage compartment lid
Applies to: vehicles with automatic luggage compartment lid
Fig. 27 Driver's door: opening the luggage compartment
lid
Opening the luggage compartment lid
> Applies to: vehicles without convenience key:
Unlock the vehicle or the luggage compartment
lid using the @ / <3 / As button on the vehicle
key and press the handle in the luggage com-
partment lid. Or
> Applies to: vehicles with convenience key: Press
the handle in the luggage compartment lid.
The vehicle key cannot be more than approxi-
mately 4 feet (1.5 m) away from the luggage
compartment. Or
> When the ignition is switched off, press and
hold the < button on the vehicle key for at
least one second or press the 4s button twice.
Or
> Engage the “P” selector lever position and pull
the <¥ button in the driver's door.
Closing the luggage compartment lid
> Applies to vehicles without automatic luggage
compartment lid: Use the inside grip to pull the
luggage compartment lid down and allow it to
drop gently to close it. Or
> Applies to vehicles with automatic luggage
compartment lid: Note > page 40.
ZX WARNING
Observe the safety precautions > page 39.
40
Fig. 28 Luggage compartment lid: @ closing button*, @)
lock button* (vehicles with convenience key*)
The luggage compartment lid can be opened and
closed automatically > /\ in General informa-
tion on page 39.
Opening the luggage compartment lid
> When the ignition is switched off, press and
hold the << button on the vehicle key for at
least one second or press the 4s button twice
=> page 36, fig. 24. Or
» Engage the “P” selector lever position and pull
the <3 button* in the driver's door. Or
> Applies to: vehicles with convenience key: Press
the handle in the luggage compartment lid.
The vehicle key cannot be more than approxi-
mately 4 feet (1.5 m) away from the luggage
compartment.
Closing the luggage compartment lid
> Press the <3 button in the luggage compart-
ment lid. Or
> Press the handle in the luggage compartment
lid. Or
> Press the luggage compartment lid downward
slightly. Or
» When the ignition is switched on, pull the <2
switch in the driver's door > page 40, fig. 27
until the luggage compartment lid is closed. Or
» Applies to: vehicles with convenience key: Press
and hold the <3 or 4s button on the vehicle
key while the ignition is switched off until the
luggage compartment lid closes. Make sure
there is enough distance (maximum of approxi-
mately 9 feet (3 m)) between you and the lug-
gage compartment lid. Or
Page 43 of 308

4KE012721BF
Opening and closing
> Press the <3 button in the luggage compart-
ment lid. Or
» Applies to vehicles with convenience key: When
the ignition is switched off, press the a /f}
button in the luggage compartment lid. The ve-
hicle key must not be more than approximately
4 feet (1.5 m) away from the luggage compart-
ment and it must not be inside the vehicle. If
you press the f}* button, then the vehicle will
lock.
Storing the luggage compartment lid
opening position
The position must be at a certain height or higher
to store.
> Bring the luggage compartment lid into the de-
sired open position. If you want to move the
luggage compartment lid to a lower position,
move it slowly in small increments; otherwise,
the luggage compartment lid will close auto-
matically.
> Press and hold the <3 button in the luggage
compartment lid for at least four seconds to
store the new opening position. A visual and
audio signal will follow.
> To set a higher open position, wait at least five
seconds and then carefully press the luggage
compartment lid upward.
> Press and hold the <3 button again for at least
four seconds to store the desired opening posi-
tion.
The automatic opening or closing will stop if:
— You press the < button or press the handle in
the luggage compartment lid again Or
— If something blocks the luggage compartment
lid or makes it difficult for the lid to move.
If you press the << button or press the handle in
the luggage compartment lid again, the luggage
compartment lid will open again.
ZA WARNING
Observe the safety precautions > page 39.
D_ The closing function applies to vehicles that also have au-
tomatic luggage compartment lid operation.
@ Tips
The luggage compartment lid can be operat-
ed manually if the vehicle battery is low. It is
necessary to use more force when doing this.
Move the lid slowly to reduce the amount of
force needed.
Opening and closing the luggage
oYnale- adnate eM tam cole) Manele MC dce dle]
movement)
Applies to: vehicles with sensor-controlled luggage compart-
ment lid
re a Ss
9
<
go a
Fig. 29 Vehicle rear: foot motion (example)
The luggage compartment lid can be opened and
closed automatically 1) > /A\ in General informa-
tion on page 39.
Requirements: you must be carrying your conven-
ience key* with you. The ignition must be switch-
ed off. You must be standing at the center behind
the luggage compartment lid.
> Move your foot back and forth under the bump-
er one time > fig. 29. Do not touch the bumper.
Make sure you have firm footing. The luggage
compartment lid will open or close ) once the
system detects the movement. The automatic
opening or closing will be canceled if you re-
peat one of the movements described.
ZA\ WARNING
Observe the safety precautions > page 39. >
41
Page 44 of 308
 if you perform the movement as
described. This prevents the luggage com-
partment lid from opening or closing due")
Opening and closing
The luggage compartment lid will only open
or close ») if you perform the movement as
described. This prevents the luggage com-
partment lid from opening or closing due to
similar movements 2), such as when you walk
between the rear of the vehicle and your ga-
rage door. In some situations, the function
may be limited or temporarily unavailable.
This may happen if:
— You are standing too close to the bumper or
too far away from it
— The luggage compartment lid was closed or
opened immediately beforehand
— You park close to a hedge and the branches
move back and forth under the vehicle for a
long period of time
— You clean your vehicle, for example with a
pressure washer or in a car wash
— There is heavy rain
— The bumper is very dirty, for example after
driving on salt-covered roads
— There is interference to the vehicle key's ra-
dio signal, such as from mobile devices or
remote controls
Mechanically unlocking luggage
compartment lid
The luggage compartment lid can be released
from the inside in an emergency.
Fig. 30 Inner luggage compartment lid: access to the
emergency release
D_ The closing function applies to vehicles that also have au-
tomatic luggage compartment lid operation.
2) Use the flat side of the reversible screwdriver blade.
42
» Fold the backrest on the rear bench seat for-
ward > page 82.
» Remove the mechanical key > page 36 or the
screwdriver > page 267.
> Using the mechanical key/screwdriver 2), pry
the cover &> off the luggage compartment lid
trim panel.
> To unlock the luggage compartment lid, press
the lever in the direction of the arrow using a
suitable object (such as a screwdriver) or using
the mechanical key if necessary.
Z\ WARNING
Observe the safety precautions > page 39.
A WARNING
If you have folded the backrests into the up-
right
position, always check if the lock is cor-
rectly engaged by pulling forward on the
backrest.
Child safety lock
The child safety lock prevents the rear doors
from being opened from the inside and the rear
power windows from being operated.
RAZ-1026,
Fig. 31 Driver's door: controls
> To activate or deactivate the child safety lock
for the rear doors (which controls the power
windows and interior door handle), press the
left and/or right @ button in the driver's door
=> fig. 31. The indicator light in the button turns
on/blinks.
Page 45 of 308

4KE012721BF
Opening and closing
» Make sure the child safety lock is working by
checking the function on the rear power win-
dow switch and door handle.
> Applies to: vehicles with controls for the cli-
mate control system in the rear and MMI: To al-
so restrict the operation of the climate control
system in the rear, select on the home screen:
SETTINGS > Display & brightness > Operation
in rear
When the child safety lock is switched on, the
following functions are disabled:
—The rear inner door handles
— The rear power windows
— The control panel* for the climate control sys-
tem in the rear
Message in the instrument cluster display
@/ Child safety lock: malfunction! Please
contact Service
There is a malfunction in the child safety lock.
Press the @ button again.
If the message stays on, drive immediately to an
authorized Audi dealer or authorized Audi Service
Facility to have the malfunction repaired.
ZA\ WARNING
— Observe the safety precautions > page 32.
—A malfunction in the child safety lock could
allow
the rear doors to be opened from the
inside, which increases the risk of an acci-
dent.
Power windows
o) Xe Mlle Ma ceiiare amuses
RAZ-0723
Fig. 32 Driver's door: power window switch
Power window switches:
©@ Left front door
@ Right front door
® Left rear door
@ Right rear door
Opening and closing the windows
The driver can control all power windows. All
power window switches are equipped with a two-
stage function:
> To open or close the window completely, press
the switch down or pull the switch up briefly to
the second level. The operation will stop if the
switch is pressed or pulled again.
> To select a position in between opened and
closed, press or pull the switch to the first level
until the desired window position is reached.
Correcting a malfunction in the one-touch
up/down function
If necessary, you can reactivate the one-touch
up/down function if it malfunctions.
> Pull the power window switch up until the win-
dow is completely raised.
>» Release the switch and pull it up again for at
least one second.
ZA WARNING
— Observe the safety precautions > page 32.
— Never close the windows carelessly or in an
uncontrolled manner, because this increases
the risk of injury.
G) Tips
— You can still open and close the windows for
several minutes after turning the ignition
off. The power window switch is not disa-
bled until the driver's door or front passeng-
er's door is opened.
— The power windows are equipped with pinch
protection. The automatic window may stop
closing and will open all the way again even
if no obstacle is detected. Pull the power
window switch up until the window is com-
pletely raised.
43
Page 46 of 308

Opening and closing
Convenience opening and closing
Applies to: vehicles with convenience key
Convenience opening or closing the windows
or panoramic glass roof*
You can set in the MMI if all windows or the roof*
should open or close all at once > page 33, Set-
ting the central locking system.
> Press and hold the & or & button on the vehicle
key until all windows and the roof* have
reached the desired position > /\.
> Touch the sensor* on the door handle until all
of the windows and the roof* are closed. Do not
place your hand in the door handle when doing
this.
When all of the windows and the roof* are
closed, the turn signals will flash once.
ZX WARNING
— Never close the windows or panoramic glass
roof* carelessly or in an uncontrolled man-
ner, because this increases the risk of injury.
— For security reasons, the windows and the
panoramic glass roof* can only be opened
and closed with the vehicle key at a maxi-
mum distance of approximately 6.5 feet
(2 m) from the vehicle. Always pay attention
when using the & button to close the win-
dows and the panoramic glass roof* so that
no one is pinched. The closing process will
stop immediately when the f button is re-
leased.
44
Panoramic glass roof
Operating the panoramic glass roof a
eked mel ad ar- Vel)
Applies to: vehicles with panoramic glass roof and roof sun-
shade
Fig. 33 Headliner: panoramic glass roof and sunshade*
buttons
The control buttons are equipped with a two-
stage function.
When tilting or opening the roof, the roof sun-
shade will open partially or completely if the sun-
shade is closed.
Operating the roof sunshade
> Opening and closing the sunshade: push the -&
switch in the headliner @) forward or toward
the rear to the second level.
> Partially opening the sunshade: press the -&&
switch to the first level until the sunshade
reaches the desired position.
Operating the roof
> Tilting the roof: press the 2S switch in the
headliner briefly up to the second level ().
> Closing the tilted roof: pull the 2> switch down
briefly to the second level.
> Opening the roof: slide the A> switch back
briefly twice in a row to the second level @).
> Closing the opened roof: push the 29 switch
forward briefly to the second level.
> Opening or closing partially: slide the A>
switch to the first level and hold it there until
the roof reaches the desired position.
Quick opening
You can also open the roof and roof sunshade in
one movement.
Page 47 of 308
 twice in a row.
Roof emergency closing
If an object is detected when closing, the roof
will open again")
4KE012721BF
Opening and closing
> Push the 2S switch back briefly to the second
level 2) twice in a row.
Roof emergency closing
If an object is detected when closing, the roof
will open again automatically. In this case, you
can then close it with the power emergency clos-
ing function.
> Within five seconds after the sunroof opens au-
tomatically, pull the applicable button until the
roof is closed.
Z\ WARNING
To reduce the risk of injury, always pay atten-
tion when closing the roof. Always switch the
ignition off and take the key with you when
leaving the vehicle.
@) Note
Always close the roof when you leave the vehi-
cle and when there is precipitation to reduce
the risk of damage to the interior equipment,
particularly the electronic equipment.
G) Tips
— After switching off the ignition, the roof and
sunshades can still be operated for several
minutes as long as neither of the front
doors have been opened.
— It is not possible to open the roof when
temperatures are too low.
Garage door opener
Applies to: vehicles with garage door opener
With the garage door opener, you can activate
systems such as the garage doors, security sys-
tems or house lights from inside your vehicle.
These functions are operated in the MMI. Multi-
ple receivers can be programmed, which can con-
trol the functions of up to eight!) hand-held
transmitters.
)) The possible number of hand-held transmitters depends
on the equipment.
ZA\ WARNING
— When operating or programming the garage
door opener, make sure that no people or
objects are in the area immediately sur-
rounding the equipment. People can be in-
jured or property can be damaged if struck
when closing.
— Do not allow yourself to be distracted from
traffic by the viewing and operating the dis-
plays.
Gi) Tips
— If you sell your vehicle, reset all settings to
the factory default settings > page 229.
— The system complies with United States FCC
regulations and ISED regulations
=> page 288.
G) Tips
Before you program your system to the ga-
rage door opener, first check the compatibili-
ty:
— Ask an authorized Audi dealer or authorized
Audi Service Facility or check at www.
homelink.com. You can also find more infor-
mation about HomeLink there.
— You can display information about Home-
Link (compatibility level/status/country
code/HomeLink generation) in the MMI:
— Select on the home screen: VEHICLE > Set-
tings & Service > Garage door opener > @.
Applies to: vehicles with garage door opener
Requirements: the remote control transmitter
must be programmed > page 46, Program-
ming, the vehicle must be within range of the
system, and the ignition must be switched on.
There are multiple options to open or close the
system (such as the garage door).
45
Page 48 of 308

Opening and closing
> If you have only programmed one remote con-
trol transmitter, press the rd button on the
lower display. Or
> If you have programmed multiple remote con-
trol transmitters, press the r button on the
lower display and then press the respective sys-
tem button. Or
> Applies to: vehicles with programmable steer-
ing wheel button: If you have configured the
programmable steering wheel button, press
the *K button > page 28. Or
» Applies to: vehicles with location pairing: If you
have programmed Location pairing, press the
button for this in the upper display (notification
center > page 20). As you approach the system,
the button is displayed on the MMI.
If transmission was successful, the message:
Send to: XXX will appear.
Applies to: vehicles with garage door opener
You can program both fixed code and rolling code
systems in the MMI using the procedure that is
described.
Requirement: the ignition must be switched on.
Programming the system
Applies to: MMI
Requirement: the hand transmitter must be
present and the vehicle must be within range of
the system (such as the garage door) that you
would like to program.
> If you are programming the garage door opener
for the first time, press the - button on the
lower display. Follow the instructions in the up-
per
display. Or
> If you would like to program other systems, se-
lect on the home screen: VEHICLE > Settings &
Service > Garage door opener. Select the de-
sired button: @). Follow the instructions in the
MMI.
> If you would like to reprogram systems that are
already programmed, select on the home
screen: VEHICLE > Settings & Service > Garage
D_ Only applies to rolling code systems
46
door opener. Press the Z button and select 7
for the system to be reprogrammed. Select:
Program. Follow the instructions in the MMI.
With some systems, the garage door opener will
be immediately available after programming.
With other systems, the garage door opener
must also be synchronized.
Synchronizing)
Requirement: the hand transmitter must already
be programmed and the vehicle must be within
range of the system (such as the garage door).
If the system synchronization is performed di-
rectly after the programming procedure, follow
the instructions on the MMI.
If you would like to sync at a later time:
> Applies to: MMI: Select on the home screen:
VEHICLE > Settings & Service > Garage door
opener.
> Press the button for the system that you would
like to synchronize.
> Follow the instructions in the MMI.
Location pairing
Applies to: vehicles with location pairing
For easier operation, you can program your sys-
tem's location.
Requirements: the respective hand transmitter
must be programmed © page 46 and the vehicle
must be located in front of the system.
> If you have programmed your system, follow
the instructions in the MMI. Or
If you would like to set up location pairing at an-
other time:
> Applies to: MMI: Select on the home screen:
VEHICLE > Settings & Service > Garage door
opener.
> Press the Z button.
> Press the button for the system your vehicle
is facing.
> Select: Location pairing.
> Follow the instructions in the MMI.
 1
1 2
2 3
3 4
4 5
5 6
6 7
7 8
8 9
9 10
10 11
11 12
12 13
13 14
14 15
15 16
16 17
17 18
18 19
19 20
20 21
21 22
22 23
23 24
24 25
25 26
26 27
27 28
28 29
29 30
30 31
31 32
32 33
33 34
34 35
35 36
36 37
37 38
38 39
39 40
40 41
41 42
42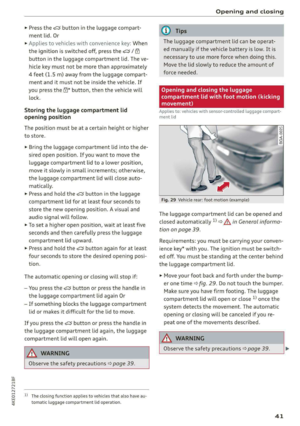 43
43 44
44 45
45 46
46 47
47 48
48 49
49 50
50 51
51 52
52 53
53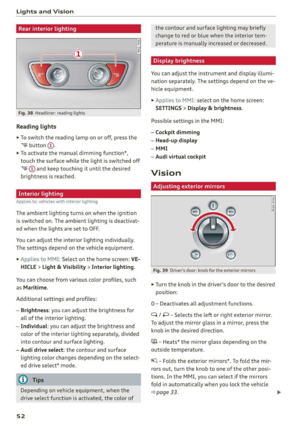 54
54 55
55 56
56 57
57 58
58 59
59 60
60 61
61 62
62 63
63 64
64 65
65 66
66 67
67 68
68 69
69 70
70 71
71 72
72 73
73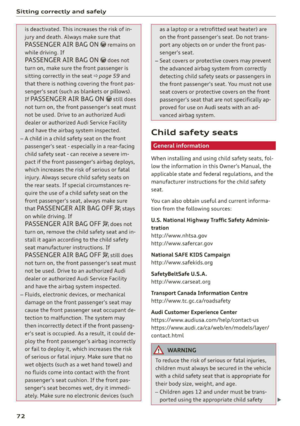 74
74 75
75 76
76 77
77 78
78 79
79 80
80 81
81 82
82 83
83 84
84 85
85 86
86 87
87 88
88 89
89 90
90 91
91 92
92 93
93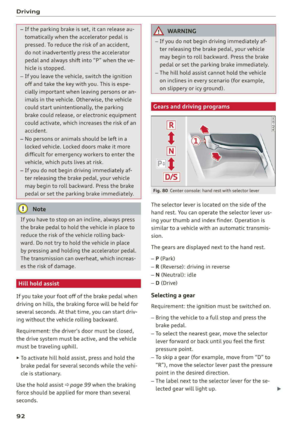 94
94 95
95 96
96 97
97 98
98 99
99 100
100 101
101 102
102 103
103 104
104 105
105 106
106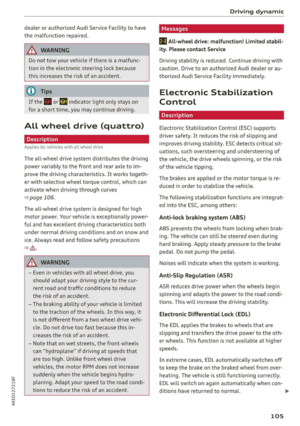 107
107 108
108 109
109 110
110 111
111 112
112 113
113 114
114 115
115 116
116 117
117 118
118 119
119 120
120 121
121 122
122 123
123 124
124 125
125 126
126 127
127 128
128 129
129 130
130 131
131 132
132 133
133 134
134 135
135 136
136 137
137 138
138 139
139 140
140 141
141 142
142 143
143 144
144 145
145 146
146 147
147 148
148 149
149 150
150 151
151 152
152 153
153 154
154 155
155 156
156 157
157 158
158 159
159 160
160 161
161 162
162 163
163 164
164 165
165 166
166 167
167 168
168 169
169 170
170 171
171 172
172 173
173 174
174 175
175 176
176 177
177 178
178 179
179 180
180 181
181 182
182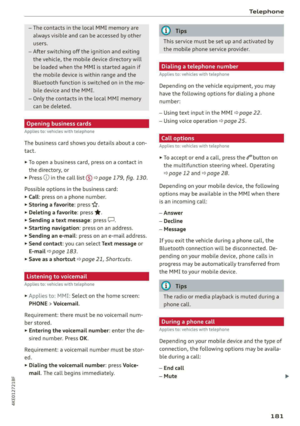 183
183 184
184 185
185 186
186 187
187 188
188 189
189 190
190 191
191 192
192 193
193 194
194 195
195 196
196 197
197 198
198 199
199 200
200 201
201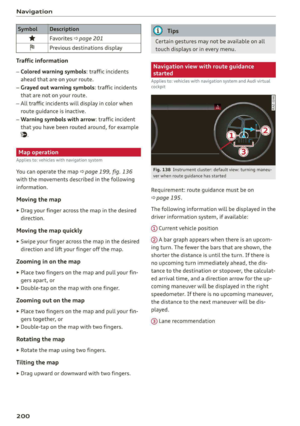 202
202 203
203 204
204 205
205 206
206 207
207 208
208 209
209 210
210 211
211 212
212 213
213 214
214 215
215 216
216 217
217 218
218 219
219 220
220 221
221 222
222 223
223 224
224 225
225 226
226 227
227 228
228 229
229 230
230 231
231 232
232 233
233 234
234 235
235 236
236 237
237 238
238 239
239 240
240 241
241 242
242 243
243 244
244 245
245 246
246 247
247 248
248 249
249 250
250 251
251 252
252 253
253 254
254 255
255 256
256 257
257 258
258 259
259 260
260 261
261 262
262 263
263 264
264 265
265 266
266 267
267 268
268 269
269 270
270 271
271 272
272 273
273 274
274 275
275 276
276 277
277 278
278 279
279 280
280 281
281 282
282 283
283 284
284 285
285 286
286 287
287 288
288 289
289 290
290 291
291 292
292 293
293 294
294 295
295 296
296 297
297 298
298 299
299 300
300 301
301 302
302 303
303 304
304 305
305 306
306 307
307