2021 AUDI E-TRON 22 mph
[x] Cancel search: 22 mphPage 13 of 308

4KE012721BF
Instrument cluster
Instrument cluster
Instrument cluster overview
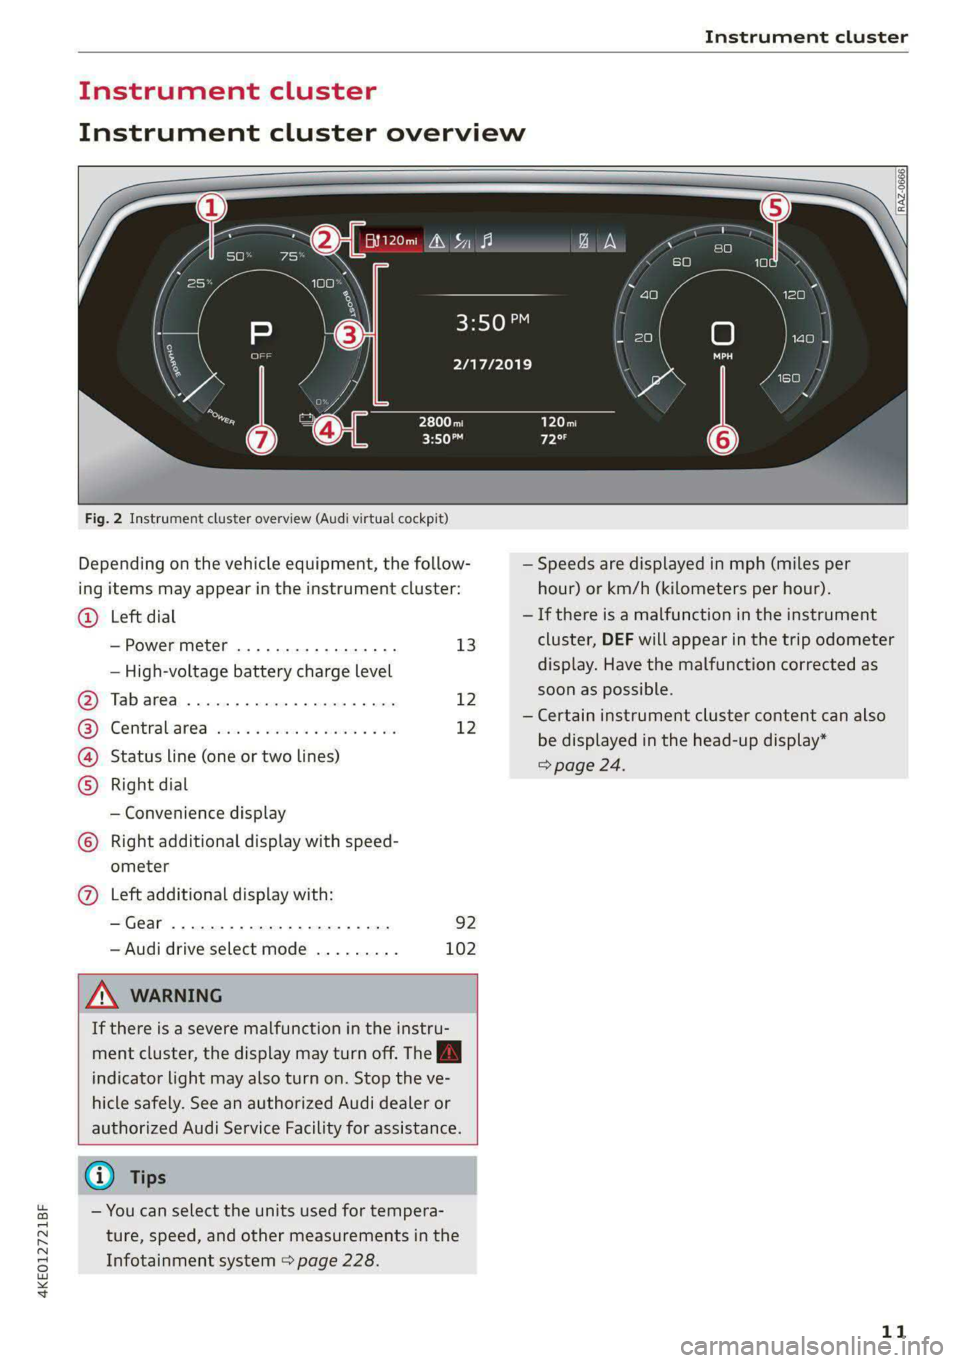
Fig. 2 Instrument cluster overview (Audi virtual cockpit)
Depending on the vehicle equipment, the follow-
ing items may appear in the instrument cluster:
Left dial
— Power meter ..............00. 13
©
— High-voltage battery charge level
Tabarea .... 0... eee eee 12
Centralised via as ieee s maven 6 wa 12
Status line (one or two lines)
Right dial
— Convenience display
Right additional display with speed-
COE
OLORORS)
3:50™
2/17/2019
ometer
Left additional display with:
—Gear ...... 02. eee eee eee 92
— Audi drive select mode ......... 102
ZA WARNING
If there is a severe malfunction in the instru-
ment cluster, the display may turn off. The A
indicator light may also turn on. Stop the ve-
hicle safely. See an authorized Audi dealer or
authorized Audi Service Facility for assistance.
G) Tips
— You can select the units used for tempera-
ture, speed, and other measurements in the
Infotainment system > page 228.
| zl ‘ae.
N a |
a WAi==)/)
A
— Speeds are displayed in mph (miles per
hour) or km/h (kilometers per hour).
— If there is a malfunction in the instrument
cluster, DEF will appear in the trip odometer
display. Have the malfunction corrected as
soon as possible.
— Certain instrument cluster content can also
be displayed in the head-up display*
> page 24.
11
Page 27 of 308

4KE012721BF
Voice recognition system
Voice recognition system
General information
Applies to: vehicles with voice recognition system
You can operate many functions in the vehicle
easily using voice commands.
Using the voice recognition system optimally
> Speak clearly and distinctly at a normal volume.
Speak louder when driving faster.
» Emphasize the words in the commands evenly
and do not leave long pauses.
> Close the doors, the windows, and the sunroof*
to reduce background noise. Make sure that
passengers are not speaking when you are giv-
ing a voice command.
> Do not direct the vents toward the hands-free
microphone, which is in the roof headliner near
the front interior lights.
> Only the driver should speak to the system, be-
cause the handsfree microphone is aimed to-
ward this seating position.
ZA\ WARNING
— Direct your full attention to driving. As the
driver, you have complete responsibility for
safety in traffic. Only use the functions in
such a way that you always maintain com-
plete control over your vehicle in all traffic
situations.
— Do not use the voice recognition system in
emergencies because your voice may change
in stressful situations. The system may take
longer to dial the number or may not be
able to dial it at all. Dial the emergency
number manually.
G) Tips
There are no voice guidance* prompts when a
dialog is active.
Description
eye aU mame ees eR
Applies to: vehicles with voice recognition system
Se
Drive me to
Where is a a
Connect
Pre)
Play
Eg
Maes
coy
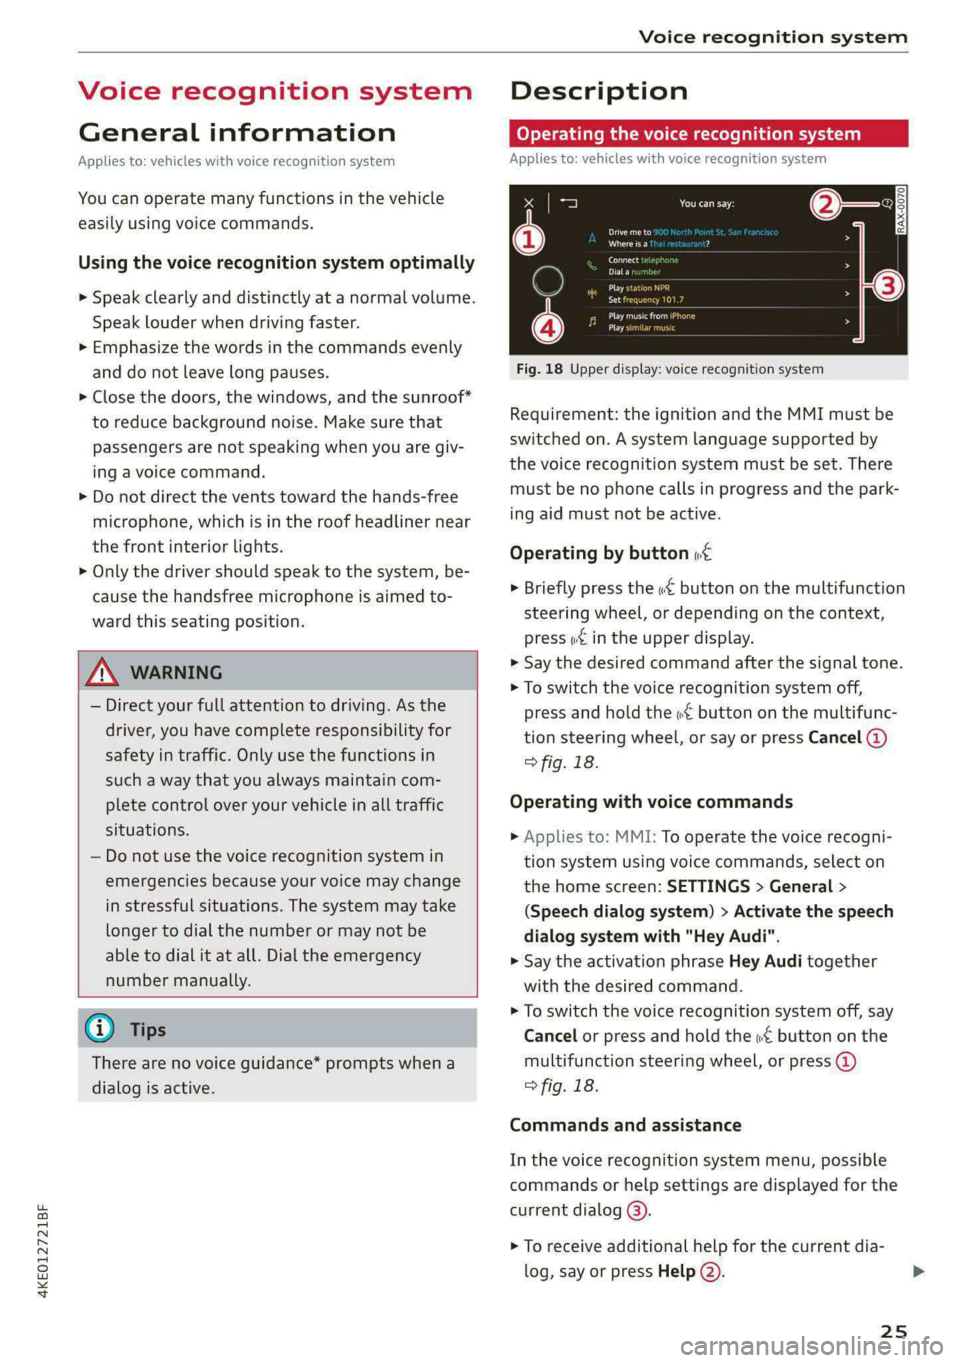
Fig. 18 Upper display: voice recognition system
Requirement: the ignition and the MMI must be
switched on. A system language supported by
the voice recognition system must be set. There
must be no phone calls in progress and the park-
ing aid must not be active.
Operating by button «£
> Briefly press the «€ button on the multifunction
steering wheel, or depending on the context,
press we in the upper display.
> Say the desired command after the signal tone.
> To switch the voice recognition system off,
press and hold the «€ button on the multifunc-
tion steering wheel, or say or press Cancel (@)
> fig. 18.
Operating with voice commands
> Applies to: MMI: To operate the voice recogni-
tion system using voice commands, select on
the home screen: SETTINGS > General >
(Speech dialog system) > Activate the speech
dialog system with "Hey Audi".
> Say the activation phrase Hey Audi together
with the desired command.
> To switch the voice recognition system off, say
Cancel or press and hold the «£ button on the
multifunction steering wheel, or press @)
> fig. 18.
Commands and assistance
In the voice recognition system menu, possible
commands or help settings are displayed for the
current dialog @).
> To receive additional help for the current dia-
log, say or press Help (2).
25
Page 34 of 308

Opening and closing
Opening and closing
Central locking
(eT e e eeu)
ZA WARNING
— If you leave the vehicle, switch the ignition
off and take the key with you. This applies
particularly when children remain in the ve-
hicle. Otherwise, children could start the ve-
hicle or operate electrical equipment (such
as power windows), which increases the risk
of an accident.
— Applies to vehicles with anti-theft alarm sys-
tem: When the vehicle is locked from the
outside, no one - especially children - should
remain in the vehicle, because the windows
can no longer open from the inside
= page 35, Anti-theft alarm system.
Locked doors make it more difficult for
emergency workers to enter the vehicle,
which puts lives at risk.
All doors and the luggage compartment lid can
be centrally unlocked and locked at once. You can
select in the MMI if the entire vehicle or only the
driver's door should unlock when unlocking the
vehicle > page 33. The turn signals flash twice
when you unlock the vehicle and flash once when
you lock the vehicle. If they do not flash when
locking, check if all doors and lids are closed.
Depending on the vehicle equipment, you may
have different options for centrally unlocking and
locking your vehicle.
— Vehicle key > page 37
— Sensors in the door handles > page 37
— Lock cylinder in the driver's door > page 35
— Interior central locking switch > page 34
Vehicle key
The term “vehicle key” refers to the remote con-
trol key or convenience key*. The convenience
key* is a remote control key with special func-
tions > page 37 and > page 90.
32
Power closing*
When closing a door or the luggage compart-
ment lid, you only have to let it fall lightly into
the latch. It then closes automatically > A\.
Automatic locking
If you unlock the vehicle but then do not open
any of the doors, the luggage compartment, or
the hood within a short period time, the vehicle
locks again automatically. This feature prevents
the vehicle from being accidentally left unlocked
for a long period of time.
Automatic locking (Auto Lock)
The Auto Lock function locks all doors and the
luggage compartment lid once the speed has ex-
ceeded approximately 9 mph (15 km/h). The ve-
hicle will unlock again if the unlock function in
the central locking switch is pressed, the “P” gear
is engaged, or the ignition is switched off.
You can open the doors individually from the in-
side by pulling the door handle one time. To open
the rear doors individually, you must pull the
door handle twice.
In the event of a crash with airbag deployment,
the doors will also automatically unlock to allow
access to the vehicle.
Unintentionally locking yourself out
Only lock your vehicle when all of the doors and
the luggage compartment lid are closed and
there is no key in the vehicle. This reduces the
risk of locking yourself out accidentally.
The
following features help to reduce the risk of
locking your vehicle key in the vehicle:
— If the driver's door is open, the vehicle cannot
be locked by pressing the & button on the re-
mote control key or by touching the locking
sensor* on a door.
— If the vehicle key that was used most recently is
inside the luggage compartment, the luggage
compartment lid will automatically open again
after it closes > ©.
— If the vehicle key that was last used is detected
inside the vehicle, then the vehicle cannot be
locked from the outside > ©.
Page 36 of 308

Opening and closing
vehicle key or in the driver's door. In vehicles with
a convenience key*, you can still open the lug-
gage compartment lid using the handle if an au-
thorized convenience key is detected > page 39.
Fold mirrors
You can select if the exterior mirrors automatical-
ly fold in when locking.
Tone when locking!)
You can select if an audio signal sounds when
locking the vehicle.
Open with convenience key
Applies to: vehicles with convenience key
You can deactivate the feature for unlocking us-
ing
the sensor. The function for locking via the
sensor will still be enabled > page 37.
ete] ole cine uaa)
Fig. 21 Driver's door: central locking switch
> To lock or unlock the vehicle, press the for B
button > /\.
When locking the vehicle with the central locking
switch,
the following applies:
— The doors and the luggage compartment lid
cannot be opened from the outside for security
reasons, for example, to reduce the risk of un-
authorized entry while stopped at a light.
— The LED in the central locking switch turns on
when all doors are closed and locked.
— You can open the doors individually from the in-
side by pulling the door handle one time. To
D_ This function is not available in all countries.
34
open the rear doors individually, you must pull
the door handle twice.
— In the event of a crash with airbag deployment,
the doors unlock automatically to allow access
to the vehicle.
ZA WARNING
— Observe the safety precautions > page 32.
— The central locking button works when the
ignition is switched off.
— The central locking switch is inoperative
when the vehicle is locked from the outside.
Messages
EB Driver's door: malfunction! Shift to P before
leaving vehicle. See owner's manual
There is a malfunction in the driver's door. Secure
the vehicle before exiting by selecting the “P” se-
lector lever position. Drive immediately to an au-
thorized Audi dealer or authorized Audi Service
Facility to have the malfunction repaired.
2B Central locking: malfunction! See owner's
manual
There is a central locking malfunction. If the
doors cannot lock, you can emergency lock the
doors > page 35. Drive to an authorized Audi
dealer or authorized Audi Service Facility immedi-
ately to have the malfunction corrected.
Door lock: Opening while driving is only pos-
sible with the emergency release. See owner's
manual
It is not possible to power unlock the doors at
speeds above approximately 9 mph (15 km/h). If
you must open doors at higher speeds in cases of
emergency, you can manually unlock the door by
forcefully pulling the door handle beyond its no-
ticeable resistance two times. Then press the
door handle back into its original position, if nec-
essary.
Page 50 of 308

Lights and Vision
Lights and Vision
Exterior lighting
Switching the lights on and off
Fig. 34 Instrument panel: light button module
@ Light switch &
Press and hold @ until the desired light function
is selected. The selected function is displayed
briefly in the instrument cluster. When switching
on the ignition, the AUTO light function is auto-
matically selected.
— AUTO - The automatic headlights adapt to the
surrounding brightness automatically. The day-
time running lights* will automatically turn on.
In vehicles for certain markets, you can switch
the automatic daytime running lights* on and
off in the MMI.
— 20 - You can switch the low beam headlights on
manually once the ignition is switched on.
— 3 - You can switch the parking lights on at
speeds below 20 mph (32 km/h).
— USA models: OFF - You can switch off all light
functions at speeds under 6 mph (10 km/h).
— Canada models: OFF - You can switch off all
light functions when the ignition is switched off
while the vehicle is stationary.
When the low beam headlights or parking lights
are switched on, the respective Ba or EB indica-
tor light appears in the instrument cluster.
@ All-weather lights 2
The headlights automatically adjust so that there
will be less glare, for example when the road sur-
face is wet.
48
Automatic headlight range control
Your vehicle is equipped with automatic head-
light range control. It reduces glare for oncoming
traffic if the vehicle load changes. The headlight
range adjusts automatically.
Audi adaptive light
Applies to: vehicles with Audi adaptive light
Audi adaptive light provides better visibility when
driving in the dark. The lights are adapted to the
road conditions based on speed, such as when
driving on expressways, rural roads, at intersec-
tions, and around curves. The adaptive light only
functions when the automatic headlights are ac-
tivated.
A WARNING
— Observe the safety precautions and note the
limits of the assist systems, sensors, and
cameras > page 129.
— Automatic headlights are only intended to
assist the driver. The driver is still responsi-
ble for controlling the headlights and may
need to switch them on and off manually
depending on light and visibility conditions.
For example, fog cannot be detected by the
light sensors. So always switch on the low
beams ZO under these weather conditions
and when driving in the dark.
G) Tips
— If the vehicle battery has been discharging
for a while, the parking light may switch off
automatically. Avoid using the parking
lights for several hours.
— When using lighting equipment, the driver
is responsible for adhering to any local ap-
plicable regulations while driving and when
parking the vehicle.
— Only the front headlights turn on when the
daytime running lights are switched on*. In
vehicles in certain markets, the tail lights
will also turn on.
—Incool or damp weather, the inside of the
headlights, turn signals, and tail lights can
fog
over due to the temperature difference
between the inside and outside. They will
clear shortly after switching them on. This >
Page 55 of 308

4KE012721BF
Lights and Vision
Front passenger's exterior mirror tilt
function*
Requirement: the knob must be in the position
for the front passenger’s exterior mirror.
The mirror surfaces tilt slightly when reverse
gear is selected to provide a better view, for ex-
ample of the edge of the curb.
You can adjust the mirror surface by turning the
knob in the desired direction.
The mirror moves from the reversing position
back to the original position:
— When you switch the ignition off
— When you drive forward at speeds faster than 9
mph (15 km/h).
— When the knob is no longer in the position for
the front passenger exterior mirror
ZA WARNING
Curved mirror surfaces (for example convex)
enlarge the field of vision. However, they
make objects in the mirror appear smaller and
farther away. When using these mirrors to es-
timate your distance to vehicles behind you
when changing lanes, you could estimate in-
correctly, which increases the risk of an acci-
dent.
() Note
— Applies to: vehicles with power folding exte-
rior mirrors: If the mirror housing was
moved by outside forces (such as an impact
when maneuvering), you must use the pow-
er folding function to fold the mirror all the
way out. The mirrors will make a loud noise
when they latch into place. The mirror hous-
ing must not be moved back into place by
hand because this could impair the function
of the mirror mechanism.
— Applies to: vehicles without power folding
exterior mirrors: If the mirror housing was
moved by outside forces (such as an impact
when maneuvering), you must move it back
in place by hand.
— If you wash the vehicle in an automatic car
wash, you must fold the exterior mirrors in
to reduce the risk of damage to the mirrors.
Never fold power folding exterior mirrors*
by hand. Only fold them in and out using
the power controls.
Gi) Tips
If the power adjusting function malfunctions,
the glass in both mirrors can be adjusted by
pressing on the edge of it by hand.
Dimming the mirrors
Automatic dimming rearview mirror
> The interior and exterior mirrors dim automati-
cally when light shines on them, for example
from headlights on a vehicle behind you.
ZA WARNING
—If the glass on an automatic dimming mirror
breaks, electrolyte can leak out. This liquid
can irritate the skin, eyes and respiratory
system. If there is contact with the fluid,
flush immediately with plenty of water. Con-
sult a physician if necessary.
— Repeated or long-term exposure to electro-
lyte fluid can lead to irritation of the air-
ways, especially in people with asthma or
other respiratory conditions. Take deep
breaths immediately after leaving the vehi-
cle or, if this is not possible, open all of the
doors and windows as wide as possible.
— If electrolyte fluid comes into contact with
the eyes, flush them thoroughly with plenty
of clean water for at least 15 minutes and
then seek medical attention.
— If electrolyte fluid comes into contact with
the skin, flush the affected area with clean
water for at least 15 minutes, and then
clean with soap and water and seek medical
attention. Clean affected clothing and shoes
thoroughly before wearing again.
— If the fluid was swallowed and the person is
conscious, flush the mouth with water for at
least 15 minutes. Do not induce vomiting
unless this is recommended by medical pro-
fessionals. Seek medical attention immedi-
ately.
53
Page 57 of 308

4KE012721BF
Lights and Vision
exceeds approximately 2 mph (4 km/h) and it is
raining. The higher the sensitivity of the rain sen-
sor that is set (switch ©) to the right), the earlier
the windshield wipers react to moisture on the
windshield. You can deactivate the rain sensor
mode, which switches the interval mode on. In
intermittent mode, you can adjust the interval
time using the switch ©).
> Applies to: MMI: Select on the home screen:
VEHICLE > Light & Visibility > Rain sensor.
@ Slow wiping
@ Fast wiping
@ Single wipe. If you hold the lever in this posi-
tion longer, the wipers switch from slow wiping
to fast wiping.
© Clean the windshield &. The number of wipes
and afterwipes depends on how long the lever is
held in position G).
The wipers wipe one time after several seconds of
driving to remove water droplets. You can switch
this function off by moving the lever to position
© within ten seconds of the afterwipe. The after-
wipe function is reactivated the next time you
switch the ignition on.
If you hold the lever in position ©) for longer
than half a second, the edge wiping feature will
be activated. This moves the windshield wipers
closer to the edge of the windshield and per-
forms an afterwipe to clean the residue that re-
sults from the wiping process from the edge of
the windshield. The function is available when
driving at speeds up to 75 mph (120 km/h).
The headlight washer system* operates only
when the low beam headlights are on. If you
move the lever to position ©), the headlights and
the night vision assist camera* are cleaned at in-
tervals.
@ Wipe the rear window ©. The number of
wipes depends on the windshield wiper move-
ment.
The rear wiper automatically switches on when
the reverse gear is selected and the front wind-
shield wipers are on and running.
Clean the rear window &. The number of
wipes depends on how long the lever is held in
position (8). This may also clean the rearview
camera, depending on the vehicle equipment.
A WARNING
—The rain sensor is only intended to assist the
driver. The driver may still be responsible for
manually switching the wipers on based on
visibility conditions.
— The windshield must not be treated with
water-repelling windshield coating agents.
Under unfavorable conditions, such as wet-
ness, darkness, and when the sun is low,
these coatings can cause increased glare,
which increases the risk of an accident. They
can also cause wiper blade chatter.
— Properly functioning windshield wiper
blades are required for a clear view and safe
driving > page 56, Cleaning/changing wip-
er blades.
@) Note
— If there is frost, make sure the windshield
wiper blades are not frozen to the wind-
shield. Switching on the windshield wipers
when the blades are frozen to the wind-
shield can damage the wiper blades.
— Prior to using a car wash, the windshield
wiper system must be switched off (lever in
position @). This prevents the wipers from
switching on unintentionally and causing
damage to the windshield wiper system.
(i) Tips
— The windshield wipers switch off when the
ignition is switched off. You can activate the
windshield wipers after the ignition is
switched on again by moving the windshield
wiper lever to any position. The single wipe
function (lever in position @)) also functions
when the ignition is switched off.
— Worn or dirty windshield wiper blades result
in streaking. This can affect the rain sensor
function. Check your windshield wiper
blades regularly.
55
Page 58 of 308

Lights and Vision
— The washer fluid nozzles for the windshield
washer system are heated when the ignition
is on if the outside temperature is low.
— When stopping temporarily, such as at a
traffic light, the speed of the windshield
wipers automatically reduces by one level.
[eG a Res ct wiper blades
B8V-0696|
Ae
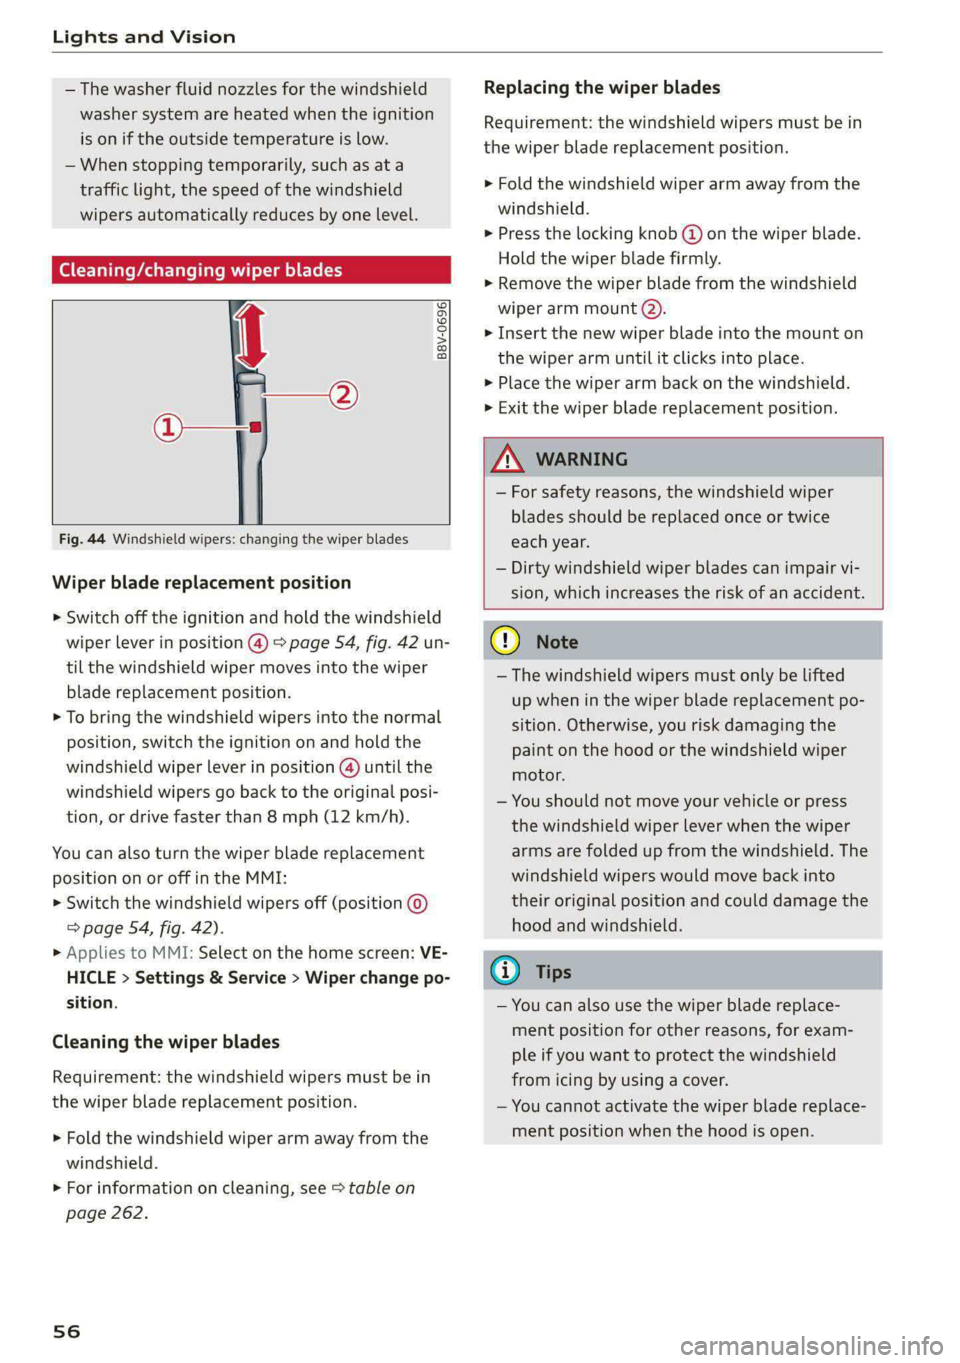
Fig. 44 Windshield wipers: changing the wiper blades
Wiper blade replacement position
> Switch off the ignition and hold the windshield
wiper lever in position @) > page 54, fig. 42 un-
til the windshield wiper moves into the wiper
blade replacement position.
> To bring the windshield wipers into the normal
position, switch the ignition on and hold the
windshield wiper lever in position @) until the
windshield wipers go back to the original posi-
tion, or drive faster than 8 mph (12 km/h).
You can also turn the wiper blade replacement
position on or off in the MMI:
> Switch the windshield wipers off (position ©
=> page 54, fig. 42).
» Applies to MMI: Select on the home screen: VE-
HICLE > Settings & Service > Wiper change po-
sition.
Cleaning the wiper blades
Requirement: the windshield wipers must be in
the wiper blade replacement position.
> Fold the windshield wiper arm away from the
windshield.
> For information on cleaning, see > table on
page 262.
56
Replacing the wiper blades
Requirement: the windshield wipers must be in
the wiper blade replacement position.
> Fold the windshield wiper arm away from the
windshield.
> Press the locking knob (@ on the wiper blade.
Hold the wiper blade firmly.
> Remove the wiper blade from the windshield
wiper arm mount Q).
> Insert the new wiper blade into the mount on
the wiper arm until it clicks into place.
> Place the wiper arm back on the windshield.
> Exit the wiper blade replacement position.
ZA\ WARNING
— For safety reasons, the windshield wiper
blades should be replaced once or twice
each year.
— Dirty windshield wiper blades can impair vi-
sion, which increases the risk of an accident.
C) Note
— The windshield wipers must only be lifted
up when in the wiper blade replacement po-
sition.
Otherwise, you risk damaging the
paint on the hood or the windshield wiper
motor.
— You should not move your vehicle or press
the windshield wiper lever when the wiper
arms are folded up from the windshield. The
windshield wipers would move back into
their original position and could damage the
hood and windshield.
G) Tips
— You can also use the wiper blade replace-
ment position for other reasons, for exam-
ple if you want to protect the windshield
from icing by using a cover.
— You cannot activate the wiper blade replace-
ment position when the hood is open.