2021 ALFA ROMEO STELVIO turn signal
[x] Cancel search: turn signalPage 128 of 280
STARTING AND OPERATING
126
(Continued)
ParkSense System Usage Precautions
NOTE:
Some conditions may influence the perfor-
mance of the ParkSense system:
Reduced sensor sensitivity could be due to
the presence of ice, snow, mud, or thick
paint on the surface of the sensor.
The sensors may detect a false obstacle
(echo interference) due to mechanical inter -
ference, for example when washing the
vehicle or in extreme weather.
The signals sent by the sensors can be
altered by the presence of ultrasonic
systems (e.g. pneumatic brake systems of
trucks or pneumatic drills) near the vehicle.
System performance can be influenced by
the position of the sensors. For example,
due to a change in the ride setting (caused
by wear to the shock absorbers or suspen -
sion), by changing tires, overloading the
vehicle or operations that require the
vehicle to be lowered.
Be sure not to place bumper stickers or
other adhesives over the sensors as this will
affect system performance.
The presence of a trailer hitch without a
trailer. This may interfere with the operation
of the parking sensors. Before using the
ParkSense system, it is recommended to remove or close the trailer hitch assembly
when the vehicle is not being used for
towing.
LANE DEPARTURE WARNING
(LDW) SYSTEM
Lane Departure Warning Operation
The Lane Departure Warning system uses a
forward looking camera located on the wind
-
shield to detect lane markings and measure
vehicle position within the lane boundaries.
When one or both lane limits are detected and
the vehicle passes over one without an acti -
vated turn signal, the system emits a visual as
well as an acoustic signal.
If the vehicle continues to go beyond the line
of the lane without any intervention from the
driver, the surpassed line will light up on the
display (left or right) to urge the driver to bring
the vehicle back into the limits of the lane.
CAUTION!
Projecting loads on the roof of the vehicle
may interfere with the correct operation of
the camera. Before starting, make sure
the load is correctly positioned in order
not to cover the camera operating range.
Do not cover the operating range of the
camera with stickers or other objects.
Do not tamper with nor operate on the
camera. Do not close the openings in the
aesthetic cover located under the interior
rearview mirror. In the event of a failure of
the camera, contact your authorized
dealer.
The camera may have limited or absent
operation due to weather conditions such
as: heavy rain, hail, thick fog, heavy snow,
formation of ice layers on the windshield.
Camera operation may also be compro -
mised by the presence of dust, condensa -
tion, dirt or ice on the windshield, by traffic
conditions (e.g. vehicles that are driving
not aligned with yours, vehicle driving in a
transverse or opposite way on the same
lane, bend with a small radius of curva -
ture), by road surface conditions and by
driving conditions (e.g. off-road driving).
Make sure the windshield is always clean.
Use specific detergents and clean cloths
to avoid scratching the windshield. The
camera operation may also be limited or
absent in some driving, traffic and road
surface conditions.
If the windshield must be replaced due to
scratches, chipping or breakage, contact
exclusively an authorized dealer. Do not
replace the windshield on your own. It is
advisable to replace the windshield if it is
damaged in the area of the camera.
CAUTION! (Continued)
21_GU_OM_EN_USC_t.book Page 126
Page 129 of 280
127
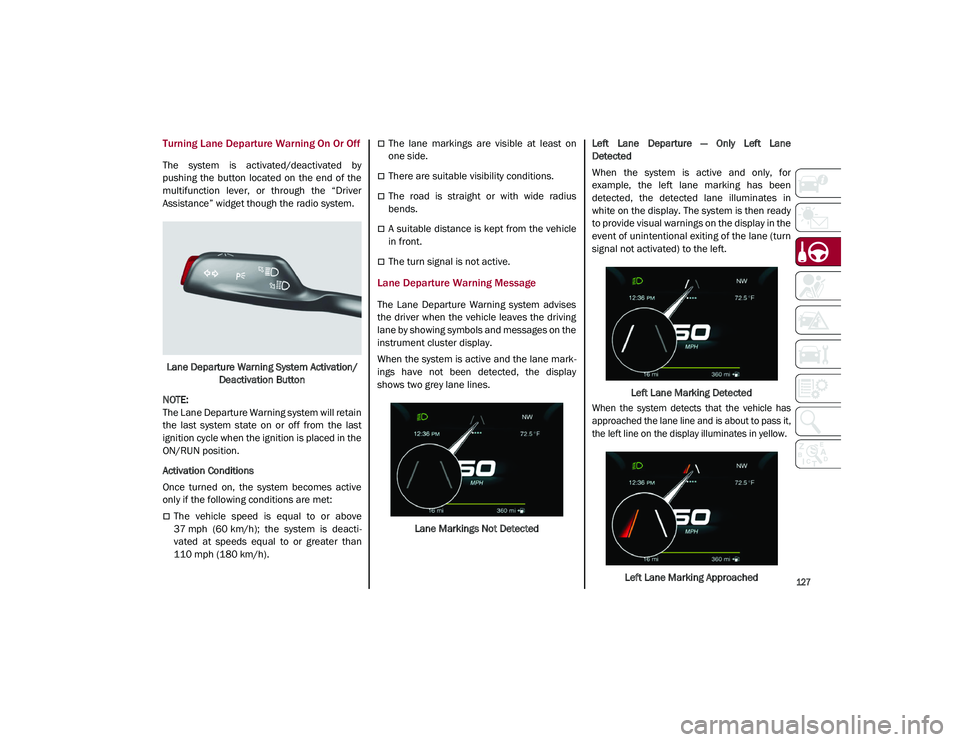
Turning Lane Departure Warning On Or Off
The system is activated/deactivated by
pushing the button located on the end of the
multifunction lever, or through the “Driver
Assistance” widget though the radio system.Lane Departure Warning System Activation/ Deactivation Button
NOTE:
The Lane Departure Warning system will retain
the last system state on or off from the last
ignition cycle when the ignition is placed in the
ON/RUN position.
Activation Conditions
Once turned on, the system becomes active
only if the following conditions are met:
The vehicle speed is equal to or above
37 mph (60 km/h); the system is deacti -
vated at speeds equal to or greater than
110 mph (180 km/h).
The lane markings are visible at least on
one side.
There are suitable visibility conditions.
The road is straight or with wide radius
bends.
A suitable distance is kept from the vehicle
in front.
The turn signal is not active.
Lane Departure Warning Message
The Lane Departure Warning system advises
the driver when the vehicle leaves the driving
lane by showing symbols and messages on the
instrument cluster display.
When the system is active and the lane mark -
ings have not been detected, the display
shows two grey lane lines.
Lane Markings Not Detected Left Lane Departure — Only Left Lane
Detected
When the system is active and only, for
example, the left lane marking has been
detected, the detected lane illuminates in
white on the display. The system is then ready
to provide visual warnings on the display in the
event of unintentional exiting of the lane (turn
signal not activated) to the left.
Left Lane Marking Detected
When the system detects that the vehicle has
approached the lane line and is about to pass it,
the left line on the display illuminates in yellow.
Left Lane Marking Approached
21_GU_OM_EN_USC_t.book Page 127
Page 130 of 280
STARTING AND OPERATING
128
The system operates in the same way, but
mirrored, in the event of exiting the right lane
when only the right lane marking has been
detected.
Left Lane Departure — Both Lanes Detected
When the system is active, both lane lines on
the display illuminate in white to indicate that
both of the lane markings have been detected.
When lane markings are detected, the system
is ready to provide indications in case the
driver unintentionally leaves the lane (turn
signal not activated).
As the Lane Departure Warning system
detects the lane markings while the vehicle is
in motion, it will adjust the display accordingly
(from white to yellow and yellow to white, and
increase their thickness).
If a lane line is crossed, the driver is alerted by
an audible signal as well as the visual indica-
tion in the instrument cluster. The signal is
emitted through the speakers on the side of
the lane limit which is being crossed (e.g. if the
vehicle is exceeding the left line of the lane,
the audible signal will come from the speakers
on the left of the vehicle).
Limited Operation Warning
If a message appears on the display, a condi -
tion limiting the Lane Departure Warning
system operation may have occurred. This
could be an obstruction of the camera view, or
a fault in the system.
If an obstruction is detected, clean the area of
the windshield by the interior rearview mirror. Although the vehicle can still be driven in
normal conditions, the system may not func
-
tion properly.
When the conditions limiting the system are
corrected, it will go back to normal operation.
Should a fault persist, contact an authorized
dealer.
System Failure Warning
If the system turns off and appears on the
display, it means that there is a system fault.
In this case, it is still possible to drive the
vehicle, but you are advised to contact an
authorized dealer as soon as possible.
Changing Lane Departure Warning Status
The system's sensitivity can be set through the
radio system. Sensitivity “High” or “Low” can
be selected.
To access the function, from the main menu
select the following in order:
1. “Settings”
2. “Driver Assistance”
3. “Lane Departure Warning”
4. “Sensitivity”
LANE KEEPING ASSIST (LKA)
SYSTEM —IF EQUIPPED
The Lane Keeping Assist (LKA) system uses a
camera located on the windshield to detect
the lane markings and calculate the position of the vehicle within such markings, in order to
make sure that the vehicle remains inside the
lane. This is an active system that will apply
torque to the steering wheel if it senses that
the vehicle is drifting out of the lane.
When one or both lane markings are detected
and the vehicle passes over one without a turn
signal being applied, the system will apply
torque to the steering wheel and a visual
signal will be displayed in the instrument
cluster display. An audible signal may also
sound.
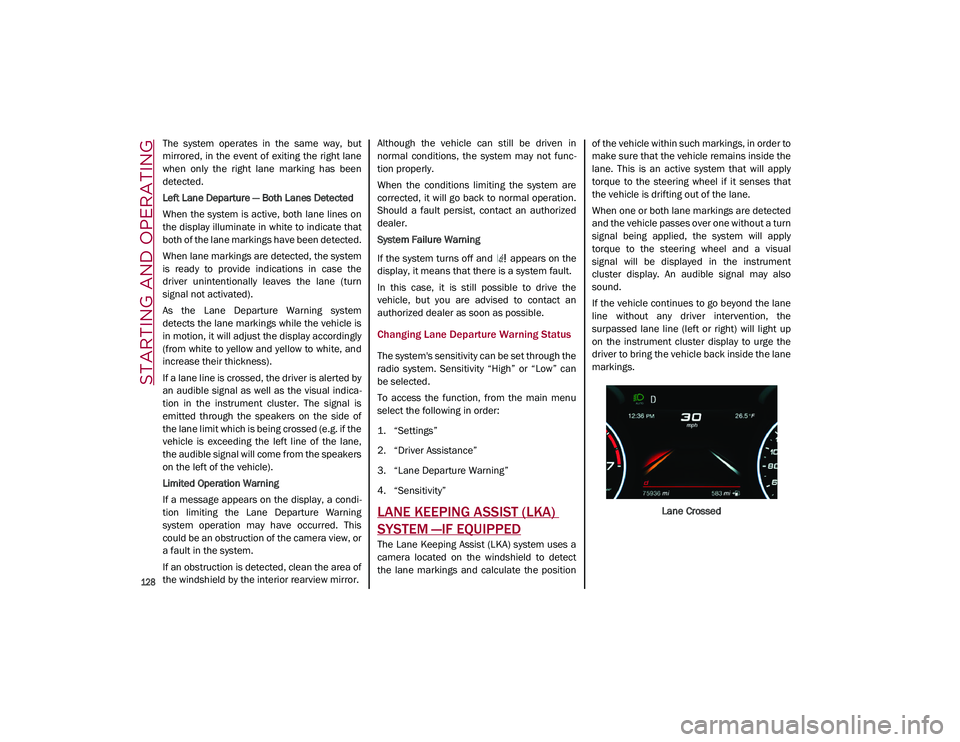
If the vehicle continues to go beyond the lane
line without any driver intervention, the
surpassed lane line (left or right) will light up
on the instrument cluster display to urge the
driver to bring the vehicle back inside the lane
markings.
Lane Crossed
21_GU_OM_EN_USC_t.book Page 128
Page 131 of 280
129
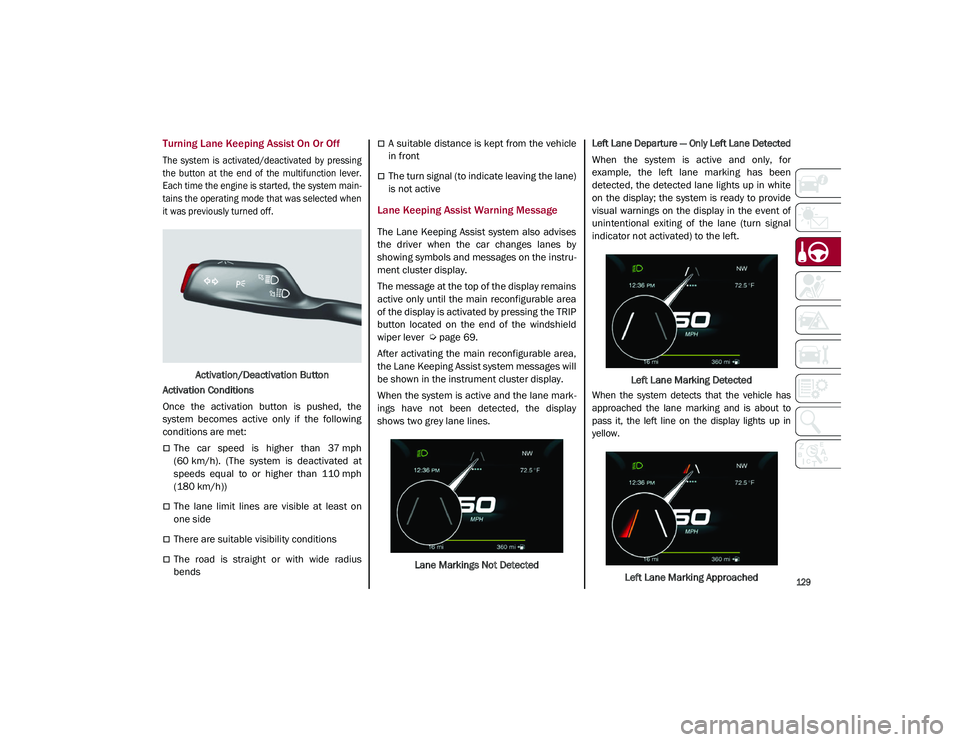
Turning Lane Keeping Assist On Or Off
The system is activated/deactivated by pressing
the button at the end of the multifunction lever.
Each time the engine is started, the system main-
tains the operating mode that was selected when
it was previously turned off.
Activation/Deactivation Button
Activation Conditions
Once the activation button is pushed, the
system becomes active only if the following
conditions are met:
The car speed is higher than 37 mph
(60 km/h). (The system is deactivated at
speeds equal to or higher than 110 mph
(180 km/h))
The lane limit lines are visible at least on
one side
There are suitable visibility conditions
The road is straight or with wide radius
bends
A suitable distance is kept from the vehicle
in front
The turn signal (to indicate leaving the lane)
is not active
Lane Keeping Assist Warning Message
The Lane Keeping Assist system also advises
the driver when the car changes lanes by
showing symbols and messages on the instru -
ment cluster display.
The message at the top of the display remains
active only until the main reconfigurable area
of the display is activated by pressing the TRIP
button located on the end of the windshield
wiper lever
Ú
page 69.
After activating the main reconfigurable area,
the Lane Keeping Assist system messages will
be shown in the instrument cluster display.
When the system is active and the lane mark -
ings have not been detected, the display
shows two grey lane lines.
Lane Markings Not Detected
Left Lane Departure — Only Left Lane Detected
When the system is active and only, for
example, the left lane marking has been
detected, the detected lane lights up in white
on the display; the system is ready to provide
visual warnings on the display in the event of
unintentional exiting of the lane (turn signal
indicator not activated) to the left.
Left Lane Marking Detected
When the system detects that the vehicle has
approached the lane marking and is about to
pass it, the left line on the display lights up in
yellow.
Left Lane Marking Approached
21_GU_OM_EN_USC_t.book Page 129
Page 132 of 280
STARTING AND OPERATING
130
NOTE:
The system operates in the same way, but
mirrored, in the event of exiting the right lane
when only the right lane marking has been
detected.
Left Lane Departure — Both Lanes Detected
When the system is active, both lane lines on
the display illuminate in white to indicate the
successful detection of both limits.
When lane markings are detected, the system
is ready to provide indications in case the
driver unintentionally leaves the lane (turn
signal not activated).
As the Lane Keeping Assist system detects the
lane markings while the vehicle is in motion, it
will adjust the display accordingly (from white
to yellow and yellow to white, and increase
their thickness).
If a lane line is crossed, the driver is alerted by
an audible signal as well as the visual indica-
tion in the instrument cluster. The signal is
emitted through the speakers on the side of
the lane marking which is being crossed (e.g.
if the vehicle is exceeding the left line of the
lane, the audible signal will come from the
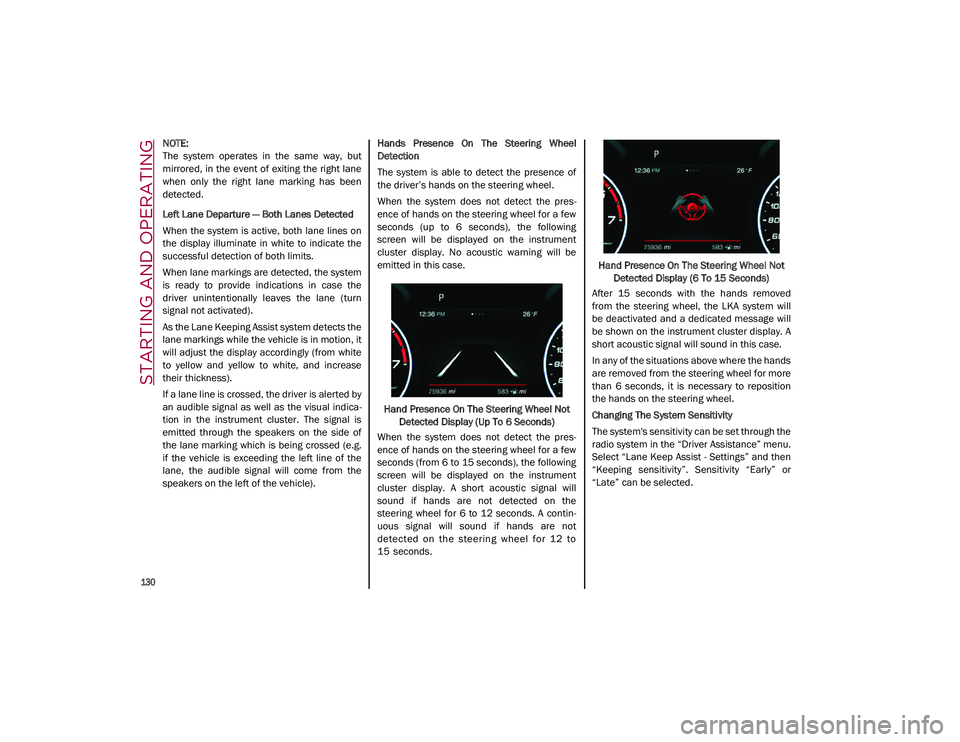
speakers on the left of the vehicle). Hands Presence On The Steering Wheel
Detection
The system is able to detect the presence of
the driver’s hands on the steering wheel.
When the system does not detect the pres
-
ence of hands on the steering wheel for a few
seconds (up to 6 seconds), the following
screen will be displayed on the instrument
cluster display. No acoustic warning will be
emitted in this case.
Hand Presence On The Steering Wheel Not Detected Display (Up To 6 Seconds)
When the system does not detect the pres -
ence of hands on the steering wheel for a few
seconds (from 6 to 15 seconds), the following
screen will be displayed on the instrument
cluster display. A short acoustic signal will
sound if hands are not detected on the
steering wheel for 6 to 12 seconds. A contin-
uous signal will sound if hands are not
detect ed on th e steerin g wheel for 12 to
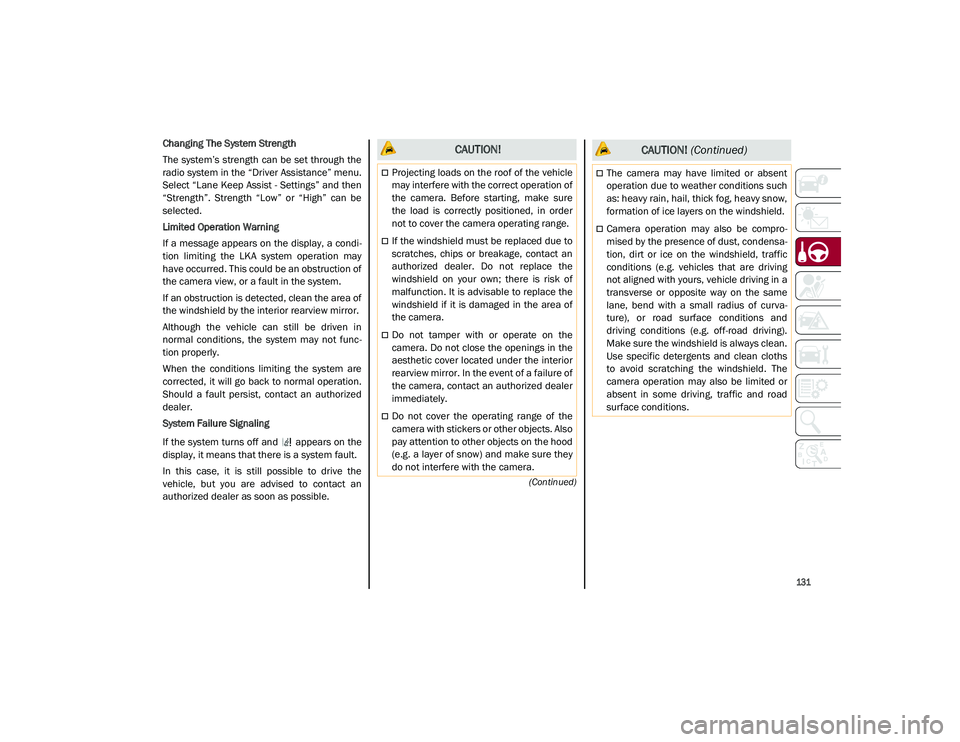
15 seconds. Hand Presence On The Steering Wheel Not
Detected Display (6 To 15 Seconds)
After 15 seconds with the hands removed
from the steering wheel, the LKA system will
be deactivated and a dedicated message will
be shown on the instrument cluster display. A
short acoustic signal will sound in this case.
In any of the situations above where the hands
are removed from the steering wheel for more
than 6 seconds, it is necessary to reposition
the hands on the steering wheel.
Changing The System Sensitivity
The system's sensitivity can be set through the
radio system in the “Driver Assistance” menu.
Select “Lane Keep Assist - Settings” and then
“Keeping sensitivity”. Sensitivity “Early” or
“Late” can be selected.
21_GU_OM_EN_USC_t.book Page 130
Page 133 of 280
131
(Continued)
Changing The System Strength
The system’s strength can be set through the
radio system in the “Driver Assistance” menu.
Select “Lane Keep Assist - Settings” and then
“Strength”. Strength “Low” or “High” can be
selected.
Limited Operation Warning
If a message appears on the display, a condi-
tion limiting the LKA system operation may
have occurred. This could be an obstruction of
the camera view, or a fault in the system.
If an obstruction is detected, clean the area of
the windshield by the interior rearview mirror.
Although the vehicle can still be driven in
normal conditions, the system may not func -
tion properly.
When the conditions limiting the system are
corrected, it will go back to normal operation.
Should a fault persist, contact an authorized
dealer.
System Failure Signaling
If the system turns off and appears on the
display, it means that there is a system fault.
In this case, it is still possible to drive the
vehicle, but you are advised to contact an
authorized dealer as soon as possible. CAUTION!
Projecting loads on the roof of the vehicle
may interfere with the correct operation of
the camera. Before starting, make sure
the load is correctly positioned, in order
not to cover the camera operating range.
If the windshield must be replaced due to
scratches, chips or breakage, contact an
authorized dealer. Do not replace the
windshield on your own; there is risk of
malfunction. It is advisable to replace the
windshield if it is damaged in the area of
the camera.
Do not tamper with or operate on the
camera. Do not close the openings in the
aesthetic cover located under the interior
rearview mirror. In the event of a failure of
the camera, contact an authorized dealer
immediately.
Do not cover the operating range of the
camera with stickers or other objects. Also
pay attention to other objects on the hood
(e.g. a layer of snow) and make sure they
do not interfere with the camera.
The camera may have limited or absent
operation due to weather conditions such
as: heavy rain, hail, thick fog, heavy snow,
formation of ice layers on the windshield.
Camera operation may also be compro -
mised by the presence of dust, condensa -
tion, dirt or ice on the windshield, traffic
conditions (e.g. vehicles that are driving
not aligned with yours, vehicle driving in a
transverse or opposite way on the same
lane, bend with a small radius of curva -
ture), or road surface conditions and
driving conditions (e.g. off-road driving).
Make sure the windshield is always clean.
Use specific detergents and clean cloths
to avoid scratching the windshield. The
camera operation may also be limited or
absent in some driving, traffic and road
surface conditions.
CAUTION! (Continued)
21_GU_OM_EN_USC_t.book Page 131
Page 142 of 280
STARTING AND OPERATING
140
Towing Requirements — Trailer Brakes
Do not interconnect the hydraulic brake
system or vacuum system of your vehicle
with that of the trailer. This could cause
inadequate braking and possible personal
injury.
An electronically actuated trailer brake
controller is required when towing a trailer
with electronically actuated brakes. When
towing a trailer equipped with a hydraulic
surge actuated brake system, an electronic
brake controller is not required.
Trailer brakes are recommended for trailers
over 1,000 lbs (453 kg) and required for
trailers in excess of 2,000 lbs (907 kg).
Towing Requirements — Trailer Lights And
Wiring
Whenever you pull a trailer, regardless of the
trailer size, stoplights and turn signals on the
trailer are required for motoring safety.
The Trailer Tow Package may include a four-
and seven-pin wiring harness. Use a factory
approved trailer harness and connector.
NOTE:
Do not cut or splice wiring into the vehicle’s
wiring harness.
The electrical connections are all complete to
the vehicle but you must mate the harness to
a trailer connector. Refer to the following illus -
trations.
NOTE:
Disconnect trailer wiring connector from the
vehicle before launching a boat (or any
other device plugged into vehicle’s elec -
trical connect) into water.
Be sure to reconnect once clear from water
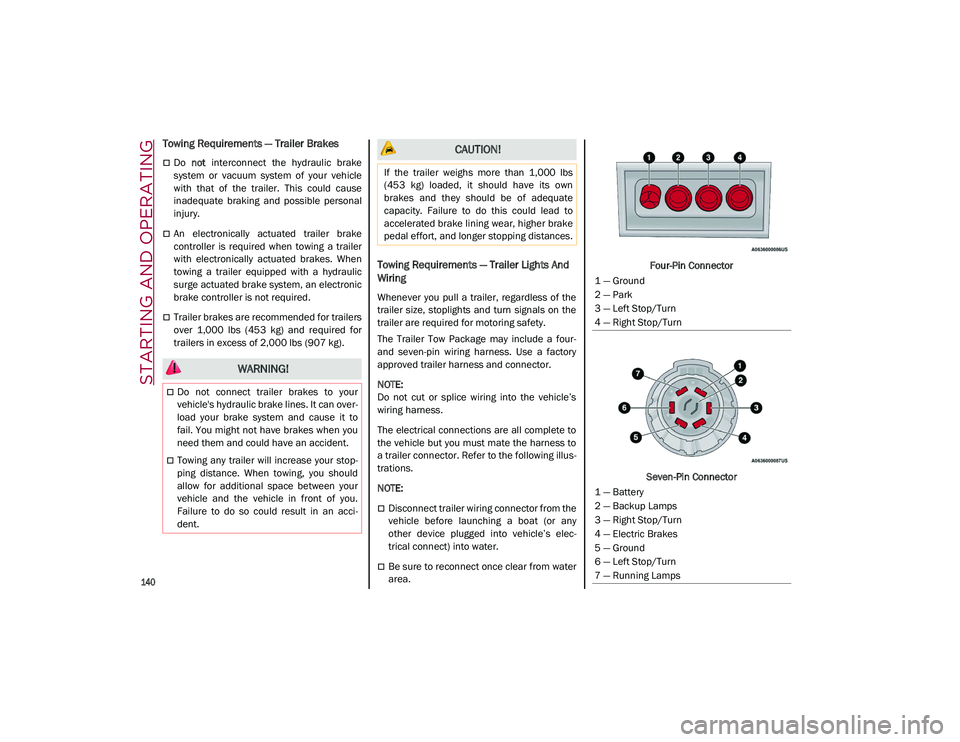
area. Four-Pin Connector
Seven-Pin Connector
WARNING!
Do not connect trailer brakes to your
vehicle's hydraulic brake lines. It can over -
load your brake system and cause it to
fail. You might not have brakes when you
need them and could have an accident.
Towing any trailer will increase your stop -
ping distance. When towing, you should
allow for additional space between your
vehicle and the vehicle in front of you.
Failure to do so could result in an acci -
dent.
CAUTION!
If the trailer weighs more than 1,000 lbs
(453 kg) loaded, it should have its own
brakes and they should be of adequate
capacity. Failure to do this could lead to
accelerated brake lining wear, higher brake
pedal effort, and longer stopping distances.
1 — Ground
2 — Park
3 — Left Stop/Turn
4 — Right Stop/Turn
1 — Battery
2 — Backup Lamps
3 — Right Stop/Turn
4 — Electric Brakes
5 — Ground
6 — Left Stop/Turn
7 — Running Lamps
21_GU_OM_EN_USC_t.book Page 140
Page 143 of 280
141
Towing Tips
Before setting out on a trip, practice turning,
stopping, and backing up the trailer in an area
located away from heavy traffic.
Automatic Transmission
Select the DRIVE range when towing. The
transmission controls include a drive strategy
to avoid frequent shifting when towing.
However, if frequent shifting does occur while
in DRIVE, you can use the AutoStick shift
control to manually select a lower gear.
NOTE:
Using a lower gear while operating the vehicle
under heavy loading conditions will improve
performance and extend transmission life by
reducing excessive shifting and heat build-up.
This action will also provide better engine
braking.
Cruise Control — If Equipped
Do not use on hilly terrain or with heavy
loads.
When using the Cruise Control, if you expe-
rience speed drops greater than 10 mph
(16 km/h), disengage until you can get back
to cruising speed.
Use Cruise Control in flat terrain and with
light loads to maximize fuel efficiency.
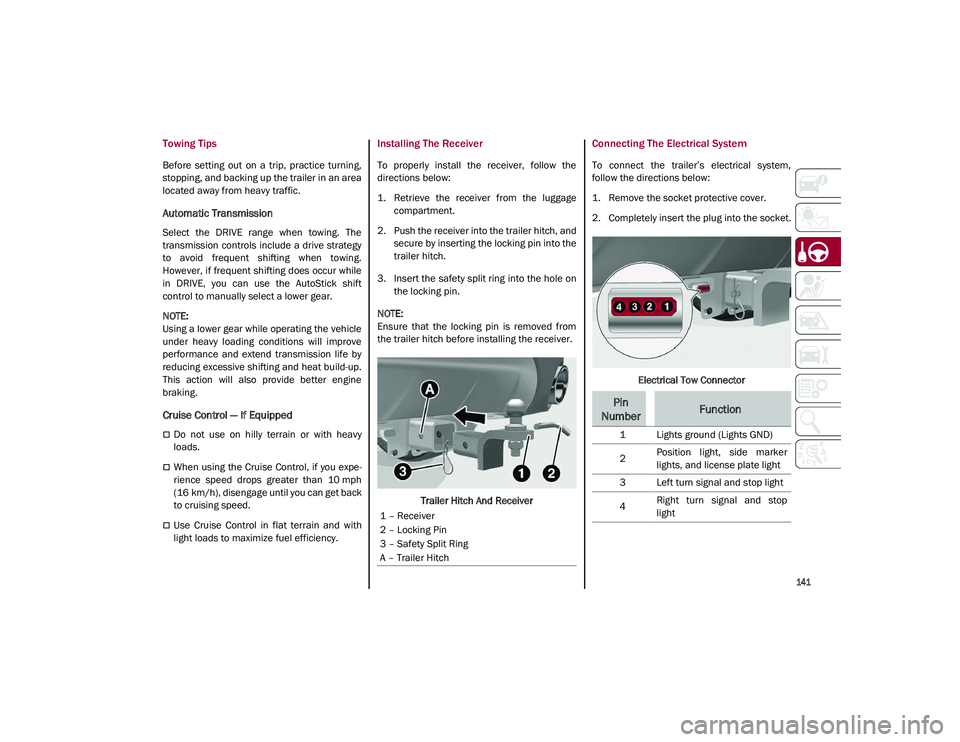
Installing The Receiver
To properly install the receiver, follow the
directions below:
1. Retrieve the receiver from the luggage compartment.
2. Push the receiver into the trailer hitch, and secure by inserting the locking pin into the
trailer hitch.
3. Insert the safety split ring into the hole on the locking pin.
NOTE:
Ensure that the locking pin is removed from
the trailer hitch before installing the receiver.
Trailer Hitch And Receiver
Connecting The Electrical System
To connect the trailer’s electrical system,
follow the directions below:
1. Remove the socket protective cover.
2. Completely insert the plug into the socket.
Electrical Tow Connector
1 – Receiver
2 – Locking Pin
3 – Safety Split Ring
A – Trailer Hitch
Pin
NumberFunction
1 Lights ground (Lights GND)
2 Position light, side marker
lights, and license plate light
3 Left turn signal and stop light
4 Right turn signal and stop
light
21_GU_OM_EN_USC_t.book Page 141