2021 ALFA ROMEO STELVIO turn signal
[x] Cancel search: turn signalPage 79 of 280
77
also reduces fuel efficiency and tire tread life,
and may affect the vehicle’s handling and
stopping ability.
Please note that the TPMS is not a substitute
for proper tire maintenance, and it is the
driver’s responsibility to maintain correct tire
pressure, even if under inflation has not
reached the level to trigger illumination of the
TPMS low tire pressure telltale.
Your vehicle has also been equipped with a
TPMS malfunction indicator to indicate when
the system is not operating properly. The
TPMS malfunction indicator is combined with
the low tire pressure telltale. When the system
detects a malfunction, the telltale will flash for
approximately one minute and then remain
continuously illuminated. This sequence will
continue upon subsequent vehicle start-ups
as long as the malfunction exists. When the
malfunction indicator is illuminated, the
system may not be able to detect or signal low
tire pressure as intended. TPMS malfunctions
may occur for a variety of reasons, including
the installation of replacement or alternate
tires or wheels on the vehicle that prevent the
TPMS from functioning properly. Always check
the TPMS malfunction telltale after replacing
one or more tires or wheels on your vehicle to
ensure that the replacement or alternate tires
and wheels allow the TPMS to continue to
function properly.
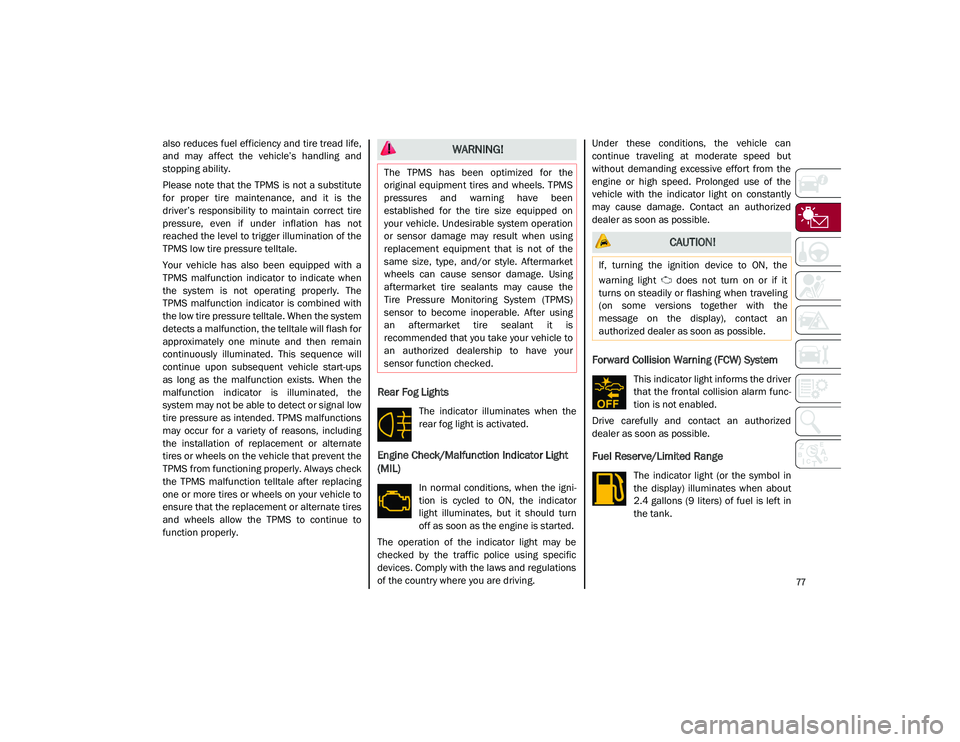
Rear Fog Lights
The indicator illuminates when the
rear fog light is activated.
Engine Check/Malfunction Indicator Light
(MIL)
In normal conditions, when the igni-
tion is cycled to ON, the indicator
light illuminates, but it should turn
off as soon as the engine is started.
The operation of the indicator light may be
checked by the traffic police using specific
devices. Comply with the laws and regulations
of the country where you are driving. Under these conditions, the vehicle can
continue traveling at moderate speed but
without demanding excessive effort from the
engine or high speed. Prolonged use of the
vehicle with the indicator light on constantly
may cause damage. Contact an authorized
dealer as soon as possible.
Forward Collision Warning (FCW) System
This indicator light informs the driver
that the frontal collision alarm func
-
tion is not enabled.
Drive carefully and contact an authorized
dealer as soon as possible.
Fuel Reserve/Limited Range
The indicator light (or the symbol in
the display) illuminates when about
2.4 gallons (9 liters) of fuel is left in
the tank.
WARNING!
The TPMS has been optimized for the
original equipment tires and wheels. TPMS
pressures and warning have been
established for the tire size equipped on
your vehicle. Undesirable system operation
or sensor damage may result when using
replacement equipment that is not of the
same size, type, and/or style. Aftermarket
wheels can cause sensor damage. Using
aftermarket tire sealants may cause the
Tire Pressure Monitoring System (TPMS)
sensor to become inoperable. After using
an aftermarket tire sealant it is
recommended that you take your vehicle to
an authorized dealership to have your
sensor function checked.
CAUTION!
If, turning the ignition device to ON, the
warning light does not turn on or if it
turns on steadily or flashing when traveling
(on some versions together with the
message on the display), contact an
authorized dealer as soon as possible.
21_GU_OM_EN_USC_t.book Page 77
Page 80 of 280
GETTING TO KNOW YOUR INSTRUMENT PANEL
78
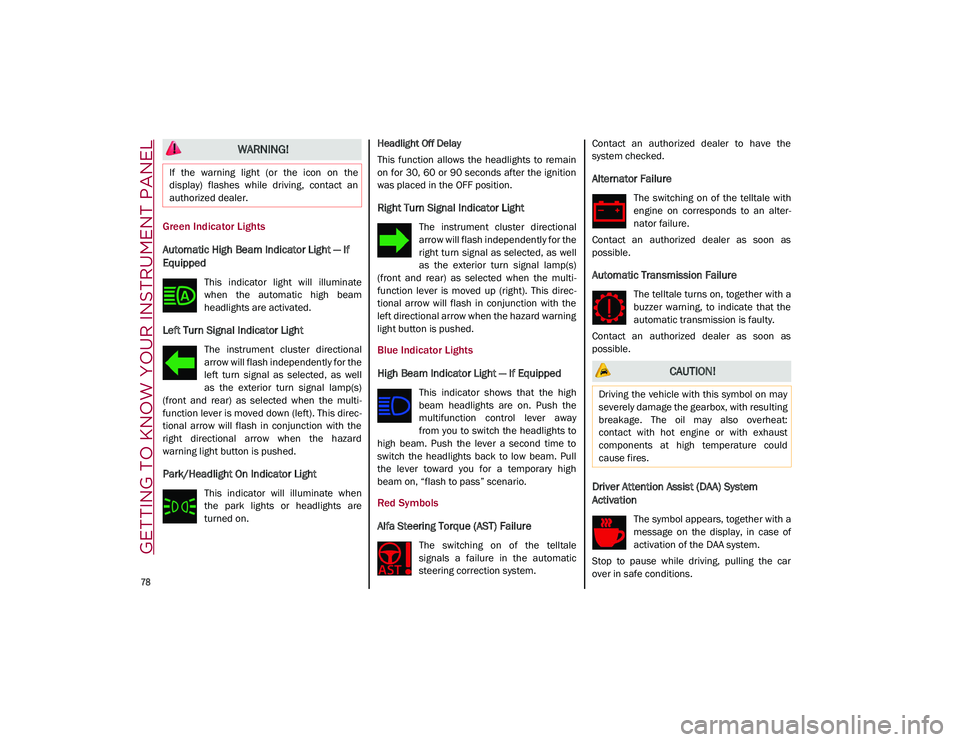
Green Indicator Lights
Automatic High Beam Indicator Light — If
Equipped
This indicator light will illuminate
when the automatic high beam
headlights are activated.
Left Turn Signal Indicator Light
The instrument cluster directional
arrow will flash independently for the
left turn signal as selected, as well
as the exterior turn signal lamp(s)
(front and rear) as selected when the multi -
function lever is moved down (left). This direc -
tional arrow will flash in conjunction with the
right directional arrow when the hazard
warning light button is pushed.
Park/Headlight On Indicator Light
This indicator will illuminate when
the park lights or headlights are
turned on. Headlight Off Delay
This function allows the headlights to remain
on for 30, 60 or 90 seconds after the ignition
was placed in the OFF position.
Right Turn Signal Indicator Light
The instrument cluster directional
arrow will flash independently for the
right turn signal as selected, as well
as the exterior turn signal lamp(s)
(front and rear) as selected when the multi -
function lever is moved up (right). This direc -
tional arrow will flash in conjunction with the
left directional arrow when the hazard warning
light button is pushed.
Blue Indicator Lights
High Beam Indicator Light — If Equipped
This indicator shows that the high
beam headlights are on. Push the
multifunction control lever away
from you to switch the headlights to
high beam. Push the lever a second time to
switch the headlights back to low beam. Pull
the lever toward you for a temporary high
beam on, “flash to pass” scenario.
Red Symbols
Alfa Steering Torque (AST) Failure
The switching on of the telltale
signals a failure in the automatic
steering correction system. Contact an authorized dealer to have the
system checked.
Alternator Failure
The switching on of the telltale with
engine on corresponds to an alter
-
nator failure.
Contact an authorized dealer as soon as
possible.
Automatic Transmission Failure
The telltale turns on, together with a
buzzer warning, to indicate that the
automatic transmission is faulty.
Contact an authorized dealer as soon as
possible.
Driver Attention Assist (DAA) System
Activation
The symbol appears, together with a
message on the display, in case of
activation of the DAA system.
Stop to pause while driving, pulling the car
over in safe conditions.
WARNING!
If the warning light (or the icon on the
display) flashes while driving, contact an
authorized dealer.
CAUTION!
Driving the vehicle with this symbol on may
severely damage the gearbox, with resulting
breakage. The oil may also overheat:
contact with hot engine or with exhaust
components at high temperature could
cause fires.
21_GU_OM_EN_USC_t.book Page 78
Page 81 of 280
79
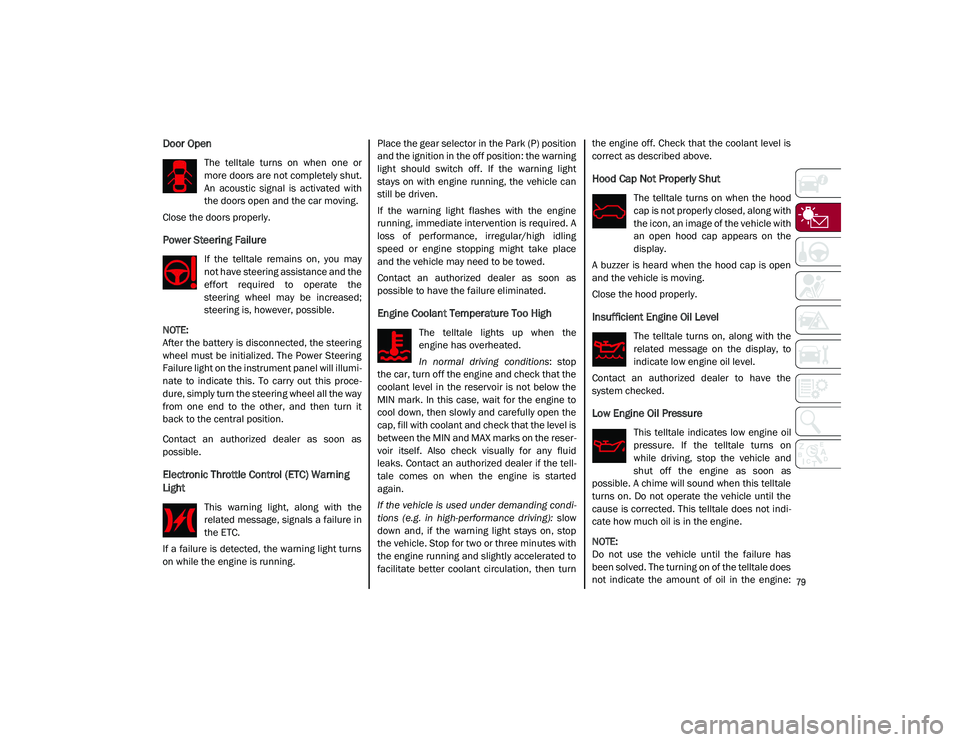
Door Open
The telltale turns on when one or
more doors are not completely shut.
An acoustic signal is activated with
the doors open and the car moving.
Close the doors properly.
Power Steering Failure
If the telltale remains on, you may
not have steering assistance and the
effort required to operate the
steering wheel may be increased;
steering is, however, possible.
NOTE:
After the battery is disconnected, the steering
wheel must be initialized. The Power Steering
Failure light on the instrument panel will illumi -
nate to indicate this. To carry out this proce -
dure, simply turn the steering wheel all the way
from one end to the other, and then turn it
back to the central position.
Contact an authorized dealer as soon as
possible.
Electronic Throttle Control (ETC) Warning
Light
This warning light, along with the
related message, signals a failure in
the ETC.
If a failure is detected, the warning light turns
on while the engine is running. Place the gear selector in the Park (P) position
and the ignition in the off position: the warning
light should switch off. If the warning light
stays on with engine running, the vehicle can
still be driven.
If the warning light flashes with the engine
running, immediate intervention is required. A
loss of performance, irregular/high idling
speed or engine stopping might take place
and the vehicle may need to be towed.
Contact an authorized dealer as soon as
possible to have the failure eliminated.
Engine Coolant Temperature Too High
The telltale lights up when the
engine has overheated.
In normal driving conditions
: stop
the car, turn off the engine and check that the
coolant level in the reservoir is not below the
MIN mark. In this case, wait for the engine to
cool down, then slowly and carefully open the
cap, fill with coolant and check that the level is
between the MIN and MAX marks on the reser -
voir itself. Also check visually for any fluid
leaks. Contact an authorized dealer if the tell -
tale comes on when the engine is started
again.
If the vehicle is used under demanding condi -
tions (e.g. in high-performance driving): slow
down and, if the warning light stays on, stop
the vehicle. Stop for two or three minutes with
the engine running and slightly accelerated to
facilitate better coolant circulation, then turn the engine off. Check that the coolant level is
correct as described above.
Hood Cap Not Properly Shut
The telltale turns on when the hood
cap is not properly closed, along with
the icon, an image of the vehicle with
an open hood cap appears on the
display.
A buzzer is heard when the hood cap is open
and the vehicle is moving.
Close the hood properly.
Insufficient Engine Oil Level
The telltale turns on, along with the
related message on the display, to
indicate low engine oil level.
Contact an authorized dealer to have the
system checked.
Low Engine Oil Pressure
This telltale indicates low engine oil
pressure. If the telltale turns on
while driving, stop the vehicle and
shut off the engine as soon as
possible. A chime will sound when this telltale
turns on. Do not operate the vehicle until the
cause is corrected. This telltale does not indi -
cate how much oil is in the engine.
NOTE:
Do not use the vehicle until the failure has
been solved. The turning on of the telltale does
not indicate the amount of oil in the engine:
21_GU_OM_EN_USC_t.book Page 79
Page 83 of 280
81
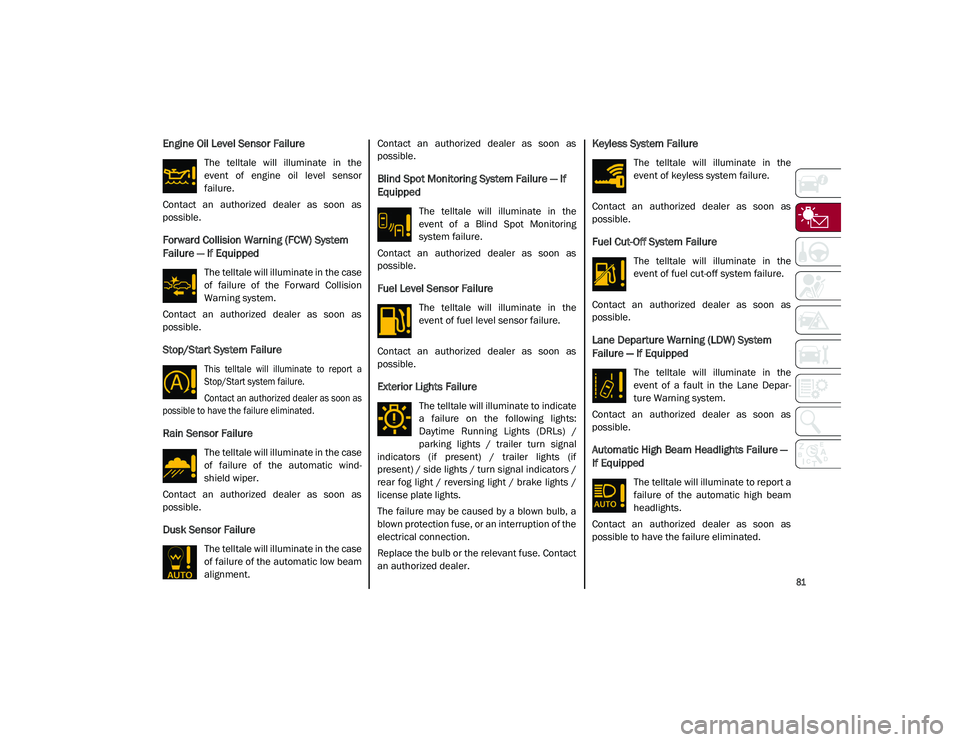
Engine Oil Level Sensor Failure
The telltale will illuminate in the
event of engine oil level sensor
failure.
Contact an authorized dealer as soon as
possible.
Forward Collision Warning (FCW) System
Failure — If Equipped
The telltale will illuminate in the case
of failure of the Forward Collision
Warning system.
Contact an authorized dealer as soon as
possible.
Stop/Start System Failure
This telltale will illuminate to report a
Stop/Start system failure.
Contact an authorized dealer as soon as
possible to have the failure eliminated.
Rain Sensor Failure
The telltale will illuminate in the case
of failure of the automatic wind -
shield wiper.
Contact an authorized dealer as soon as
possible.
Dusk Sensor Failure
The telltale will illuminate in the case
of failure of the automatic low beam
alignment. Contact an authorized dealer as soon as
possible.
Blind Spot Monitoring System Failure — If
Equipped
The telltale will illuminate in the
event of a Blind Spot Monitoring
system failure.
Contact an authorized dealer as soon as
possible.
Fuel Level Sensor Failure
The telltale will illuminate in the
event of fuel level sensor failure.
Contact an authorized dealer as soon as
possible.
Exterior Lights Failure
The telltale will illuminate to indicate
a failure on the following lights:
Daytime Running Lights (DRLs) /
parking lights / trailer turn signal
indicators (if present) / trailer lights (if
present) / side lights / turn signal indicators /
rear fog light / reversing light / brake lights /
license plate lights.
The failure may be caused by a blown bulb, a
blown protection fuse, or an interruption of the
electrical connection.
Replace the bulb or the relevant fuse. Contact
an authorized dealer.
Keyless System Failure
The telltale will illuminate in the
event of keyless system failure.
Contact an authorized dealer as soon as
possible.
Fuel Cut-Off System Failure
The telltale will illuminate in the
event of fuel cut-off system failure.
Contact an authorized dealer as soon as
possible.
Lane Departure Warning (LDW) System
Failure — If Equipped
The telltale will illuminate in the
event of a fault in the Lane Depar -
ture Warning system.
Contact an authorized dealer as soon as
possible.
Automatic High Beam Headlights Failure —
If Equipped
The telltale will illuminate to report a
failure of the automatic high beam
headlights.
Contact an authorized dealer as soon as
possible to have the failure eliminated.
21_GU_OM_EN_USC_t.book Page 81
Page 84 of 280

GETTING TO KNOW YOUR INSTRUMENT PANEL
82
Automatic Transmission Fluid Overheating
The telltale will illuminate in the case
of transmission overheating, after a
particularly demanding use. In this
case an engine performance limita-
tion is carried out.
Wait for the telltale to turn off with the engine
off or idling.
Audio System Failure
The telltale will illuminate to report a
failure of the audio system.
Contact an authorized dealer as soon as
possible to have the failure eliminated.
Speed Limiter System Failure
While driving, the telltale will illumi -
nate to signal a Speed Limiter
system failure.
Contact an authorized dealer as soon as
possible to have the failure eliminated.
Loose Fuel Filler Cap
Lights up if the fuel tank cap is open
or not properly closed.
Tighten the cap properly.
Electric Park Brake Failure
The telltale will illuminate and a
message will display to signal a
failure in the electric park brake
system.
This failure may partially or completely block
the vehicle because the park brake could
remain activated even if automatically or
manually disengaged using the relevant
controls. In these circumstances, you can
disengage the park brake following the emer -
gency disengagement procedure
Ú
page 90.
If you are still able to drive the vehicle (park
brake is not engaged), drive to the nearest
authorized dealer and remember, when
executing any maneuvers/commands, that
the electric park brake is not operational.
Low Coolant Level — If Equipped
This telltale will illuminate to indicate
that the vehicle coolant level is low.
Service Adaptive Cruise Control (ACC)
System
This light will illuminate when the
ACC is not operating and needs
service.
Contact an authorized dealer to have the
system checked.
Wear On Brake Pads
This light will illuminate when the
brake pads have reached their wear
limit.
Contact an authorized dealer as soon as
possible.
NOTE:
Always use genuine parts or similar because
the Integrated Brake System (IBS) system
could detect anomalies.
Dynamic Drive Control System Failure
The telltale will illuminate to signal a
failure in the dynamic drive control
system.
Windshield Wiper Failure
Signals a windshield wiper failure.
Contact an authorized dealer.
WARNING!
If a failure is present with sharp braking,
the rear wheels may lock and the vehicle
may swerve.
21_GU_OM_EN_USC_t.book Page 82
Page 103 of 280
101
"Natural" mode, depending on which mode
was selected before the engine was
stopped.
When the engine is started again, the
"RACE" mode selected previously is not
retained. The system will reactivate in
"Dynamic" mode.
ALFA ACTIVE SUSPENSION
(AAS) — IF EQUIPPED
The vehicle's electronic suspension manage-
ment system is aimed at optimizing the
vehicle's performance.
The system continuously monitors the
damping of the suspensions through the actu -
ator installed on each shock absorber. This
way, the calibration of the shock absorbers
can be adjusted to the conditions of the road
surface and to the dynamic conditions of the
vehicle, improving its comfort and road
holding.
The driver can choose, even while driving,
(only in “Dynamic” mode), between two types
of suspension calibration: a more sporty or a
more comfortable one.
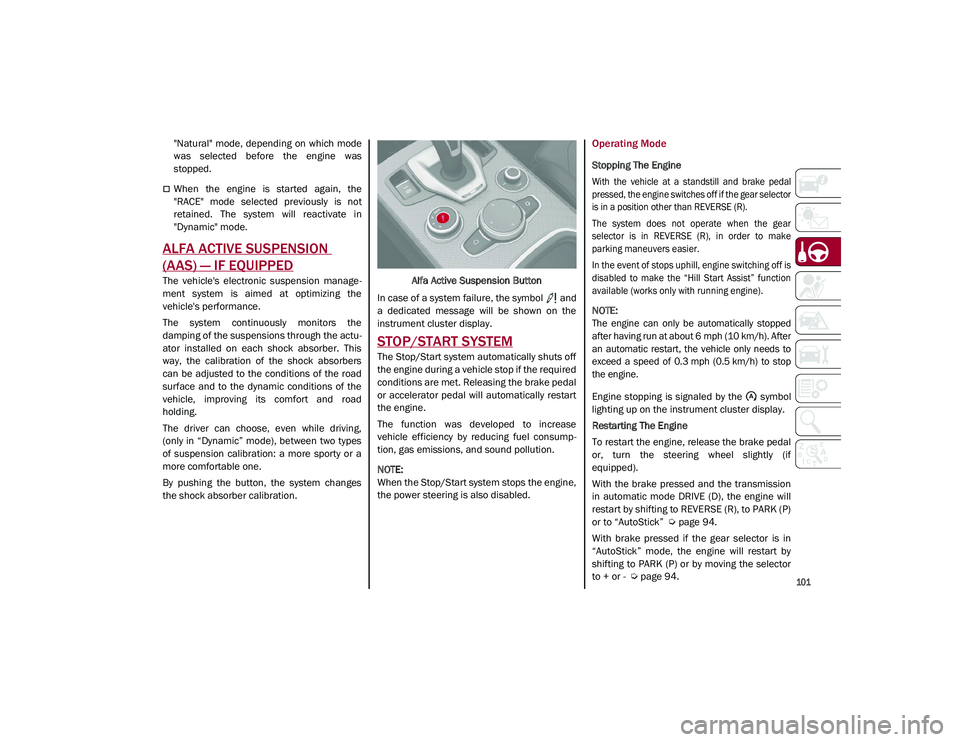
By pushing the button, the system changes
the shock absorber calibration. Alfa Active Suspension Button
In case of a system failure, the symbol and
a dedicated message will be shown on the
instrument cluster display.
STOP/START SYSTEM
The Stop/Start system automatically shuts off
the engine during a vehicle stop if the required
conditions are met. Releasing the brake pedal
or accelerator pedal will automatically restart
the engine.
The function was developed to increase
vehicle efficiency by reducing fuel consump -
tion, gas emissions, and sound pollution.
NOTE:
When the Stop/Start system stops the engine,
the power steering is also disabled.
Operating Mode
Stopping The Engine
With the vehicle at a standstill and brake pedal
pressed, the engine switches off if the gear selector
is in a position other than REVERSE (R).
The system does not operate when the gear
selector is in REVERSE (R), in order to make
parking maneuvers easier.
In the event of stops uphill, engine switching off is
disabled to make the “Hill Start Assist” function
available (works only with running engine).
NOTE:
The engine can only be automatically stopped
after having run at about 6 mph (10 km/h). After
an automatic restart, the vehicle only needs to
exceed a speed of 0.3 mph (0.5 km/h) to stop
the engine.
Engine stopping is signaled by the symbol
lighting up on the instrument cluster display.
Restarting The Engine
To restart the engine, release the brake pedal
or, turn the steering wheel slightly (if
equipped).
With the brake pressed and the transmission
in automatic mode DRIVE (D), the engine will
restart by shifting to REVERSE (R), to PARK (P)
or to “AutoStick”
Ú
page 94.
With brake pressed if the gear selector is in
“AutoStick” mode, the engine will restart by
shifting to PARK (P) or by moving the selector
to + or -
Ú
page 94.
21_GU_OM_EN_USC_t.book Page 101
Page 106 of 280
STARTING AND OPERATING
104
To access the function on the main menu,
select the following items in order:
1. “Driver Assistance”
2. “Speed Limiter - Set Speed”
By turning the Rotary Pad, the speed increases
by 5 mph (5 km/h), from a minimum of
18 mph (30 km/h) to a maximum of 112 mph
(180 km/h).
Exceeding The Programmed Speed
By fully pressing the accelerator pedal, the
programmed speed can be exceeded even
with the device active (e.g. in the event of over-
taking).
The device is disabled until the speed drops
below the set limit, after which it reactivates
automatically.
Programmed Speed Icon Flashing
The programmed speed will flash in the
following scenarios:
When the accelerator pedal has been fully
pressed and the vehicle has exceeded the
programmed speed.
Activating the system after setting a limit
below the effective speed of the vehicle.
In the event of overtake acceleration.
Deactivation
The feature can be activated/deactivated
through the radio system.
Deactivating The Device
To access this feature, select the “Driver Assis -
tance” widget in the radio system, then select
the following items in sequence:
1. “Speed Limiter”
2. “OFF”
Automatic Deactivation Of The Device
The device deactivates automatically in the
event of fault in the system. In this case,
contact an authorized dealer.
Temporary Signal Loss
When the devices loses the signal, the white
symbol without the speed indication illumi -
nates on the display.
System Failure
If there is a system failure, the amber symbol
illuminates on the display.
CRUISE CONTROL SYSTEMS — IF
EQUIPPED
Cruise Control — If Equipped
When engaged, the Cruise Control takes over
accelerator operations at speeds greater than
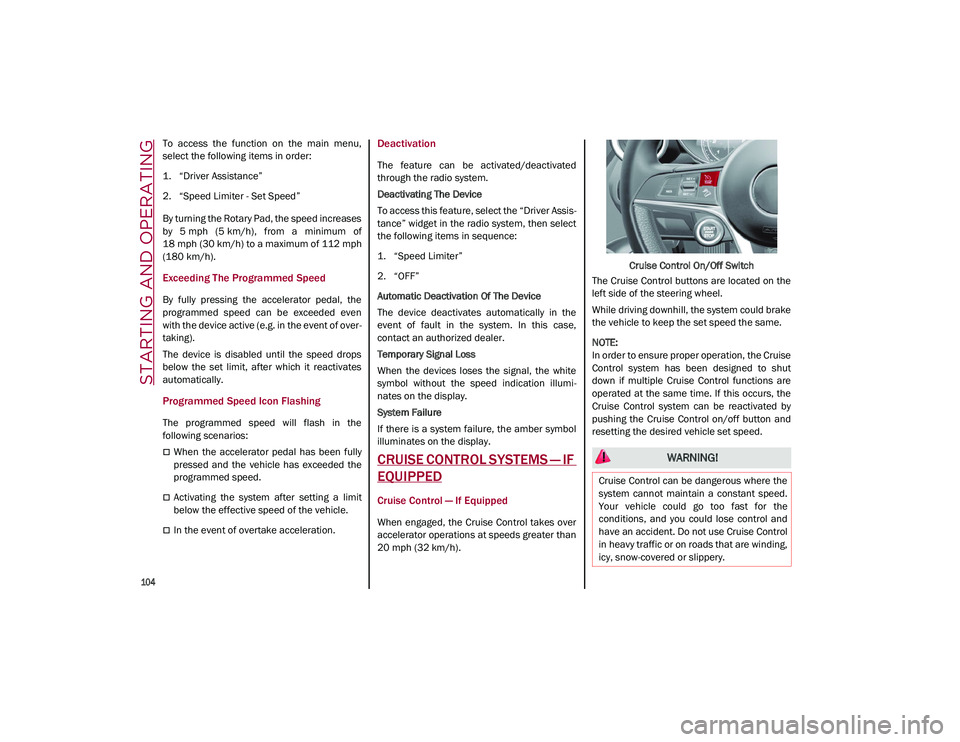
20 mph (32 km/h). Cruise Control On/Off Switch
The Cruise Control buttons are located on the
left side of the steering wheel.
While driving downhill, the system could brake
the vehicle to keep the set speed the same.
NOTE:
In order to ensure proper operation, the Cruise
Control system has been designed to shut
down if multiple Cruise Control functions are
operated at the same time. If this occurs, the
Cruise Control system can be reactivated by
pushing the Cruise Control on/off button and
resetting the desired vehicle set speed.
WARNING!
Cruise Control can be dangerous where the
system cannot maintain a constant speed.
Your vehicle could go too fast for the
conditions, and you could lose control and
have an accident. Do not use Cruise Control
in heavy traffic or on roads that are winding,
icy, snow-covered or slippery.
21_GU_OM_EN_USC_t.book Page 104
Page 107 of 280
105
To Activate
To activate the Cruise Control System, push
the on/off button located on the left side of the
steering wheel.
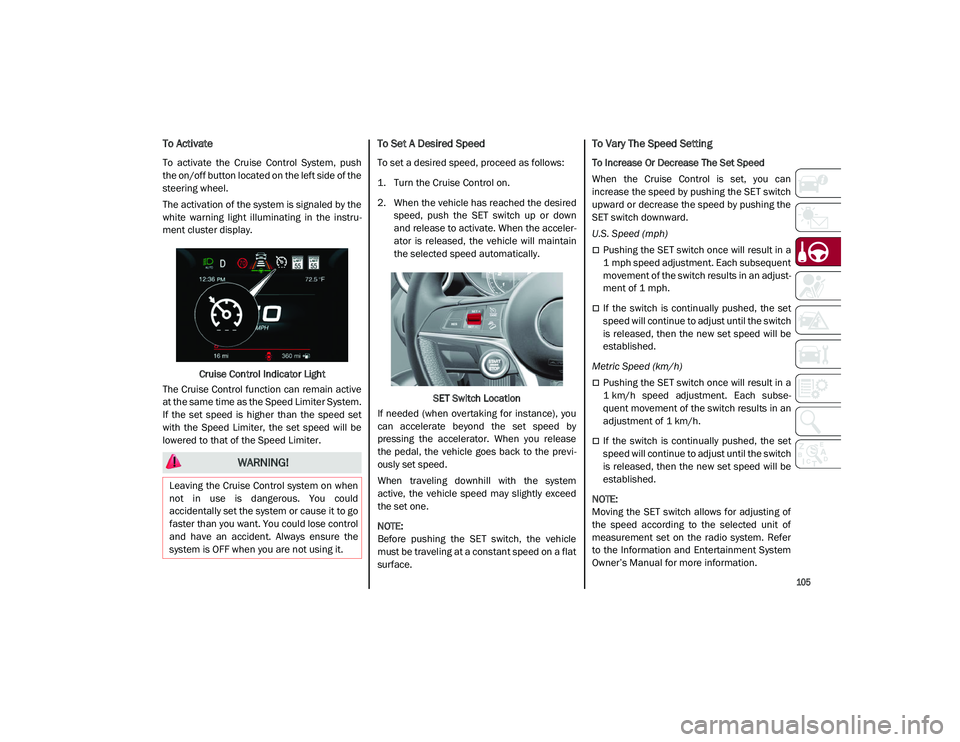
The activation of the system is signaled by the
white warning light illuminating in the instru-
ment cluster display.
Cruise Control Indicator Light
The Cruise Control function can remain active
at the same time as the Speed Limiter System.
If the set speed is higher than the speed set
with the Speed Limiter, the set speed will be
lowered to that of the Speed Limiter.
To Set A Desired Speed
To set a desired speed, proceed as follows:
1. Turn the Cruise Control on.
2. When the vehicle has reached the desired speed, push the SET switch up or down
and release to activate. When the acceler -
ator is released, the vehicle will maintain
the selected speed automatically.
SET Switch Location
If needed (when overtaking for instance), you
can accelerate beyond the set speed by
pressing the accelerator. When you release
the pedal, the vehicle goes back to the previ -
ously set speed.
When traveling downhill with the system
active, the vehicle speed may slightly exceed
the set one.
NOTE:
Before pushing the SET switch, the vehicle
must be traveling at a constant speed on a flat
surface.
To Vary The Speed Setting
To Increase Or Decrease The Set Speed
When the Cruise Control is set, you can
increase the speed by pushing the SET switch
upward or decrease the speed by pushing the
SET switch downward.
U.S. Speed (mph)
Pushing the SET switch once will result in a
1 mph speed adjustment. Each subsequent
movement of the switch results in an adjust -
ment of 1 mph.
If the switch is continually pushed, the set
speed will continue to adjust until the switch
is released, then the new set speed will be
established.
Metric Speed (km/h)
Pushing the SET switch once will result in a
1 km/h speed adjustment. Each subse -
quent movement of the switch results in an
adjustment of 1 km/h.
If the switch is continually pushed, the set
speed will continue to adjust until the switch
is released, then the new set speed will be
established.
NOTE:
Moving the SET switch allows for adjusting of
the speed according to the selected unit of
measurement set on the radio system. Refer
to the Information and Entertainment System
Owner’s Manual for more information.
WARNING!
Leaving the Cruise Control system on when
not in use is dangerous. You could
accidentally set the system or cause it to go
faster than you want. You could lose control
and have an accident. Always ensure the
system is OFF when you are not using it.
21_GU_OM_EN_USC_t.book Page 105