Page 185 of 212
Uconnect™ 5” Radio LIVE - Uconnect™ 5” Radio Nav LIVE
CONTROLS ON FRONT PANEL
132A0J0394C
183
Page 186 of 212
 FRONT PANEL CONTROL SUMMARY TABLE
Button Functions Mode
1–Power on/off Short button press
Volume adjustment Left/right rotation of knob
2–
Volume activation/deactivation (Mute/Pause) Short button")
FRONT PANEL CONTROL SUMMARY TABLE
Button Functions Mode
1–Power on/off Short button press
Volume adjustment Left/right rotation of knob
2–
Volume activation/deactivation (Mute/Pause) Short button press
3–
CD ejection Short button press
4CD housing –
5–
Display on/off Short button press
6–
Exit the selection/return to previous screen Short button press
7 –BROWSE ENTERScrolling the list or tuning to a radio station Left/right rotation of knob
Confirmation of the option displayed Short button press
8 - APPSAccess to additional functions: Display of time, Trip
Computer, Compass, External temperature, Settings,
Uconnect
™LIVE services (where provided)Short button press
9 – PHONEAccess to the Phone mode Short button press
10 – SETTINGS
(*)Access to the main settings menu Short button press
10–NAV
(**)Access to the Navigation menu Short button press
11 – MEDIA
Source selection: CD, USB/iPod, AUX,
Bluetooth®Short button press
12 –RADIOAccess to the Radio mode Short button press
(*) Versions withUconnect™5” Radio LIVE / (**) Versions withUconnect™5” Radio Nav LIVE
184
MULTIMEDIA
Page 187 of 212
STEERING WHEEL CONTROLS
Description
The controls for the main system functions are present on the steering wheel fig. 133 to make control easier.
The activation of the function selected is controlled, in some cases, by how long the button is pressed (short or long press) as
described in the table below.
133A0J0052C
185
Page 188 of 212
 STEERING WHEEL CONTROL SUMMARY TABLE
Button Interaction
Acceptance of incoming call
Acceptance of the second incoming call and putting the active call on hold
Activation of voice recognition for Phone")
STEERING WHEEL CONTROL SUMMARY TABLE
Button Interaction
Acceptance of incoming call
Acceptance of the second incoming call and putting the active call on hold
Activation of voice recognition for Phone function
Interruption of the voice message in order to give a new voice command
Interruption of voice recognition
Rejection of incoming call
Ending of call in progress
Deactivate/reactivate the microphone during a phone conversation
Activation/deactivation of the Pause function for CD, USB/iPod,Bluetooth®sources
Activation/deactivation of radio Mute function
+/-Adjustment of the audio volume: hands-free, text message reader, voice announcements and music sources
Activation of voice recognition
Interruption of the voice message in order to give a new voice command
Interruption of voice recognition
Short press (Radio mode): selection of next/previous station
Long press (Radio mode): scan higher/lower frequencies until released
Short press (CD, USB/iPod,Bluetooth®mode): selection of previous/next track
Long press (CD, USB/iPod,Bluetooth®mode): fast forward/rewind until released
186
MULTIMEDIA
Page 189 of 212
 SWITCHING THESYSTEM ON/OFF
The system is switched on/off by
pressing the
(ON/OFF) button/knob.
Turn the button/knob clockwise to
increase the radio volume or
anticlockwise to decrease it.
RADIO (TUNER")
SWITCHING THESYSTEM ON/OFF
The system is switched on/off by
pressing the
(ON/OFF) button/knob.
Turn the button/knob clockwise to
increase the radio volume or
anticlockwise to decrease it.
RADIO (TUNER) MODE
Press the RADIO button on the front
panel to activate radio mode.
Select the band by pressing the
corresponding button: “AM”, “FM” or
“DAB”.
Selecting a frequency band
Briefly press the "AM/FM" button to
switch from AM to FM and vice versa.
If the DAB tuner is available, briefly press
the "AM/FM", "AM/DAB", "FM/DAB"
buttons to select the desired band.
Indications on display
After the desired radio station is
selected, the following information is
shown on the display:
At the top: the list of radio stations
stored (presets) is displayed; the station
currently playing is highlighted.
In the middle: display of the name of the
current radio station and the buttons for
selecting the previous or next radio
station.
At the bottom:radio station selection,radio band, tuning, track information and
audio settings.
Searching for the previous/next radio
station
To search for the desired radio station,
rotate the BROWSE ENTER button/knob,
press the
orbuttons or use
the steering wheel controls
.
When searching forwards, if the system
reaches the end of the band, it will
automatically stop on the station where
the search has started from.
Previous/next radio station fast search
Hold down buttons
oron the
display: when the button is released, the
first tunable radio station will be
displayed.
Tuning the radio (AM/FM)
Press the "Tune" button on the display
and then enter the frequency of the radio
station using the keypad on the display.
In this mode, use buttons + and – to
fine-tune the frequency.
To delete an incorrect number (and enter
the correct station number) press the
(Delete) button.
After entering the last digit of the
station, the screen is deactivated and the
system tunes automatically to the
station selected (the number of the radio
station is displayed in the "Tune" text
box).The screen disappears automatically
after 5 seconds or manually by pressing
the "OK" or “X” buttons.
Exit the "Direct Tune" screen
Press the "Exit" or "Radio" button on the
display to return to the main system
screen.
DAB Radio
(where provided)
Once DAB radio mode is selected, the
information on the current station is
displayed and the following functions.
Selection of the previous/next radio
station by:
turning the BROWSE ENTER
button/knob;
briefly pressing theor
buttons on the display;
Steering wheel control press.
Hold down the
orbuttons to
fast scroll the station list.
The "Browse" button is used to display:
the list of all DAB stations;
the list of stations filtered by "Genres";
the list of stations filtered by
"Ensembles" (broadcast group).
Setting the presets
Presets are available in all system modes
and are activated by touching one of the
preset buttons located in the upper area
of the display.
If you are tuned to a radio station that
187
Page 190 of 212
 you wish to store, hold down the button
on the display which corresponds to the
desired preset or until an acoustic
confirmation signal is emitted.
The system can store up to 12 radio
stations in each")
you wish to store, hold down the button
on the display which corresponds to the
desired preset or until an acoustic
confirmation signal is emitted.
The system can store up to 12 radio
stations in each mode: 3 radio stations
are displayed in the upper area.
Press the "All" button on the display to
show all the radio stations stored in the
frequency band selected.
Audio
To access the “Audio” menu, press the
APPS button on the front panel, scroll
through the menu, then select and press
the “Audio” option on the display.
The following adjustments can be carried
out using the "Audio" menu:
“Equaliser” (where provided): to adjust
the bass, medium and treble tones;
“Balance/Fader” (left/right and
front/rear audio balance adjustment);
“Volume/Speed” (excluding versions
with Hi-Fi system) speed-dependent
automatic volume adjustment;
“Loudness” (where provided):
improves audio quality at low volumes;
“Auto-On Radio”: provides the options
of radio on, radio off or restore status
when the ignition key was last turned to
STOP;
“Radio Off Delay”: keeps the radio on
for a preset time after the ignition key is
turned to STOP.
MEDIA MODE
Press the "Source" button to select the
desired audio source among those
available: CD,
Bluetooth®, AUX, USB/iPod
Change track (next/previous)
Briefly press the
graphic button or
press
on the steering wheel or,
alternatively, turn the BROWSE ENTER
button/knob clockwise to play the next
track. Briefly press the
graphic
button or press
on the steering wheel
or, alternatively, turn the BROWSE
ENTER button/knob clockwise to return
to the beginning of the track or return to
the beginning of the previous track of the
track has been playing for less than
8 seconds.
Fast forward/rewind through tracks
Press and hold down the
button to
fast forward the selected track or keep
the
button pressed to fast rewind
the track.
Track selection (Browse)
The selection options depend on the
device connected or the CD type
inserted.
Press the "Browse" button to activate
this function on the source being played.
NOTE A few
Bluetooth®devices do not
offer the possibility of scrolling tracks
through all categories.
NOTE Within each list, the “ABC” buttonallows the user to skip to the desired
letter in the list. This button might be
disabled for some
Apple®devices.
Turn the BROWSE ENTER button/knob
to select the desired category and then
press the button/knob to confirm the
selection.
Press the "X" button to cancel the
function.
Track information display
Press the "Info" button to display the
information on the track being listened to
for devices that support the function.
Press the "X" button to exit the screen.
Shuffle
Press the ">" button then the "Shuffle"
button to play the tracks on the CD,
USB/iPod or
Bluetooth®in a random
order.
Press the "Shuffle" button again to
deactivate the function.
Repeat
Press the ">" button then the "Repeat"
button to activate the function.
Press the "Repeat" button again to
deactivate the function.
188
MULTIMEDIA
Page 191 of 212
 CD PLAYER
To activate CD mode, insert an audio or
MP3 CD in the relevant slot or press the
MEDIA button on the front panel. If the
CD has already been inserted, press the
“Source” button and then")
CD PLAYER
To activate CD mode, insert an audio or
MP3 CD in the relevant slot or press the
MEDIA button on the front panel. If the
CD has already been inserted, press the
“Source” button and then select “CD”.
To load the CD, insert it gently into the
slot to activate the motorised loading
system, which will position it correctly
(the “CD” symbol on the display comes
on). Enter a CD when the system is on, the
CD mode is automatically selected and
the system starts playing the tracks.
Press the button
(EJECT) on the front
panel, with the system on, to eject the CD.
Important notes
The presence of dirt, scratches or
distortions on the CDs may cause
skipping while it is playing and poor
sound quality. Clean every CD thoroughly
removing any fingerprints or dust using a
soft cloth. Hold CDs by the outside edge
and clean them from the middle
outwards; Never use chemical products
(e.g. antistatic, thinner or spray cans) for
cleaning as they could damage the
surface of the CDs. After listening to
them place CDs back in their cases to
avoid them being damaged. Do not
expose CDs to direct sunlight, high
temperatures or moisture for long
periods.
Bluetooth® SOURCE
Pairing aBluetooth® deviceactivate theBluetooth®function on
the device;
press the MEDIA button on the front
panel;
if the “Media” source is active, press
the “Source” button;
select theBluetooth®Media source;press the “Add Device” button;
look forUconnect™on theBluetooth®
audio device.
when requested by the audio device,
enter the PIN code shown on the system
display or confirm on the device the PIN
displayed. Select “Yes” or “No” when
asked if you want to set the
Bluetooth®
audio device as the favourite;
an audio device can also be paired by
pressing the APPS button on the front
panel and then selecting “Settings” and
“Bluetooth”.
USB/iPod SUPPORT
150)
If a USB/iPod device is inserted with the
system on, this starts playing the tracks
present on the device.
AUX SOURCE
151)
When a device is inserted using the AUX
output socket the system starts
reproducing the AUX source connected,
if it is already being played.
Adjust the volume using the
button/knob on the front panel or
using the volume adjustment control on
the connected device.
IMPORTANT The functions of the device
connected with the AUX socket are
directly managed by the device itself.
IMPORTANT Do not leave the cable of
the portable player connected to the
AUX socket after disconnection, to avoid
possible hiss from the speakers.
PHONE MODE
Activate phone mode
Press the PHONE button on the front
panel to activate the Phone mode. A
message on the display confirms
connection of the phone.
To read the list of mobile phones and
supported functions, visit the
www.driveuconnect.eu website or call
Customer Service number at
00800.2532.0000 (the number may
vary depending on the country: please
refer to the reference table in the
paragraph “Customer Service number
189
Page 192 of 212
 list” in theUconnect™attachments).
Main functions
Use the buttons on the display to:
dial the phone number (using the
graphic keypad on the display);
display and call the contacts in the
mobile ph")
list” in theUconnect™attachments).
Main functions
Use the buttons on the display to:
dial the phone number (using the
graphic keypad on the display);
display and call the contacts in the
mobile phone phonebook;
display and call contacts from the
registers of previous calls;
pair up to 10 phones/audio devices to
make access and connection easier and
quicker;
transfer calls from the system to the
mobile phone and vice versa and
deactivate the microphone audio for
private conversations.
Pairing a mobile phone
To pair the mobile phone, proceed as
follows:
activate theBluetooth®function on
the mobile phone;
press the PHONE button on the front
panel;
if no phone is paired with the system
yet, the display shows a dedicated
screen;
select “Yes” to start the pairing
procedure, then search for the
Uconnect™device on the mobile phone;
when prompted by the mobile phone,
use its keypad to enter the PIN code
shown on the system display or confirm
on the mobile phone the PIN displayed;
from the “Phone” screen you can
always pair a mobile phone by pressing
the “Settings” button: press the “Add
Device” button and proceed as described
above;
select “Yes” or “No” at the request to
pair the mobile phone as the preferred
device;
NOTE After updating the phone software,
for proper operation, it is recommended
to remove the phone from the list of
devices linked to the radio, delete the
previous system pairing also from the list
of
Bluetooth®devices on the phone and
make a new pairing.
Storing names/numbers in the mobile
phone phonebook
Before pairing your mobile phone, make
sure you have stored the names you want
to contact in the phonebook on your
mobile phone so that you can call them
using the car's hands-free system.
Transferring phone data (phonebook
and recent calls)
If your mobile phone has a function for
sending the phonebook via
Bluetooth®
technology.
Answer “Yes” when asked to copy the
phonebook to the system. Answer “No” to
carry out the operation later on.Making a phone call
The operations described below can only
be accessed if supported by the mobile
phone in use.
A call can be made by:
selecting theicon (mobile phone
phonebook);
selecting “Recent Calls”;
selecting the icon(Keypad);
pressing the “Redial” button.
Handling an incoming call
The buttons on the display allow the
following phone call functions to be
managed:
To answer a call: press the “Answer”
button or the
button on the steering
wheel controls;
To end a call: press the “Ignore” button
or the
button on the steering wheel
controls;
Ignore;
Put on hold/resume;
Deactivate/activate the microphone;
Transfer the call;
Switch from one call to the other;
Conference/merge two active calls.
Text message reader
To use this function the mobile phone
must support the SMS exchange function
through
Bluetooth®.
If this function is not supported by the
190
MULTIMEDIA
 1
1 2
2 3
3 4
4 5
5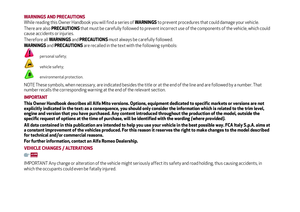 6
6 7
7 8
8 9
9 10
10 11
11 12
12 13
13 14
14 15
15 16
16 17
17 18
18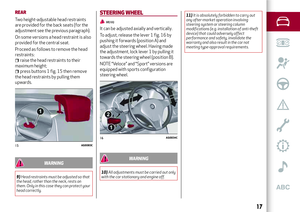 19
19 20
20 21
21 22
22 23
23 24
24 25
25 26
26 27
27 28
28 29
29 30
30 31
31 32
32 33
33 34
34 35
35 36
36 37
37 38
38 39
39 40
40 41
41 42
42 43
43 44
44 45
45 46
46 47
47 48
48 49
49 50
50 51
51 52
52 53
53 54
54 55
55 56
56 57
57 58
58 59
59 60
60 61
61 62
62 63
63 64
64 65
65 66
66 67
67 68
68 69
69 70
70 71
71 72
72 73
73 74
74 75
75 76
76 77
77 78
78 79
79 80
80 81
81 82
82 83
83 84
84 85
85 86
86 87
87 88
88 89
89 90
90 91
91 92
92 93
93 94
94 95
95 96
96 97
97 98
98 99
99 100
100 101
101 102
102 103
103 104
104 105
105 106
106 107
107 108
108 109
109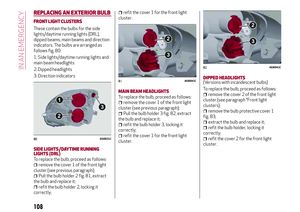 110
110 111
111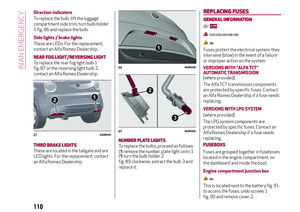 112
112 113
113 114
114 115
115 116
116 117
117 118
118 119
119 120
120 121
121 122
122 123
123 124
124 125
125 126
126 127
127 128
128 129
129 130
130 131
131 132
132 133
133 134
134 135
135 136
136 137
137 138
138 139
139 140
140 141
141 142
142 143
143 144
144 145
145 146
146 147
147 148
148 149
149 150
150 151
151 152
152 153
153 154
154 155
155 156
156 157
157 158
158 159
159 160
160 161
161 162
162 163
163 164
164 165
165 166
166 167
167 168
168 169
169 170
170 171
171 172
172 173
173 174
174 175
175 176
176 177
177 178
178 179
179 180
180 181
181 182
182 183
183 184
184 185
185 186
186 187
187 188
188 189
189 190
190 191
191 192
192 193
193 194
194 195
195 196
196 197
197 198
198 199
199 200
200 201
201 202
202 203
203 204
204 205
205 206
206 207
207 208
208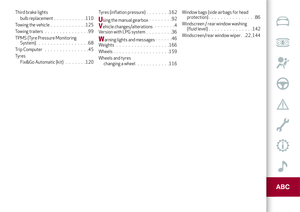 209
209 210
210 211
211 Uconnect™ 5” Radio LIVE - Uconnect™ 5” Radio Nav LIVE
CONTROLS ON FRONT PANEL
132A0J0394C
183")
 STEERING WHEEL CONTROLS
Description
The controls for the main system functions are present on the steering wheel fig. 133 to make control easier.
The activation of the function selected is controlled,")